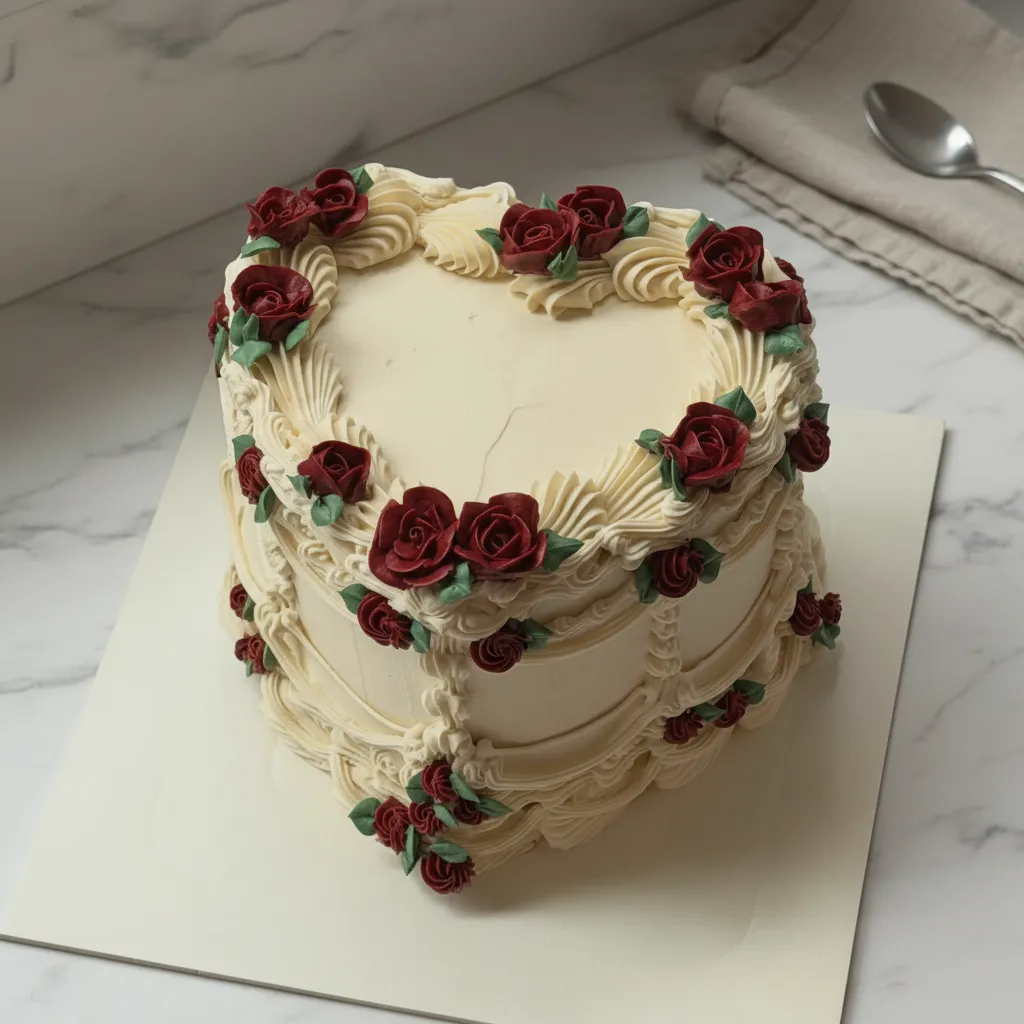
Ever wanted to bake a truly special birthday cake that wows everyone, but felt a little intimidated? Well, guess what? You absolutely can! Imagine presenting a gorgeous, heart shaped cake, adorned with delicate ruffles and pretty roses. It is not just a dessert, it is a statement piece.
This recipe is all about bringing that beautiful, elaborate birthday cake vision to life, right in your own kitchen. We are talking about a cake that looks like it stepped out of a classic bakery window, perfect for celebrating those you love. Get ready to bake some magic!
Jump To:
Why You’ll Love This Recipe
Honestly, who does not love a homemade birthday cake? There is something incredibly heartwarming about baking a treat from scratch, especially when it is for someone special. This recipe takes that feeling up a notch by teaching you how to create a truly beautiful, custom looking cake that will be the talk of the party.
You will adore this recipe because it is surprisingly straightforward, even for bakers who are just starting out with decorative piping. We break down the steps, making it easy to achieve that stunning Aesthetic Vintage Cake look. Think elegant swirls, delicate ruffles, and charming piped roses that make every slice feel like a celebration.
Plus, making your own birthday cake means you control the flavors and ingredients. No weird preservatives, just pure, delicious goodness. This cake is moist, flavorful, and the buttercream is simply divine. It is perfect for capturing that Elegant Cake Designs Birthday vibe without the hefty price tag of a professional baker.
If you have been eyeing those gorgeous Lace Birthday Theme or Roses Birthday Cake designs on social media, this recipe is your ticket to recreating them. You will learn the tricks to create beautiful details that give your cake a luxurious, handcrafted feel. Get ready to impress everyone with your baking prowess!
Ingredients
For the Cake
- 2 1/2 cups all purpose flour
- 2 cups granulated sugar
- 3 teaspoons baking powder
- 1 teaspoon salt
- 1 cup unsalted butter, softened
- 1 cup whole milk, room temperature
- 1 tablespoon vanilla extract
- 4 large eggs, room temperature
For the Buttercream
- 5 large egg whites
- 1 1/2 cups granulated sugar
- 1 1/2 cups unsalted butter, cubed and room temperature
- 1 teaspoon vanilla extract
- Red gel food coloring
- Green gel food coloring
Step By Step Instructions
Step 1: Prep and Mix Dry Ingredients
First things first, preheat your oven to 350 degrees Fahrenheit. Grab two 8 inch round cake pans, grease them well, and then dust them with flour. This helps prevent sticking, a real lifesaver!
In a big bowl, whisk together your flour, sugar, baking powder, and salt. Then, add the softened butter and mix on low speed until the mixture looks like coarse sand. This technique gives your birthday cake a wonderful texture.
Step 2: Combine Wet and Dry Ingredients
In a separate bowl, whisk together the eggs, milk, and vanilla extract until they are nicely combined. Now, slowly add this wet mixture to your dry ingredients.
Beat on medium speed for about 2 minutes, until your batter is perfectly smooth. This is key for a light and fluffy birthday cake.
Step 3: Bake the Cakes
Divide the batter evenly between your prepared pans. Pop them into the preheated oven and bake for 30 to 35 minutes.
You will know they are done when a toothpick inserted into the center comes out clean. Let those beauties cool completely in their pans before moving on. Patience is a virtue when baking a showstopping birthday cake!
Step 4: Create the Heart Shape
Here is where your cake gets its charming heart shape, no special pan needed! Take one of your cooled round cakes and cut two semi circles from it.
Attach these semi circles to the top sides of the other round cake, which you can trim into a slight diamond shape. Use a little buttercream as glue to hold them in place. Voila, a heart shaped birthday cake!
Step 5: Make the Silky Buttercream
For the buttercream, whisk egg whites and 1 1/2 cups sugar in a heatproof bowl set over a pot of simmering water. Whisk constantly until the sugar is completely dissolved and the mixture reaches 160 degrees Fahrenheit.
Transfer this mixture to a stand mixer. Whip on high speed until stiff, glossy peaks form and the bowl feels cool to the touch. This makes a wonderfully stable buttercream for your Cake Decoration Aesthetic.
Lower the speed and add the cubed butter one piece at a time, mixing until smooth. Stir in the vanilla extract. This buttercream is perfect for Vintage Aesthetic Birthday cakes.
Step 6: Crumb Coat and Final Layer
Apply a thin crumb coat of cream colored buttercream to your heart shaped cake. This traps any stray crumbs, giving you a super smooth finish.
Chill the cake for 20 minutes. After chilling, apply a final smooth layer of cream buttercream. This sets the stage for your beautiful Elegant Cake Designs Birthday decorations.
Step 7: Pipe the Lambeth Style Details
Now for the fun part, the Lambeth style piping! Use a petal tip, like a Wilton 104, to pipe ruffles and swags around the top edge and sides of the cake.
Remember, the narrow end of the tip should face outward to create those delicate, intricate edges. This technique really brings out the Lace Birthday Theme and 1920 Cake Ideas inspired look.
Step 8: Add Shell Borders
Next, grab a star tip, a Wilton 32 works wonders. Use it to pipe a classic shell border along both the top and bottom base of your cake. This adds a lovely, finished touch to your Aesthetic Vintage Cake.
Step 9: Pipe Pretty Roses
Tint a small portion of your remaining buttercream with red gel food coloring. Using a petal tip, pipe small roses on a flower nail. Practice makes perfect here!
Carefully transfer these beautiful Rose Cakes accents to the top and sides of your birthday cake. They are the crowning glory of your Roses Birthday Cake design.
Step 10: Finish with Green Leaves
Finally, tint another small portion of buttercream green. Use a leaf tip, such as a Wilton 352, to pipe small leaves.
Tuck these leaves neatly behind each red rose. This adds a fresh, natural touch and completes your stunning 20 Birthday Cake Aesthetic. Enjoy your masterpiece!


How To Store Leftovers
So, you have managed to have some leftover birthday cake. What a rare and wonderful thing! To keep your beautiful creation fresh, it is all about smart storage.
If you have a cake dome, that is your best bet for keeping it on the counter for a day or two. Just make sure it is airtight. The buttercream holds up really well at room temperature.
For longer storage, or if your kitchen runs warm, pop the cake into the refrigerator. Cover it loosely with plastic wrap or place it in an airtight cake carrier. This will keep your Aesthetic Vintage Cake delicious for up to 5 days.
When you are ready for another slice, let it sit out at room temperature for about 30 minutes before serving. This brings the cake and buttercream back to their perfect texture. Nobody wants a cold, stiff slice of birthday cake, right?
You can even freeze slices of your birthday cake! Wrap individual slices tightly in plastic wrap, then again in foil. They will last in the freezer for up to a month. Thaw them in the fridge overnight or on the counter for a few hours. This is a great way to enjoy your hard work much later.
Tips
Making a beautiful birthday cake, especially one with intricate decorations, can be a breeze with a few insider tips. Let me spill the tea on how to make your baking experience even smoother and your results even more spectacular.
First, when it comes to coloring your buttercream, always opt for high quality gel food coloring. Liquid food coloring can thin out your buttercream, which is not what you want when piping delicate designs like those Rose Cakes.
For that gorgeous Lambeth style piping, the buttercream consistency is everything. You want it firm enough to hold its shape, but pliable enough to flow smoothly through your piping bag. If your buttercream gets too warm from your hands while piping, just pop the piping bag into the fridge for 5 minutes. It works like a charm!
Do not rush the cooling process for your cakes. Trying to decorate warm cakes is a recipe for disaster, literally. They will crumble, and your buttercream will melt. Trust me, waiting for them to cool completely will save you a lot of headaches and ensure your Cake Decoration Aesthetic is flawless.
Practice your piping on a piece of parchment paper before going straight for the cake. This lets you get a feel for the pressure and movement needed for those ruffles, swags, and roses. You can scrape the practiced buttercream back into the bag, so nothing goes to waste!
Finally, remember this recipe yields a standard two layer 8 inch heart cake. If you are looking to feed a bigger crowd, consider doubling the recipe or making a second smaller cake. A special birthday cake deserves to be shared with everyone!
Conclusion
Well, there you have it, a complete guide to baking and decorating a truly unforgettable birthday cake. Who knew creating something so beautiful could be so much fun and totally within reach?
This recipe is more than just ingredients and instructions. It is an invitation to get creative, to express your love through baking, and to bring a little bit of that Vintage Aesthetic Birthday charm right into your home.
Whether you are celebrating a milestone or just want to make someone feel extra special, this heart shaped cake with its delicate Lace Birthday Theme inspired piping and beautiful Roses Birthday Cake details is sure to be a hit. It is proof that homemade can absolutely look professional and taste incredible.
So, roll up your sleeves, put on your favorite tunes, and get ready to bake a masterpiece. You have got this! Happy baking, and happy celebrating with your stunning birthday cake!
FAQ
Can I Make This Gluten Free?
Yes, you certainly can! To make this birthday cake gluten free, simply swap out the all purpose flour for a good quality 1:1 gluten free baking flour blend. Make sure your blend contains xanthan gum, or add 1/2 teaspoon per cup of flour if it does not. The rest of the recipe should work just fine.
How Can I Get a Really Deep Red Color for the Roses?
Achieving a deep red for your Rose Cakes can be tricky. The best way is to use a high quality gel food coloring, not liquid. Start with a generous amount and let the colored buttercream sit for an hour or two. The color often deepens over time. You can always add more gel coloring if needed.
Do I Need Special Piping Tips for This Cake?
Yes, for the specific Lambeth style ruffles, swags, and roses, you will want a petal tip (like Wilton 104) and a star tip (like Wilton 32) for the borders. For the leaves, a leaf tip (Wilton 352) is ideal. These tips help create that beautiful Cake Decoration Aesthetic. You can usually find these in craft stores or online.
Can I Prepare the Cake Layers Ahead of Time?
Absolutely! You can bake the birthday cake layers up to 2 days in advance. Once completely cooled, wrap them tightly in plastic wrap and store them at room temperature. For longer storage, you can freeze wrapped layers for up to a month. Thaw them in the refrigerator before decorating.
What if My Buttercream Is Too Soft or Too Stiff?
If your buttercream is too soft, it might be too warm. Pop it in the fridge for 15 to 20 minutes, then whip it again. If it is too stiff, it might be too cold. Let it sit at room temperature for a bit, then beat it on low speed until it reaches the right consistency. A perfect consistency is key for beautiful Elegant Cake Designs Birthday.
Heart-Shaped Vintage Birthday Cake
Make a beautiful, heart-shaped birthday cake with elegant ruffles and piped roses. This simple recipe brings a classic bakery look to your kitchen for any special celebration!
Requirements


Ingredients
Instructions
- Preheat oven to 350°F. Grease and flour two 8-inch round cake pans. In a big bowl, whisk together flour, sugar, baking powder, and salt. Add softened butter and mix on low until the mixture looks like coarse sand.
- In a separate bowl, whisk together eggs, milk, and vanilla extract. Slowly add this wet mixture to the dry ingredients.
- Beat on medium speed for 2 minutes until batter is smooth. Divide batter between pans and bake for 30-35 minutes. Let cool completely.
- To create the heart shape, cut one round cake into two semi-circles. Attach them to the top sides of the other cake (trimmed into a diamond shape) using buttercream as glue.
- For buttercream, whisk egg whites and 1 1/2 cups sugar over simmering water until it reaches 160°F. Move to a Small Stand Mixer and whip on high until stiff, glossy peaks form and the bowl is cool.
- Lower speed and add cubed butter one piece at a time. Stir in vanilla extract.
- Apply a thin crumb coat of buttercream to the cake and chill for 20 minutes. Apply a final smooth layer of cream buttercream.
- Use a petal tip to pipe ruffles and swags around the top edge and sides of the cake.
- Pipe a shell border along the top and bottom base of the cake using a star tip.
- Tint portions of buttercream red and green. Pipe roses with the red and tuck green leaves behind them to finish.
Notes
Always use high-quality gel food coloring for the roses; liquid coloring can thin out your buttercream and ruin the design.
If your hands warm up the piping bag too much, pop it in the fridge for 5 minutes to restore the perfect consistency.
Never rush the cooling process! Decorating a warm cake will cause the buttercream to melt and the cake to crumble.
Practice your piping on parchment paper before starting on the cake to get a feel for the pressure needed for ruffles.
Nutrition
Calories
Sugar
Fat
Carbs