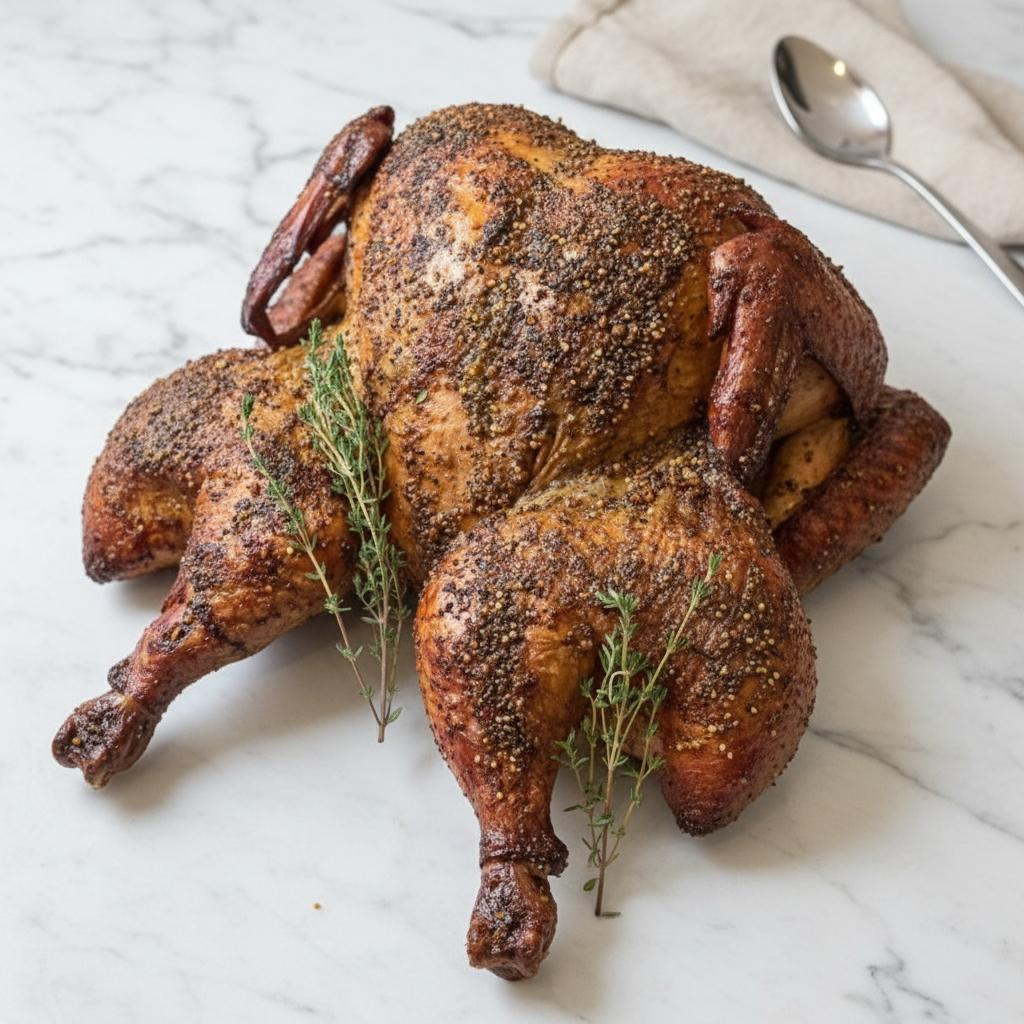
Have you ever dreamed of making a holiday turkey that people talk about for years? I’m talking about a bird so juicy and flavorful that it becomes the star of the show. Well, you’ve come to the right place. We are about to make an amazing Spicy Smoked Spatchcock Turkey together.
This method is a real treat. By preparing the turkey spatchcock style, we ensure it cooks evenly and much faster. Plus, the smoker adds a layer of flavor you just can’t get from an oven. It sounds fancy, but I promise it’s surprisingly simple. Let’s get started!
Jump To:
Why You’ll Love This Recipe
Honestly, what’s not to love? This Spicy Smoked Spatchcock Turkey recipe is a fantastic way to prepare your holiday bird. First off, the flavor is just out of this world. The combination of brine, injection butter, and a smoky finish creates a taste that is deep, rich, and wonderfully savory.
The texture is another huge win. Because the turkey is flattened, every part of it cooks evenly. You get incredibly moist breast meat and perfectly cooked thighs. No more dry spots! And the skin? It gets uniformly golden brown and crispy all over. It’s the best part for many people.
Let’s talk about time. A traditional turkey can take what feels like forever to cook. This method cuts that time down significantly. You spend less time worrying about the bird and more time enjoying the day with family and friends. It’s a more efficient way to get a delicious result.
It’s also a showstopper. When you bring this beautifully browned, flattened turkey to the table, it looks so impressive. It’s a bit different from the usual, and your guests will be so intrigued. It carves up like a dream too, making serving a breeze.
This is a great recipe for anyone, from beginners to seasoned pros. Even if you’ve never smoked anything before, the steps are clear and easy to follow. A Pit Boss Smoked Turkey is a great project to build your confidence. You’ve got this!
Ingredients
Gathering your ingredients is the first step to success. Here’s what you’ll need to create this masterpiece. The list is straightforward, and you can find these items at most grocery stores.
For The Turkey And Brine
- 12 lb turkey, spatchcocked
- 1 bottle turkey brine (herb based or citrus based)
- 1 gallon water, plus extra to cover
- ½ cup kosher salt
For The Injection And Seasoning
- ½ cup garlic herb butter injection
- Olive oil, for brushing
- ¼ cup melted butter, for basting
- 2 to 4 tablespoons Trail Dust seasoning or your favorite turkey rub
Step By Step Instructions
Alright, it’s time for the fun part. Follow these steps closely, and you’ll be on your way to a delicious Smoked Thanksgiving Turkey. We’ll take it one stage at a time.
Step 1: Prepare The Brine
First things first, we need to brine the turkey. This is a crucial step for getting that super juicy meat. Grab a large plastic brining bag or a clean food safe bucket. Make sure it’s big enough to hold your turkey and the liquid.
Pour in the bottled brine, the kosher salt, and one gallon of water. Give it a good stir to help the salt dissolve. You want everything to be well mixed before the turkey goes in.
Now, carefully place your spatchcocked turkey into the brine. You want to make sure the entire bird is completely submerged. If it’s not, just add a little more water until it is fully covered. This ensures every part of the turkey soaks up that flavorful liquid.
Cover your container and pop it in the refrigerator. Let it brine for about 12 hours. A good rule of thumb is about one hour per pound of turkey. Don’t rush this part!
Step 2: Dry The Turkey
After the brining is done, it’s time to dry the bird. This step is the key to getting that wonderfully crispy skin everyone loves. Take the turkey out of the brine and let any excess liquid drip off. Discard the brine.
Place the turkey on a cooling rack set over a rimmed baking pan. This setup allows air to circulate all around the bird. Pat the turkey dry with paper towels, getting into all the nooks and crannies.
Here’s a little trick for even crispier skin. Gently lift the skin from the flesh over the breasts and thighs. This creates a small air pocket that helps the skin render and get super crispy during cooking. Be gentle so you don’t tear it.
Now, place the whole setup, uncovered, back into the fridge. Let it air dry for at least 2 to 3 hours. If you have the time, letting it dry overnight is even better. The drier the skin, the crispier it will be.
Step 3: Prepare The Smoker
While the turkey is air drying, you can get your smoker ready. Whether you have a pellet grill like a Pit Boss or another type of smoker, the goal is the same. We want a consistent, low temperature.
Preheat your smoker to 275°F or 135°C. This temperature is great for cooking the turkey through without burning the outside. It allows the smoky flavor to gently penetrate the meat. Choose your favorite wood chips or pellets. Apple, cherry, or hickory work beautifully with turkey.
Step 4: Season And Inject
Okay, the turkey is dry and the smoker is heating up. It’s time to add our final layers of flavor. Flip the turkey so it’s breast side down. Sprinkle the underside generously with your Trail Dust seasoning or other turkey rub.
Flip it back over. Now it’s time for the injection. If you haven’t made your garlic herb butter, just melt half a cup of unsalted butter and mix in garlic powder, dried parsley, and dried thyme. It smells amazing!
Using a meat injector, inject this butter mixture all over the bird. Focus on the thickest parts of the breast, thighs, and legs. This puts flavor and moisture deep inside the meat.
Next, brush the entire skin with a light coating of olive oil. This helps the seasoning stick and promotes browning. Finally, sprinkle the seasoning evenly all over the skin. Don’t be shy!
Step 5: Smoke The Turkey
The moment has arrived! Carefully place your seasoned turkey directly on the top rack of your preheated smoker. Slide a rimmed baking sheet on a lower rack to catch any drippings. This keeps your smoker clean.
After the first hour of smoking, it’s time to start monitoring the temperature. Insert a reliable meat thermometer into the thickest part of the breast. Make sure you don’t hit a bone, as that can give you a false reading.
Every hour, you’ll want to do two things. First, baste the turkey with the quarter cup of melted butter. This adds flavor and helps the skin brown nicely. Second, rotate the bird to ensure it cooks evenly, especially if your smoker has hot spots.
Continue to smoke the turkey until the internal temperature reaches 165°F or 74°C. The general timing is about 10 minutes per pound, but always cook to temperature, not to time. Your thermometer is your best friend here.
Step 6: Rest And Serve
Once the turkey hits 165°F, carefully remove it from the smoker. Place it on a large cutting board. Tent it loosely with aluminum foil. You don’t want to wrap it tightly, as that can steam the skin and make it soft.
Let the turkey rest for at least 20 minutes before you even think about carving it. This resting period is so important. It allows the juices to redistribute throughout the meat, making it tender and moist. If you cut it too soon, all that delicious juice will run out onto the board.
After resting, it’s time to carve and serve. Your Spicy Smoked Spatchcock Turkey is ready to be enjoyed. Prepare for the compliments to roll in!


How To Store Leftovers
If you somehow end up with leftovers, storing them properly is key to enjoying them later. Let the turkey cool down to room temperature before you pack it away. Don’t leave it out for more than two hours.
Carve the remaining meat off the bones. This makes it much easier to store and reheat. Place the leftover turkey in an airtight container or a resealable plastic bag. It will keep well in the refrigerator for 3 to 4 days.
For longer storage, you can freeze the turkey. Wrap it tightly in plastic wrap and then in foil, or use a vacuum sealer if you have one. Frozen leftover turkey is best if used within 2 to 3 months. It’s great for sandwiches, soups, or casseroles later on.
Tips
Here are a few extra tips to make sure your Spicy Smoked Spatchcock Turkey is a roaring success.
- Don’t Skip The Brine: Seriously, this step makes a huge difference in the moisture and flavor of the final product. It’s worth the time and fridge space.
- A Good Thermometer is Essential: Do not guess when your turkey is done. An accurate instant read meat thermometer is the only way to ensure your turkey is cooked safely and is not overdone.
- Choose Your Wood Wisely: The type of wood you use for smoking adds a lot of character. Fruit woods like apple or cherry give a milder, sweeter smoke. Hickory or pecan offer a stronger, more classic smoky flavor.
- Let It Rest: I know I said it before, but it bears repeating. Resting the turkey is not an optional step. It is vital for a juicy bird. Be patient!
- Save The Drippings: The drippings you catch on the baking sheet are pure gold. You can use them to make a fantastic smoky gravy to serve alongside your turkey.
Conclusion
And there you have it! A complete guide to making a truly memorable Spicy Smoked Spatchcock Turkey. This recipe proves that you don’t need to be a professional chef to create a stunning main course for your family and friends. It’s all about good ingredients and a little bit of technique.
From the flavorful brine to the crispy, seasoned skin and smoky, juicy meat, every bite is a delight. I hope you give this recipe a try for your next big meal. It’s a wonderful way to bring everyone together around the table. Happy cooking!
FAQ
Can I Make This In An Oven Instead Of A Smoker?
Absolutely! If you don’t have a smoker, you can still make a delicious spatchcock turkey in your oven. Follow all the prep steps for brining and seasoning. Then, roast it on a rack in a roasting pan at 350°F (177°C). It will cook faster than a whole bird, likely in about 80 to 90 minutes, but still use a meat thermometer to check for doneness at 165°F.
What Does Spatchcocking Mean?
Great question! Learning How To Spatchcock A Turkey is simple. It’s a technique where you remove the turkey’s backbone, allowing you to flatten it out. You place the turkey breast side down and use sturdy kitchen shears or a sharp knife to cut along both sides of the backbone. Once it’s removed, you flip the bird over and press down firmly on the breastbone to break it and flatten the turkey. This allows for faster, more even cooking.
What If I Do Not Have A Meat Injector?
No problem at all. If you don’t have a meat injector, you can still get that garlic herb butter flavor into the meat. Carefully separate the skin from the breast and thigh meat with your fingers. Then, take the softened or melted garlic herb butter and rub it directly onto the meat under the skin. It works just as well to keep the meat moist and flavorful.
How Long Does It Take To Thaw A Turkey?
Thawing a turkey safely takes time, so you need to plan ahead. The safest method is to thaw it in the refrigerator. You should allow about 24 hours of thawing time for every 4 to 5 pounds of turkey. So for a 12 pound turkey, you’ll need to plan for about 3 days in the fridge before you plan to cook it.
Spicy Smoked Spatchcock Turkey
This Spicy Smoked Spatchcock Turkey recipe delivers a wonderfully juicy and flavorful bird with crispy, golden-brown skin. By flattening the turkey, it cooks faster and more evenly, making it a showstopping main course for any holiday meal.
Ingredients
Instructions
- In a large brining bag or food-safe bucket, combine the bottled brine, kosher salt, and 1 gallon of water. Stir to dissolve the salt. Submerge the spatchcocked turkey completely, adding more water if needed. Refrigerate and brine for about 12 hours.
- Remove the turkey from the brine and discard the liquid. Pat the turkey completely dry with paper towels and place it on a cooling rack over a baking pan. For extra crispy skin, gently lift the skin from the flesh over the breasts and thighs. Refrigerate, uncovered, for at least 2-3 hours or overnight to air dry.
- Preheat your smoker to 275°F (135°C). Use apple, cherry, or hickory wood for flavor.
- Flip the turkey breast-side down and season the underside. Flip it back over. Using a meat injector, inject the garlic herb butter mixture into the breast, thighs, and legs. Brush the entire skin with olive oil and sprinkle generously with your turkey rub.
- Place the turkey on the top rack of the smoker. Place a baking sheet on a lower rack to catch drippings. After the first hour, insert a meat thermometer into the thickest part of the breast.
- Every hour, baste the turkey with melted butter and rotate it to ensure even cooking.
- Continue smoking until the internal temperature reaches 165°F (74°C), which is about 10 minutes per pound. Always cook to temperature, not time.
- Remove the turkey from the smoker and place it on a cutting board. Tent loosely with aluminum foil and let it rest for at least 20 minutes before carving. This allows the juices to redistribute for a moist result.
Notes
Don’t skip the brine; it’s crucial for moisture and flavor. Please note the 12-hour brining time and 2-3 hour air-drying time are not included in the active prep time.
An accurate meat thermometer is essential for ensuring the turkey is cooked safely and not overdone.
Letting the turkey rest for at least 20 minutes before carving is vital for a juicy bird.
The drippings can be used to make a flavorful, smoky gravy.
Nutrition
Calories
Sugar
Fat
Carbs