Graduation season is here, and that means parties, celebrations, and of course, cake! But let’s be honest, ordering a custom cake can get expensive fast. What if I told you that you could make a beautiful, delicious, and totally impressive cake right in your own kitchen? You absolutely can.
This recipe for simple graduation cakes is designed for everyone. You don’t need to be a professional baker. You just need a little time and a desire to create something special for your graduate. This is more than just a cake; it’s a sweet way to say, “We’re so proud of you.”
Jump To:
Why You’ll Love This Recipe
First off, this cake is incredibly delicious. The vanilla cake is moist and fluffy, and the buttercream is sweet, creamy, and perfect for decorating. It’s a classic flavor combination that everyone loves.
It’s also a huge money saver. Bakery cakes can cost a small fortune, but making your own simple cake for graduation cuts down the cost without sacrificing the wow factor. All the ingredients are easy to find at your local grocery store.
Plus, this recipe is so versatile. You can customize the decorations to match school colors or the graduate’s field of study. It’s a fantastic base for all your creative simple graduation cake designs.
The best part? It’s a truly thoughtful gesture. A homemade cake shows how much you care and adds a personal touch that a store bought cake just can’t match. It becomes a memorable part of the celebration.
Ingredients
Here is what you will need to gather before you get started. Making sure your dairy and eggs are at room temperature is a key step for a perfect cake!
- 2 1/2 cups all purpose flour
- 2 1/2 tsp baking powder
- 1/2 tsp baking soda
- 1/2 tsp fine salt
- 1 1/2 cups granulated sugar
- 3 large eggs, room temperature
- 1 cup whole milk, room temperature
- 1/2 cup sour cream, room temperature
- 1 tbsp pure vanilla extract
- 3/4 cup unsalted butter, melted and cooled
- 1 1/2 cups unsalted butter, softened (for frosting)
- 5 1/2 cups powdered sugar, sifted
- 1/3 cup heavy cream
- 2 tsp vanilla extract
- Pinch of salt
- Black, white, and gold fondant
Step By Step Instructions
Ready to make some magic? Follow these steps for a perfect graduation simple cake. We’ll go through it together, one easy step at a time.
Step 1: Prep Your Pans and Oven
First things first, preheat your oven to 350 degrees F. This is super important for an even bake. While it’s heating up, grease and line two 8 inch round cake pans with parchment paper. This little step will save you a headache later, I promise!
Step 2: Mix The Dry Ingredients
In a large mixing bowl, grab a whisk and combine the flour, baking powder, baking soda, and salt. Just give it a quick whisk to make sure everything is mixed together nicely. This helps the cake rise evenly.
Step 3: Combine The Wet Ingredients
Now, in a separate bowl, whisk the eggs and granulated sugar together until they’re a bit lighter in color. Add the milk, sour cream, and vanilla. Whisk it all up until it’s smooth.
Slowly pour in the melted and cooled butter while you keep whisking. This ensures the butter mixes in smoothly without cooking the eggs. You’re doing great!
Step 4: Make The Cake Batter
Pour the wet ingredients into the bowl with the dry ingredients. Use a spatula to gently stir everything together. You want to mix it only until it’s just combined. A few small lumps are perfectly okay. Overmixing can make the cake tough!
Step 5: Bake The Cakes
Divide your beautiful batter evenly between the two prepared pans. Pop them into the preheated oven and bake for 25 to 30 minutes. You’ll know they’re done when a toothpick inserted into the center comes out clean.
Step 6: Cool The Layers
Let the cakes cool in their pans for about 10 minutes. Then, carefully flip them out onto a wire rack to cool completely. Don’t even think about frosting them until they are 100% cool to the touch!
Step 7: Whip Up The Buttercream
While the cakes cool, let’s make the frosting. In a large bowl with a mixer, beat the softened butter for 3 to 5 minutes. You want it to get very pale and creamy. This step makes the buttercream light and fluffy.
Next, add the sifted powdered sugar, heavy cream, vanilla, and a pinch of salt. Start the mixer on low speed so you don’t get a sugar cloud in your kitchen! Once it’s incorporated, turn it up to high and beat for another 2 minutes until it’s super fluffy.
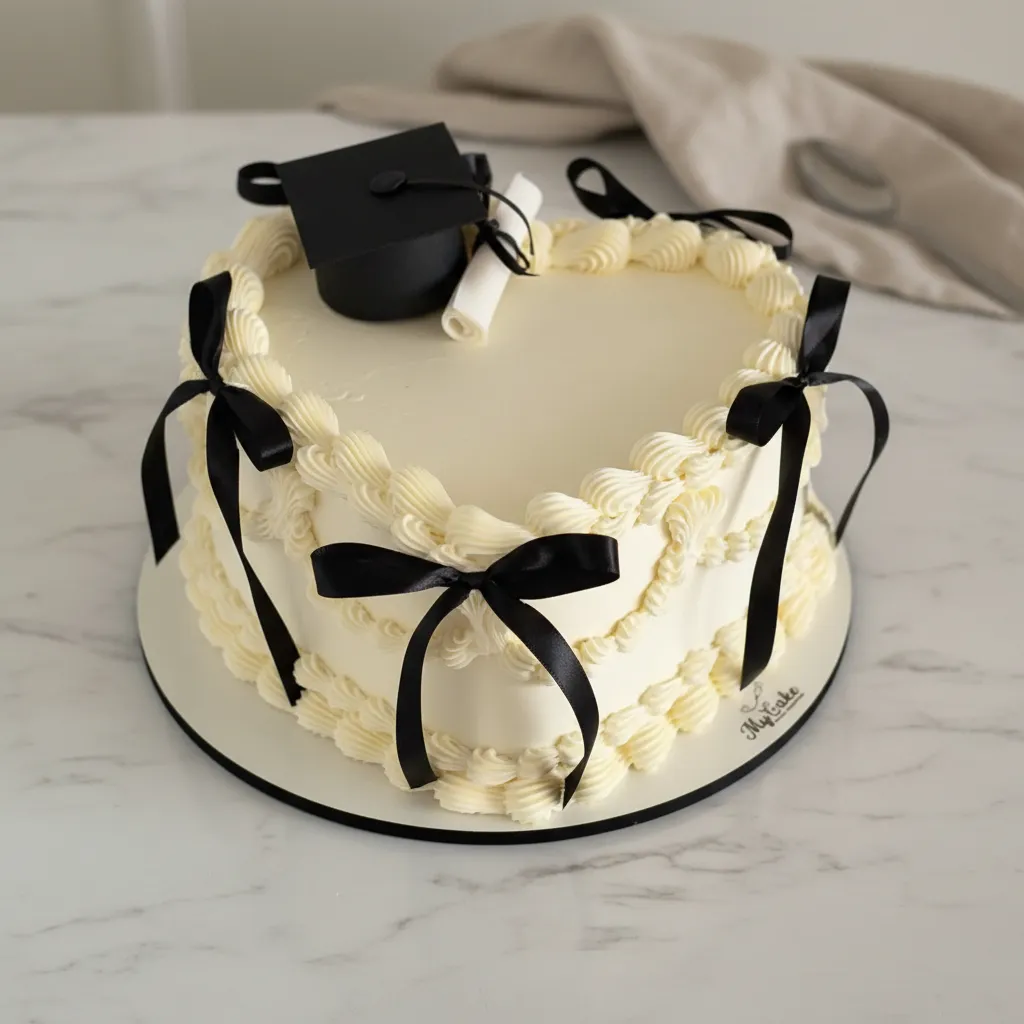
Step 8: Assemble Your Cake
It’s time to build your simple cake graduation masterpiece. Place one cake layer on your serving plate or cake stand. Spread a generous layer of that yummy buttercream over the top. Place the second cake layer right on top.
Step 9: Frost And Decorate
Apply a thick, even layer of buttercream to the top and sides of the cake. Now for the fun part! To get that cool textured look, hold a small offset spatula vertically against the side of the cake. Pull it upward in straight lines to create ridges all around.
For the top, place the tip of the spatula in the center. Rotate the cake while moving the spatula outward to create a pretty spiral. This is one of the easiest simple graduation cake designs that looks so professional.
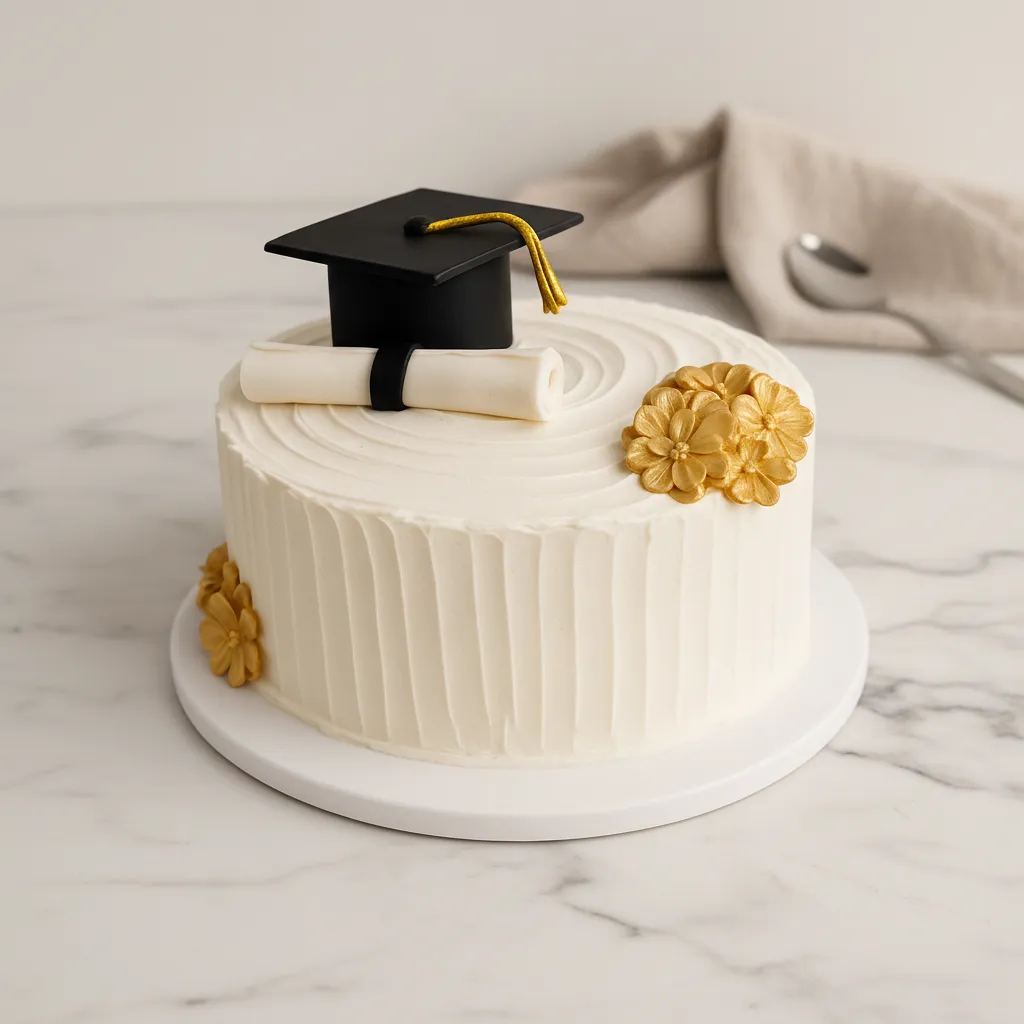
Step 10: Add The Fondant Details
Let’s make the decorations for our simple graduation cakes. To make the cap, cut a square of black fondant and place it on a small cylinder of fondant. Attach a thin strand of gold fondant for the tassel.
For the diploma, roll a piece of white fondant into a scroll and wrap a thin strip of black fondant around the middle. You can also mold small flowers and dust them with edible gold luster dust for a little sparkle.
Finally, cut a banner from white fondant. Use an edible gold marker to write a message like “Congrats Grad!”. Arrange all your beautiful decorations on the cake. Stand back and admire your work!


How To Store Leftovers
If you have any cake left over, which is a big if, storing it is easy. You can keep the cake in an airtight container at room temperature for up to 2 days. The buttercream will help keep it moist.
If you need to store it longer, you can place it in the refrigerator for up to 5 days. Just be sure to let it sit at room temperature for about 30 minutes before serving. This helps the buttercream soften up again.
Tips
Room temperature ingredients are not just a suggestion! They are crucial for a smooth, well combined batter. Cold eggs or milk can cause the batter to curdle.
If your buttercream seems too soft to hold the textured design, don’t panic. Just pop the bowl in the fridge for about 15 minutes to firm it up a bit. It’ll make frosting much easier.
For a more vibrant gold touch, you can use edible gold paint. Mix it with a tiny drop of clear vanilla extract or vodka to make it paintable. This is great for the tassel or any other gold details you want to add.
Working with fondant for the first time? Keep a little cornstarch or powdered sugar on hand to dust your work surface. This prevents it from sticking. A minimalist graduation cake often relies on clean fondant work, and this helps a lot.
Conclusion
And there you have it! A beautiful, homemade graduation cake simple enough for any baker to tackle. Creating simple graduation cakes at home is such a rewarding experience. It’s a delicious way to celebrate a huge achievement.
This cake isn’t just about flour and sugar. It’s about celebrating hard work, dedication, and the start of a new chapter. So go ahead, preheat that oven, and make a dessert that’s as special as your graduate. Congratulations to them!
FAQ
Can I Make This Cake Ahead Of Time?
Yes, absolutely! You can bake the cake layers up to two days in advance. Let them cool completely, then wrap them tightly in plastic wrap and store them at room temperature. You can also make the buttercream a day ahead and store it in an airtight container in the fridge. Just let it come to room temperature and re whip it before using.
What If I Don’t Want To Use Fondant?
No problem at all! You can easily decorate this cake using only buttercream. You can use a piping bag with different tips to write a message or create a border. You could also tint a small amount of buttercream with black food coloring to pipe a simple cap design on top.
Can I Use A Different Size Pan?
You can! This recipe works well for two 9 inch round pans, but the layers will be a bit thinner, so you’ll need to reduce the baking time by a few minutes. For small simple graduation cakes, you could halve the recipe and bake it in two 6 inch pans. Just keep an eye on the baking time.
How Can I Personalize This For A Specific Degree?
This is where you can get really creative! For law graduation cake designs, you could add a small fondant gavel or scales of justice. For Phd graduation cake ideas, you could write a funny, subject specific equation or quote on the banner. Matching the fondant colors to the school’s colors is another great way to personalize it.
“`htmlSimple Graduation Cake
This recipe for simple graduation cakes is designed for everyone. You don’t need to be a professional baker. You just need a little time and a desire to create something special for your graduate. This is more than just a cake; it’s a sweet way to say, “We’re so proud of you.”
Requirements


Ingredients
Instructions
- First things first, preheat your oven to 350 degrees F. This is super important for an even bake. While it’s heating up, grease and line two 8 inch round cake pans with parchment paper. This little step will save you a headache later, I promise!
- In a large mixing bowl, grab a whisk and combine the flour, baking powder, baking soda, and salt. Just give it a quick whisk to make sure everything is mixed together nicely. This helps the cake rise evenly.
- Now, in a separate bowl, whisk the eggs and granulated sugar together until they’re a bit lighter in color. Add the milk, sour cream, and vanilla. Whisk it all up until it’s smooth.
- Slowly pour in the melted and cooled butter while you keep whisking. This ensures the butter mixes in smoothly without cooking the eggs. You’re doing great!
- Pour the wet ingredients into the bowl with the dry ingredients. Use a spatula to gently stir everything together. You want to mix it only until it’s just combined. A few small lumps are perfectly okay. Overmixing can make the cake tough!
- Divide your beautiful batter evenly between the two prepared pans. Pop them into the preheated oven and bake for 25 to 30 minutes. You’ll know they’re done when a toothpick inserted into the center comes out clean.
- Let the cakes cool in their pans for about 10 minutes. Then, carefully flip them out onto a wire rack to cool completely. Don’t even think about frosting them until they are 100% cool to the touch!
- While the cakes cool, let’s make the frosting. In a large bowl with a mixer, beat the softened butter for 3 to 5 minutes. You want it to get very pale and creamy. This step makes the buttercream light and fluffy.
- Next, add the sifted powdered sugar, heavy cream, vanilla, and a pinch of salt. Start the mixer on low speed so you don’t get a sugar cloud in your kitchen! Once it’s incorporated, turn it up to high and beat for another 2 minutes until it’s super fluffy.
- It’s time to build your simple cake graduation masterpiece. Place one cake layer on your serving plate or cake stand. Spread a generous layer of that yummy buttercream over the top. Place the second cake layer right on top.
- Apply a thick, even layer of buttercream to the top and sides of the cake. Now for the fun part! To get that cool textured look, hold a small offset spatula vertically against the side of the cake. Pull it upward in straight lines to create ridges all around.
- For the top, place the tip of the spatula in the center. Rotate the cake while moving the spatula outward to create a pretty spiral. This is one of the easiest simple graduation cake designs that looks so professional.
- Let’s make the decorations for our simple graduation cakes. To make the cap, cut a square of black fondant and place it on a small cylinder of fondant. Attach a thin strand of gold fondant for the tassel.
- For the diploma, roll a piece of white fondant into a scroll and wrap a thin strip of black fondant around the middle. You can also mold small flowers and dust them with edible gold luster dust for a little sparkle.
- Finally, cut a banner from white fondant. Use an edible gold marker to write a message like “Congrats Grad!”. Arrange all your beautiful decorations on the cake. Stand back and admire your work!
Notes
Room temperature ingredients are not just a suggestion! They are crucial for a smooth, well combined batter. Cold eggs or milk can cause the batter to curdle.
If your buttercream seems too soft to hold the textured design, don’t panic. Just pop the bowl in the fridge for about 15 minutes to firm it up a bit. It’ll make frosting much easier.
For a more vibrant gold touch, you can use edible gold paint. Mix it with a tiny drop of clear vanilla extract or vodka to make it paintable. This is great for the tassel or any other gold details you want to add.
Working with fondant for the first time? Keep a little cornstarch or powdered sugar on hand to dust your work surface. This prevents it from sticking. A minimalist graduation cake often relies on clean fondant work, and this helps a lot.
Nutrition
Calories
Sugar
Fat
Carbs