Have you ever found yourself staring into the freezer, wishing for a scoop of ice cream but not the sugar that comes with it? I know I have. It feels like you have to choose between a satisfying treat and your health goals. Well, what if I told you that you can have both? It’s totally possible, and it’s easier than you might think.
Get ready to meet your new favorite dessert. We are talking about creamy, dreamy ice cream made from a simple protein shake. This is where the magic of Fairlife Ninja Creami Recipes comes into play. You can create a delicious and protein packed treat with minimal effort. Let’s get into it.
Jump To:
Why You’ll Love This Recipe
Honestly, there are so many reasons to get excited about this recipe. First off, it is incredibly simple. You are basically using ingredients you might already have on hand. There is no complicated cooking or churning involved at all.
The prep time is just a few minutes. All you need to do is blend the base and pour it into the pint container. The freezer and the Ninja Creami do all the heavy lifting for you. It’s a wonderful set it and forget it kind of dessert.
Next, let’s talk about the texture. If you are worried about homemade protein shake ice cream being icy, don’t be. This method creates a genuinely smooth and creamy result. It really feels like you are eating traditional ice cream.
The addition of a little cream cheese is the key. It adds just enough fat and stabilizers to give you that rich mouthfeel we all look for in a good scoop of ice cream. It is what makes these Fairlife Ninja Creami Recipes so satisfying.
This recipe is also so versatile. We are starting with a vanilla base, which is amazing on its own. But you can also think of it as a blank canvas. The possibilities for mix ins and flavors are nearly endless. You can truly make it your own.
And of course, it’s a healthier option. You get a good dose of protein without a lot of carbs or sugar. It’s a treat that actually fits into a balanced lifestyle. What’s not to love about a dessert that you can feel good about eating?
It is the kind of recipe that makes healthy eating feel like a joy, not a chore. Creating your own Ninja Creami Fairlife Protein Ice Cream is a fun kitchen project. You will be amazed at what your machine can do.
Ingredients
The beauty of these Fairlife Ninja Creami Recipes lies in their simplicity. You only need a few key items to create a fantastic base. Each one plays an important role in achieving that perfect creamy texture and flavor.
You will start with your favorite low carb protein drink. I have had great success with both Nurri and Oikos vanilla shakes. Fairlife protein shakes are another excellent choice for this. The flavor of the shake will be the star of the show.
Next up is whipped cream cheese. This might sound like an odd ingredient for ice cream, but trust me on this. It adds a wonderful richness and helps make the final product incredibly smooth. It prevents that icy texture nobody wants.
Finally, a little vanilla bean paste or extract enhances the flavor. It deepens the vanilla notes of the protein shake, giving it a more homemade and authentic taste. It really makes a big difference.
- 1 bottle low carb protein drink (like Fairlife, Nurri, or Oikos vanilla)
- 2 tablespoons whipped cream cheese
- 1 teaspoon vanilla bean paste (or vanilla extract)
Step By Step Instructions
Ready to make some delicious protein shake ice cream? The process is very straightforward. Just follow along and you will be enjoying your frozen treat in no time. Let’s walk through it together.
Step 1: Blend The Base
First things first, gather your ingredients. Grab your protein shake, the whipped cream cheese, and your vanilla paste. Add all of them to a blender. A personal blender works great for this small volume.
Now, blend everything until it is completely smooth and well combined. You want to make sure there are no little lumps of cream cheese left. This should only take about 30 seconds or so. Easy peasy.
At this point, you can give the base a little taste. Most bottled protein drinks are quite sweet on their own. However, if you have a sweet tooth, you can add your favorite low carb sweetener now. Just be sure to blend it in fully.
Step 2: Freeze The Pint
Next, find the pint container that came with your Ninja Creami machine. Pour the blended ice cream base directly into the pint. Fill it up to the max fill line, but not over it.
Secure the storage lid tightly onto the pint. Now it’s time for the freezer. It is very important to place the pint on a completely level surface in your freezer. This ensures it freezes evenly, which helps the machine process it correctly.
You will need to let it freeze for at least 24 hours. I usually just pop it in the freezer overnight. A solid freeze is absolutely necessary for the Ninja Creami to work its magic on these Fairlife Ninja Creami Recipes.
Step 3: Process In The Ninja Creami
Once your base is frozen solid, you are ready for the fun part. Remove the pint from the freezer and take off the storage lid. Place the pint into the outer assembly bowl that came with your machine.
Attach the processing lid with the paddle onto the assembly bowl. Make sure it clicks into place securely. Then, place the entire assembly into the Ninja Creami machine and lock it in. You will hear a click when it is secure.
For this recipe, you will want to select the LITE ice cream button. Press it and let the machine run through its cycle. It can be a bit loud, but that just means it is working hard to create your delicious ice cream.
Step 4: Check And Respin
When the first cycle finishes, unlock the machine and remove the assembly. Take off the lid and look at the texture. Don’t be surprised if it looks dry and powdery. This is very normal for high protein, low fat recipes.
If it is powdery, simply put the lid back on, lock it back into the machine, and run it on the LITE cycle again. I often find that my Ninja Creami Fairlife Protein Ice Cream needs a few spins.
Sometimes it can take up to three LITE cycles. After the second or third try, you might need to use the RESPIN button instead. You know it’s done when it looks smooth and creamy, just like traditional ice cream.
A helpful trick is to add a tablespoon of almond milk or heavy cream after the first or second spin if it is still very powdery. This little bit of liquid can help it become creamy faster. It is a great shortcut to amazing protein shake ice cream.
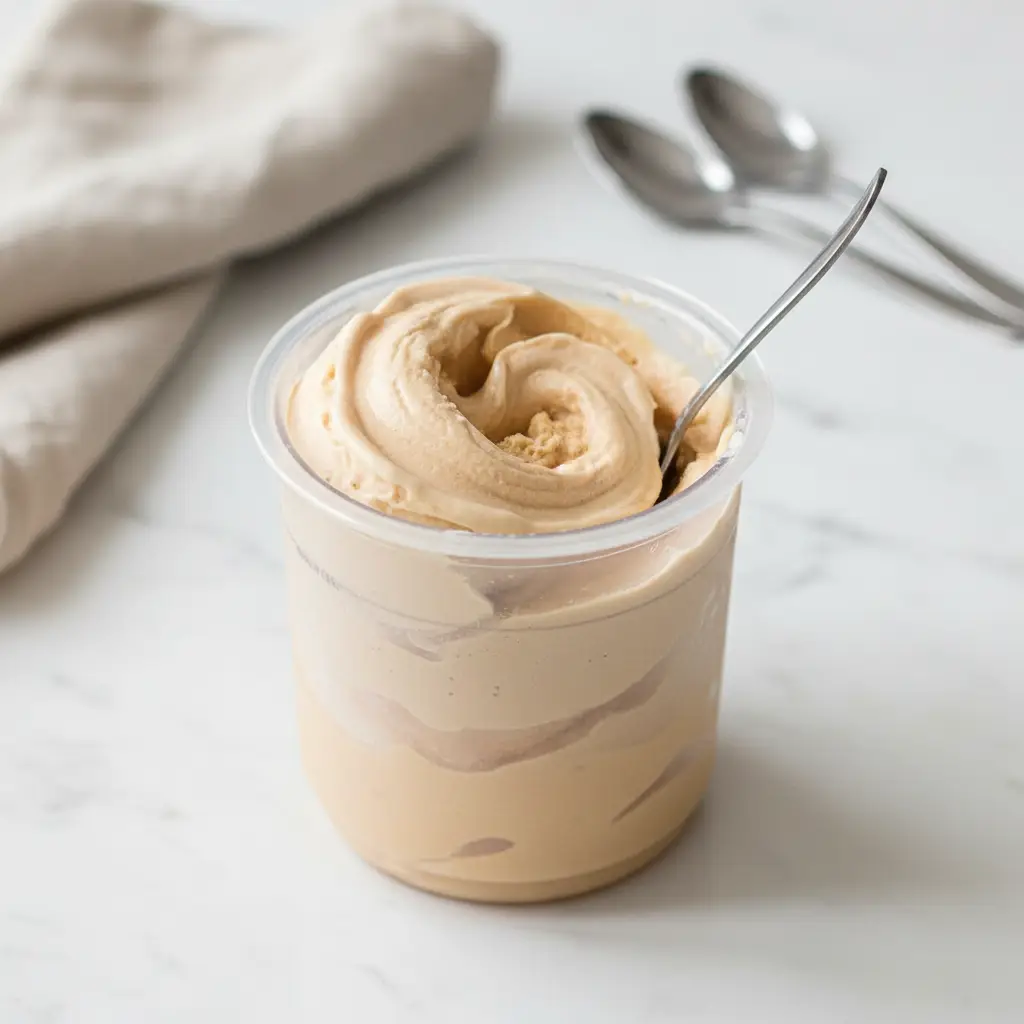
Once it reaches your desired consistency, spoon it into a bowl and enjoy your creation. You just made incredible homemade ice cream!


How To Store Leftovers
This recipe usually makes about two or three servings per pint. If you find yourself with leftovers, storing them is very simple. There is no need to worry about wasting your delicious creation.
First, take a spoon and smooth out the top surface of the ice cream inside the pint container. Creating a flat, level surface is important for when you want to enjoy it again later.
Once the top is smooth, place the storage lid back on the pint, making sure it is sealed tightly. Then, simply put it back into the freezer on a level spot. Your leftover Ninja Creami Fairlife Protein Ice Cream will be waiting for you.
When you are ready for another serving, just take the pint out of the freezer. You will need to run it through the machine again. Just follow the same processing instructions as before. It will likely need one or two spins to become creamy again.
Tips
Want to make your Fairlife Ninja Creami Recipes even better? Here are a few tips and ideas to help you get the best results every single time. These little tricks can make a big difference in flavor and texture.
First, feel free to experiment with different brands of protein shakes. While this is one of our favorite Fairlife Ninja Creami Recipes, shakes from Oikos, Premier Protein, or Nurri also work very well. You can even try different flavors like chocolate or caramel.
If you prefer using protein powder, that is an option too. Just mix your favorite vanilla protein powder with almond milk or another milk of your choice until you have a smooth shake. Then, proceed with the recipe as written.
Now let’s talk about mix ins. This is where you can get really creative. One important tip is to stir in your additions by hand. The MIX IN button on the machine can sometimes be too powerful and pulverize your chunky ingredients.
For a sweet swirl, try sugar free syrups. There are many great options available online from brands like Pyure or Lakanto. A drizzle of sugar free chocolate or maple syrup can add a new layer of flavor. Add some walnuts for crunch with the maple syrup.
Keto cookies are another fantastic addition. Just crumble one or two cookies and gently fold them into your creamy ice cream. The Benton brand from Aldi is a great choice, offering a nice crunch without adding many carbs.
Chocolate lovers can add sugar free chocolate chips. Brands like Lily’s or Chocozero work well. You can also take a high quality dark chocolate bar and grate some shavings into the ice cream using a microplane. It looks so fancy!
For some added texture, consider nuts and seeds. Toasted pecans or chopped almonds are delicious. Some homemade keto granola or a keto friendly cereal like Magic Spoon can also provide a satisfying crunch in your protein shake ice cream.
Nut butters and sugar free jams are another way to customize. To get a nice ribbon or swirl, add a spoonful after the ice cream is made and gently fold it in by hand. Using the machine’s mix in function will just blend it completely.
Other healthy ideas include toasted coconut flakes, cacao nibs, or low carb fruits like raspberries or blueberries. These simple additions can make your Vanilla Ninja Creami Ice Cream Recipes Protein feel like a new dessert every time.
Conclusion
And there you have it! A simple, delicious, and healthy way to satisfy your ice cream cravings. These Fairlife Ninja Creami Recipes are all about making dessert fun and accessible, no matter your dietary goals.
With just a few ingredients and a little patience while it freezes, you can create a treat that is packed with protein and flavor. It is a wonderful way to use your Ninja Creami and explore a world of creamy possibilities.
So go ahead and give this Ninja Creami Fairlife Protein Ice Cream a try. I have a feeling it will quickly become a staple in your dessert rotation. Enjoy every single scoop!
FAQ
Can I Use A Different Brand Of Protein Shake?
Absolutely! While these are called Fairlife Ninja Creami Recipes, you can use any brand of low carb, high protein shake you enjoy. Brands like Premier Protein, Oikos, and others work just as well. The key is to pick a flavor you love.
Why Is My Ice Cream Powdery?
A powdery or crumbly texture is very common with low fat, high protein recipes after the first spin. It just means it needs more processing. Simply run it through the LITE or RESPIN cycle again until it becomes smooth and creamy.
Can I Make This Dairy Free?
Yes, you can. To make a dairy free version, choose a plant based protein shake, such as one made from almond or pea protein. You will also need to use a dairy free cream cheese alternative to maintain that creamy texture.
What If I Don’t Have Vanilla Bean Paste?
No problem at all. You can easily substitute the vanilla bean paste with an equal amount of regular vanilla extract. It will still provide that classic vanilla flavor that makes this Vanilla Ninja Creami Ice Cream Recipes Protein so good.
How Many Servings Does This Make?
One full pint will typically yield two or three servings, depending on how big your scoops are. The nutritional information provided in the notes is based on the recipe being split into two servings.
Creamy Protein Shake Ice Cream (Ninja Creami)
Create a creamy, satisfying ice cream from a simple protein shake using your Ninja Creami. This easy recipe is high in protein and low in sugar, making for a delicious and healthy frozen treat.
Ingredients
Instructions
- In a blender, combine the protein shake, whipped cream cheese, and vanilla bean paste. Blend for about 30 seconds until completely smooth with no lumps.
- Pour the blended base into a Ninja Creami pint container, up to the max fill line. Secure the storage lid.
- Place the pint on a level surface in the freezer and freeze for at least 24 hours until frozen solid.
- Once frozen, remove the lid, place the pint in the outer bowl, attach the processing lid, and lock it into the Ninja Creami machine.
- Select the ‘LITE’ ice cream button and let the machine run its cycle.
- After the first cycle, check the texture. If it appears dry or powdery, place it back in the machine and use the ‘RESPIN’ button. Repeat if necessary until the ice cream is smooth and creamy.
- For a stubborn powdery mix, add 1 tablespoon of almond milk or heavy cream before respinning to help it become creamy faster. Serve immediately.
Notes
Feel free to experiment with different protein shake brands and flavors like chocolate or caramel.
For mix-ins like keto cookies, nuts, or sugar-free chocolate chips, stir them in gently by hand after the final spin to avoid pulverizing them.
To make this dairy-free, use a plant-based protein shake and a dairy-free cream cheese alternative.
Nutrition
Calories
Sugar
Fat
Carbs