There is nothing quite like the smell of a fresh pizza baking in the oven. It is a scent that fills the house with warmth and brings everyone to the kitchen table. Making your own at home is one of those simple joys that feels much more special than just ordering from a local spot.
You do not need a fancy kitchen or expensive tools to get started. All you need is a bit of dough and some fresh toppings. Plus, you can create a Pizza Aesthetic that looks like it came straight from a professional kitchen or a high end Pizza Pub.
In this guide, we are going to walk through everything you need. We will cover the best toppings and the right way to stretch your dough. We will even talk about how to get those perfect Pizza Aesthetic Pictures for your social media feed.
Jump To:
Why You’ll Love This Recipe
You are going to love this pizza because it is completely customizable. You get to be the chef in your own home kitchen. Whether you want a classic tomato base or something more unique like pesto, the choice is entirely yours.
This recipe is also great for families who want a 30 minute meal that is fun to make. Kids love helping with the toppings. It turns a regular Tuesday night into a creative activity that everyone can enjoy together without any stress.
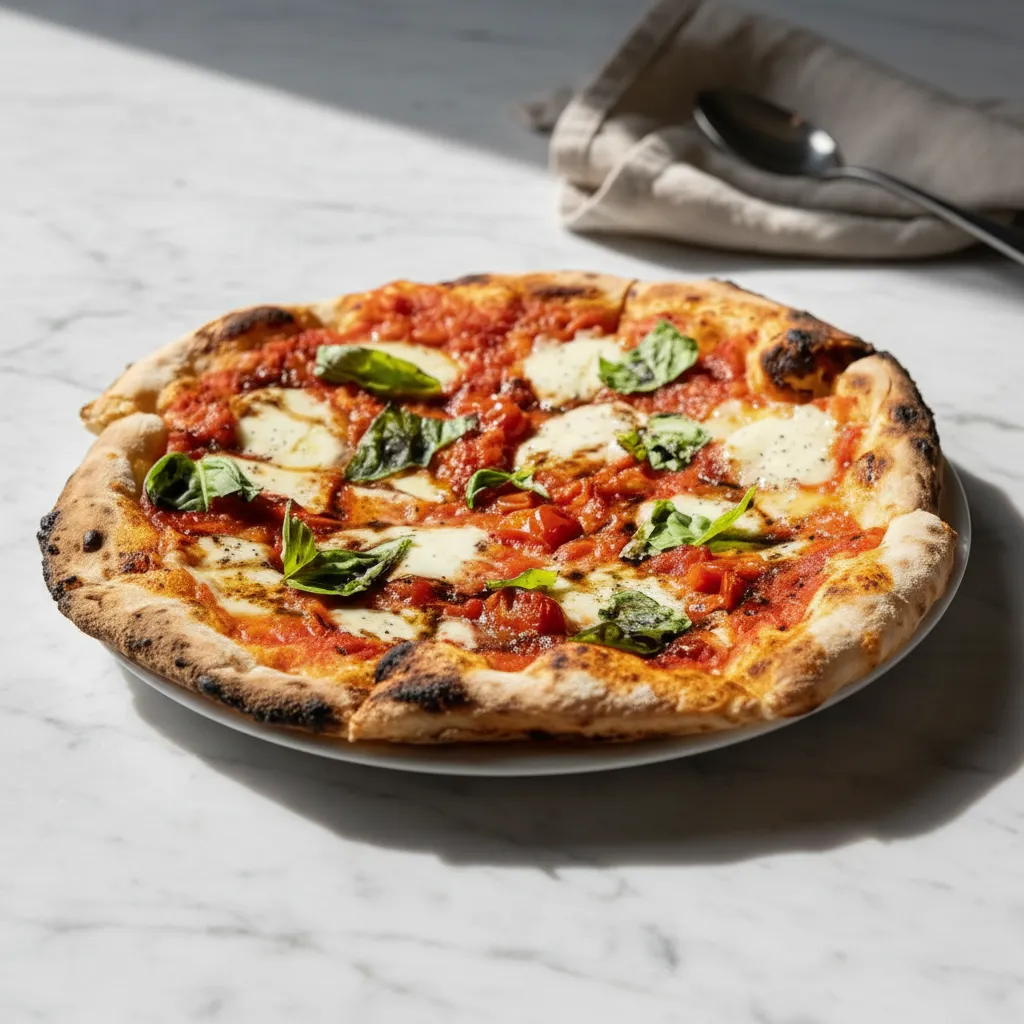
Another reason to love this is the Food Photography Aesthetic you can achieve. Homemade food has a rustic charm that store bought versions just cannot match. When you pull a charred crust out of the oven, it looks like a piece of art.
We have also focused on using accessible ingredients. We replaced traditional meats with beef and chicken alternatives. This makes it a great choice for those who avoid pork but still want that classic Italian Brand flavor profile in every single bite.
Honestly, once you start making your own, you might never go back to delivery. There is a sense of pride that comes with serving a pizza you built from scratch. It is comforting, tasty, and very easy on your monthly grocery budget.
Lastly, we will give you some Pizza Photography Ideas. This way, you can show off your hard work. A Creative Pizza Photo can make your friends feel like they are right there with you. It is all about capturing the steam and the melted cheese.
Ingredients
Pizza Bases
- Traditional Dough with a secret recipe tomato sauce
- White Base with fresh mozzarella and garlic and olive oil
- Pesto Base with nut free basil pesto sauce
Cheeses
- Fresh Mozzarella
- Ricotta Cheese
- Asiago
- Parmesan
- Pecorino Romano
- Gorgonzola
Meats
- Beef Pepperoni
- Anchovies
- Beef Meatballs
- Chicken Italian Sausage
- Spicy Chicken Sausage
- Beef Bacon
- Turkey Ham
- Cured Beef
- Grilled Chicken
Vegetables and Others
- Artichoke Hearts
- Jalapeños
- Roasted Sweet Red Peppers
- Sun Dried Tomatoes
- Onions (Red or White)
- Fresh Garlic
- Fresh Sliced Roma Tomatoes
- Kalamata Olives
- Black Olives
- Fresh Baby Spinach
- Mushrooms
- Green Peppers
- Fresh Arugula
- Fresh Cilantro
Finishes
- Mike’s Hot Honey
- Sweet Baby Ray’s Barbecue Sauce
- Signature cheese and spice blend
- Fresh Basil
Step By Step Instructions
Step 1: Stretch The Dough
First you need to prepare the dough. Take your dough ball and begin hand stretching it to your desired size. You can go for a 12 inch or even a large 18 inch pizza.
Remember that pizzas are hand stretched. This means the overall size may shrink a little bit during the cooking process. Do not worry if it is not a perfect circle. That adds to the charm.
Step 2: Apply The Base Sauce
Now it is time to choose your base. You can spread the secret recipe tomato sauce evenly. If you want a white pizza, just drizzle some garlic and olive oil over the surface.
For a more vibrant flavor, you can apply the basil pesto sauce. Make sure the sauce goes almost to the edge but leaves enough room for a crust to form as it bakes.
Step 3: Add The Cheese
Top your base with fresh mozzarella. This is the foundation of a good pizza. If you are feeling fancy, you can try a Quattro Formaggi style by adding more varieties.
Try mixing in some asiago and parmesan. You can also add pecorino romano and gorgonzola for a sharp and creamy finish. The blend of cheeses creates a beautiful Pizza Photography Aesthetic when it melts.
Step 4: Load Up The Toppings
This is where you can get creative. You can follow some chef selections like the Brooklyn Bridge. That one uses roasted red peppers and creamy ricotta cheese with chicken Italian sausage.
Or you might try The Don. It features chicken Italian sausage and beef meatballs along with beef pepperoni. If you love heat, add some jalapeños or spicy chicken sausage to the mix.
Step 5: Bake Until Charred
Place your creation in a very hot oven. If you have a coal fired brick oven, that is perfect. Otherwise, use your home oven at its highest setting for the best results.
Bake it until the crust is crisp and has a nice char. This char is essential for that Pizza Aesthetic. It shows that the dough has cooked through and developed a deep flavor.
Step 6: Final Garnish
Once it comes out of the oven, do not serve it just yet. Garnish the top with some fresh basil. Add the signature cheese and spice blend to give it a professional touch.
If you made the Prosciutto Arugula version, this is when you add the cured beef and fresh arugula. A drizzle of Mike’s Hot Honey can also add a nice sweet heat finish.


How To Store Leftovers
If you actually have leftovers, storing them properly is key. You want to keep that crust from getting soggy. Let the pizza cool down to room temperature before you pack it away.
Place the slices in an airtight container. You can stack them if you put a piece of parchment paper between the layers. This keeps the cheese from sticking to the bottom of the slice above.
Keep the container in the fridge for up to three days. When you are ready to eat again, avoid the microwave if you can. A microwave often makes the crust chewy and soft instead of crisp.
Instead, use a skillet on the stove. Put the slice in a dry pan over medium heat for a few minutes. This reheats the bottom and makes it crunchy again, just like it was fresh.
You can also use a toaster oven for a quick fix. Just a few minutes at 350 degrees will melt the cheese and crisp up the edges. It is almost as good as the first time.
Tips
To get a great Creative Pizza Photo, lighting is everything. Try to take your photos near a window during the day. Natural light makes the colors of the vegetables pop and look delicious.
When you are stretching the dough, try not to use a rolling pin. Using your hands keeps the air bubbles inside the crust. This results in a much lighter and fluffier edge after it bakes.
Do not overload the center with too many wet toppings. If you use too many roma tomatoes or mushrooms, the moisture can make the middle of the pizza a bit soft. Balance is very important.
For a true Pizza Photography look, add your fresh greens like arugula or cilantro after the bake. This keeps them looking bright and green rather than wilted and brown from the high heat.
If you want that Pizza Photography Aesthetic, try using a wooden board for serving. It gives a warm and rustic feel to your pictures. It makes the whole meal look like it came from a cozy kitchen.
Experiment with different sauces. Sometimes a simple drizzle of barbecue sauce over the top can change the whole vibe. It is all about finding what flavors you and your family love the most.
Conclusion
Making a pizza at home is a rewarding experience that everyone should try. It is not just about the food. It is about the process of creating something with your own hands and sharing it.
By following these steps, you can create a meal that rivals any Italian Brand restaurant. You have the power to choose the best ingredients and cook them exactly how you like. No more settling for lukewarm delivery.
We hope this guide inspires you to get into the kitchen this weekend. Whether you are aiming for the perfect Pizza Photography or just a tasty dinner, you now have the tools to succeed.
Remember to have fun with it. There are no mistakes in home cooking, only new discoveries. Grab your flour and your favorite toppings and start your own tradition tonight. Enjoy every single bite of your creation.
FAQ
Can I Make This Gluten Free?
Yes you can. You just need to swap the traditional flour for a gluten free blend. Many stores sell pre made gluten free dough that works very well with these toppings and instructions.
What If I Do Not Have A Pizza Stone?
You can use a regular baking sheet turned upside down. Let it heat up in the oven before you slide your dough onto it. This helps mimic the heat of a professional oven floor.
How Do I Get The Best Pizza Aesthetic Pictures?
Focus on the details. Zoom in on a melting piece of cheese or a charred crust. Use a simple background so the food is the star of your Pizza Photography Aesthetic shot.
Is The Pesto Sauce Safe For Nut Allergies?
The pesto sauce mentioned in this recipe is nut free. It uses basil and oil and cheese but leaves out the pine nuts. This makes it a safer option for many people with allergies.
How Hot Should My Oven Be?
You should set your oven as high as it will go. Usually this is around 500 or 550 degrees. A hot oven is the secret to getting that crisp crust and beautiful cheese melt.
Quick & Easy Homemade Pizza
Skip the delivery! This no-fuss homemade pizza recipe is perfect for a fun weeknight dinner. Customize with your favorite toppings for a tasty, comforting meal the whole family will love.
Requirements


Ingredients
Instructions
- Preheat your oven to its highest setting (around 500-550°F). Hand-stretch your pizza dough to your desired size and thickness on a lightly floured surface.
- Spread your chosen base sauce (tomato, pesto, or garlic and olive oil) evenly over the dough, leaving a small border for the crust.
- Sprinkle the fresh mozzarella and other cheeses over the sauce.
- Add your favorite meat and vegetable toppings. Be careful not to overload the center to avoid a soggy crust.
- Bake for 10-15 minutes, or until the crust is golden brown and the cheese is bubbly and slightly charred.
- Remove from the oven and garnish with fresh basil. Let it cool for a minute before slicing and serving.
Notes
For a crispier crust, preheat your baking sheet or pizza stone in the oven before sliding the pizza onto it.
Don’t use a rolling pin to stretch the dough; using your hands keeps air bubbles in the crust, making it lighter and fluffier.
For the best presentation, add fresh greens like arugula or cilantro after baking to keep them from wilting.
If you don’t have a pizza stone, a regular baking sheet turned upside down works great. Let it heat up in the oven first.
Nutrition
Calories
Sugar
Fat
Carbs