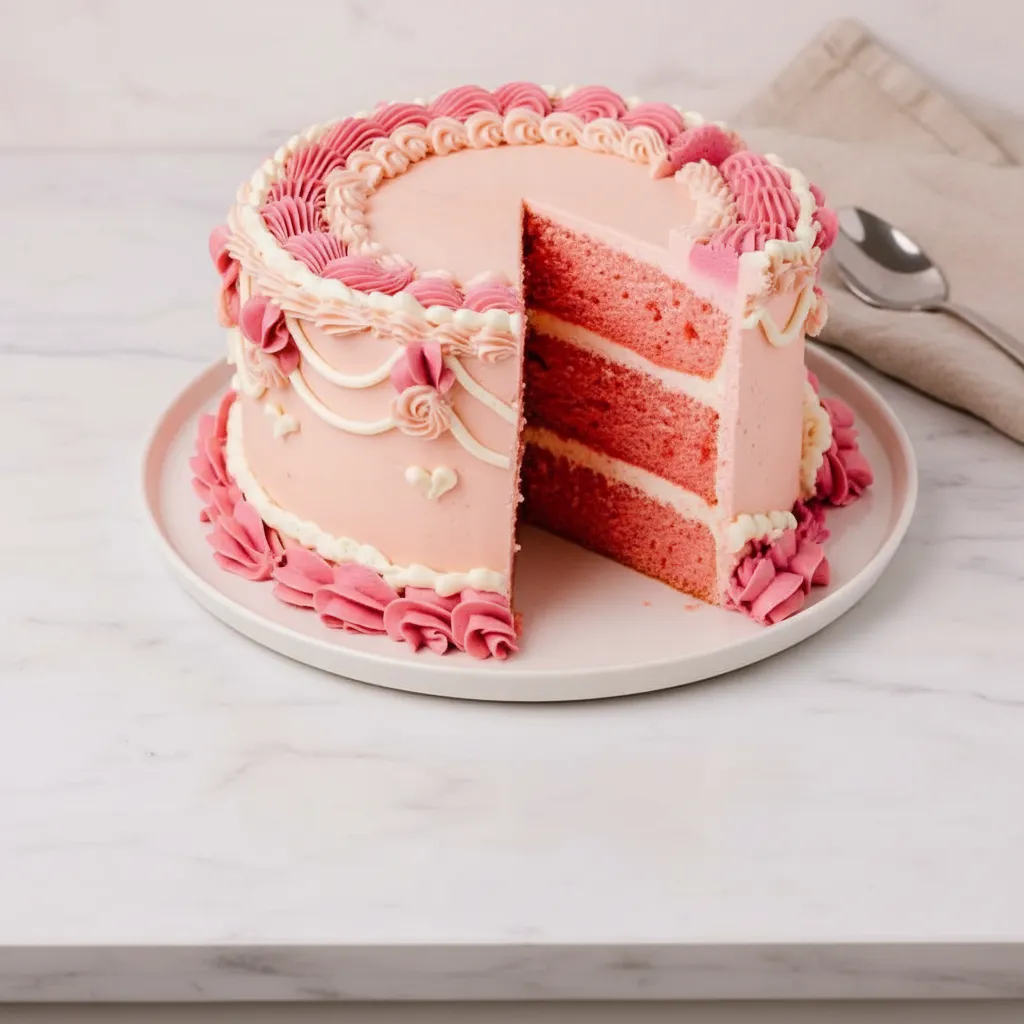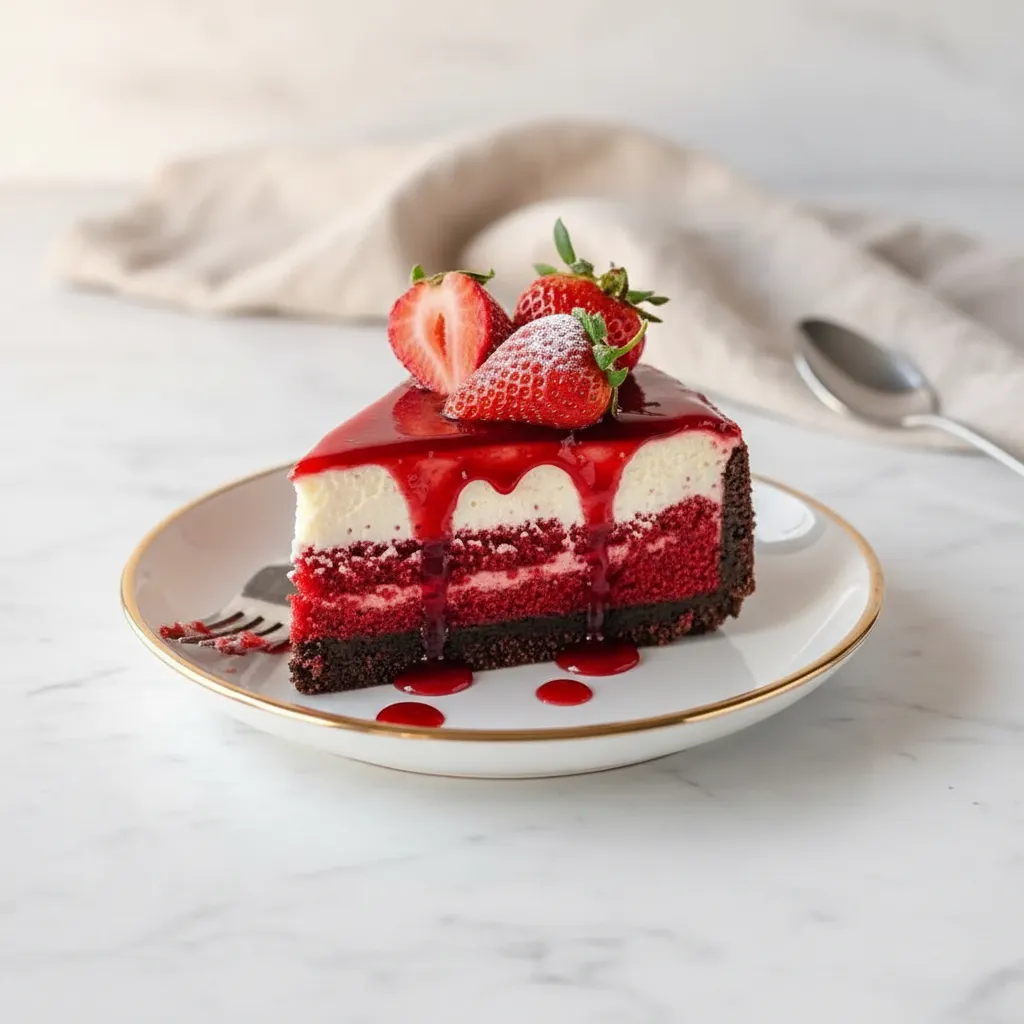
Ever dreamt of making a showstopping cake that looks like it came from a fancy bakery but is totally doable at home? Well, get ready because this Red Velvet Cheesecake cake recipe is about to make those dreams a reality. It is a fantastic blend of two beloved desserts!
Imagine a moist, vibrant red velvet cake base topped with a creamy, dreamy strawberry cheesecake filling. It is a match made in heaven, offering a delightful twist on classic cake and dessert pairings. This recipe is your ticket to creating truly tasty sweets without breaking a sweat or the bank.
Jump To:
Why You’ll Love This Recipe
Honestly, what is not to love about a dessert that brings together the best of both worlds? This Red Velvet Cheesecake cake is a total crowd pleaser. It is visually stunning, making it perfect for celebrations, but it is also surprisingly simple to whip up, even for beginner bakers.
You will appreciate how the rich cocoa notes of the red velvet complement the fresh, tangy sweetness of the strawberry cheesecake. It is a symphony of flavors and textures in every single bite. Plus, it is a fantastic way to impress your family and friends with your baking prowess!
Forget complicated techniques or expensive equipment. We are talking about straightforward steps and ingredients you can easily find at your local grocery store. It is one of those dessert cake ideas that feels gourmet but is totally budget friendly and fun to make. Get ready for some seriously delicious dessert cake.
Ingredients
For The Red Velvet Cake Base
- 1 ½ cups all purpose flour
- 1 cup granulated sugar
- 1 teaspoon baking powder
- 1 teaspoon baking soda
- ½ teaspoon salt
- 1 tablespoon cocoa powder
- 1 cup vegetable oil
- 1 cup buttermilk, room temperature
- 2 large eggs, room temperature
- 2 tablespoons red food coloring
- 1 teaspoon vanilla extract
- 1 teaspoon white vinegar
For The Strawberry Cheesecake Filling
- 16 oz cream cheese, softened
- 1 cup powdered sugar
- 1 teaspoon vanilla extract
- 1 cup fresh strawberries, pureed (about 8 10 strawberries)
- 1 cup heavy whipping cream
For Topping
- Fresh strawberries, halved
- Whipped cream (optional)
Step By Step Instructions
Step 1: Prep Your Oven And Pan
First things first, let us get that oven ready. Preheat your oven to 350°F (175°C). Next, grab a 9 inch springform pan. You will want to grease it really well and then line the bottom with parchment paper. This makes sure your beautiful cake comes out easily.
Step 2: Combine Dry Ingredients
In a large mixing bowl, sift together your all purpose flour, granulated sugar, baking powder, baking soda, salt, and cocoa powder. Sifting is a great little trick for a lighter, fluffier cake texture. Give them a good whisk to make sure everything is evenly distributed.
Step 3: Whisk Wet Ingredients
Now for the wet stuff! In a separate bowl, whisk together the vegetable oil, room temperature buttermilk, eggs, red food coloring, vanilla extract, and white vinegar. Keep whisking until the mixture is smooth and beautifully vibrant. This is where the magic red color of your cake really comes to life.
Step 4: Mix Batter Gently
Slowly add your dry ingredients to the wet mixture. Stir gently until they are just combined. Be careful not to overmix here. Overmixing can lead to a tough cake, and we want it tender and moist. A few lumps are totally fine!
Step 5: Pour And Smooth
Pour your gorgeous red velvet batter into your prepared springform pan. Use a spatula to gently smooth the top. This helps ensure your cake bakes evenly and looks picture perfect.
Step 6: Bake The Cake Base
Pop the pan into your preheated oven. Bake for about 25 to 30 minutes, or until a toothpick inserted into the center of the cake comes out clean. Once baked, let the cake cool completely in the pan. Patience is key here for a perfect outcome.
Step 7: Prepare The Cream Cheese Mixture
While your cake is cooling, let us get started on that amazing strawberry cheesecake filling. In a large mixing bowl, beat the softened cream cheese until it is wonderfully smooth and creamy. Gradually add the powdered sugar and vanilla extract, mixing until everything is fully incorporated. This is the base for your delicious dessert cake topping.
Step 8: Add Pureed Strawberries
Stir in your pureed fresh strawberries. Make sure everything is well combined, giving the mixture that lovely pink hue and fresh berry flavor. This step really makes this a memorable cake and dessert.
Step 9: Whip And Fold In Cream
In a separate, clean bowl, whip your heavy cream until stiff peaks form. Then, gently fold this whipped cream into your strawberry cheesecake mixture. Do it slowly and carefully to keep that light and fluffy texture. This is what makes the filling so irresistible.
Step 10: Assemble Your Cake
Once the red velvet cake is completely cool, carefully remove it from the springform pan. Place it onto your favorite serving dish. Now for the fun part: spread that luscious strawberry cheesecake filling evenly over the top of the cake base. This is where your cake on a plate starts to look like a masterpiece.
Step 11: Chill Until Set
This is a critical step, folks! Place your assembled cheesecake cake in the refrigerator and chill it for at least 4 hours, or even better, overnight. This allows the filling to set properly, making for clean slices and a truly firm, delightful texture. You want that perfect desert cake consistency.
Step 12: Garnish And Serve
Before you serve your amazing creation, garnish it with fresh strawberry halves on top. If you are feeling extra fancy, a dollop of whipped cream adds an extra touch of decadence. Slice, serve, and enjoy your incredible homemade cake and sweets!


How To Store Leftovers
Got some of this wonderful cake left over? Lucky you! To keep it fresh and tasting its best, cover the leftover cake tightly with plastic wrap or place it in an airtight container. Store it in the refrigerator. It will stay fresh and yummy for up to 3 to 4 days.
Because of the cream cheese filling, it is really important to keep this cake chilled. Do not leave it out at room temperature for too long, especially on a warm day. You want to preserve that amazing texture and flavor for as long as possible. A little planning means more tasty sweets later!
Tips
Want to make your Red Velvet Cheesecake cake even better? Here are a few handy tips. Make sure your cream cheese, buttermilk, and eggs are at room temperature. This helps them combine smoothly, preventing lumps in your batter and filling. It is a small step that makes a big difference.
When you are folding in the whipped cream into the cheesecake mixture, be super gentle. You do not want to deflate all that lovely air you just whipped in. A light hand will ensure your filling stays light and fluffy, just like it should be for a perfect desert cake.
For a deeper red color in your cake, you can use gel food coloring instead of liquid. It is more concentrated, so you might need a little less. Always start with a smaller amount and add more until you get the vibrant hue you are looking for. It is all about personal preference for your cake baking ideas.
If you do not have buttermilk on hand, do not fret! You can easily make your own. Just add 1 tablespoon of white vinegar or lemon juice to a measuring cup, then fill the rest of the cup with regular milk until it reaches 1 cup. Let it sit for 5 to 10 minutes until it slightly curdles. Voila, homemade buttermilk!
Feeling adventurous? You can play around with the fruit in the cheesecake filling. Instead of strawberries, try pureed raspberries or even blueberries for a different flavor profile. This cake is super versatile, so feel free to experiment and make it your own signature cake and sweets creation.
Always make sure your red velvet cake base is completely cool before adding the cheesecake filling. If the cake is still warm, it will melt the filling, and you will end up with a mess instead of a beautifully layered dessert cake. Patience truly is a virtue in baking!
Conclusion
There you have it, folks! A truly amazing Red Velvet Cheesecake cake recipe that is bound to become a new favorite in your kitchen. It is the kind of cake that makes you feel like a baking superstar, even if you are just starting out. This recipe proves that making delicious dessert cake does not have to be intimidating.
Whether you are celebrating a special occasion, hosting a get together, or just craving some seriously tasty sweets, this cake delivers on all fronts. It is simple, it is scrumptious, and it is sure to bring smiles to everyone who tries a slice. So go ahead, give it a whirl. Happy baking, and enjoy every single bite of your homemade cake and pastries!
FAQ
Can I Make This Cake Gluten Free?
Yes, you absolutely can! You can substitute the all purpose flour in the red velvet cake base with a good quality gluten free all purpose flour blend. Just make sure your blend contains xanthan gum, or add about ½ teaspoon if it does not, to help with the cake‘s structure. The cheesecake filling is naturally gluten free.
How Do I Prevent My Cake From Sticking To The Pan?
To prevent your cake from sticking, make sure to grease your springform pan thoroughly with butter or baking spray. Then, line the bottom with a circle of parchment paper. This double method provides the best insurance for an easy release, ensuring your beautiful cake on a plate looks perfect.
Can I Freeze This Cake?
Yes, you can freeze this Red Velvet Cheesecake cake. For best results, freeze it without the fresh strawberry garnish. Wrap individual slices or the whole cake tightly in plastic wrap, then an additional layer of aluminum foil. It can be frozen for up to 1 month. Thaw in the refrigerator before serving. This is a great tip for your cake baking ideas.
What If My Cheesecake Filling Is Too Runny?
If your cheesecake filling seems too runny, it might be due to overmixing or not chilling long enough. Ensure your cream cheese is softened but not warm. Also, make sure your heavy cream is whipped to stiff peaks. The most important step is to chill the assembled cake for the full recommended time, at least 4 hours, to allow it to firm up properly.
Red Velvet Cheesecake Cake
Imagine a moist, vibrant red velvet cake base topped with a creamy, dreamy strawberry cheesecake filling. It’s a match made in heaven, offering a delightful twist on classic cake and dessert pairings. This recipe is your ticket to creating truly tasty sweets without breaking a sweat or the bank. It’s simple, scrumptious, and perfect for any occasion.
Requirements


Ingredients
Instructions
- Preheat your oven to 350°F (175°C). Grease a 9 inch springform pan really well and line the bottom with parchment paper.
- In a large mixing bowl, sift together all purpose flour, granulated sugar, baking powder, baking soda, salt, and cocoa powder. Whisk to combine.
- In a separate bowl, whisk together vegetable oil, room temperature buttermilk, eggs, red food coloring, vanilla extract, and white vinegar until smooth and vibrant.
- Slowly add dry ingredients to the wet mixture. Stir gently until just combined, being careful not to overmix.
- Pour the red velvet batter into the prepared springform pan. Use a spatula to gently smooth the top for even baking.
- Bake for 25 to 30 minutes, or until a toothpick inserted into the center comes out clean. Let the cake cool completely in the pan.
- While the cake cools, beat the softened cream cheese in a large mixing bowl until smooth. Gradually add powdered sugar and vanilla extract, mixing until fully incorporated.
- Stir in the pureed fresh strawberries until well combined, creating a lovely pink hue and berry flavor.
- In a separate, clean bowl, whip heavy cream until stiff peaks form. Gently fold this whipped cream into the strawberry cheesecake mixture to maintain a light, fluffy texture.
- Once the red velvet cake is completely cool, carefully remove it from the springform pan and place it on a serving dish. Spread the strawberry cheesecake filling evenly over the cake base.
- Place the assembled cheesecake cake in the refrigerator and chill for at least 4 hours, or even better, overnight, to allow the filling to set properly.
- Before serving, garnish with fresh strawberry halves. A dollop of whipped cream is optional. Slice, serve, and enjoy!
Notes
Make sure your cream cheese, buttermilk, and eggs are at room temperature for smooth combining and to prevent lumps.
Gently fold in the whipped cream to keep the cheesecake filling light and fluffy.
For a deeper red color, use gel food coloring instead of liquid. Start with a smaller amount and add more as needed.
If you don’t have buttermilk, make your own by adding 1 tablespoon of white vinegar or lemon juice to a measuring cup, then filling the rest with regular milk to 1 cup. Let sit for 5-10 minutes.
Experiment with other pureed fruits like raspberries or blueberries in the cheesecake filling.
Ensure the red velvet cake base is completely cool before adding the cheesecake filling to prevent melting.
Nutrition
Calories
Sugar
Fat
Carbs