Have you ever spent hours preparing a holiday turkey, only for it to come out a little dry? It’s a common story. We’ve all been there, hoping for that picture perfect centerpiece. The good news is there’s a much better way to get incredible results without all the stress.
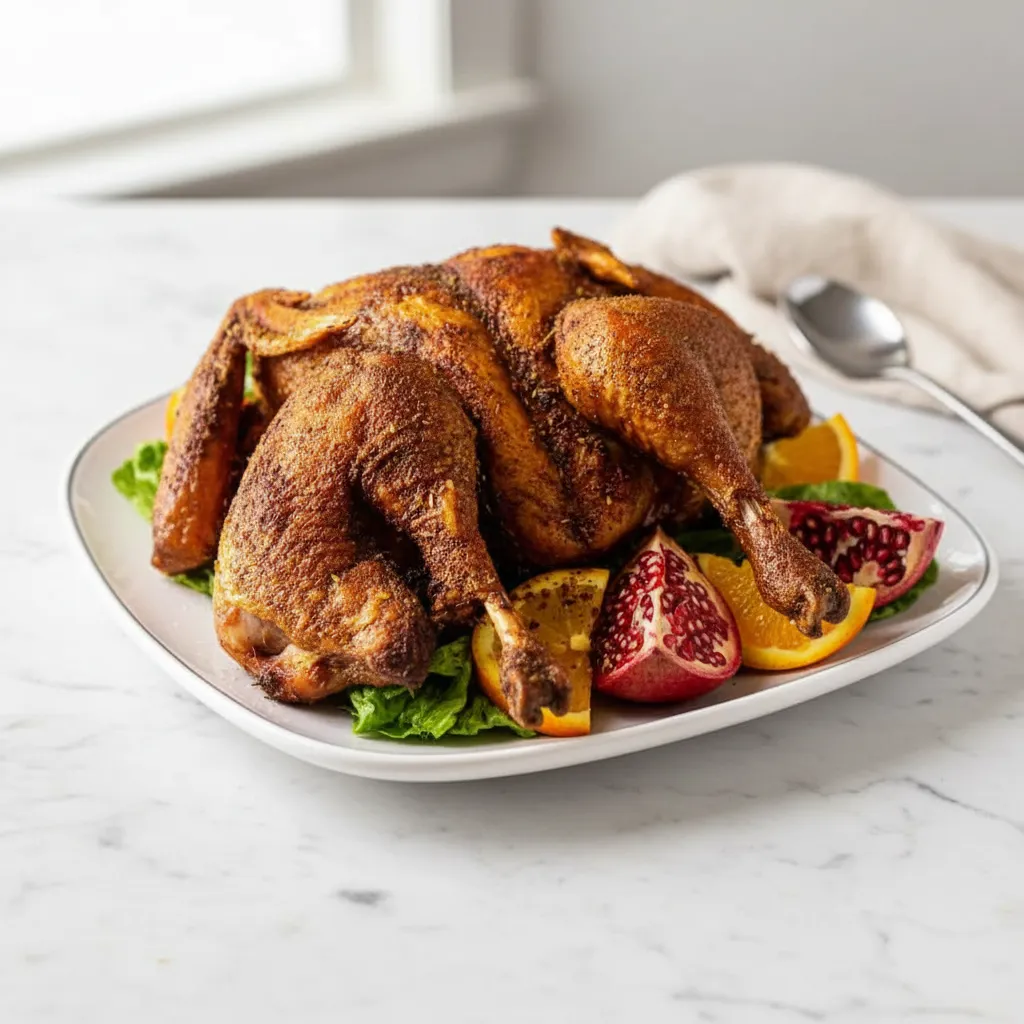
Let me introduce you to the magic of the Smoked Spatchcock Turkey. By removing the backbone and flattening the bird, you get a turkey that cooks faster and much more evenly. The result is exceptionally juicy meat and crispy skin all over. It’s a total game changer for your family gatherings.
Jump To:
Why You’ll Love This Recipe
Honestly, once you try a Smoked Spatchcock Turkey, you might never go back to the old way. The biggest win is how evenly everything cooks. You know how the breast meat can dry out while you wait for the thighs to finish? That problem completely disappears with this method.
Every single bite is tender and moist. Seriously.
Another huge plus is the skin. Oh, the skin! Because the turkey is flat, almost all the skin is exposed to that wonderful smoky heat. This creates an unbelievably crispy, golden brown exterior that is just so delicious. It’s the part everyone fights over at the dinner table.
Let’s talk about time, too. A traditional turkey can take what feels like forever to cook. This method significantly cuts down on the cooking time. You get to spend less time watching the smoker and more time with your family and friends. That’s a win in my book.
The flavor is also just out of this world. The smoke really gets a chance to penetrate the meat, giving it a deep, savory taste that you just can’t get from an oven alone. It complements the simple yet powerful dry rub in the best way possible.
And it looks amazing! A Smoked Spatchcock Turkey has a rustic, impressive look when you bring it to the table. It’s a fantastic centerpiece for any holiday or special occasion. It just screams celebration and good food.
Ingredients
For this recipe, we are using a simple dry brine and a classic herb and spice rub. These ingredients come together to create a beautifully seasoned bird that lets the smoke flavor shine. Here is what you will need.
- 10 to 15 pound whole turkey, giblets and neck removed, fully thawed
- 3 to 4 tablespoons kosher salt
- 1 tablespoon packed brown sugar
- 1 tablespoon smoked paprika
- 2 teaspoons black pepper
- 2 teaspoons garlic powder
- 2 teaspoons onion powder
- 2 teaspoons dried sage
- 1 teaspoon dried thyme
- 1 teaspoon dried rosemary
- Olive oil
Step By Step Instructions
Following these steps will give you a fantastic Smoked Spatchcock Turkey. It might seem like a lot, but each step is straightforward. Let’s get started!
Step 1: Dry Brine For Flavor And Moisture
First things first, make sure your turkey is completely thawed. This is super important for food safety and even cooking. Pat the turkey completely dry with paper towels. You want the skin as dry as possible.
Now, rub the kosher salt all over the entire bird. Get it into every little nook and cranny. Place the salted turkey on a large sheet pan and put it in the refrigerator, uncovered. Let it sit there for 24 to 48 hours.
This is called dry brining. It draws moisture out of the skin, making it extra crispy later. It also helps the meat retain moisture during cooking, ensuring a juicy result. Don’t wipe off the salt when it’s done.
Step 2: How To Spatchcock The Turkey
Now for the fun part. Take the turkey out of the fridge. Flip it over so the breast side is facing down. You should see the backbone running down the middle.
You will need a good, sturdy pair of kitchen shears for this. Starting at the tail end, cut along one side of the backbone all the way to the neck. Then, do the same thing on the other side of the backbone.
Once you’ve made both cuts, you can remove the backbone completely. Don’t throw it away! You can save it to make a delicious turkey stock later.
Flip the turkey back over so the breast side is up. Place the heel of your hands on the center of the breast bone. Push down firmly until you hear a crack. This flattens the bird, and that’s it! You have successfully spatchcocked a turkey.
Step 3: Prepare The Smoker And The Rub
It’s time to get your smoker ready. You’ll want to preheat it to 225 degrees F. While it’s heating up, you can mix together your dry rub. In a small bowl, combine the brown sugar, smoked paprika, black pepper, garlic powder, onion powder, sage, thyme, and rosemary.
Stir everything together until it’s well combined. Rub this glorious mixture all over the turkey. Make sure you get it on every part of the skin. For extra flavor, gently lift the skin over the breast and thighs and rub some of the spices directly onto the meat.
Step 4: The Initial Low And Slow Smoke
Once your smoker is at temperature, it’s time to cook. Place the turkey directly on the smoker grate with the breast side up. It’s a good idea to position the thighs closest to the main heat source, as they can handle more heat.
If you’re making a Pit Boss Smoked Turkey, this method works beautifully. Insert a leave in meat thermometer into the thickest part of the breast. Be careful not to touch any bone, as that can give you an inaccurate reading.
Close the lid and let it smoke. You’re looking for an internal temperature of 130 degrees F. This will take about three to four hours, depending on the size of your turkey and your specific smoker.
Step 5: Crank The Heat For Crispy Skin
When the turkey hits 130 degrees F, carefully remove it from the smoker. Now, crank up the smoker’s heat to 400 degrees F. While it’s getting hotter, generously brush the entire surface of the turkey skin with olive oil. This is the key to getting that super crispy finish.
Reinsert the meat thermometer into the breast. Place the turkey back in the hot smoker. Continue to cook until the breast meat reaches an internal temperature between 157 and 160 degrees F. This should take another 45 minutes to an hour and a half.
Step 6: The All Important Rest
Once the turkey is at the right temperature, take it out of the smoker. Place it on a large cutting board. Loosely tent it with a piece of aluminum foil. Now, you have to let it rest for 30 to 45 minutes. I know it’s tempting to cut into it right away, but don’t do it!
Resting is critical. During this time, the juices inside the turkey will redistribute throughout the meat. If you skip this step, all that delicious moisture will run out onto your cutting board. Resting also allows for carryover cooking. The internal temperature will continue to rise to the safe temperature of 165 degrees F.
Step 7: Carve And Enjoy Your Masterpiece
After the rest, it’s finally time to enjoy your amazing Smoked Spatchcock Turkey. Carving is much easier with a flattened bird. You can easily remove the legs and thighs first, then the wings. After that, you can slice the breast meat directly off the bone. Serve it up and get ready for the compliments to roll in.


How To Store Leftovers
If you happen to have any leftovers, storing them is simple. First, let the turkey cool down completely. Then, carve the remaining meat off the bones and place it in an airtight container or a resealable plastic bag.
You can store the leftover turkey in the refrigerator for three to four days. It’s great for sandwiches, salads, or just reheating for a quick meal. For longer storage, you can freeze it. It will stay good in the freezer for up to six months.
When you’re ready to use the frozen turkey, just thaw it in the refrigerator overnight. This ensures it stays safe and tasty. Leftover turkey is one of the best parts of a big feast!
Tips
Here are a few extra tips to help you make the absolute best Smoked Spatchcock Turkey on your first try. Thawing is key. Make sure your turkey is fully thawed before you begin. A large turkey can take several days to thaw in the refrigerator.
Invest in a good pair of kitchen shears. They will make the process of removing the backbone so much easier. A sharp knife can work in a pinch, but shears are safer and more effective for this task.
Always cook to temperature, not to time. Every turkey and every smoker is different. A reliable meat thermometer is your best friend for getting juicy, perfectly cooked meat every time.
Feel free to experiment with different wood chips or pellets for smoking. Apple and cherry wood lend a milder, sweeter flavor that is fantastic with poultry. Hickory or mesquite will give you a stronger, more traditional smoke flavor.
This technique is also great for chicken. A Smoked Spatchcock Chicken is a wonderful weeknight meal and cooks even faster. The principles are exactly the same.
If you don’t own a smoker, you can still use this method. A Spatchcock Turkey Oven recipe follows similar temperature guidelines. You won’t get the smoke flavor, but you will still get juicy meat and a faster cooking time.
Conclusion
Making a Smoked Spatchcock Turkey is a truly rewarding experience. It transforms the classic holiday bird into something extra special. You get flavorful, moist meat, crispy skin, and a much faster cooking process. What’s not to love?
It may seem a little different at first, but this method is very beginner friendly. Once you try it, I’m confident it will become your new favorite way to prepare turkey for any occasion. So go ahead, give it a try and wow your guests!
FAQ
What Size Turkey Should I Use?
This recipe works well for a 10 to 15 pound turkey. As a general rule, you can expect a 10 pound turkey to feed about eight people. A 15 pound turkey will serve around twelve people. Remember to increase the amount of dry rub if you are using a larger bird.
Can I Use A Different Spice Rub?
Absolutely! The provided rub is a classic and delicious choice, but feel free to get creative. You could add some cayenne for a little heat or use other herbs like marjoram or tarragon. You can also use your favorite store bought poultry seasoning to save time.
What If I Don’t Have A Smoker?
No problem at all. You can achieve great results in your oven. Simply follow the same preparation and spatchcocking steps. For a Spatchcock Turkey Oven recipe, roast it at a consistent high temperature, around 400 degrees F, until it reaches the correct internal temperature. You will miss the smoke flavor but still get juicy meat.
Do I Have To Dry Brine It?
While you can skip the dry brine if you are short on time, I highly recommend it. The 24 to 48 hour dry brine makes a huge difference in the final texture of the skin and the juiciness of the meat. It’s a simple step that really pays off in the end.
Is Spatchcocking Hard To Do?
It might look intimidating, but it’s easier than you think. The main thing you need is a good pair of kitchen shears. Cutting through the small bones alongside the backbone requires a bit of muscle, but it is a very manageable task for the home cook. Just take your time.
Smoked Spatchcock Turkey
Learn how to make a Smoked Spatchcock Turkey for a faster, more evenly cooked bird with incredibly juicy meat and crispy skin. This method is a straightforward way to get great results for any holiday or family gathering.
Requirements


Ingredients
Instructions
- Pat the turkey completely dry with paper towels. Rub the kosher salt all over the turkey. Place it on a sheet pan in the refrigerator, uncovered, for 24 to 48 hours to dry brine.
- Place the turkey breast-side down. Using sturdy kitchen shears, cut along both sides of the backbone to remove it. Flip the turkey over and press down firmly on the breastbone to flatten the bird.
- Preheat your smoker to 225°F. In a small bowl, combine the brown sugar, smoked paprika, black pepper, garlic powder, onion powder, sage, thyme, and rosemary. Rub this mixture all over the turkey, including under the skin.
- Place the turkey on the smoker grate, breast-side up. Insert a meat thermometer into the thickest part of the breast. Smoke until the internal temperature reaches 130°F, which takes about 3 to 4 hours.
- Remove the turkey from the smoker and increase the heat to 400°F. Brush the entire turkey skin with olive oil.
- Return the turkey to the smoker. Cook until the breast meat reaches an internal temperature of 157-160°F, which should take another 45 to 90 minutes.
- Remove the turkey and place it on a large cutting board. Tent loosely with aluminum foil and let it rest for 30 to 45 minutes. The internal temperature will continue to rise to a safe 165°F. Carve and serve.
Notes
A good pair of kitchen shears is highly recommended for spatchcocking the turkey. It makes removing the backbone much easier and safer.
Always cook to temperature, not time. A reliable meat thermometer is essential for ensuring the turkey is cooked safely and remains juicy.
Don’t skip the resting step! It is critical for allowing the juices to redistribute throughout the meat, ensuring a moist final product.
Feel free to experiment with different wood chips or pellets. Apple or cherry wood provides a mild, sweet smoke that is wonderful with poultry.
Nutrition
Calories
Sugar
Fat
Carbs