Have you ever needed a sweet treat right now? I mean, a dessert that doesn’t require turning on the oven or using a ton of complicated ingredients. That’s exactly where this recipe comes in. It’s a lifesaver!
This Easy Cool Whip Candy is one of those wonderfully simple creations that feels like a sweet little secret. It’s creamy, it’s chocolatey, and it comes together with almost no effort. It’s one of my favorite Cool Whip Desserts Easy to make when a craving hits.
Jump To:
Why You’ll Love This Recipe
So, what makes this Easy Cool Whip Candy so special? Honestly, it’s the simplicity. You only need three ingredients to make a batch of these delightful little squares. Three! It doesn’t get much easier than that.
It’s also a completely no bake recipe. This is a huge win during warmer months or when you just don’t want to heat up the kitchen. This makes it one of the best Cool Whip Recipes Easy for any time of year.
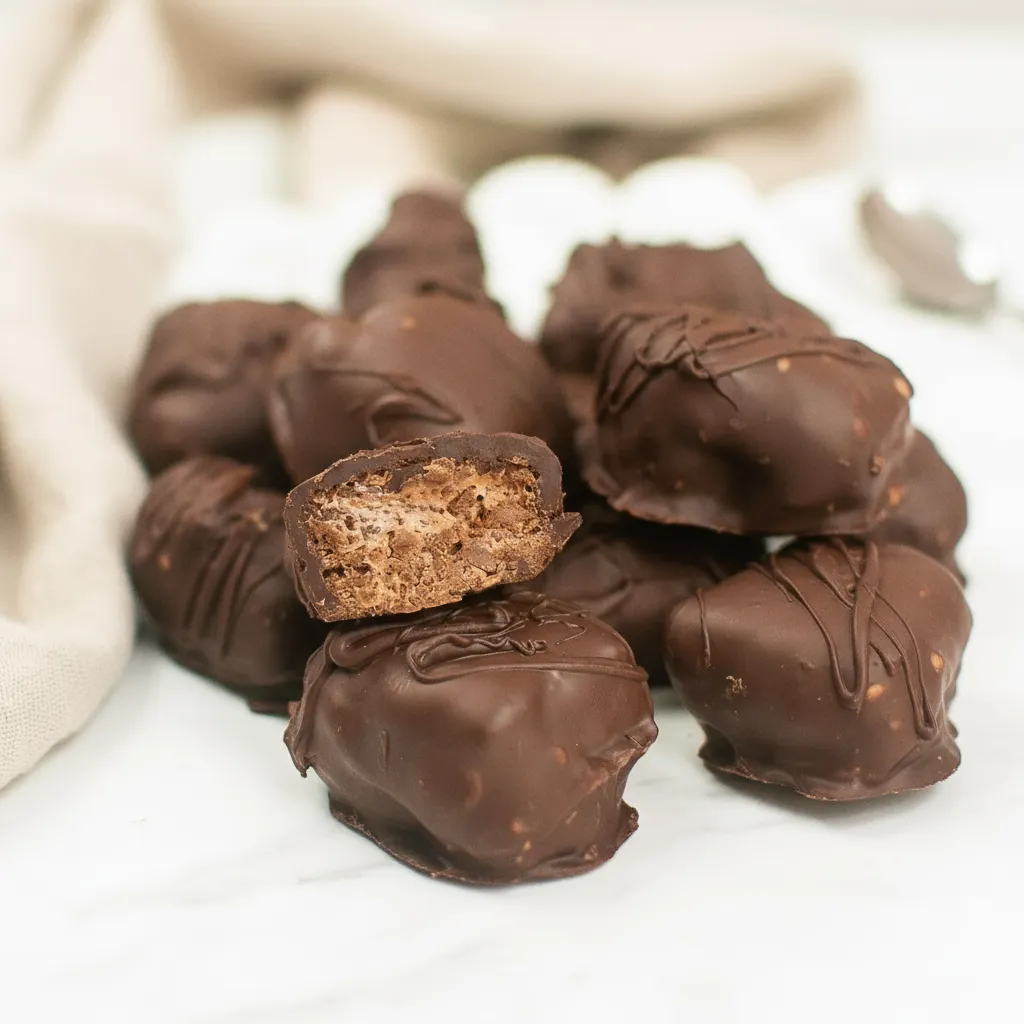
The texture is just fantastic. You get this soft, fluffy, almost mousse like center from the Cool Whip and chocolate mixture. Then it’s coated in a snappy layer of semi sweet chocolate. It’s a really satisfying combination.
This is a great recipe for beginners or for making with kids. The steps are straightforward, and the result is super rewarding. It feels like you’re making fancy candy, but it’s practically foolproof.
It’s also incredibly versatile. You can cut the pieces as big or as small as you like. They make a great addition to a holiday dessert tray or just a simple after dinner treat. These are true Fluff Desserts Cool Whip style.
Ingredients
As I mentioned, the ingredient list is beautifully short. You probably have most of what you need already! Here’s the simple rundown of what you’ll grab from the store.
- 2 cups milk chocolate chips
- 2 cups semi sweet chocolate chips
- 4 ounces Cool Whip whipped topping, thawed (about half of a standard tub)
That’s it! Just three basic ingredients stand between you and a batch of this amazing Easy Cool Whip Candy. It’s one of the simplest Cool Whip Desserts Easy you will ever find.
Step-By-Step Instructions
Ready to see how it all comes together? Let’s walk through the process. I promise it’s just as simple as it sounds. We’ll have you enjoying your homemade candy in no time at all.
Step 1: Melt The Milk Chocolate
First things first, let’s get our filling started. Grab a microwave safe bowl and add your two cups of milk chocolate chips. Pop them into the microwave for about 45 seconds.
After that first zap, give them a good stir. They won’t be fully melted yet. Continue to microwave them in 20 second bursts, stirring after each one, until the chocolate is completely smooth.
Now for a very important small step. Let the melted chocolate cool on the counter for about 10 minutes. If it’s too hot, it will melt the Cool Whip, and we don’t want that!
Step 2: Combine Chocolate And Cool Whip
Once your chocolate has cooled down a bit, it’s time to mix. In a separate mixing bowl, combine the thawed Cool Whip with the melted milk chocolate. It’s the start of our Easy Cool Whip Candy filling.
Use a sturdy wooden spoon or a firm rubber spatula for this part. The mixture will be thick. Fold and stir the ingredients together until they are fully combined. Don’t worry if there are a few little chunks.
You can keep mixing until it’s super smooth or leave it slightly lumpy for a bit of texture. It’s totally up to you. Once it looks good, pour the mixture into a dish lined with parchment paper.
Press it out into an even layer. You can decide how thick you want your candy to be. A standard 8×8 inch dish usually works great for this amount of filling.
Step 3: Freeze The Filling
Now for the easiest part of all. Take the dish with your filling and place it flat in the freezer. Let it chill for at least 20 minutes. This will firm it up enough so we can cut it into clean pieces.
You want it to be solid but not frozen like a rock. This short time in the freezer is key to making the next steps much, much easier. It’s a simple trick for great Fluff Desserts Cool Whip.
Step 4: Cut The Candy Centers
After 20 minutes, take the dish out of the freezer. Using the parchment paper, carefully lift the entire slab of filling out of the dish and place it on a cutting board. It should come out in one piece.
Use a sharp knife to cut the filling into 16 equal squares. You can make them smaller or larger if you prefer, but 16 pieces is a good starting point for a nice bite sized candy.
Step 5: Melt The Coating Chocolate
It’s time for the delicious outer shell. Place your two cups of semi sweet chocolate chips into another clean, microwave safe bowl. Melt them the same way you did the milk chocolate chips.
Start with 45 seconds, stir, and then continue in 20 second intervals until it’s perfectly smooth and glossy. This will be the coating for our fantastic candy.
Step 6: Dip And Drizzle
Now for the fun part! Set up a dipping station. Have your bowl of melted semi sweet chocolate, your cut filling pieces, and a baking sheet lined with fresh parchment paper ready to go.
Using a fork, dip each square of filling into the melted chocolate. Turn it over to coat it completely. Lift it out with the fork and let any excess chocolate drip back into the bowl.
Carefully place the chocolate coated piece onto your prepared parchment paper. Repeat this process with all the remaining squares. Working quickly helps here, as the filling can start to soften.
Once all the pieces are dipped, you can take any leftover melted chocolate and drizzle it over the tops of the candies for a pretty, decorative finish. Let the chocolate set completely before serving. The Easy Cool Whip Candy is almost ready!


How To Store Leftovers
Because this candy is made with Cool Whip, it needs to stay cold. Store any leftovers in an airtight container in the refrigerator. They will stay fresh and delicious for up to a week.
If you want to keep them for longer, you can also store them in the freezer. Just place them in a freezer safe container or bag. They will last for about a month. Let them sit out for a few minutes before eating from frozen.
Tips
Want to make your Easy Cool Whip Candy even better? Here are a few little tips and tricks I’ve learned along the way. These will help you get great results every single time.
For a smoother chocolate coating, you can add a tiny bit of coconut oil or shortening to your semi sweet chocolate chips before melting. This helps the chocolate become a bit thinner and easier to work with.
Feel free to get creative with flavors! Add a drop of peppermint extract to the filling for a mint chocolate vibe. Or try a bit of vanilla or almond extract. This is one of those Cool Whip Recipes Easy to customize.
You can also play with toppings. Before the chocolate drizzle sets, sprinkle on some chopped nuts, colorful sprinkles, or a pinch of sea salt. This adds a nice crunch and a pop of color.
Some people have even made a version of Cool Whip Candy With Pudding mix. Try adding a tablespoon or two of dry chocolate pudding mix to the filling for an even richer, more stable center.
Conclusion
And there you have it! A super simple, incredibly tasty recipe for Easy Cool Whip Candy. It’s proof that you don’t need a long list of ingredients or a lot of time to make something truly special.
This is one of my favorite Cool Whip Desserts Easy to whip up for a last minute gathering or just a quiet night at home. I really hope you give this recipe a try and love it as much as I do.
Let me know how yours turns out! I always love to hear about your kitchen adventures. Happy candy making!
FAQ
Can I Use A Different Type Of Chocolate?
Absolutely! Feel free to switch things up. You can use dark chocolate, white chocolate, or even peanut butter chips for the filling or the coating. It’s a great way to customize your Easy Cool Whip Candy.
Does This Candy Need To Be Refrigerated?
Yes, it’s very important to keep this candy in the refrigerator. The filling is made with Cool Whip, which needs to be kept cold to maintain its texture and for food safety. Always store it in an airtight container in the fridge.
How Long Does It Take To Make?
The hands on time is very short, only about 15 to 20 minutes. You will also need about 20 minutes for the filling to set in the freezer and some additional time for the chocolate coating to harden.
Can I Add Mix Ins To The Filling?
You sure can. Finely chopped nuts, mini chocolate chips, or crushed cookies would be wonderful additions to the filling. Just gently fold them in when you combine the Cool Whip and melted chocolate. This is what makes Fluff Desserts Cool Whip so fun.
Easy Cool Whip Candy
This Easy Cool Whip Candy is a wonderfully simple creation that feels like a sweet secret. It’s creamy, chocolatey, and comes together with almost no effort, making it a perfect no-bake treat.
Requirements


Ingredients
Instructions
- In a microwave safe bowl, melt two cups of milk chocolate chips in 45-second bursts, stirring until smooth. Let cool for 10 minutes.
- In a separate mixing bowl, combine the thawed Cool Whip with the cooled milk chocolate using a wooden spoon or rubber spatula. Pour into an 8×8 inch dish lined with parchment paper and spread into an even layer.
- Place the dish in the freezer for at least 20 minutes until firm, but not frozen solid.
- Lift the frozen slab from the dish using the parchment paper. Use a sharp knife to cut into 16 equal squares.
- In another microwave safe bowl, melt two cups of semi sweet chocolate chips in 45-second bursts, stirring until smooth and glossy.
- Set up a dipping station with melted semi sweet chocolate, cut filling pieces, and a baking sheet lined with fresh parchment paper. Dip each square using a fork, letting excess chocolate drip off. Place on parchment paper. Drizzle any leftover chocolate over the candies for decoration. Let set completely before serving.
Notes
Taste the base before freezing and adjust sweetener if needed. Frozen desserts tastes less sweet, so aim for slightly sweeter than you prefer.
Do not fill the pint past the max fill line, as the mixture will expand during freezing and processing.
A full 24-hour freeze is essential for the best, creamiest texture. Rushing this step can result in an icy or soupy consistency.
Feel free to experiment with other flavors like vanilla protein with frozen berries or adding mint extract for a mint-chip version.
Nutrition
Calories
Sugar
Fat
Carbs