There is something incredibly nostalgic and exciting about cutting into a cake that looks like it came straight out of a fairy tale. We have all seen the rise of the vintage, coquette style bakery trends taking over our social feeds. That specific Birthday Cake Aesthetic is defined by pastel colors, over the top piping, and a sense of whimsy that makes any celebration feel magical. Whether you are planning a surprise for a friend or looking for the perfect 18Th Birthday Cake, mastering this look at home is easier than you might think.
You do not need to be a professional pastry chef to create Pretty Birthday Cakes that wow your guests. This recipe focuses on achieving that classic bakery flavor with a visual style that screams fun. The secret lies in the balance of a tender, moist crumb and a stable cream cheese frosting that holds those intricate piping details perfectly. If you have been hunting for Birthday Cake Ideas that stand out from the usual grocery store sheet cakes, you have found the right place.
Jump To:
Why You’ll Love This Recipe
- Trendy Visuals: This recipe captures that popular Birthday Cake Aesthetic with its pink layers and vintage piping style, making it totally Instagram worthy.
- Beginner Friendly: Despite looking fancy, the instructions are broken down simply so anyone can achieve great results without stress.
- Incredible Texture: The combination of butter and oil ensures the cake stays moist for days while retaining a fluffy structure.
- Stable Frosting: The cream cheese frosting is specially balanced to be firm enough for piping those retro swoops and borders.
- Budget Conscious: You get a high end bakery look for a fraction of the price using standard pantry staples.
Ingredients
To nail this Birthday Cake Aesthetic, you need the right foundation. Here is what you need to gather before you start baking.
For the Cake Layers
- ¾ cup unsalted butter (softened)
- ½ cup vegetable oil
- 1 ½ cups granulated sugar
- ¼ teaspoon sea salt
- 6 large egg whites (room temperature)
- 1 tablespoon pure vanilla extract
- 1 tablespoon vinegar (white or apple cider vinegar)
- ¼ teaspoon pink gel food coloring
- 3 cups cake flour (345g)
- 2 teaspoons baking powder
- ½ teaspoon baking soda
- 1 ¼ cup buttermilk (room temperature)
For the Cream Cheese Frosting
- 2 cups butter (softened)
- ¼ teaspoon sea salt
- 6 to 7 cups powdered sugar
- 8 oz cream cheese (softened for 10 minutes at room temperature)
- 1 tablespoon pure vanilla extract
- Pink gel food coloring
- Red gel food coloring
- Edible glitter spray (optional)
Step-By-Step Instructions
Creating Pretty Birthday Cakes is all about patience and following the process. Let us break this down so you can get that perfect bakery finish.
Step 1: Prepare the Pans and Batter Base
Start by preheating your oven to 355°F (180°C). You want to grease three 8 inch round baking pans with a little bit of cold butter. Line the bottoms with rounds of parchment paper to ensure the cakes come out perfectly smooth. In a large bowl or stand mixer, combine your softened butter, vegetable oil, granulated sugar, and sea salt. Beat this mixture with an electric mixer until it has lightened significantly in color and increased in volume. This step builds the structure for your Birthday Cake Aesthetic.
Step 2: Incorporate Eggs and Color
Scrape down the sides of your bowl. Add half of the egg whites and blend well, then add the rest of the egg whites and blend again. Continue beating until the mixture has increased in volume and looks thick. Add in the vanilla extract and vinegar, blending until combined. Now comes the fun part. Add the pink food coloring, just a pea sized amount at a time, until you reach your desired pink hue. Remember that the color will lighten slightly after adding the flour, so aim for a shade slightly darker than your final goal.
Step 3: Mix Dry and Wet Ingredients
Sift half of the cake flour, all of the baking powder, and all of the baking soda directly into the bowl with the batter. Add the buttermilk and use a whisk to gently fold everything together. Sift in the remaining flour and fold well with the whisk. You want to break up most of the lumps to create a mostly smooth batter, but be very careful not to overmix. Overmixing can ruin the tender texture we want for this Birthday Cake Aesthetic.
Step 4: Bake the Layers
Evenly divide the batter between your three greased and lined baking pans. Smooth the tops of the batter and gently tap the pans on the counter to release large air pockets. Bake for 15 to 18 minutes. You will know they are done when a toothpick inserted into the center comes out mostly clean with just a few crumbs attached.
Step 5: Cool and Trim
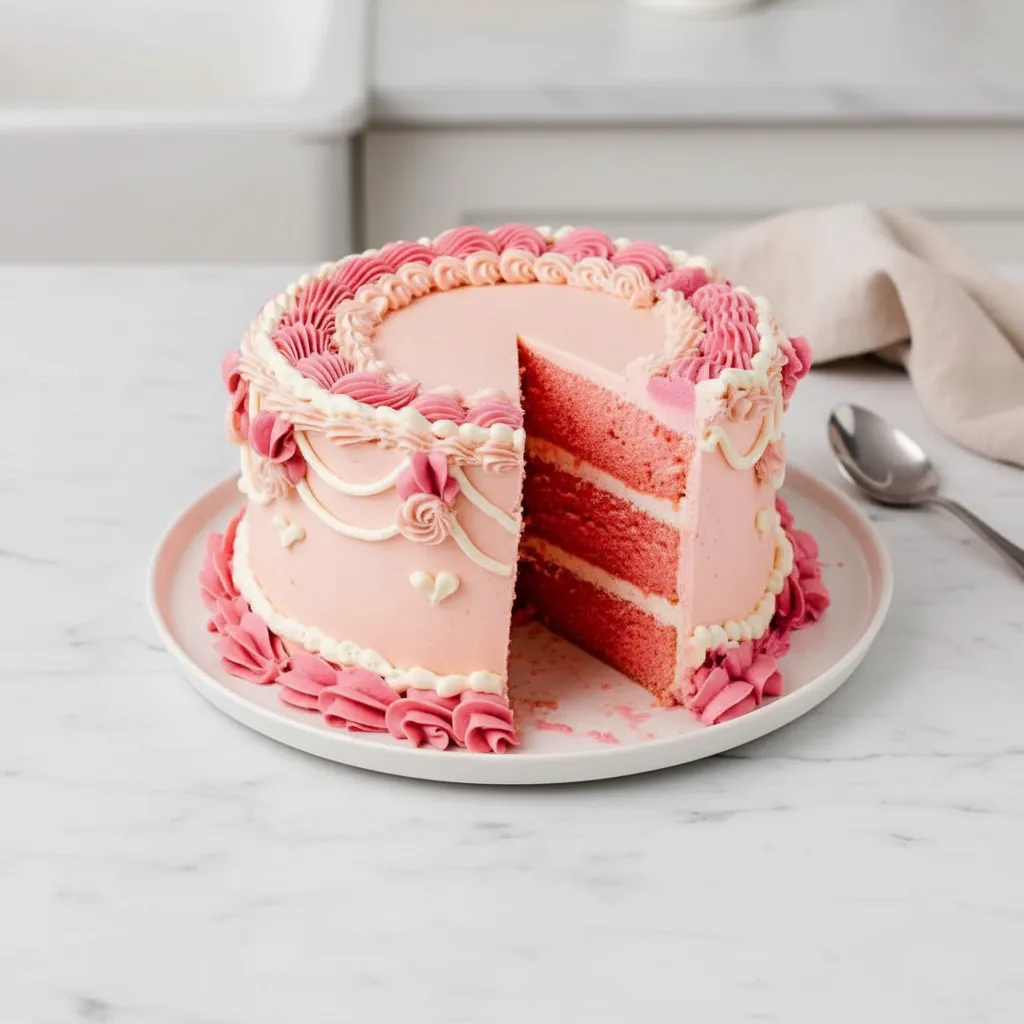
Remove the cakes from the oven and let the layers cool for 8 minutes inside the pans. Loosen the edges with a spatula and turn them out onto cooling racks to cool completely. Once cooled, use a serrated knife and a gentle sawing motion to trim the edges, top, and bottom of the layers. You only want to trim off the golden brown bits. This reveals the clean, pink interior that defines the modern Birthday Cake Aesthetic.
Step 6: Make the Frosting
In a large bowl or stand mixer, beat the butter with a paddle attachment until it is creamy and lightened in color. Add the salt and powdered sugar, one cup at a time. Beat well between each addition and scrape down the sides of the bowl frequently. Whip until the mixture is very creamy and light. Add pieces of cream cheese, blending well before adding the next piece. The frosting will become very light and fluffy. Finally, add the vanilla and beat again.
Step 7: Assemble the Cake
Smear a small dollop of frosting onto your serving plate or cake stand to secure the cake. Place the first layer down and spread about ⅓ cup of frosting in an even layer on top. Repeat this until the last layer is placed. Cover the stacked cake with a very thin layer of frosting all over the top and sides to create a crumb coat. Use a long metal spatula or cake scraper to help spread it. Pop the cake in the freezer for 10 minutes to set and lock in the crumbs.
Step 8: Decorate with Vintage Piping
While the crumb coat chills, divide your remaining frosting. Transfer about 1 cup of frosting into a medium bowl for white piping. Color the remaining bulk of the frosting a pale pink. Cover the cake with this pale pink frosting and smooth the sides and top. Set aside a third of the remaining pink frosting and add more red and pink coloring to the rest to create a darker pink. You should now have three piping bags: white, pale pink, and dark pink. Use a large open star tip (like a Wilton 1M) for the dark pink, a small open star tip for the pale pink, and a round tip (or just a cut bag) for the white. Pipe borders and swoops all along the edges and sides to achieve that maximalist Birthday Cake Aesthetic.


How To Store Leftovers
If you somehow have leftovers of this delicious cake, storing it correctly is key to maintaining that fresh taste. Because of the cream cheese in the frosting, this cake should be kept in the refrigerator. You can store it in an airtight cake carrier for up to 5 days. If you have already sliced it, press a piece of plastic wrap directly against the exposed cake crumb to prevent it from drying out.
For longer storage, you can freeze individual slices. Wrap each slice tightly in plastic wrap and then place them in a freezer safe bag or container. They will stay good for up to 2 months. When you are ready to eat, just let the slice thaw in the fridge overnight or on the counter for about 30 minutes. This ensures you can enjoy your 18Th Birthday Cake memories long after the party is over.
Tips
Achieving the perfect Birthday Cake Aesthetic requires a few insider tricks. Here is how to ensure success.
First, temperature matters immensely. Make sure your butter, eggs, and buttermilk are truly at room temperature. This creates an emulsion that traps air, resulting in a fluffy cake. If your ingredients are cold, the batter might curdle or bake unevenly.
When it comes to the color, go easy on the gel. It is very potent. You can always add more, but you cannot take it out. For that vintage look, soft pastels are usually better than neon brights. Also, do not skip the trimming step. Removing the browned edges is what makes the slice look professional and clean, which is a huge part of the Birthday Cake Aesthetic.
Finally, if your frosting feels too soft to pipe those intricate swoops, put the piping bag in the fridge for 5 to 10 minutes. The butter in the frosting needs to be cool enough to hold its shape. If it is too warm, your beautiful vintage piping will droop.
Conclusion
Making a cake that fits the trending Birthday Cake Aesthetic is a rewarding project that pays off in both taste and style. Whether you are baking an 18Th Birthday Cake for a milestone celebration or just testing out Birthday Cake Ideas for a fun weekend project, this recipe delivers on all fronts. The combination of moist, tender pink cake and rich, creamy frosting is timeless.
We hope you love making this recipe as much as you will love eating it. There is nothing quite like the satisfaction of slicing into a cake that looks this good and knowing you made it yourself. Do not forget to snap a few photos before you dig in, because Pretty Birthday Cakes like this deserve to be shared!
FAQ
Can I Make This Gluten Free?
Yes, you can swap the cake flour for a high quality gluten free 1 to 1 baking flour. Just keep in mind that the texture might be slightly denser than with traditional cake flour, but it will still be delicious.
Why Did My Cake Sink in the Middle?
This usually happens if the oven door was opened too early or if the batter was overmixed. Try to keep the oven door closed until the minimum baking time has passed to keep the heat consistent.
Can I Use All Butter Instead of Oil?
While you can, the oil is what keeps this cake moist for days. Using only butter might result in a cake that dries out faster, especially when stored in the fridge.
How Do I Get Super Smooth Sides?
A metal cake scraper and a turntable are your best friends here. Run the scraper around the side while spinning the table. dipping the scraper in hot water and wiping it dry before smoothing can also help melt the butter slightly for a glass like finish.
Vintage Birthday Cake Aesthetic
Create a stunning, trendy vintage-style birthday cake with moist pink layers and a stable cream cheese frosting perfect for intricate piping. A no-fuss, family-friendly recipe for a show-stopping dessert.
Requirements


Ingredients
For the Cake Layers
For the Cream Cheese Frosting
Instructions
- Preheat oven to 355°F (180°C). Grease three 8-inch round baking pans with cold butter and line bottoms with parchment paper. In a stand mixer, beat softened butter, oil, sugar, and salt until light and fluffy.
- Add egg whites in two batches, blending well after each. Beat until thick. Mix in vanilla extract, vinegar, and pink food coloring until desired shade is reached.
- Sift in half the cake flour, all baking powder, and baking soda. Add buttermilk and gently fold with a whisk. Sift in remaining flour and fold until mostly smooth, being careful not to overmix.
- Divide batter evenly between the three pans and smooth the tops. Bake for 15-18 minutes, or until a toothpick comes out with a few crumbs.
- Cool cakes in pans for 8 minutes, then turn out onto cooling racks to cool completely. Loosen the edges with a spatula. Once cool, use a serrated knife to trim the golden-brown tops, bottoms, and edges.
- For the frosting, beat butter in a stand mixer until creamy. Add salt and powdered sugar one cup at a time, beating well. Add cream cheese in pieces, blending until light and fluffy. Mix in vanilla.
- To assemble, place a dollop of frosting on a cake stand. Add the first layer, top with ⅓ cup frosting, and repeat. Apply a thin crumb coat over the entire cake and freeze for 10 minutes.
- Divide remaining frosting. Leave 1 cup white. Color the bulk pale pink and frost the cake. Darken a portion of the pink frosting for piping. Use various tips to pipe vintage borders and swoops.
Notes
Ensure butter, eggs, and buttermilk are at room temperature for a fluffy cake. This helps create a smooth batter.
Use gel food coloring sparingly; it’s very potent. You can always add more, but you can’t take it away.
If your frosting feels too soft for piping, chill the piping bag in the fridge for 5-10 minutes to firm it up.
Nutrition
Calories
Sugar
Fat
Carbs