There is something truly magical about the moment you carry a homemade birthday cake into a room filled with friends and family. The glowing candles and the look of pure joy on a loved ones face make all the effort in the kitchen feel worth it. You do not need to be a professional pastry chef to create something that looks like it came from a high end bakery. Honestly, some of the best memories are baked right in your own kitchen with simple tools and a lot of love.
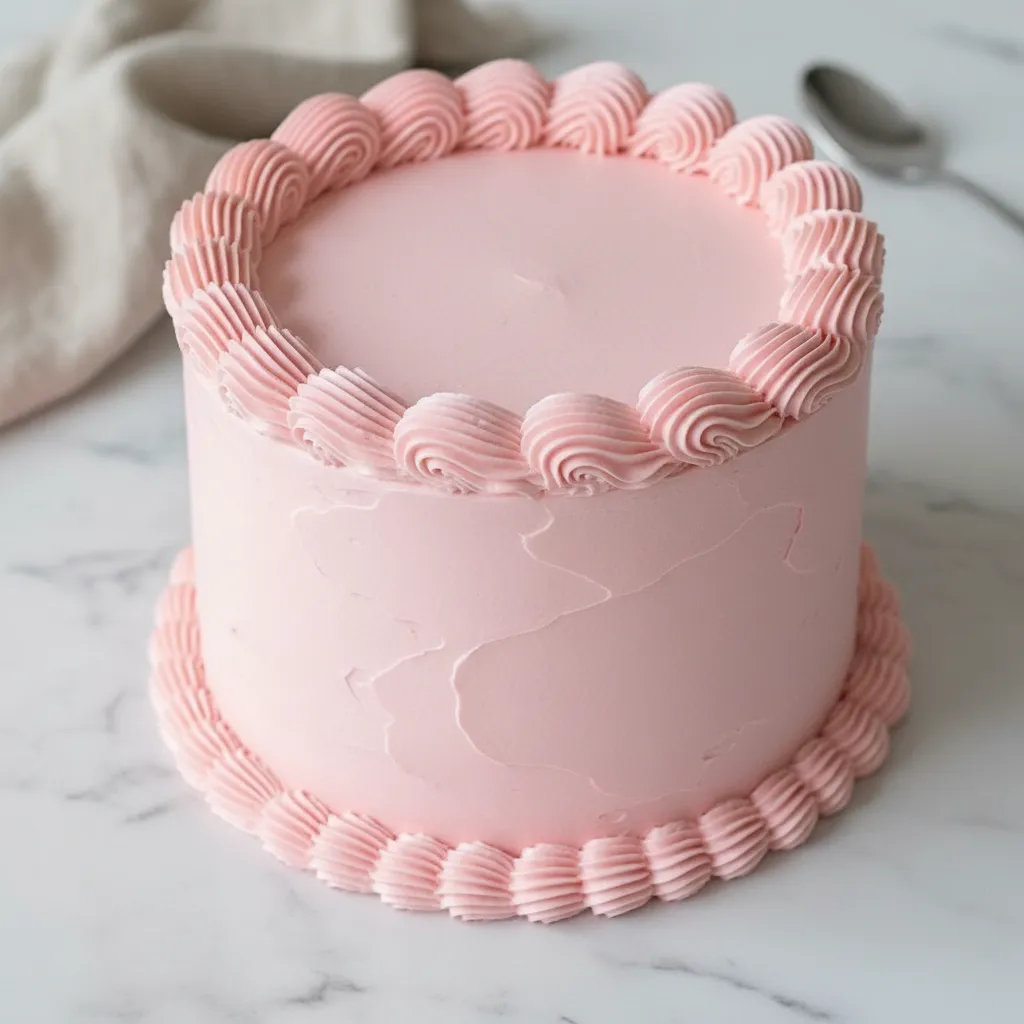
If you are looking for a way to make a Pink Icing Cake that stands out, you have come to the right place. This recipe is designed for the busy home cook who wants a reliable and delicious result every single time. We are going to take a standard mix and elevate it with a few clever additions to ensure it is moist and flavorful. Whether you are celebrating a first birthday or a milestone year, this cake is going to be the star of the show.
Jump To:
Why Youll Love This Recipe
You are going to absolutely adore this recipe because it strikes the perfect balance between convenience and that classic homemade taste. We all know that life gets busy, and sometimes we do not have hours to measure out every single dry ingredient from scratch. By starting with a quality box mix, you save time while still having the freedom to customize the flavor. This approach makes creating Cute Birthday Cakes Pink accessible for everyone, regardless of their skill level in the kitchen.
Another reason to love this specific Cake Design Pink is the texture. By adding unsweetened applesauce, we ensure the crumb is incredibly tender without making it greasy. It is a little secret that many home bakers swear by to get that professional feel. Plus, the buttercream frosting is rich, creamy, and easy to work with, allowing you to achieve that Bday Cakes Aesthetic Pink look that is so popular on social media right now.
This recipe is also very budget friendly. You do not need to go out and buy expensive specialty flours or rare extracts. Most of these items are likely already sitting in your pantry or fridge. It is about taking basic staples and turning them into Cute Cakes For Girls Birthday or any celebration that needs a touch of pink. The versatility here is endless, and you can easily adapt the colors or decorations to suit your specific party theme.
Finally, the cleanup is a breeze. Since we are using a simple mixing method, you wont find yourself facing a mountain of dirty dishes. It is a one bowl kind of vibe for the batter, which means more time spent celebrating and less time scrubbing the sink. For a busy parent or a beginner baker, that is a huge win. You get to enjoy the process of making Simple Girl Birthday Cakes without the usual stress that comes with complex baking projects.
Ingredients
Before we get started, make sure you have all your items ready on the counter. Having everything at room temperature, especially the eggs and butter, will help everything mix together smoothly and prevent any lumps in your Pink Icing Cake batter.
For The Cake Layers
- 1 box cake mix in vanilla or yellow flavor
- 1 and a half cups water
- 0.5 cup vegetable oil
- 3 large eggs
- 0.25 cup unsweetened applesauce
- 1 teaspoon vanilla extract
For The Buttercream Frosting
- 1 cup or 2 sticks unsalted butter softened
- 3 cups powdered sugar
- 0.25 cup milk
- 1 teaspoon vanilla extract
- Pink food coloring
Step By Step Instructions
Step 1: Prep The Oven And Pans
First things first, go ahead and preheat your oven to 350 degrees F. This ensures that as soon as your batter is ready, it can go straight into a hot environment to start rising. While the oven warms up, take two 8 inch round cake pans and grease them thoroughly. You can use butter or a nonstick cooking spray. I also like to add a light dusting of flour to the pans to make sure the birthday cake layers pop right out after baking without any sticking.
Step 2: Mix The Batter
In a large mixing bowl, combine your cake mix, water, vegetable oil, eggs, and that secret ingredient, the unsweetened applesauce. Use an electric hand mixer or a stand mixer on medium speed for about 2 minutes. You want to see the batter become smooth and slightly aerated. This is the foundation for your Cute Cake Designs Birthday project, so make sure there are no large dry pockets of flour hiding at the bottom of the bowl.
Step 3: Add Final Flavors
Once the main batter is smooth, stir in the vanilla extract. Using a good quality vanilla makes a world of difference in the final taste of your birthday cake. It gives it that warm, comforting aroma that everyone loves. Just a quick stir with a spatula is all you need here to distribute the flavor evenly throughout the mixture.
Step 4: Bake The Layers
Pour the batter evenly between your two prepared pans. If you want to be super precise, you can use a kitchen scale, but eyeballing it works just fine too. Place them in the oven and bake for 30 to 35 minutes. You will know they are done when a wooden skewer or toothpick inserted into the center comes out clean. Your kitchen is going to smell amazing right about now.
Step 5: Cool The Cakes
This is the hardest part, waiting! Let the cakes cool in their pans for about 10 minutes. This allows the structure to set so they do not break when you move them. After 10 minutes, carefully invert them onto a wire rack. Let them cool completely before you even think about adding the Pink Pastel Cake frosting. If the cake is even slightly warm, the butter in the frosting will melt and create a mess.
Step 6: Make The Buttercream
While the layers are cooling, let us get started on that gorgeous frosting. In a clean bowl, beat the softened butter until it is light and creamy. Gradually add the powdered sugar one cup at a time, alternating with small splashes of milk. Keep beating until the mixture is fluffy and holds its shape. Stir in the vanilla extract at the very end for that perfect finish.
Step 7: Tint It Pink
Now for the fun part! Add your pink food coloring just a tiny bit at a time. It is much easier to add more color than it is to fix a shade that has gone too dark. Stir well until you achieve the exact look you want for your Cute Birthday Cakes Pink. You can go for a soft blush or a vibrant hot pink depending on the vibe of the party.
Step 8: Assemble And Decorate
Place one cooled layer on your serving plate. Spread a generous layer of pink buttercream on top, then place the second layer over it. Cover the top and sides with the remaining frosting. You can use a simple butter knife to create swirls or a bench scraper for a smooth finish. This is your Cake Design Pink masterpiece, so have fun with it! Add sprinkles or edible pearls to finish the look.


How To Store Leftovers
If you happen to have any of this delicious birthday cake left over, you want to make sure it stays fresh. The best way to store it is in an airtight container at room temperature for up to two days. If your kitchen is particularly warm, you might want to pop it in the fridge to keep the buttercream from getting too soft. Just remember to let it come back to room temperature before serving for the best texture.
For longer storage, you can actually freeze individual slices. Wrap each slice tightly in plastic wrap and then place them in a freezer bag. They will stay good for up to three months. This is a great trick for when you want a little treat later on without having to bake a whole new Simple Girl Birthday Cakes batch. Simply thaw a slice on the counter for an hour and it will be ready to enjoy.
Tips
One of my top tips for a perfect birthday cake is to ensure your butter is truly softened but not melted. If it is too cold, the frosting will be lumpy. If it is melted, the frosting will be soup. You should be able to press your finger into the butter and leave an indentation without it sliding around. This is the secret to that Bday Cakes Aesthetic Pink smooth finish everyone loves.
If you find that your cake layers have a bit of a dome on top after baking, do not worry. Once they are cool, you can use a serrated knife to gently level them off. This makes stacking much easier and prevents the 6 Inch Birthday Cake or 8 inch version from leaning to one side. Plus, the scraps are a great snack for the baker while you work on the frosting!
When it comes to food coloring, gel colors are usually better than liquid ones. They provide a much more intense color without changing the consistency of your Pink Icing Cake frosting. A little goes a long way, so start with a toothpick dip of gel and build from there. It helps you get those beautiful Cute Cakes For Girls Birthday colors without any stress.
Lastly, do not be afraid to practice your piping. If you want to add some extra flair to your Cake Design Pink, try piping some small stars or borders around the base. Even if it is not perfect, the effort shows, and your guests will be so impressed that you made it yourself. Remember, the goal is fun and flavor, not absolute perfection.
Conclusion
Baking a birthday cake at home is such a rewarding experience. It allows you to put your own personal touch on a celebration and creates a centerpiece that everyone will remember. This recipe proves that you do not need fancy equipment or expensive ingredients to make something beautiful and tasty. With just a few simple steps, you can create a Pink Pastel Cake that looks and tastes like it was made by a pro.
So the next time a big day rolls around, skip the grocery store bakery and head to your own kitchen. Put on some music, get your ingredients ready, and enjoy the process of creating Cute Birthday Cakes Pink for your loved ones. You might just find that baking becomes your new favorite way to show people how much you care. Happy baking and enjoy every single bite of your masterpiece!
FAQ
Can I Use This Recipe For A 6 Inch Birthday Cake?
Yes you certainly can! If you want to make a 6 Inch Birthday Cake, you will likely have enough batter for three layers instead of two. Just keep an eye on the bake time as smaller pans might cook a little faster. It is a great way to get a taller and more dramatic look for your Cute Cake Designs Birthday.
What If I Do Not Have Applesauce?
No problem at all. If you do not have applesauce on hand, you can substitute it with the same amount of sour cream or plain Greek yogurt. These will still provide that incredible moisture that makes this birthday cake so special. It is all about using what you have to create something wonderful.
How Do I Get The Perfect Pink Shade?
The key to a perfect Pink Icing Cake is patience. Add your coloring in very small increments and mix thoroughly before adding more. Remember that the color often deepens slightly as it sits, so aim for a shade just a tiny bit lighter than your final goal. This is how you get those beautiful Simple Girl Birthday Cakes looking exactly right.
Easy Pink Birthday Cake
This no-fuss Pink Icing Cake recipe is perfect for busy parents. Starting with a simple cake mix and adding a few clever tricks, you get a moist, delicious, and beautiful birthday cake without the stress. It’s a tasty, family-friendly treat that’s ready for any celebration.
Requirements


Ingredients
Instructions
- Preheat oven to 350°F. Grease and flour two 8-inch round cake pans.
- In a large mixing bowl, combine cake mix, water, vegetable oil, eggs, and unsweetened applesauce. Beat with an electric hand mixer on medium speed for about 2 minutes until smooth.
- Stir in 1 teaspoon of vanilla extract.
- Pour batter evenly into the prepared pans. Bake for 30-35 minutes, or until a toothpick inserted into the center comes out clean.
- Let the cakes cool in the pans for 10 minutes before inverting them onto a wire rack to cool completely.
- To make the buttercream, beat the softened butter in a bowl until light and creamy. Gradually add the powdered sugar, alternating with the milk, until fluffy. Stir in the remaining 1 teaspoon of vanilla extract.
- Add pink food coloring a little at a time, mixing well, until you reach your desired shade.
- Place one cooled cake layer on a serving plate. Spread a layer of frosting on top. Place the second layer on top and frost the entire cake. Decorate with sprinkles if desired.
Notes
Ensure your butter for the frosting is softened but not melted for the creamiest texture.
For easier stacking, use a serrated knife to level off any domes on your cooled cake layers.
Gel food coloring provides a more vibrant color without thinning the frosting.
Nutrition
Calories
Sugar
Fat
Carbs