There is something truly special about a homemade Birthday Cake. It’s more than just a dessert. It is a centerpiece, a tradition, and a sweet symbol of celebration. While store bought cakes are convenient, making one yourself adds a personal touch that everyone remembers.
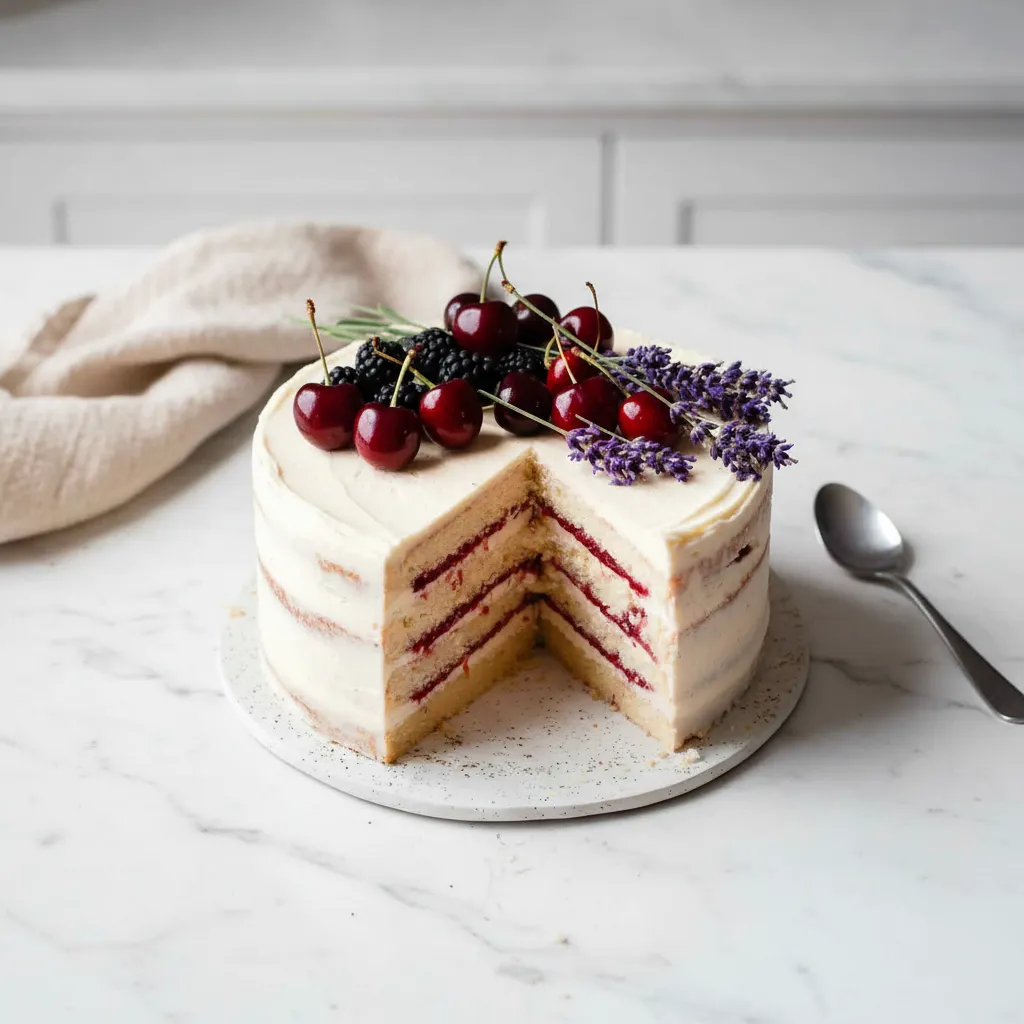
This recipe is all about creating one of those wonderfully pretty birthday cakes that feels both nostalgic and fresh. We are channeling a lovely Vintage Cake vibe. Think soft vanilla cake layers, a bright cherry filling, and a simple, elegant finish. It’s one of my favorite birthday cake ideas because it looks incredible but is surprisingly straightforward to make at home.
Jump To:
Why You’ll Love This Recipe
So, what makes this the Birthday Cake you have to try? Honestly, it’s the combination of amazing flavors and textures. The cake itself is moist and tender, with a rich vanilla flavor that comes from using real vanilla beans. It’s a classic taste that never goes out of style.
Then you have the cherry filling. It is tart, sweet, and wonderfully fruity. It cuts through the richness of the cake and buttercream beautifully. It adds a surprising burst of freshness that makes each bite interesting.
And let’s talk about the look. This is one of those simple aesthetic birthday cakes that gets all the compliments. The frosting is applied with a light touch, giving it a charming, rustic appearance. You do not need to be a professional decorator to make this cake look stunning.
It’s a fantastic recipe for anyone wanting to bake a memorable cake for a loved one. It is approachable for beginners and satisfying for experienced bakers. Plus, the end result is just so rewarding.
Ingredients
Here is everything you will need to gather to create this beautiful Vintage Cake. Having your ingredients at room temperature is really important for a smooth batter, so try to take them out of the fridge ahead of time.
For The Cake
- 3 ¼ cups all purpose flour, spooned and leveled
- 2 ½ teaspoon baking powder
- ¾ teaspoon salt
- ½ cup unsalted butter, at room temperature
- ½ cup canola oil or mild vegetable oil
- 1 ½ cups granulated white sugar
- 4 large eggs, at room temperature
- 3 vanilla beans (or 3 tsp vanilla extract)
- 1 ½ cups buttermilk, at room temperature
For The Cherry Filling
- 2 cups fresh cherries, pitted (thaw first if frozen)
- ½ cup granulated white sugar
- 1 ½ tablespoon cornstarch
- 1 tablespoon freshly squeezed lemon juice
- ¼ cup water
For The Buttercream Frosting
- 1 ¼ cups unsalted butter, room temperature
- 4 cups unpacked powdered sugar, sifted
- 2 vanilla beans (or 2 tsp vanilla extract)
- 2 to 4 tablespoon heavy whipping cream
- 1 pinch salt
Step By Step Instructions
Let’s get baking! Follow these steps closely, and you will have a gorgeous Birthday Cake ready for celebrating. I’ve broken it down to make it as simple as possible.
Step 1: Prepare The Oven And Pans
First things first, preheat your oven to 350°F or 175°C. Getting the temperature right from the start is key for an even bake. While it heats up, prepare two 8 inch round baking pans. Line the bottom and sides with parchment paper. This little step makes getting the cakes out later a breeze.
Step 2: Make The Cake Batter
In a medium bowl, whisk together the flour, baking powder, and salt. Combining the dry ingredients now ensures they are evenly distributed throughout the batter. Set this bowl aside for a moment.
Now, in a large mixing bowl, beat the room temperature butter, oil, and sugar together. Use a stand mixer with a whisk or paddle attachment, or a handheld mixer. You want to beat it for about two to three minutes until it looks light and creamy.
Next, add the eggs one at a time. Make sure each egg is fully mixed in before adding the next one. This helps create a stable emulsion. After the eggs, stir in the vanilla. If you are using vanilla beans, scrape the seeds in now.
It is time to combine the wet and dry ingredients. Add the flour mixture and the buttermilk to the butter mixture alternately. Start with the dry ingredients, then add some buttermilk, then more dry, and so on, ending with the last of the dry ingredients. Mix only until everything is just combined. Be careful not to overmix!
Step 3: Bake The Cake Layers
Divide the batter evenly between your two prepared pans. An easy way to do this is with a kitchen scale, but you can also just eyeball it. Smooth the tops with a spatula.
Bake for 30 to 33 minutes. You will know they are done when a toothpick inserted into the center comes out clean. Try not to overbake, as this can make the cake dry. Let the layers cool completely to room temperature before you even think about frosting.
Step 4: Make The Fresh Cherry Filling
While the cakes cool, you can make the delicious cherry filling. Place the cherries, sugar, cornstarch, lemon juice, and water into a large saucepan. Bring it to a boil over medium heat.
Cook for five to eight minutes, stirring constantly, until the cherries soften up. The kitchen will start to smell amazing. Once soft, you can use an immersion blender to blend the cherries right in the pot. If you do not have one, you can carefully transfer the mixture to a regular blender.
Return the blended mixture to the heat and cook for another five to eight minutes. Keep stirring! You want the filling to thicken and reduce by about a third. Once it’s nice and thick, remove it from the heat and let it cool completely. It will get even thicker as it cools down.
Step 5: Whip Up The Vanilla Buttercream
For the frosting, start by beating the room temperature butter in a large mixing bowl on medium speed. Beat it for about two to three minutes until it’s super creamy and pale. This step is important for a fluffy buttercream.
Gradually add the sifted powdered sugar, one cup at a time, on low speed. Once all the sugar is in, turn the speed up to medium and beat until the sugar is dissolved and the frosting is smooth.
Stir in the vanilla seeds or extract. Then, add the heavy cream one tablespoon at a time until you get the consistency you like. It should be creamy and fluffy, but still firm enough to hold its shape. I used three tablespoons. Finally, add a pinch of salt to balance the sweetness.
Step 6: Assemble Your Beautiful Birthday Cake
It is time for the fun part! First, level your cake layers. If they have a dome on top, use a long serrated knife to carefully slice it off. Then, cut each cake layer in half horizontally, so you have four thin layers in total.
Place your first cake layer on a cake stand or serving plate. Spread about a quarter of the buttercream on top. A neat trick is to pipe a thicker border of frosting around the edge. This creates a dam to hold the cherry filling in.
Spoon about a third of the cooled cherry filling inside the buttercream border. Gently spread it out. Place the next cake layer on top and repeat the process two more times: buttercream, cherry filling, and then the next layer of cake.
Place the last cake layer on top. Use the remaining frosting to apply a light, thin coat on the top and sides of the cake. This is often called a crumb coat, and it gives the cake that lovely simple aesthetic birthday cakes look. You can make it as smooth or as rustic as you like.
Now for the hardest part: waiting. Chill the assembled Birthday Cake in the fridge for at least four hours. This allows the filling and frosting to set properly, making it much easier to slice and serve.


How To Store Leftovers
If you have any cake left over, which is a big if, you can store it in an airtight container in the refrigerator. It will stay fresh and delicious for up to two days. The cake is best enjoyed at room temperature, so you might want to let a slice sit out for a few minutes before eating.
Tips
Here are a few extra pointers to help you make the best Birthday Cake ever. These little details can make a big difference in your final result and are worth keeping in mind as you bake.
Avoid Over Mixing. I mentioned this before, but it is super important. Once you add the flour, mix only until you no longer see dry streaks. Over mixing develops the gluten in the flour too much, which results in a dense, tough cake instead of a light and tender one.
Level Your Cakes. Taking a moment to level your cake layers creates a stable and professional looking final product. A flat surface ensures the layers stack neatly without wobbling. This is a key step for creating those pretty birthday cakes you see online.
Fresh Cherries Are Best. While you can use frozen cherries, fresh sweet cherries will give you the best flavor and texture in the filling. If you can find them in season, I highly recommend using them for this Vintage Cake.
Using Vanilla Beans. Vanilla beans have a more complex and intense flavor than extract. To use one, slice it open lengthwise with a sharp knife. Then use the back of the knife to scrape out all the tiny seeds inside. Those seeds are where all the flavor is! Add them directly to your batter and frosting.
Chill The Cake. Do not skip the chilling time! This four hour period in the fridge is crucial. It lets the buttercream firm up and the cherry filling set. A well chilled cake is stable, clean to slice, and allows the flavors to meld together beautifully.
Conclusion
And there you have it! A recipe for a truly special homemade Birthday Cake. It takes a little time and love, but the result is so worth it. This cake is not just a dessert. It is a beautiful centerpiece that will make any celebration feel extra memorable.
I hope this becomes one of your go to birthday cake ideas for years to come. There is nothing quite like the smile on someone’s face when you bring out a cake you made just for them. Happy baking!
FAQ
Can I Use Frozen Cherries For The Filling?
Yes, you absolutely can. The instructions note that if you use frozen cherries, you should thaw them first. Thawing them helps release some of their excess water and ensures the filling cooks down to the right consistency. Fresh cherries often have a slightly brighter flavor, but frozen ones are a great option when fresh are not in season.
What If I Do Not Have A Stand Mixer?
No problem at all! A handheld electric mixer works just as well for both the cake batter and the buttercream. It might take a minute or two longer to get the butter and sugar creamy, but you will get the same great results. You can even mix it by hand with a whisk and a lot of elbow grease, but an electric mixer makes it much easier.
Can I Make This Cake Ahead Of Time?
Yes, you can. You can bake the cake layers a day or two in advance. Once they are completely cool, wrap them tightly in plastic wrap and store them at room temperature. The cherry filling and buttercream can also be made a day ahead and stored in airtight containers in the refrigerator. Just let the buttercream come to room temperature and give it a quick whip before frosting the cake.
My Buttercream Is Grainy. What Did I Do Wrong?
Grainy buttercream is usually caused by the sugar not fully dissolving. This can happen if your butter is too cold or if you do not beat it long enough after adding the sugar. Make sure your butter is at a soft room temperature. Also, be sure to sift your powdered sugar, and beat the frosting on medium speed for a few minutes after all the sugar is incorporated.
My Cake Layers Are Domed, What Do I Do?
This is very common! Don’t worry. As mentioned in the assembly steps, you can easily fix this. Once the cakes are completely cool, simply use a long, serrated knife to carefully slice off the rounded top. This creates a flat, stable surface for stacking and ensures your finished Birthday Cake is level and looks professional.
Vintage Cherry Vanilla Birthday Cake
This lovely vintage-inspired birthday cake features moist vanilla layers, a bright cherry filling, and a fluffy vanilla buttercream, perfect for any celebration.
Requirements


Ingredients
Instructions
- Preheat your oven to 350°F (175°C). Prepare two 8 inch round baking pans, lining the bottom and sides with parchment paper.
- In a medium bowl, whisk together the flour, baking powder, and salt. Set aside. In a large mixing bowl, beat the room temperature butter, oil, and sugar for 2-3 minutes until light and creamy.
- Add the eggs one at a time, mixing well after each. Stir in the vanilla seeds or extract.
- Alternately add the flour mixture and buttermilk to the butter mixture, starting and ending with dry ingredients. Mix only until just combined, being careful not to overmix.
- Divide batter evenly between prepared pans. Bake for 30-33 minutes, or until a toothpick comes out clean. Cool completely.
- For the cherry filling: Place cherries, sugar, cornstarch, lemon juice, and water in a large saucepan. Bring to a boil over medium heat.
- Cook for 5-8 minutes, stirring constantly, until cherries soften. Blend with an immersion blender or regular blender until smooth.
- Return blended mixture to heat and cook for another 5-8 minutes, stirring constantly, until thickened and reduced by about a third. Cool completely.
- For the buttercream: Beat room temperature butter in a large mixing bowl on medium speed for 2-3 minutes until creamy and pale.
- Gradually add sifted powdered sugar, one cup at a time, on low speed. Once incorporated, increase speed to medium and beat until smooth.
- Stir in vanilla seeds or extract. Add heavy cream one tablespoon at a time until desired consistency is reached (about 3 tablespoons). Add a pinch of salt to balance sweetness.
- Assemble the cake: Level cooled cake layers and cut each horizontally into two thin layers (total of four).
- Place the first cake layer on a stand. Spread a quarter of the buttercream, piping a thicker border around the edge to create a dam.
- Spoon a third of the cooled cherry filling inside the buttercream border. Gently spread. Place the next cake layer and repeat two more times.
- Place the last cake layer. Use remaining frosting to apply a light, thin crumb coat on top and sides.
- Chill the assembled cake in the fridge for at least four hours to set. Serve at room temperature.
Notes
Taste the base before freezing and adjust sweetener if needed. Frozen desserts tastes less sweet, so aim for slightly sweeter than you prefer.
Do not fill the pint past the max fill line, as the mixture will expand during freezing and processing.
A full 24-hour freeze is essential for the best, creamiest texture. Rushing this step can result in an icy or soupy consistency.
Feel free to experiment with other flavors like vanilla protein with frozen berries or adding mint extract for a mint-chip version.
Nutrition
Calories
Sugar
Fat
Carbs