There is something undeniably special about biting into a fresh ear of sweet Corn. It brings back memories of warm summer evenings, backyard gatherings, and plates piled high with delicious food. But you do not need a grill or perfect weather to enjoy this classic treat. In fact, making roasted Corn in the oven is one of the easiest ways to get that perfect balance of tender kernels and savory flavor right in your kitchen.
Many of us grew up boiling our cobs in a big pot of water. While that works, it often washes away some of the natural sweetness. Roasting, on the other hand, intensifies the flavor. It turns simple Yellow Corn into a side dish that steals the show. Plus, you can slather it with a rich garlic butter mixture before cooking, allowing those flavors to soak deep into the cob as it roasts.
If you have been searching for How To Make Corn that tastes better than the standard boiled version, you are in the right place. This recipe is all about minimal effort and maximum reward. It is perfect for busy parents, budget conscious shoppers, and anyone who loves good Corn Food without the fuss.
Jump To:
Why You’ll Love This Recipe
You are going to fall in love with this method for so many reasons. First and foremost, it is incredibly fast. With just a few minutes of prep time and about 20 minutes in the oven, you have a fantastic side dish ready to go. There is no need to wait for a giant pot of water to boil, which saves you time and keeps your kitchen cooler.
Another reason this recipe rocks is the flavor. When you roast Corn, the dry heat caramelizes the natural sugars. This creates a depth of flavor that boiling just cannot match. Add the garlic butter to the mix, and you have a savory and sweet combination that is hard to resist. It is the kind of Hot Corn that makes you want to reach for seconds immediately.
This dish is also very wallet friendly. Corn is often one of the most affordable vegetables you can buy, especially when it is in season. You do not need any expensive tools or fancy kitchen gadgets. A simple baking sheet and an oven are all you need to create something tasty. It is accessible cooking at its finest.
Finally, this recipe is highly customizable. While we are using garlic and butter today, you can easily switch things up. Add some chili powder for heat or sprinkle on parmesan cheese for a savory twist. It is a blank canvas for whatever flavors your family enjoys most. It truly is versatile Corn Food that fits any meal plan.
Ingredients
The beauty of this recipe lies in its simplicity. You only need a handful of ingredients to transform raw cobs into a delicious side dish. Here is what you will need to get started.
- 4 ears Corn on the cob, husked
- ¼ cup unsalted butter, softened
- 2 cloves garlic, minced
- ½ tsp salt, or to taste
- ¼ tsp black pepper, or to taste
- 1 tbsp fresh parsley, chopped (for garnish, optional)
Let’s talk a bit about selecting your produce. When you are at the store looking for Yellow Corn, try to peek at the kernels if possible. You want them to be plump and bright yellow. Avoid ears where the silk looks overly dried out or black, as this usually means it is old.
For the butter, using unsalted is a smart move. It gives you total control over the saltiness of the final dish. If you only have salted butter on hand, just reduce the additional salt in the recipe slightly. Softened butter is key here so it mixes easily with the garlic.
Fresh garlic makes a huge difference. While jarred garlic is convenient, chopping fresh cloves provides a punchier and more aromatic flavor that pairs perfectly with the sweet Corn. It really elevates the simple ingredients into something special.
Step-By-Step Instructions
Making this dish is a breeze. Follow these simple steps to get perfect roasted cobs every single time. It is a foolproof method that anyone can master.
Step 1: Prepare The Oven
Start by preheating your oven to 400°F (200°C). Getting the oven nice and hot is crucial for roasting vegetables properly. You want that high heat to cook the kernels quickly while developing a nice golden color.
While the oven is heating up, line a baking sheet with parchment paper. This helps with cleanup later and prevents the butter from burning on the pan. Nobody likes scrubbing pans after a nice meal.
Step 2: Make The Garlic Butter
Grab a small bowl for mixing. Combine your softened butter, minced garlic, salt, and black pepper. Use a fork or a small spoon to mash everything together until it is well combined.
You want the garlic and spices to be evenly distributed throughout the butter. This ensures that every bite of your Hot Corn will be seasoned perfectly. It should look like a creamy, speckled paste when you are done.
Step 3: Season The Cobs
Take your husked ears of Corn and place them on a plate or cutting board. Using a pastry brush or just your hands, spread the garlic butter mixture generously over each ear.
Make sure you get into all the little crevices between the kernels. Coat them from end to end. This butter is not just for flavor; it also keeps the kernels moist while they roast in the hot oven.
Step 4: Roast To Perfection
Place the buttered cobs onto your prepared baking sheet. Arrange them so they are not touching each other too much. This allows the hot air to circulate freely around each one.
Pop the tray into the oven and roast for 20 to 25 minutes. About half way through the cooking time, open the oven and give the cobs a turn using tongs. This ensures they cook evenly on all sides.
Step 5: Garnish And Serve
Once the kernels are tender and slightly charred in spots, they are done. Carefully remove the baking sheet from the oven. The kitchen should smell amazing by now.
Transfer the Hot Corn to a serving platter. If you like, sprinkle fresh chopped parsley over the top for a pop of color and freshness. Serve immediately while it is warm and buttery.


How To Store Leftovers
If you happen to have leftovers, you are in luck. Roasted Corn keeps very well and can be used in many other dishes. To store it in the fridge, wait until the cobs have cooled down completely.
Place the cobs in an airtight container or wrap them tightly. They will stay fresh in the refrigerator for up to 3 to 4 days. You can reheat them in the microwave or cut the kernels off to use in salads.
Freezing is also a great option if you want to save the harvest for later. Once the cobs are cool, wrap each one individually in plastic cling wrap. Then, wrap them again in aluminum foil.
Place these wrapped cobs into a freezer safe bag or container. They can be frozen for up to 6 months. When you are ready to eat, just thaw them completely and reheat on the grill, in the oven, or in the microwave until warmed through.
Tips
To make the husking process easier, try microwaving the whole ear (husk and all) for about 2 minutes before peeling. The steam helps separate the silk from the kernels, making it much faster to clean.
If you love a smoky flavor but do not have a grill, you can use smoked paprika in your butter mixture. It mimics that outdoor barbecue taste perfectly. A little pinch goes a long way.
Do not be afraid to cut the kernels off the cob after roasting. These roasted kernels make an incredible addition to salsa, tacos, or pasta salads. It adds a sweet crunch that elevates simple meals.
Always check for doneness by pressing a kernel with a fork. If it pierces easily and juice comes out, it is ready. If it feels hard or starchy, it needs a few more minutes in the oven.
For a cheesy twist, roll the hot, buttered cobs in grated parmesan cheese or cotija cheese right after they come out of the oven. The cheese melts slightly and creates a delicious crust.
Conclusion
Learning How To Make Corn in the oven is a game changer for home cooks. It is simple, mess free, and results in the most flavorful Yellow Corn you will ever taste. Whether you are serving it alongside a steak dinner or eating it as a snack, it is sure to satisfy.
Next time you are at the market, grab a few extra ears and give this recipe a try. It is proof that good food does not have to be complicated. Enjoy the sweet, buttery goodness of homemade roasted Corn tonight!
FAQ
Can I Make This Vegan?
Absolutely. Simply swap the dairy butter for your favorite plant based butter alternative or even olive oil. The roasting method works just the same, and the result is still delicious Corn Food suitable for a vegan diet.
Do I Need To Boil The Corn Before Roasting?
No, you do not. Roasting raw cobs allows them to steam in their own juices while caramelizing on the outside. Boiling beforehand can actually make them mushy when roasted. Starting from raw is the best way to get that crisp tender texture.
Can I Use Frozen Corn Cobs?
Yes, you can use frozen cobs. Thaw them completely before applying the butter mixture. You may need to reduce the roasting time slightly since frozen vegetables are often blanched before freezing. Keep an eye on them so they do not dry out.
How Do I Know When The Corn Is Done?
The kernels should be tender when pierced with a knife and look vibrant yellow. You might see some light browning or charring on the edges, which is a good sign. If they look shriveled, they might be overcooked.
Is This Recipe Gluten Free?
Yes, this recipe is naturally gluten free. Corn is a grain that does not contain gluten, and the other ingredients like butter and garlic are safe as well. Just double check your spices to ensure no additives were included.
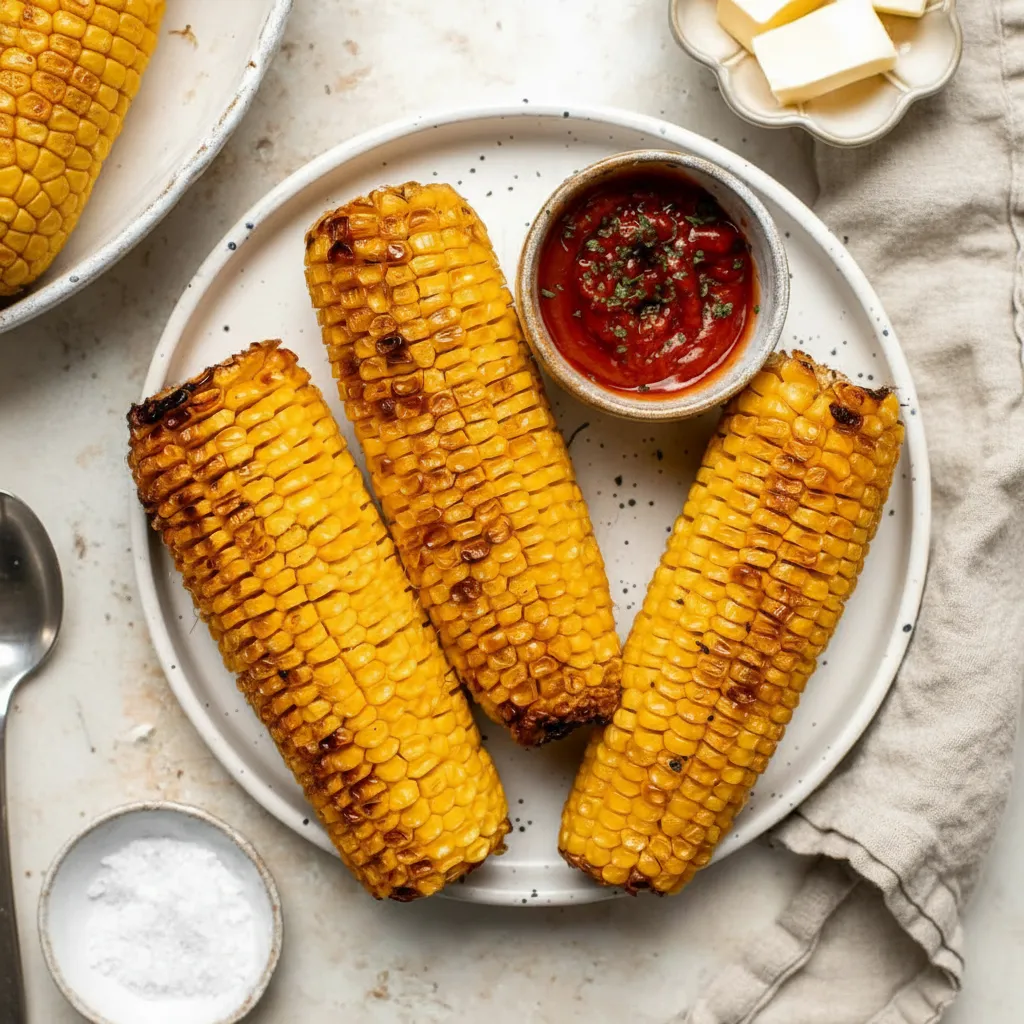
Easy Oven-Roasted Corn with Garlic Butter
Ditch boiling and discover the best way to cook corn! This no-fuss oven-roasted corn recipe uses a simple garlic butter to create a tender, sweet, and savory side dish that’s perfect for any weeknight meal.
Requirements


Ingredients
Instructions
- Preheat oven to 400°F (200°C). Line a baking sheet with parchment paper.
- In a small bowl, combine the softened butter, minced garlic, salt, and black pepper until well mixed.
- Using a pastry brush or your hands, spread the garlic butter mixture generously over each ear of corn, coating them completely.
- Arrange the corn on the prepared baking sheet in a single layer. Roast for 20-25 minutes, turning halfway through, until kernels are tender and slightly charred.
- Remove from the oven, garnish with fresh parsley if desired, and serve immediately.
Notes
For a smoky flavor, add a pinch of smoked paprika to the butter mixture.
For a cheesy twist, roll the hot, buttered cobs in grated parmesan or cotija cheese right after they come out of the oven.
To make husking easier, microwave the whole ear for about 2 minutes before peeling.
Nutrition
Calories
Sugar
Fat
Carbs