The holiday season is a wonderful whirlwind, isn’t it? Between the decorating, the gift wrapping, and all the festive cheer, finding time to cook can be a challenge. You want to bring something delicious to the table, but you also don’t want to spend hours in the kitchen. I get it completely.
That’s where this recipe comes in. These classic deviled eggs are one of my favorite Christmas appetizers because they are simple, elegant, and always a huge hit. They are a timeless classic for a very good reason.
Why You’ll Love This Recipe
First off, these deviled eggs are incredibly easy to make. There are no complicated steps or fancy equipment needed. If you can boil an egg, you can make these. They are a fantastic recipe for beginners.
They are also a serious crowd pleaser. I have yet to meet someone who doesn’t enjoy a good deviled egg at a holiday gathering. They are perfect Christmas Finger Foods that disappear from the platter in minutes.
What I really appreciate about them is how customizable they are. This recipe gives you a classic, delicious base. But you can easily add your own little touches to make them unique. A sprinkle of this, a dash of that, it’s all part of the fun.
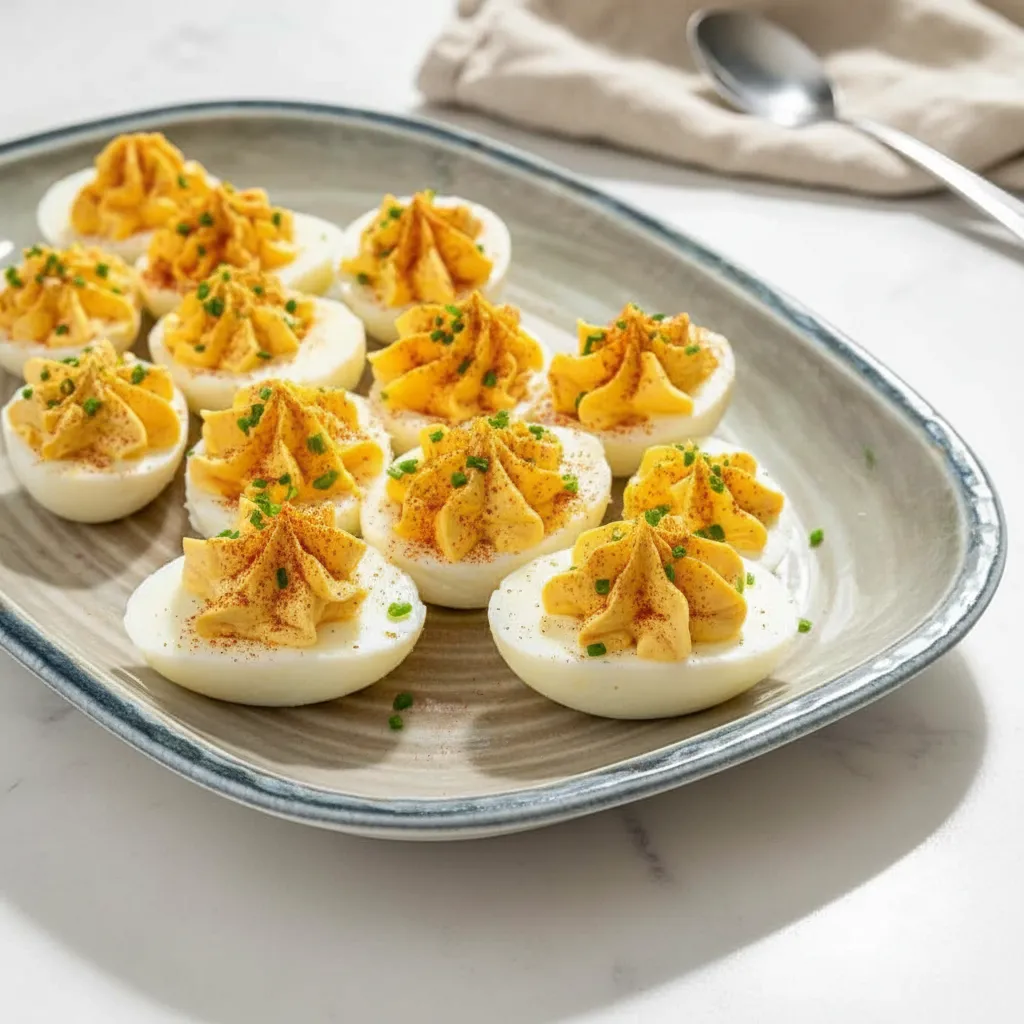
Plus, they just look so festive on a platter. Those little white ovals with their bright yellow filling, garnished with a pop of red paprika, look like edible holiday ornaments. They really add a touch of simple elegance to any spread of Christmas appetizers.
They are also naturally low carb and gluten free. This makes them a wonderful option for guests who might have dietary restrictions. It’s always nice to have some thoughtful Holiday Appetizers Easy for everyone to enjoy.
Ingredients
The beauty of this recipe lies in its simplicity. You probably have most of these ingredients in your kitchen right now. Nothing fancy, just good, honest flavors coming together.
- 2 tablespoons butter, salted or unsalted
- 6 hard cooked eggs
- 2 tablespoons mayonnaise
- 2 teaspoons Dijon mustard
- 1/2 to 1 teaspoon hot sauce, like Tabasco
- 2 teaspoons pickle brine or olive brine, optional
- Salt and freshly ground black pepper, to taste
- For garnish (optional): paprika, chopped fresh chives
A little note on the ingredients. The softened butter is what makes this filling extra rich and creamy. It’s a small step that makes a big difference in the final texture.
For the mayonnaise, use your favorite brand. A full fat mayonnaise will give you the creamiest result. Dijon mustard adds a lovely tang that cuts through the richness of the yolks and mayo. And the optional pickle brine? It adds a little something special, a zippy flavor that keeps you coming back for more.
Step By Step Instructions
Alright, let’s get down to making these wonderful Christmas appetizers. I’ll walk you through each part of the process. It’s easier than you think!
Step 1: Prepare The Butter
First, we need to soften the butter. Place your butter in a medium sized bowl that is safe for the microwave. Heat it for just 10 to 15 seconds. You want it soft, not completely melted. A little bit of melting around the edges is totally fine.
Step 2: Prepare The Eggs
Now for the main event, the eggs. Make sure your hard cooked eggs are fully cooled. This makes them much easier to peel. Gently peel the shells off. Then, using a sharp knife, slice each egg in half lengthwise. Try to make the cut as clean as possible.
Carefully pop the cooked yolks out of the egg whites. The whites will be our little boats for the filling. Place the yolks directly into the bowl with the softened butter.
Step 3: Make The Filling
This is where the magic happens. Using a fork, mash the egg yolks into the softened butter. Keep mashing until the butter is fully incorporated and the mixture is crumbly. You want to get rid of any large lumps.
If you prefer a super smooth filling, you can use a hand mixer for this part. Beat the yolk and butter mixture on low speed until it’s light and fluffy. This makes for some very fancy feeling christmas appetizers.
Next, mix in the mayonnaise, Dijon mustard, hot sauce, and the pickle or olive brine if you are using it. Stir everything together until it’s well combined and creamy. Give it a taste and add salt and pepper as needed. I always start with a small amount and add more until it tastes just right.
Step 4: Fill The Eggs
Arrange your hollowed out egg whites on a platter. Now it’s time to fill them up. For a beautiful presentation, I like to use a piping bag with a star tip. It makes the filling look so pretty and professional.
If you don’t have a piping bag, no worries at all. You can spoon the filling into a heavy duty Ziploc bag. Just snip off a small piece from one of the corners, and you have a makeshift piping bag. It works just as well.
Of course, you can also just use two small spoons to scoop the filling into each egg white. It might not look as frilly, but I promise it will taste just as delicious. Making Holiday Appetizers Easy is the goal here!
Step 5: Garnish And Serve
The final touch! A light sprinkle of paprika over the top of each filled egg adds a beautiful pop of color. If you have fresh chives, chop them up and sprinkle them on as well. The mild onion flavor pairs wonderfully with the creamy filling. Your Christmas appetizers are now ready to serve!
How To Store Leftovers
If you happen to have any leftovers, which is rare in my house, storing them is simple. Arrange the deviled eggs in a single layer in an airtight container. You can buy special deviled egg carriers, but any container where they fit snugly will work.
Store them in the refrigerator for up to two days. After that, they can start to get a little watery, so it’s best to enjoy them fresh. They are a great addition to a Christmas Brunch the next day!
You can also prepare the components ahead of time. The filling can be made a day in advance and stored in an airtight container in the fridge. The egg whites can also be prepared and stored separately. Just assemble them right before you’re ready to serve.
Tips
Want to make your deviled egg experience even better? Here are a few of my favorite tips that I’ve learned over the years. These little tricks help ensure your Christmas appetizers turn out great every time.
For the easiest peeling, use eggs that are not super fresh. Older eggs tend to peel more cleanly. After boiling, immediately place the eggs in an ice water bath for about 10 minutes. This helps the egg contract from the shell, making it easier to peel.
Don’t be afraid to experiment with the filling. You can add a little bit of sweet pickle relish for a classic sweet and tangy flavor. Crumbled bacon, finely chopped celery, or even a little avocado can be fun additions.
To transport your deviled eggs to a party, the make ahead method is your best friend. Keep the filling and the whites separate until you arrive. Then, quickly pipe the filling in and garnish on site. They will look and taste incredibly fresh.
For an extra creamy filling, press the cooked yolks through a fine mesh sieve before mixing them with the other ingredients. This breaks up the yolks into a fine powder, ensuring a completely smooth and light texture. It’s an extra step, but worth it for special occasions.
Conclusion
And there you have it. A simple, classic recipe for deviled eggs that is sure to be a star on your holiday table. It’s proof that the best Christmas appetizers don’t have to be complicated or expensive.
Sometimes, the most beloved dishes are the ones that are simple, made with care, and remind us of happy times. These deviled eggs are more than just Christmas Finger Foods. They are a little bite of comfort and tradition.
I hope you and your loved ones enjoy this recipe as much as my family does. Happy holidays, and happy cooking!
FAQ
Can I Make These Deviled Eggs Ahead Of Time?
Yes, absolutely! To make them ahead of time, I recommend preparing the egg whites and the filling separately. Store them in airtight containers in the refrigerator for up to one day. Then, just before serving, pipe the filling into the whites and garnish.
How Do I Get My Egg Yolks So Creamy?
The secret to an extra creamy filling is twofold. First, using softened butter adds a wonderful richness. Second, for a completely smooth texture, mash the yolks very well. You can even press them through a fine mesh sieve or use a hand mixer to whip the filling until it’s light and airy.
What Are Some Other Garnish Ideas For The Holidays?
For a festive touch, you can get creative with your garnishes. Besides paprika and chives, try a tiny piece of roasted red pepper, a small sprig of fresh dill, a single caper, or a little piece of crumbled bacon. These add both color and flavor to your Christmas appetizers.
Are These Deviled Eggs Gluten Free?
Yes, they are! All the ingredients used in this classic deviled egg recipe are naturally gluten free. It makes them a great, worry free option to serve at holiday parties where guests may have different dietary needs.
Classic Deviled Eggs
These classic deviled eggs are a simple, elegant, and always popular choice for any holiday gathering. Easy to make and wonderfully customizable, they add a festive touch to your spread, perfect as Christmas appetizers or finger foods.
Requirements


Ingredients
Instructions
- Soften the butter: Place butter in a microwave-safe bowl and heat for 10-15 seconds until soft, not fully melted.
- Prepare the eggs: Ensure hard cooked eggs are fully cooled and gently peel the shells. Slice each egg in half lengthwise and carefully pop the yolks into the bowl with the softened butter.
- Make the filling: Using a fork, mash the egg yolks into the softened butter until fully incorporated and crumbly. For a super smooth filling, use a hand mixer.
- Add mayonnaise, Dijon mustard, hot sauce, and optional pickle or olive brine. Stir until well combined and creamy. Taste and add salt and pepper as needed.
- Fill the eggs: Arrange hollowed egg whites on a platter. Use a piping bag with a star tip (or a Ziploc bag with a snipped corner, or two small spoons) to fill each egg white with the mixture.
- Garnish and serve: Lightly sprinkle paprika and chopped fresh chives over the filled eggs. Serve immediately.
Notes
For easiest peeling, use older eggs and plunge them into an ice water bath for about 10 minutes immediately after boiling.
To make ahead, prepare filling and egg whites separately, store in airtight containers in the fridge for up to one day, then assemble just before serving.
For an extra creamy filling, press cooked yolks through a fine mesh sieve before mixing, or use a hand mixer to whip until light and airy.
Experiment with additions like sweet pickle relish, crumbled bacon, finely chopped celery, or avocado.
Nutrition
Calories
Sugar
Fat
Carbs