There’s just something about a decadent dessert that makes a meal feel complete, don’t you think? Especially when it’s a beautiful dessert that looks like it came straight from a fancy restaurant, but you made it right in your own kitchen. We’re talking about those kinds of treats that make your taste buds sing and your guests say, “Wow, you made that?”
Well, get ready because today we’re diving into a beautiful desserts recipe that’s sure to impress without breaking a sweat or the bank. This isn’t just any dessert; it’s a Molten Chocolate Lava Cake, a classic for a reason. It’s got that rich, gooey center that just oozes pure chocolate bliss. And honestly, it’s way easier to pull off than you might imagine. We’re going to walk through how to make these fancy desserts to impress everyone, even if you’re a complete beginner in the kitchen. Let’s get baking!
Jump To:
Why You’ll Love This Recipe
You know what’s great about this beautiful desserts recipe? It’s all about maximum impact with minimum fuss. You get this incredibly luxurious dessert that tastes like a million bucks, but it only takes about 20 minutes from start to finish. Seriously, it’s that quick! Think about it: a little effort for a big reward.
This recipe is also super customizable. Want to make it extra special for a romantic dinner? Stick to two ramekins. Hosting a small get together? A muffin tin works just as well for smaller individual portions. Plus, the sheer joy of cutting into one of these cakes and watching that molten chocolate flow out? Pure happiness right there. It’s a classic for a reason and once you try it, you’ll understand why it’s a staple in many home kitchens.
Ingredients
Gathering your ingredients for these delicious desserts is pretty straightforward. You won’t need anything too exotic, which is always a win in my book. Here’s what you’ll need to create this amazing treat:
- 1/2 cup salted butter
- 2 ounces bittersweet baking chocolate (remember, baking chocolate bars, not chips)
- 4 ounces semi sweet baking chocolate (again, baking chocolate bars are key)
- 2 large eggs
- 2 large egg yolks
- 1 and 1/2 tsp vanilla extract
- 2/3 cup powdered sugar
- 1/4 cup + 2 tbsp all purpose flour, spooned and leveled
- A pinch of salt
- A pinch of espresso powder (this is optional, but it really deepens the chocolate flavor!)
- Extra butter and cocoa powder, for greasing your ramekins or muffin tin
Optional Toppings (because why not make it even more beautiful?):
- Vanilla bean ice cream
- Fresh berries (raspberries are particularly nice)
- Whipped cream
- A light dusting of cocoa powder or powdered sugar
Step By Step Instructions
Alright, let’s get down to business and make these gorgeous desserts. Don’t sweat it; we’ll take it one simple step at a time. You’ve got this!
Prep Your Ramekins and Oven
First things first, you need to get your ramekins ready for action. Grease two small ramekins really well with butter, getting into every nook and cranny. Then, dust them with cocoa powder until they are completely coated, tapping out any extra. This step is super important to stop the cakes from sticking. If you don’t have ramekins, no worries! A regular muffin or cupcake pan will do the trick. Just prepare three cavities the same way, with butter and cocoa. Preheat your oven to 425° F.
Make the Cake Batter
Now for the fun part: making the batter. Break up your bittersweet and semi sweet baking chocolate and pop them into a medium microwave safe bowl with the butter. Melt this mixture in 30 second bursts, stirring gently after each, until it’s perfectly smooth. Set it aside for a moment. In a smaller bowl, whisk together your eggs and vanilla extract. In another small bowl, whisk together the powdered sugar, flour, salt, and that optional espresso powder. Add the egg mixture and the dry ingredients to your chocolate bowl and carefully fold everything together. The batter might look a bit lumpy at first, but just switch to a whisk and gently whisk until it’s smooth. It should be thick, a bit like brownie batter.
Time to Bake
Divide your lovely batter evenly between the two prepared ramekins. If you’re using a muffin tin, you’ll divide it among three cavities. Bake the ramekin cakes for 11 minutes. If you’re using a muffin tin, start checking them at 7-8 minutes. How do you know they’re done? The edges of the cake will look set, but the middle will still have a slight glistening, wet look. That’s your cue to take them out! Let the cakes cool for just one minute before you try to remove them from the ramekins. While they cool, grab a damp kitchen washcloth; it’ll help you get a good grip on those hot ramekins. Get your plates and toppings ready for serving.
Serve Them Up
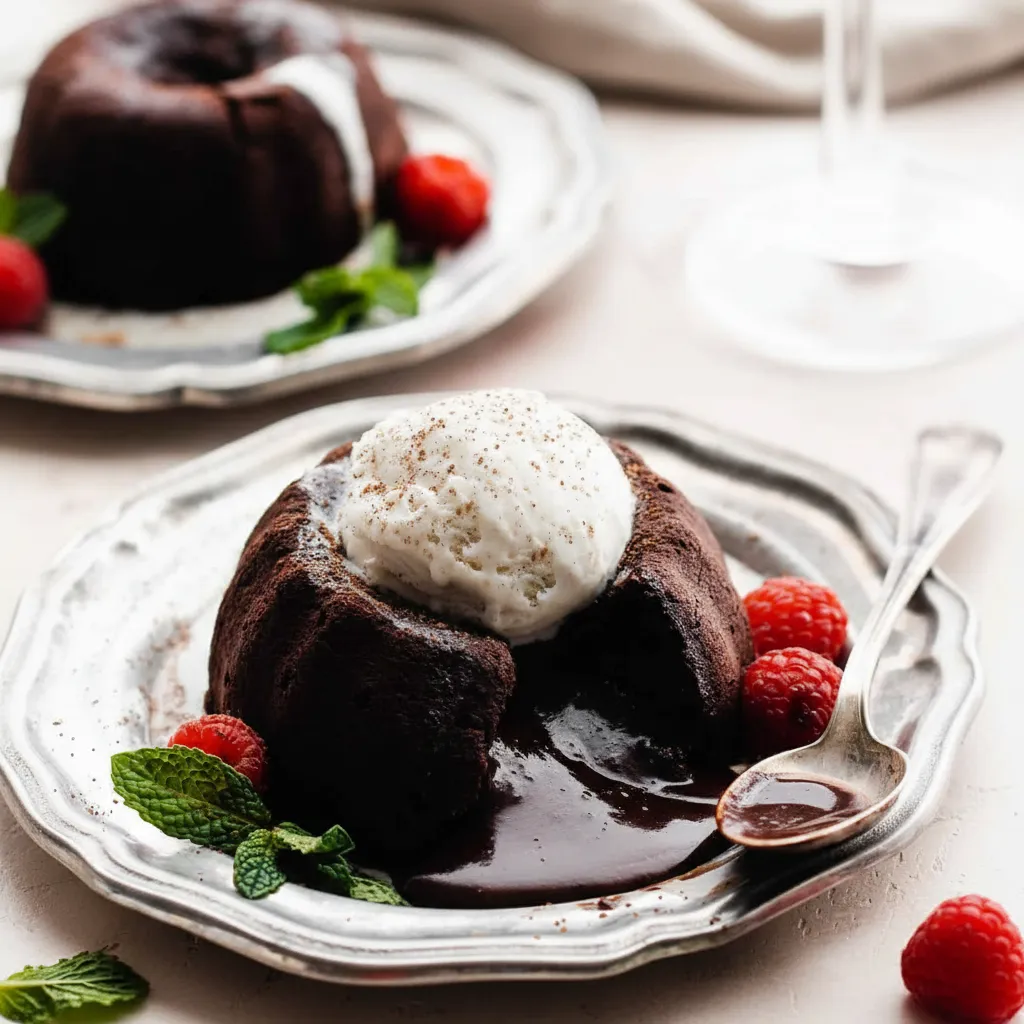
This is where the magic happens! Carefully set a plate upside down over the top of one cake. Using an oven mitt for safety, flip the whole thing over. Use that damp cloth to grab the ramekin and gently lift it straight up and off the cake. Voilà! A beautiful dessert, ready to eat. Enjoy these immediately with your chosen toppings, whether it’s creamy vanilla bean ice cream, bright fresh raspberries, or a delicate dusting of powdered sugar. There’s nothing quite like a freshly baked, warm dessert.


How To Store Leftovers
Let’s be honest, these beautiful desserts are definitely best devoured warm and gooey straight from the oven. But hey, sometimes you have a little bit left over, and that’s totally fine! If you find yourself with extra molten chocolate lava cakes, you can absolutely store them.
Wrap your leftover cakes snugly in plastic wrap or pop them into an airtight container. They’ll keep well in the refrigerator for about 2 to 3 days. When you’re ready for another chocolate fix, simply reheat them in the microwave in 15 second bursts until they’re warm again. They hold up surprisingly well, though that fresh from the oven experience is truly unmatched. Remember, proper storage is key for enjoying your leftovers safely. For more tips on reheating, always refer to food safety guidelines.
Tips
Want to make your beautiful desserts even more fabulous? Here are a few little tricks of the trade to help you out:
- Chocolate Quality Matters: Because chocolate is the star of the show here, using good quality bittersweet and semi sweet baking chocolate bars really makes a difference. You want that rich, smooth flavor. Avoid chocolate chips as they have stabilizers that make them melt differently.
- Don’t Overbake: This is crucial for that molten center! The key is to take them out when the edges are set but the middle still looks a bit wet and jiggly. It might feel counterintuitive, but trust the process.
- Spice It Up (or down): The espresso powder is optional, but it truly enhances the chocolate flavor without making the cake taste like coffee. If you’re not a fan, just leave it out. You could also add a tiny pinch of cayenne pepper for a subtle kick, or a hint of orange zest for a bright note.
- Serving Temperature: These desserts are definitely best served warm. If they cool too much, that lovely molten center might firm up a bit. Have your plates and toppings ready so you can serve them right away.
- Get Creative with Toppings: While vanilla ice cream and berries are classic, feel free to get creative! A sprinkle of sea salt flakes can really make the chocolate pop, or perhaps a drizzle of raspberry coulis.
Conclusion
So there you have it: a recipe for truly beautiful desserts that are easy enough for any home cook, yet fancy enough to impress anyone. These molten chocolate lava cakes are a celebration of rich, gooey chocolate and a testament to the fact that you don’t need to be a pastry chef to create something truly special.
Whether you’re looking for fancy desserts to impress a special someone or just craving a delicious treat for yourself, this recipe hits all the right notes. Go on, give it a try. You’ll be amazed at how simple it is to whip up such an elegant dessert. Happy baking, and enjoy every single delightful bite!
FAQ
Can I make the batter ahead of time?
You can prepare the batter a few hours in advance and keep it covered in the refrigerator. Just let it come to room temperature for about 15-20 minutes before baking for the best results.
What if I don’t have ramekins?
No problem! You can use a standard muffin or cupcake tin. This recipe yields about three smaller cakes in a muffin tin. Just remember to grease and dust them with cocoa powder the same way, and reduce the baking time to 7-8 minutes initially.
How do I know when the lava cakes are done baking?
Look for the edges of the cake to appear set, while the center still looks slightly underdone with a glistening or wet appearance. That’s your signal to take them out to achieve that perfect molten center.
Can I use chocolate chips instead of baking chocolate bars?
It’s really best to stick with bittersweet and semi sweet baking chocolate bars for this recipe. Chocolate chips contain stabilizers that prevent them from melting as smoothly, which can affect the texture of your lava cake.
What are some other topping ideas?
Besides ice cream, berries, and whipped cream, you could try a dusting of powdered sugar, a drizzle of caramel sauce, a sprinkle of toasted nuts, or even a dollop of crème fraîche for a sophisticated touch.
Recipe Title Here
A short, enticing description of the recipe to draw the reader in. Explain what makes this dish special.
Recipe Shop


Ingredients
Instructions
- In a Ninja Creami pint, combine the protein shake, protein powder, cocoa powder, sweetener, and salt. Add optional guar gum or pudding mix for extra creaminess.
- Mix with a frother or whisk until the base is completely smooth with no clumps.
- Secure the lid and freeze on a level surface for at least 24 hours until solid.
- Place the frozen pint into the machine and process using the ‘Lite Ice Cream’ setting.
- If the texture is crumbly, add a tablespoon of milk or shake and use the ‘Re-Spin’ function.
- If desired, create a well in the center, add mix-ins, and use the ‘Mix-In’ function to combine. Enjoy immediately!
Notes
Taste the base before freezing and adjust sweetener if needed. Frozen desserts tastes less sweet, so aim for slightly sweeter than you prefer.
Do not fill the pint past the max fill line, as the mixture will expand during freezing and processing.
A full 24-hour freeze is essential for the best, creamiest texture. Rushing this step can result in an icy or soupy consistency.
Feel free to experiment with other flavors like vanilla protein with frozen berries or adding mint extract for a mint-chip version.
Nutrition
Calories
Sugar
Fat
Carbs