Ever dream of baking a truly unforgettable birthday cake? Something that makes everyone say, “Wow, you made that?!” Well, get ready, because today we are diving headfirst into creating a stunning, ocean themed birthday cake that is as fun to make as it is to eat. It is all about those vibrant blues and greens, giving you serious blue cake inspo and a total beach vibe cake feel.
Forget complicated techniques and fancy equipment. This recipe is designed for the home baker, the beginner, and anyone looking to whip up something special without breaking a sweat or the bank. We are talking about a delicious, moist cake that is perfect for any celebration, especially if you are looking for creative birthday cakes aesthetic ideas. Let’s make some magic, shall we?
Jump To:
Why You’ll Love This Recipe
Honestly, what is not to love about a homemade birthday cake? This particular recipe brings so much joy and a fantastic sense of accomplishment. It is not just about baking a cake; it is about crafting a memory, a centerpiece that perfectly captures a playful, celebratory spirit.
First off, it is surprisingly simple. We have broken down every step so even if you are new to baking, you will feel like a pro. No intimidating steps, just straightforward instructions that lead to a gorgeous result. Plus, the ocean theme is just so versatile and charming, making it a fantastic choice for 27 birthday cake ideas for her or any age, really!
You get to unleash your inner artist with the decorating. The marbled blue and green frosting gives a truly unique ocean inspired cake look, and you can customize it with your favorite sea creatures or even a little pirate ship. Talk about a fun project for the whole family!
This cake also tastes absolutely amazing. The vanilla cake is moist and fluffy, paired with a rich buttercream and an optional hint of raspberry jam. It is a flavor combination that will have everyone asking for seconds. You will be getting compliments left and right, trust me!
Ingredients
Gathering your ingredients is the first step to any great baking adventure. For this delightful birthday cake, you will need a few pantry staples and some fun decorating elements to bring that cake ocean theme to life. Let’s get everything ready!
For The Cake
- 1 1/3 cups (300g) butter, softened
- 1 1/3 cups (300g) golden caster sugar (superfine sugar)
- 6 large eggs
- 2.4 cups (300g) self rising flour
- 1 ½ tsp baking powder
- 3 Tbsp milk
- 2 tsp vanilla extract
To Decorate
- 1.65 cups (375g) butter
- 6.25 cups (750g) powdered sugar
- 1 Tbsp vanilla extract
- Blue and green gel food colorings
- ½ jar seedless raspberry jam (optional)
- Plastic sea creatures and pirate ship decoration (for that true ocean inspired cake feel!)
Step By Step Instructions
Let’s roll up our sleeves and get this beautiful birthday cake baked! Follow these simple steps for a perfect result that will impress everyone. You will be amazed at how easily these aesthetic cake designs birthday dreams come true.
Step 1: Get Ready To Bake
Preheat your oven to 375°F (190°C / Gas Mark 5). Grab three 8 inch (20cm) round cake pans. These shallow sandwich pans are just ideal for this recipe. Grease them well and line them with parchment paper. This helps prevent sticking and makes sure your cakes come out perfectly.
Step 2: Cream The Butter And Sugar
In a large mixing bowl, combine the softened butter and the golden caster sugar. Whisk these two together until they are well combined and have a lovely, fluffy texture. This step is crucial for a light and airy cake batter, giving your birthday cake a wonderful texture.
Step 3: Add The Eggs
Now it is time for the eggs! Add the six large eggs to your butter and sugar mixture, two at a time. After each pair of eggs, whisk thoroughly. This ensures everything is fully incorporated, leading to a smooth and consistent batter.
Step 4: Mix In Dry And Wet Ingredients
Once all the eggs are whisked in, gently add the self rising flour, baking powder, milk, and vanilla extract to the bowl. Whisk everything again until it is just combined. Be careful not to overmix here; overmixing can make your cakes tough.
Step 5: Divide And Bake
Divide your beautifully mixed batter evenly among the three prepared cake pans. Use a spatula to gently smooth the tops. Pop them into your preheated oven for about 20 minutes. You will know they are done when they are golden and springy to the touch.
Step 6: Cool Down
Once baked, carefully turn the cakes out onto cooling racks. It is super important to let them cool completely before you even think about icing them. Patience is a virtue here; a warm cake and buttercream are not a good combination!
Step 7: Prepare The Buttercream
While your cake layers are chilling out, let’s get that luscious buttercream ready. Whisk the butter until it is soft and fluffy. Then, gradually add the powdered sugar, whisking as you go, until it is all combined. Finish with the vanilla extract and whisk again.
Step 8: Portion The Icing
Now, let’s portion that buttercream for different uses. Remove approximately 1 1/3 cups (300g) and set it aside for filling the cake. Take another 1 1/3 cups (300g) for the crumb coating. These specific portions make the decorating process much smoother.
Step 9: Color Your Ocean
Here is where the blue cake inspo truly begins! Take two thirds of the remaining icing and color it a beautiful blue using your gel food coloring. Color the final third green. These vibrant hues will create that perfect cake ocean theme effect.
Step 10: Assemble The Cake
Time to build your masterpiece! Secure one cake layer onto a cake board with a little bit of buttercream. Spread half of the reserved filling buttercream over it, and if you are using it, add a couple of spoonfuls of raspberry jam. Repeat this with the second cake layer, then top with the third.
Step 11: Crumb Coat Magic
Using a palette knife, spread the crumb coat buttercream all over the cake. If you have a cake turntable, it is a game changer for getting an even coat. Spin the cake slowly and use a large cake scraper to smooth out the sides. This locks in crumbs and creates a perfect canvas for your final decoration.
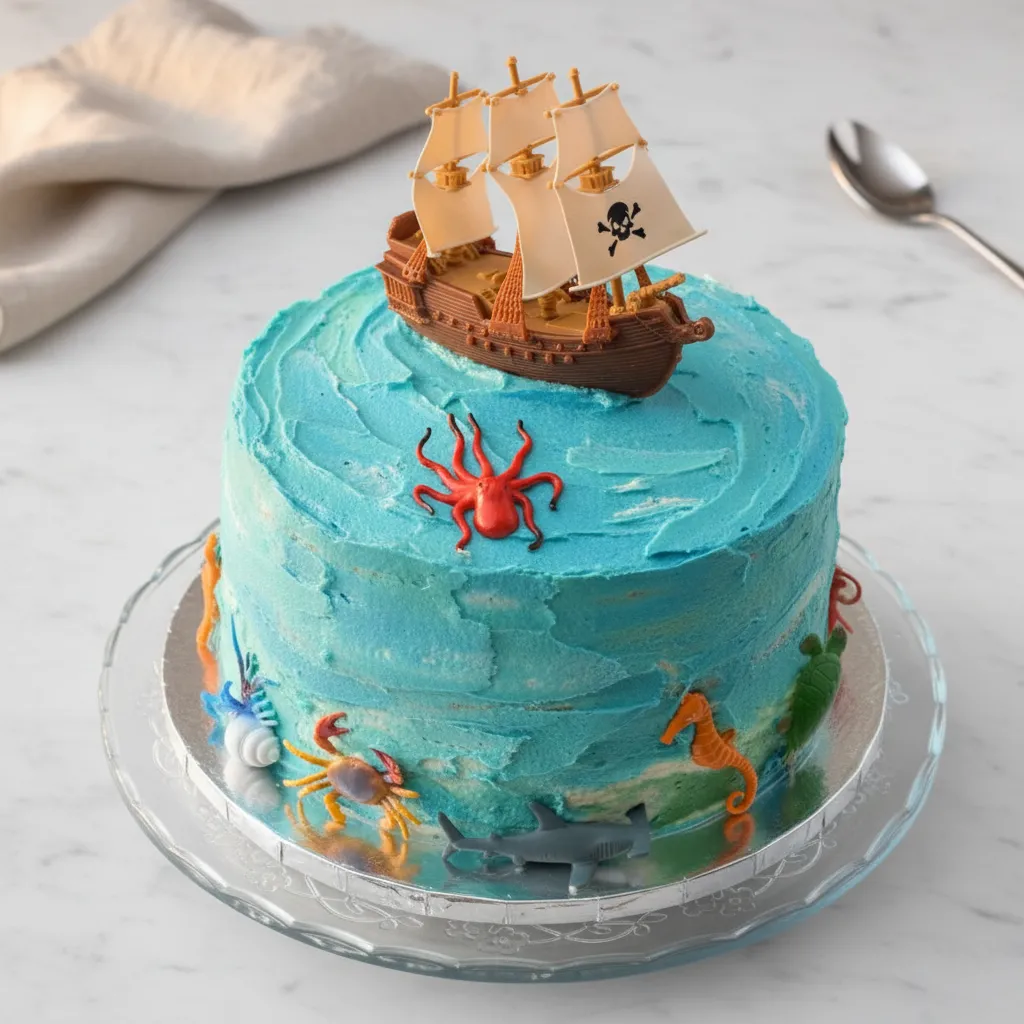
Step 12: Create The Ocean Effect
Once the crumb coat is set, dab small amounts of green icing all over the cake. Continue with the blue icing until the entire cake is covered in dabs of both colors. Now, using your cake scraper, gently smooth the icing until it is roughly even and blended together. Remember, you are going for an ocean effect, so it does not have to be perfectly smooth. The swirls and blends will give it that natural aesthetic cake designs birthday look.
Step 13: Decorate Your Scene
The final, fun step! Decorate your birthday cake with plastic sea creatures and that adorable pirate ship decoration. I love pushing the ocean creatures into the buttercream around the base of the cake, and an octopus on top always adds a whimsical touch. This is where your ocean inspired cake truly comes to life!


How To Store Leftovers
So, you have managed to have some leftover birthday cake? That is a rare and wonderful thing! To keep your beautiful creation fresh and tasty, proper storage is key. You want to make sure every slice remains as delightful as the first.
The best way to store any remaining slices or the whole cake is in an airtight container. This prevents the cake from drying out and keeps the buttercream soft. You can keep it at room temperature for up to two days, especially if your kitchen is not too warm.
If you need it to last longer, pop it in the fridge. It will stay fresh for about five to seven days there. Just make sure to bring it back to room temperature for about 30 minutes before serving. This allows the buttercream to soften slightly, making it much more enjoyable.
For longer term storage, you can even freeze individual slices! Wrap them tightly in plastic wrap, then aluminum foil, and place them in a freezer safe bag or container. They will keep well for up to a month. Thaw them in the fridge overnight, then bring to room temperature before enjoying. Easy peasy!
Tips
Baking should be a joy, not a chore! Here are some handy tips to make sure your birthday cake baking experience is smooth, fun, and results in a truly gorgeous ocean inspired cake every time.
Room Temperature Ingredients: This is a golden rule for baking. Make sure your butter and eggs are at room temperature. This helps them combine much more easily and creates a smoother, more emulsified batter and fluffier buttercream. It really does make a difference!
Do Not Overmix: When adding the flour to your cake batter, mix just until combined. Overmixing develops the gluten in the flour too much, which can lead to a tough, dense cake. We want light and fluffy for our birthday cake!
Gel Food Coloring is Best: For vibrant colors like the blues and greens needed for our cake ocean theme, gel food coloring is your best bet. Liquid food coloring can thin out your buttercream and often does not achieve the same intense hues. A little gel goes a long way!
Chill Your Crumb Coat: After applying the crumb coat, pop your cake in the fridge for 15 to 20 minutes. This helps set that first layer, making it much easier to apply your final decorative icing without pulling up any crumbs. It is a small step that makes a big difference for aesthetic cake designs birthday.
Use a Turntable: If you plan on making cakes regularly, a cake turntable is a worthy investment. It makes frosting and smoothing the sides of your cake so much easier and gives you that professional finish, especially for those beautiful blue cakes aesthetic.
Get Creative with Decorations: The sea creatures and pirate ship are just suggestions! Feel free to use edible glitter for a shimmering ocean effect, crushed graham crackers for a sandy beach, or even little candy pearls for bubbles. Let your imagination run wild for truly creative birthday cakes aesthetic!
Taste as You Go: Always taste your buttercream before you start decorating. Adjust sweetness or vanilla to your liking. It is your cake, after all, and it should taste exactly how you want it to!
Conclusion
And there you have it, folks! A truly spectacular, ocean themed birthday cake that is not only a feast for the eyes but also a delight for the taste buds. We have journeyed through the simple steps of baking a moist vanilla cake, crafting a dreamy buttercream, and bringing that vibrant cake ocean theme to life with blues and greens.
This recipe is a testament to the fact that you do not need to be a professional baker to create something absolutely stunning. It is all about having fun in the kitchen, embracing your creativity, and making memories. Whether it is for a kid’s party, an adult celebration, or simply because you want to practice your aesthetic cake designs birthday skills, this cake is a winner.
So go ahead, give this ocean inspired cake a try. Gather your ingredients, put on some tunes, and enjoy the process. You will be so proud of the beautiful birthday cake you create, and your guests will be absolutely thrilled. Happy baking, and happy celebrating!
FAQ
Can I Use Regular All Purpose Flour Instead Of Self Rising Flour?
Yes, you can! If you only have all purpose flour, for every cup of all purpose flour, add 1 ½ teaspoons of baking powder and ¼ teaspoon of salt. For this recipe, that means you would use 2.4 cups of all purpose flour, 3.6 teaspoons of baking powder, and 0.6 teaspoons of salt. It is an easy swap!
What If I Do Not Have Golden Caster Sugar?
No worries! Regular superfine sugar or even granulated sugar will work just fine. Golden caster sugar gives a slightly richer flavor and a finer texture, but the cake will still be delicious with standard granulated sugar. It is all about what you have on hand for your birthday cake.
How Can I Make My Cake Layers Perfectly Even?
For perfectly even layers, use a kitchen scale to divide your batter equally among the three pans. Another trick is to use cake strips, which you can buy or make yourself. These help the cakes bake more evenly, preventing doming and ensuring flat tops for easy stacking, perfect for your cake inspiration aesthetic.
Can I Prepare The Buttercream Ahead Of Time?
Absolutely! You can make the buttercream a day or two in advance. Store it in an airtight container in the fridge. Before using, let it come to room temperature and then re whisk it until it is light and fluffy again. This can be a great time saver!
What Kind Of Decorations Work Best For An Ocean Theme?
Beyond plastic sea creatures, you can use edible sand (crushed graham crackers or shortbread), blue and white candy melts molded into waves, edible pearls for bubbles, or even small sugar seashells. Get creative with your aesthetic cake designs birthday for that perfect beach vibe cake!
Ocean Themed Birthday Cake
Make a splash with this fun ocean-themed birthday cake! This easy, family-friendly recipe uses simple ingredients to create a stunning beach-vibe centerpiece with marbled blue and green icing.
Requirements


Ingredients
Instructions
- Preheat oven to 375°F (190°C). Grease and line three 8-inch round pans with parchment paper.
- In a large mixing bowl, whisk butter and golden caster sugar until light and fluffy.
- Add six eggs two at a time, whisking thoroughly after each addition for a smooth batter.
- Gently mix in flour, baking powder, milk, and vanilla extract until just combined. Do not overmix.
- Divide batter among pans. Use a spatula to smooth tops and bake for 20 minutes.
- Turn cakes out onto cooling racks and let them cool completely before icing.
- Prepare buttercream by whisking butter until soft, then adding powdered sugar and vanilla extract.
- Portion out icing for the filling and the crumb coat to make decorating easier.
- Color the remaining icing with blue and green gel food coloring for that ocean theme.
- Assemble the cake by stacking layers with filling and optional raspberry jam.
- Apply a crumb coat and chill in the fridge for 15-20 minutes to lock in crumbs.
- Dab blue and green icing over the cake and smooth with a scraper for a natural marbled look.
- Add your plastic sea creatures and pirate ship decorations to bring the scene to life!
Notes
Ensure your butter and eggs are at room temperature for a much smoother, fluffier batter and buttercream.
Use gel food coloring instead of liquid to get those vibrant blues and greens without thinning out your frosting.
Don’t skip the crumb coat! Chilling the first thin layer of icing makes the final decorating much easier and cleaner.
Get creative with the beach vibe by adding crushed graham crackers for sand or candy pearls for ocean bubbles.
Nutrition
Calories
Sugar
Fat
Carbs