Have you ever stood in the freezer aisle, staring at tubs of protein ice cream, and just felt a little disappointed? They can be expensive, and sometimes the texture just isn’t quite right. What if you could make your own creamy, delicious, and protein packed ice cream at home? Well, you absolutely can.
This is where the Ninja Creami machine comes in to save the day. It creates frozen treats with incredible texture from bases you make yourself. Today, I’m going to share my favorite Ninja Creami Protein Ice Cream Recipe. It’s simple, customizable, and honestly, so much better than anything you can buy at the store. Let’s get started!
Jump To:
Why You’ll Love This Recipe
So what makes this particular recipe so special? First off, it’s incredibly easy to make. You basically just blend a few ingredients, freeze them, and let the machine do its magic. There’s no complex churning or watching over a hot stove. It’s a set it and forget it kind of deal, which is amazing for busy schedules.
It is also so good for you. Packed with protein, this ice cream makes a fantastic post workout snack or a guilt free dessert. It satisfies your sweet tooth without throwing you off your health goals. We are talking about Ninja Creami Ice Cream Recipes High Protein Low Cal that actually taste great.
The texture is another huge win. If you’ve ever had protein ice cream that was icy or chalky, you know the struggle. The Ninja Creami creates such a smooth and creamy consistency. It really feels like you’re eating genuine, full fat ice cream. You won’t believe the base is so simple and healthy.
And the best part? You can totally make it your own. This recipe is a fantastic starting point. You can swap out flavors, add different mix ins, or adjust the sweetness to your liking. It’s a great way to get creative in the kitchen and make a treat that is exactly what you are craving.
Ingredients
The ingredient list for this Ninja Creami Protein Ice Cream Recipe is short and sweet. You likely have most of these items in your kitchen already. Each one plays a key part in creating that wonderful flavor and texture. Let’s break it down.
- 1 cup 1% Fairlife milk
- ½ banana
- 2 scoops grass fed whey protein
- ½ teaspoon pure vanilla extract
- 5 drops liquid stevia
- 1 tablespoon monk fruit erythritol sweetener blend
- 2 tablespoons unsweetened cocoa powder
- 1 tablespoon stevia sweetened chocolate chips (optional for mix in)
We are using Fairlife milk because it’s ultra filtered, which means it’s higher in protein and lower in sugar than regular milk. This contributes to a creamier final product, making it a fantastic base for a Fairlife Ice Cream Recipe. The banana adds natural sweetness and helps with the smooth texture. Of course, the protein powder is the star of the show for our high protein goals!
Step-By-Step Instructions
Ready to see how simple this is? Following these steps will give you a delicious pint of protein ice cream every single time. It’s almost too easy!
Step 1: Blend The Base
First things first, you need to create your ice cream base. Grab a blender or a good shaker bottle. Combine all of your ingredients except for the optional chocolate chips. This includes the Fairlife milk, banana, protein powder, vanilla extract, liquid stevia, sweetener blend, and cocoa powder.
Blend everything together until it’s completely smooth. You want to make sure there are no clumps of protein powder or cocoa powder left. A smooth base is the key to a creamy ice cream later on.
Step 2: Freeze The Mixture
Once your base is blended, pour the mixture into a Ninja Creami pint container. Make sure you don’t fill it past the max fill line. Secure the lid tightly on the pint. Now for the hardest part, waiting!
Place the pint on a level surface in your freezer. Let it freeze for at least 18 to 24 hours. It needs to be frozen completely solid all the way through for the machine to work its magic.
Step 3: The First Spin
After waiting patiently, it’s time for the fun part. Take the pint out of the freezer and remove the lid. Place the pint into the outer bowl holder that came with your Ninja Creami. Attach the creamerizer paddle to the outer bowl lid, and then lock the lid assembly onto the outer bowl.
Place the entire assembly into the machine and twist it up to lock it into place. Select the Ice Cream or Soft Serve setting, and press the button. Let the machine run through its cycle. It’s a little loud, but it’s so worth it.
Step 4: Check The Texture
After the first spin, take the pint out and look at the texture. Sometimes, especially with high protein or low fat bases, the mixture might look a bit crumbly or powdery. Don’t worry, this is totally normal! This is a common step for many Ninja Creami Ice Cream Recipes Low Sugar.
If it does look powdery, simply put it back in the machine and press the Re-Spin button. You might need to do this once or twice. Each re-spin will make it creamier until it reaches that perfect, scoopable consistency.
Step 5: Add Mix Ins
This step is optional, but who doesn’t love some extra texture in their ice cream? If you want to add the chocolate chips, use a spoon to create a small well or hole in the center of your ice cream. Make it about an inch and a half wide, going all the way to the bottom.
Pour your stevia sweetened chocolate chips into the hole. Place the pint back into the machine and press the Mix In button. The machine will run a quick cycle to evenly distribute the chocolate chips throughout your pint.
Step 6: Serve And Enjoy
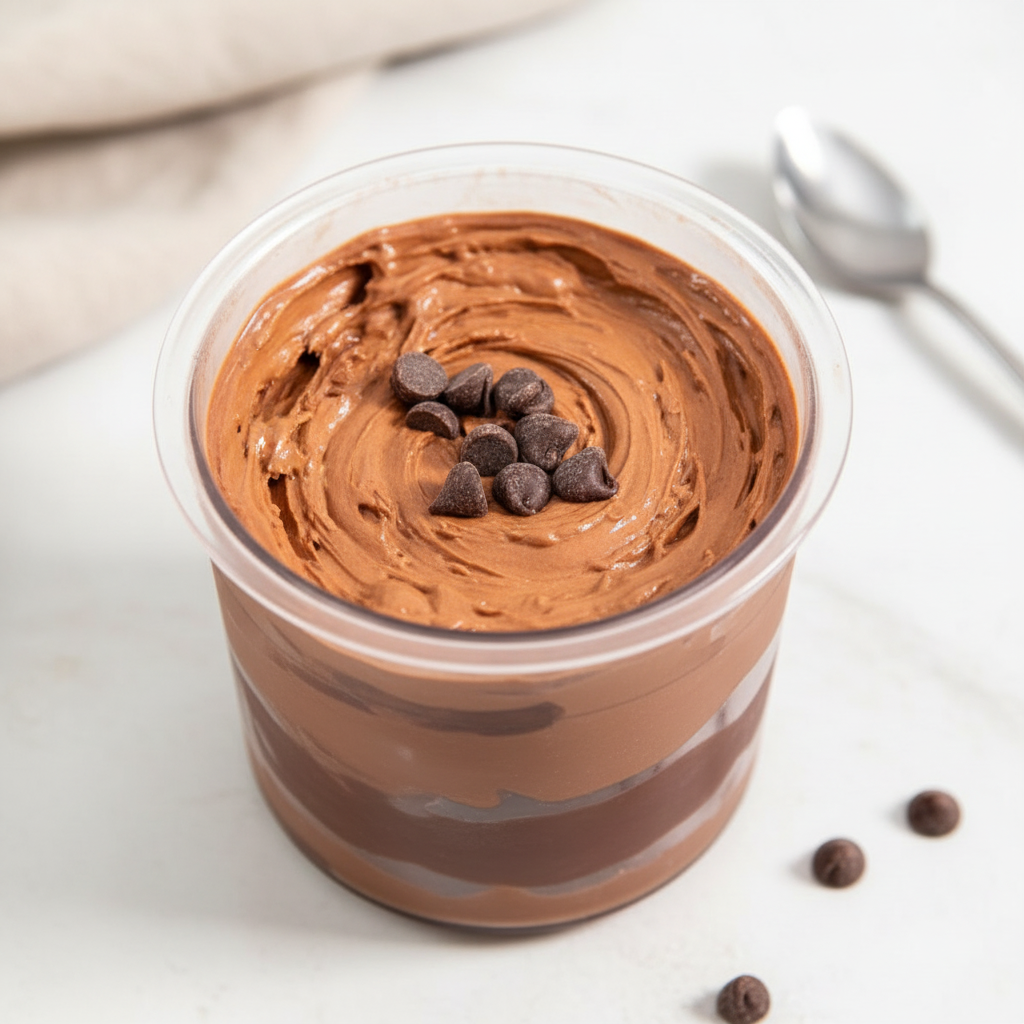
And that’s it! Your homemade Ninja Creami Protein Ice Cream Recipe is ready. You can scoop it into a bowl to serve, or just grab a spoon and enjoy it straight from the pint. No judgment here!


How To Store Leftovers
If you have any ice cream left over, which is a big if, storing it is simple. Just pop the storage lid back on the Ninja Creami pint and place it on a level surface back in your freezer. It will keep for a week or two, but the texture is always best when it’s fresh.
When you’re ready for another serving, you’ll likely need to process it again. The ice cream will freeze very hard. Just take it out, place it back in the machine, and run it on the Ice Cream or Re-Spin setting until it’s creamy again. This brings it right back to that just made texture.
Tips
Here are a few extra tips to make your ice cream experience even better. For a lighter texture, you can try using unsweetened almond milk or coconut milk instead of the Fairlife. The result will be a little less creamy but still very delicious.
If you’re not a fan of cocoa powder, you can swap it for carob powder. Carob has a naturally sweeter, milder flavor that works really well in this recipe. It’s a great alternative if you want to switch things up.
Sometimes, letting the frozen pint sit on the counter for about 5 to 10 minutes before the first spin can help achieve a creamier result with fewer re-spins. It just takes the super hard edge off the frozen base.
Don’t be afraid to experiment with other mix ins! Crushed nuts, a swirl of peanut butter, or some sugar free caramel syrup would all be amazing additions. The possibilities are really endless when it comes to creating new Ninja Creami ice cream recipes high protein low cal.
Conclusion
Making your own healthy and delicious ice cream at home is so rewarding. This Ninja Creami Protein Ice Cream Recipe is the perfect way to enjoy a sweet treat without any of the guilt. It’s creamy, flavorful, and so easy to customize to your own personal taste.
Whether you’re looking for a post workout recovery snack or just a healthier dessert option, this recipe has you covered. I hope you give this Fairlife Ice Cream Recipe a try and love it as much as I do. Have fun creating your own delicious frozen treats!
FAQ
Can I Use A Different Milk?
Yes, absolutely! While this Fairlife Ice Cream Recipe is optimized for the creaminess of ultra filtered milk, you can substitute it. Unsweetened almond milk, soy milk, oat milk, or even regular milk will work. Just be aware that the final texture might be slightly less creamy or a bit icier.
What Kind Of Protein Powder Is Best?
A whey protein blend or a casein blend tends to produce the creamiest results. However, you can definitely use a plant based protein powder if you prefer. Some plant based powders can be a bit grittier, so make sure you use one that you enjoy the taste and texture of on its own.
Why Is My Ice Cream Powdery?
A powdery or crumbly texture is very common with low fat and high protein bases in the Ninja Creami. It just means the ice crystals are very fine. The solution is simple: just use the Re-Spin function. One or two re-spins will churn it into a smooth, creamy texture. You can also add a tablespoon of milk before re-spinning to help it along.
Can I Make This Without A Banana?
You can! The banana adds natural sweetness and helps with creaminess. If you omit it, you might want to add a little extra sweetener of your choice. You could also try adding a tablespoon of sugar free pudding mix or a small amount of xanthan gum to the base before freezing to help with the texture.
What Are Some Other Mix In Ideas?
The sky is the limit! Some great ideas include crushed sugar free cookies, a swirl of nut butter, chopped nuts, shredded coconut, or even a few berries. Just make sure to use the Mix In function to incorporate them gently. This is how you create your own amazing Ninja Creami Ice Cream Recipes Low Sugar.
Ninja Creami Protein Ice Cream
A simple and customizable recipe for a creamy, delicious, and healthy high-protein ice cream made in the Ninja Creami. A fantastic post-workout snack or a satisfying, guilt-free dessert.
Ingredients
Instructions
- Blend The Base: In a blender, combine the milk, banana, protein powder, vanilla, stevia, sweetener, and cocoa powder. Blend until smooth.
- Freeze The Mixture: Pour into a Ninja Creami pint container below the max fill line. Secure the lid and freeze for at least 18-24 hours.
- First Spin: Place the frozen pint into the machine. Select the ‘Ice Cream’ setting and run the cycle.
- Check Texture & Re-spin: If the mixture is powdery, place it back in the machine and use the ‘Re-Spin’ function until creamy.
- Add Mix-Ins (Optional): Create a well in the center, add chocolate chips, and use the ‘Mix In’ function.
- Serve And Enjoy: Scoop and serve immediately.
Notes
For a lighter texture, substitute Fairlife with unsweetened almond or coconut milk.
Try swapping cocoa powder with carob powder for a different flavor profile.
Let the frozen pint sit on the counter for 5-10 minutes before the first spin for a creamier result.
Nutrition
Calories
Sugar
Fat
Carbs