Let’s be honest, who hasn’t dreamed of having an endless supply of custom-flavored ice cream right in their own freezer? We’ve all been there, standing in the grocery store aisle, torn between boring old vanilla and a fancy pint that costs a small fortune. You think, “I could probably make this at home,” but then you remember the clunky, salt-filled ice cream makers of the past. It just seemed like too much work.
Well, that’s all changed. If you’ve landed here, you’ve probably heard the buzz about a kitchen gadget that’s completely shaking up the world of homemade frozen treats. I’m talking about the Ninja Creami. This machine isn’t your grandma’s ice cream maker. It’s a whole new way to think about creating everything from rich, decadent ice cream to healthy protein-packed desserts and refreshing sorbets.
This guide is your one-stop shop for incredible ninja creami ice cream recipes. We’ll cover everything from the basics to fancy flavor combinations, helping you turn your kitchen into the best ice cream parlor in town.
Why the Ninja Creami is a Game-Changer for Homemade Ice Cream

So, what’s the big deal? Why is everyone from fitness influencers to foodie bloggers suddenly obsessed with this thing?
Here’s the thing: traditional ice cream makers work by churning a liquid base in a frozen bowl for 20-30 minutes. The constant churning freezes the liquid while incorporating air, making it creamy. It works, but it can be messy and requires you to have that bulky bowl frozen and ready to go.
The Ninja Creami flips that entire process on its head. Instead of churning a liquid, you freeze your ice cream base into a solid block (right in its own convenient pint container). When you’re ready for a treat, you pop that frozen block into the machine. A powerful paddle with a special blade then spins down, shaving and processing the block into an unbelievably smooth and creamy frozen treat in just a couple of minutes.
This unique method is what makes it so special. It allows you to make homemade ice cream with ingredients that would never work in a traditional churner. You can make incredible protein ice cream using just a protein shake, or a super simple sorbet with just canned fruit. It’s all about convenience, creativity, and getting that perfect texture every single time.
Jump To:

Vanilla Ninja Creami Ice Cream
Creamy and classic Ninja Creami vanilla ice cream made with just a few basic ingredients. A perfect frozen treat that’s smooth, sweet, and super simple.
- Total Time: 24 hours
- Yield: 4 servings 1x
Ingredients
1 cup whole milk
1 cup heavy cream
1/2 tsp vanilla extract
1/3 cup granulated sugar
Pinch of salt
Instructions
1. Add all ingredients to a blender and mix until smooth.
2. Pour the mixture into a Ninja Creami pint container and freeze for 24 hours.
3. After freezing, process using the ‘Ice Cream’ setting.
4. If the texture is crumbly, use the ‘Re-Spin’ function once or twice.
5. Serve immediately or store in the freezer.
Notes
You can use vanilla bean paste for a richer flavor.
For a lower sugar option, swap sugar for a sweetener like monk fruit or stevia.
- Prep Time: 5 minutes
- Cook Time: 0 minutes
- Category: Dessert
- Method: No-Churn, Frozen
- Cuisine: American
- Diet: Vegetarian
Nutrition
- Serving Size: 1/2 cup
- Calories: 210
- Sugar: 16g
- Sodium: 35mg
- Fat: 13g
- Saturated Fat: 8g
- Unsaturated Fat: 4g
- Trans Fat: 0g
- Carbohydrates: 19g
- Fiber: 0g
- Protein: 3g
- Cholesterol: 40mg


Ninja NC301 CREAMi Ice Cream Maker + 2 Pint Containers and Lids Bundle
Deal price: $219.94
You save 14% ($35.04)
As an Amazon Associate, I earn from qualifying purchases. Pricing and availability may change.
Top-Rated Ninja Creami Ice Cream Recipes
Alright, let’s get to the good stuff—the reason you’re really here! These recipes are tried-and-true favorites that show off just how versatile the Ninja Creami can be.
The Best High-Protein Ninja Creami Recipes

This is where the Creami truly shines for the health-conscious crowd. You can finally make a satisfying, high-protein dessert that doesn’t taste like chalky disappointment.
Chocolate Peanut Butter Protein Ice Cream
This one’s a classic for a reason. It’s rich, satisfying, and tastes way too good to be healthy.
- Ingredients:
- 1 Fairlife Chocolate Protein Shake (or your favorite brand)
- 1 tbsp Peanut Butter Powder (like PBfit)
- 1 tbsp Sugar-Free Chocolate Pudding Mix (optional, but helps with texture)
- Instructions: Pour the protein shake into your Creami pint. Whisk in the peanut butter powder and pudding mix until it’s completely smooth. Pop the lid on and freeze on a level surface for at least 24 hours. Once frozen solid, process it on the ‘Lite Ice Cream’ setting. If it comes out a bit crumbly (which is totally normal!), add a tablespoon of almond milk or more protein shake and hit the ‘Re-spin’ button. It will turn into pure magic.
Vanilla Greek Yogurt Protein Ice Cream
If you love the tangy flavor of frozen yogurt, this will be your new go-to. It’s packed with protein and has a wonderful, dense creaminess.
- Ingredients:
- 1 cup Plain Greek Yogurt (full-fat works best for creaminess)
- 1/2 cup Unsweetened Almond Milk
- 1 scoop Vanilla Protein Powder
- 1-2 tbsp Maple Syrup or sweetener of your choice
- 1 tsp Vanilla Extract
- Instructions: In a small bowl, mix all the ingredients together until there are no lumps from the protein powder. Pour the mixture into the Creami pint, secure the lid, and freeze for 24 hours. When you’re ready, run it on the ‘Lite Ice Cream’ cycle. You might need a ‘Re-spin’ with a splash of almond milk to get it perfectly smooth.
Classic & Creamy Ninja Creami Recipes
Sometimes you just want real, indulgent ice cream. No apologies needed. These recipes deliver that classic, full-fat flavor that brings you right back to childhood.
5-Ingredient Vanilla Bean Ice Cream
This is the foundational creami recipe. Master this, and you can create nearly any flavor you can dream of. It’s simple, pure, and absolutely delicious.
- Ingredients:
- 1 tbsp Cream Cheese, softened
- 1/3 cup Granulated Sugar
- 1 tsp Vanilla Bean Paste (or good quality vanilla extract)
- 1 cup Heavy Cream
- 1/2 cup Whole Milk
- Instructions: Start by microwaving the cream cheese in a small bowl for about 10-15 seconds until it’s soft. Whisk in the sugar and vanilla paste until it’s smooth and not grainy. Slowly pour in the heavy cream and milk while whisking continuously. Pour this beautiful base into your Creami pint and freeze for 24 hours. Process it on the ‘Ice Cream’ setting. It should come out perfectly creamy, but don’t be afraid to use the ‘Re-spin’ if needed.
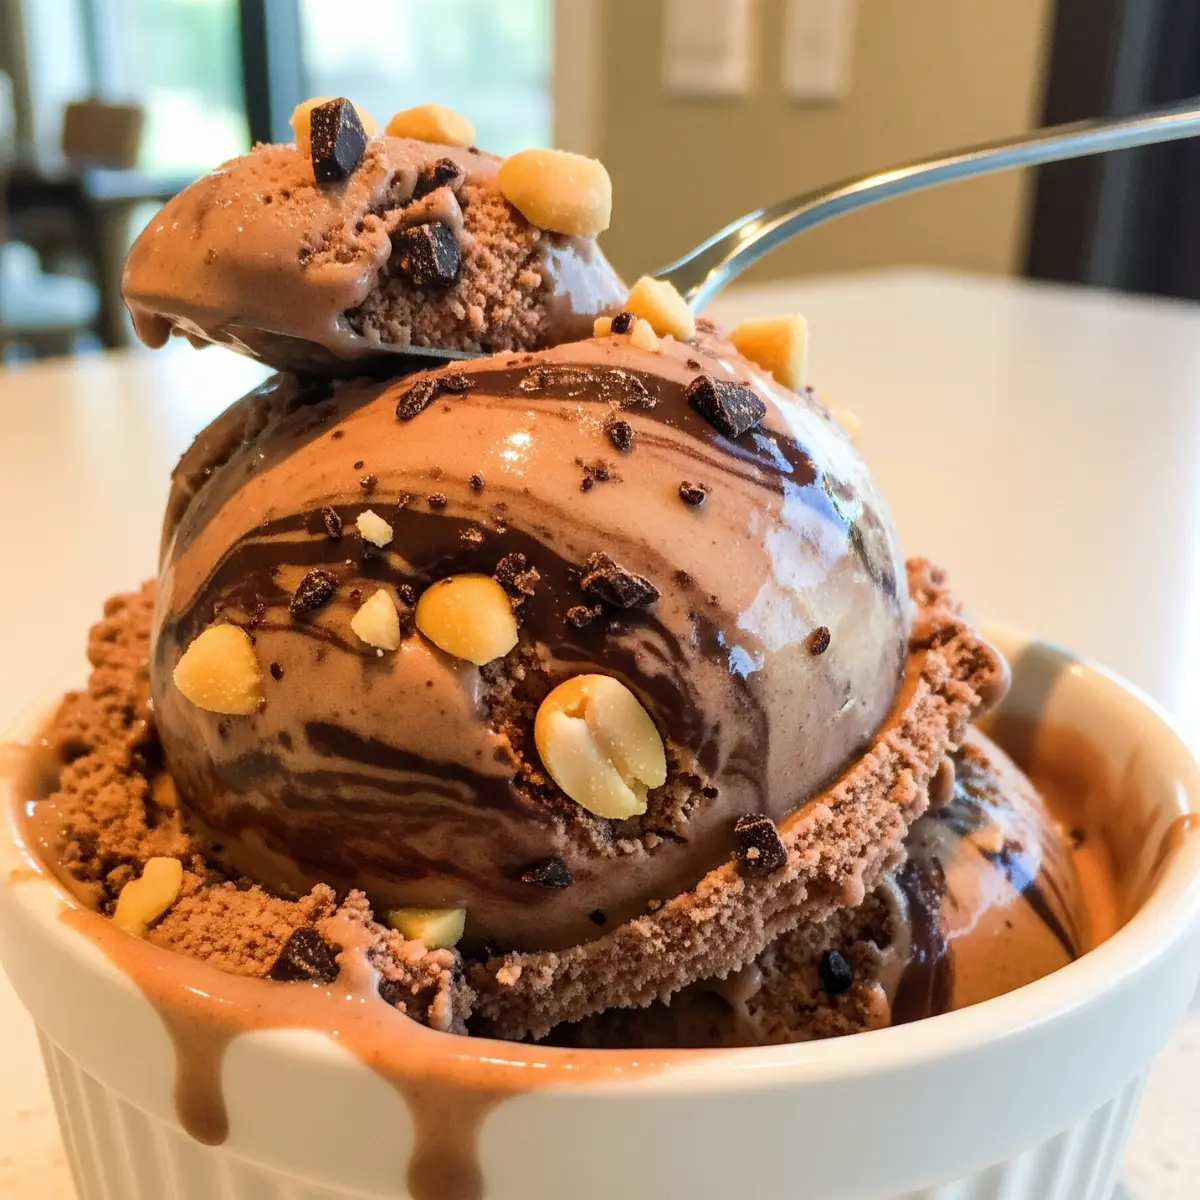
Decadent Cookies and Cream Ice Cream
A fan favorite that’s ridiculously easy to make. This is the kind of treat that disappears in minutes.
- Instructions: First, make the 5-Ingredient Vanilla Bean Ice Cream base as described above and process it. After the ‘Ice Cream’ cycle is done, you’ll notice a small hole has been created in the center of your ice cream. That’s for your mix ins! Grab a handful of crushed Oreos (or your favorite chocolate sandwich cookie) and drop them in. Place the pint back in the machine and press the ‘Mix-In’ button. The machine will gently fold the cookies into your creamy vanilla base. It’s perfection.
I’m talking about the Ninja Creami.
Delicious Dairy-Free & Vegan Ninja Creami Recipes

Finding good dairy-free ice cream can be tough. It’s often icy or has a weird aftertaste. The Ninja Creami, however, handles dairy-free ice cream like a champ, creating smooth and satisfying textures.
Creamy Coconut Milk Chocolate Ice Cream
This recipe is so rich and creamy, you won’t even miss the dairy. The key is using full-fat coconut milk from a can.
- Ingredients:
- 1 can (13.5 oz) Full-Fat Coconut Milk
- 1/2 cup Powdered Sugar
- 1/4 cup Unsweetened Cocoa Powder
- 1 tsp Vanilla Extract
- A pinch of salt
- Instructions: In a bowl, whisk together all the ingredients until the cocoa powder is fully dissolved. Make sure you scrape the thick coconut cream from the can! Pour it into the Creami pint and freeze for 24 hours. Process on the ‘Ice Cream’ setting. It comes out like a fudgy, decadent chocolate dream.
Refreshing Strawberry Almond Milk Sorbet

Looking for something a little lighter? This sorbet is bright, fruity, and incredibly easy. It’s the perfect treat for a hot summer day.
- Ingredients:
- 1 lb Fresh or Frozen Strawberries
- 1/4 cup Agave or sweetener of choice
- 1 tbsp Lemon Juice
- Just enough almond milk to blend
- Instructions: If using fresh strawberries, hull them. Add the strawberries, agave, and lemon juice to a blender. Add a tiny splash of almond milk and blend until smooth, adding more milk only if needed to get the blades moving. You want the mixture thick. Pour into your Creami pint, freeze for 24 hours, and process on the ‘Sorbet’ setting. It’s pure, refreshing fruit flavor.
Mastering the Ninja Creami: A Step-by-Step Guide

The machine might look a little intimidating at first, but believe me, it’s super simple once you get the hang of it. Here’s the basic workflow you’ll follow for almost any recipe.
Step 1: Creating and Freezing Your Ice Cream Base
This is the most important step, and it requires a little patience. You have to mix your ingredients and freeze the pint for a full 24 hours. No cheating! The base needs to be frozen solid, like a block of ice. If it’s even slightly soft in the middle, the machine won’t be able to shave it properly, and you’ll get a soupy result. Also, make sure you freeze it on a flat surface in your freezer so the top is level.
Step 2: Processing with the ‘Ice Cream’ and ‘Lite Ice Cream’ Functions
Once your base is a solid brick, it’s time for the magic. Place the pint into the outer bowl, snap on the lid with the blade, and lock it into the machine.
- Use the ‘Ice Cream’ function for bases that are high in fat and sugar—think recipes with heavy cream and regular sugar.
- Use the ‘Lite Ice Cream’ function for healthier bases, like those made with protein shakes, almond milk, or sugar substitutes. This setting is designed to handle harder, icier starting blocks.
Step 3: The Importance of the ‘Re-Spin’ for Perfect Texture
Okay, listen up, because this is the tip that separates the beginners from the pros. After the first spin, your ice cream might look dry and crumbly, like astronaut ice cream. Your first instinct might be to think you did something wrong. You didn’t!
This is completely normal, especially for low-fat or low-sugar recipes. All you have to do is add one or two tablespoons of your base liquid (like milk, cream, or a protein shake), put it back in the machine, and hit the ‘Re-spin’ button. This little bit of extra liquid allows the machine to whip it all together into the super smooth, scoopable texture you’re looking for. It’s a non-negotiable step for creamy results.
Step 4: Using the ‘Mix-In’ Function for Toppings and Flavors
After your ice cream is smooth and creamy, you can add the fun stuff. The machine automatically creates a small well down the center of your ice cream. This is where you’ll pour your mix-ins. Think crushed cookies, mini M&M’s, chocolate chips, chopped nuts, or brownie bits. Lock it back in and press the ‘Mix-In’ button. The machine uses a gentler motion to evenly distribute your goodies without pulverizing them.


Essential Ingredients for the Creamiest Results
While the machine does a lot of the heavy lifting, a few key ingredients can take your creations from good to great.
The Role of Fats: Heavy Cream vs. Cream Cheese
Fat is your friend when it comes to creamy ice cream. It coats the ice crystals and keeps them small, which is the key to a smooth mouthfeel.
- Heavy Cream: This is the classic choice for a reason. It provides a rich, clean flavor and a wonderfully silky texture. It’s the go-to for traditional ice cream recipes.
- Cream Cheese: Adding just a tablespoon of softened cream cheese to your base acts as a stabilizer. It gives the final product a slightly denser, thicker consistency—almost like a gelato or a frozen cheesecake. It also helps prevent iciness.
Binders and Thickeners: When to Use Xanthan Gum or Pudding Mix
Sometimes, especially in low-fat or dairy-free recipes, you need a little extra help to prevent that dreaded icy texture. Binders do just that.
- Pudding Mix: A tablespoon of instant pudding mix (like vanilla or chocolate) is an easy and effective trick. The starches in the mix help absorb excess water and keep the ice cream smooth. It also adds a nice little flavor boost.
- Xanthan or Guar Gum: Don’t be scared by the names! These are common, plant-based thickeners. You only need a tiny amount—like 1/4 teaspoon for a whole pint. They work wonders in protein and dairy-free recipes to create a creamier, less icy texture.
Troubleshooting Common Ninja Creami Problems (Icy, Crumbly, or Too Soft)
Even with the best machine, things can sometimes go sideways. Here’s how to fix the most common issues.
- It’s Icy: This usually means your base didn’t have enough fat, sugar, or a binder to keep the ice crystals small. Next time, try using a recipe with more heavy cream, adding a tablespoon of pudding mix, or a tiny pinch of xanthan gum.
- It’s Crumbly or Powdery: Don’t panic! This is the most common “problem,” and it’s the easiest to fix. As we covered, it just needs a ‘Re-spin’. Add a tablespoon of liquid and spin it again. It will come together beautifully.
- It’s Too Soft or Soupy: This can happen for a couple of reasons. Either your base wasn’t frozen for the full 24 hours, or it was sitting on the counter for a bit too long before you spun it. The fix? Just pop the lid back on and stick the pint in the freezer for 30-60 minutes to firm up.