
Nothing beats a Nigella Chocolate Pavlova when it comes to combining texture, taste, and drama. Crisp outside, soft inside, and oh-so chocolatey.
Let’s get you baking with confidence. In this guide, you’ll learn not only the how but also the why—what makes this dessert work so well, and how to tweak it for your own twist. Ready to dive in?
Table of Contents

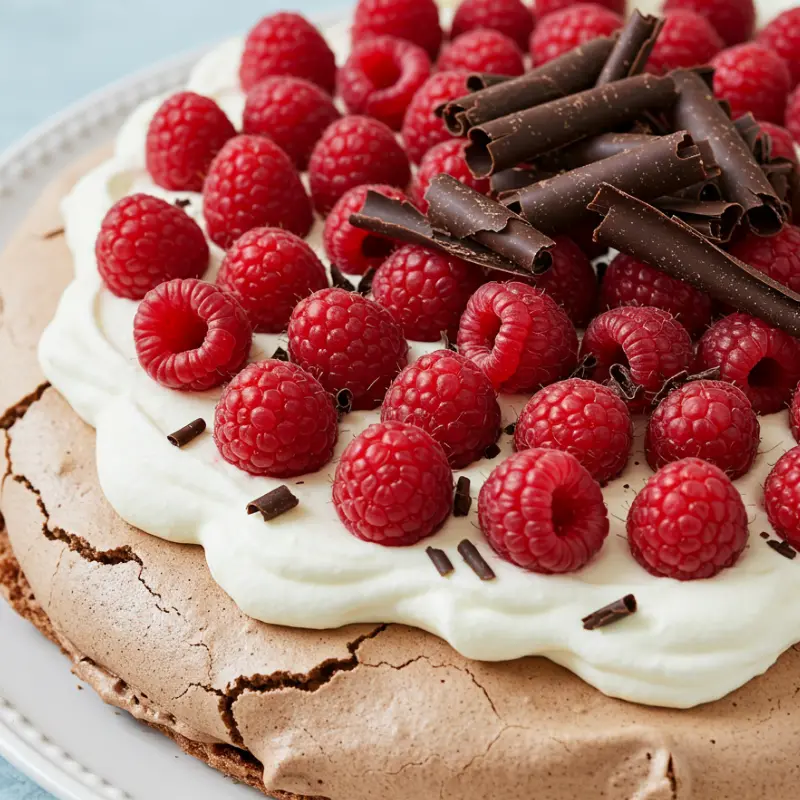
Classic Nigella Chocolate Pavlova with Raspberries
This Nigella-inspired chocolate pavlova has a crisp shell, a soft chewy middle, and a crown of whipped cream and fresh raspberries. Perfect for special occasions or a weekend indulgence.
- Total Time: 1 hour 40 minutes
- Yield: 8 servings 1x
Ingredients
For the Meringue Base:
6 large egg whites
2 cups superfine sugar
3 tablespoons unsweetened cocoa powder, sifted
1 teaspoon balsamic or red wine vinegar
2 ounces dark chocolate, finely chopped
For the Toppings:
2 cups heavy cream
4 cups raspberries
1 to 2 ounces dark chocolate
Instructions
1. Preheat oven to 350°F. Line a baking sheet with parchment paper and draw a 9-inch circle using a cake tin. Flip the paper over so the meringue won’t touch the pencil lines.
2. Beat egg whites until soft peaks form. Gradually add sugar, one spoonful at a time, until the meringue is stiff and glossy.
3. Sift cocoa over the meringue. Add vinegar and chopped chocolate. Fold gently with a rubber spatula until fully combined.
4. Dab some meringue on the corners of the parchment to secure it. Spoon the meringue inside the circle, smoothing the top and edges.
5. Put the tray in the oven and immediately reduce temperature to 300°F. Bake for 1 hour and 15 minutes. The top should be dry but the center soft when gently pressed.
6. Turn off oven, crack the door open, and let the meringue cool inside completely.
7. Whip cream until thick but soft. Invert the pavlova onto a plate. Top with whipped cream and scatter raspberries.
8. Grate or shave chocolate over the top just before serving.
Notes
Use room temperature eggs for better volume.
Store leftovers uncovered in the fridge for up to 1 day.
- Prep Time: 25 minutes
- Cook Time: 1 hour 15 minutes
- Category: Chocolate
- Method: Baking
- Cuisine: British-Inspired
- Diet: Vegetarian
Nutrition
- Serving Size: 1 slice
- Calories: 320
- Sugar: 30g
- Sodium: 35mg
- Fat: 18g
- Saturated Fat: 11g
- Unsaturated Fat: 6g
- Trans Fat: 0g
- Carbohydrates: 33g
- Fiber: 4g
- Protein: 5g
- Cholesterol: 45mg
Nigella Chocolate Pavlova Recipe

The Nigella Chocolate Pavlova is a showstopper dessert with a crackly outer shell and soft, marshmallow-like center. It balances rich cocoa flavor with the lightness of whipped egg whites and the brightness of fresh fruit. This dessert feels fancy, but it’s actually pretty simple if you follow the right steps.

You don’t need special tools or advanced skills. Just a clean bowl, a little patience, and good-quality ingredients. What sets this pavlova apart is the chopped dark chocolate mixed into the meringue. It adds little pockets of richness that melt in your mouth. If you’ve only had plain pavlova before, this chocolate version will surprise you.

Whether you’re making it for a dinner party or a weekend treat, this recipe delivers every time. It’s crispy, gooey, and perfectly sweet without being too rich.

Step-by-step breakdown of the classic recipe
Start by gathering your ingredients and preheating the oven. The base of the Nigella Chocolate Pavlova comes from a well-whipped meringue.

- Use room temperature egg whites
- Add sugar gradually while beating
- Sift in cocoa and fold it gently
- Mix in finely chopped dark chocolate

Spread the mixture into a circle on parchment paper and bake it low and slow. Let it sit in the oven after turning it off to avoid cracks. Once cool, top with whipped cream and fruit.
Tips for whipping egg whites to stiff peaks

Use a clean, dry bowl. Even a drop of fat or water can stop egg whites from whipping. Beat until the peaks hold their shape but aren’t dry.

- Room temperature eggs whip better
- Add sugar one spoon at a time
- Use a stand or hand mixer for better control
How to fold in cocoa and chopped chocolate

Folding is key. Don’t stir too hard or you’ll lose volume. Use a spatula and turn the bowl as you fold. Add cocoa first, then chocolate.
- Sift the cocoa for smooth blending
- Chop chocolate finely so it melts evenly
Best ways to cool pavlova without cracking
Once baked, turn the oven off and let the pavlova cool inside with the door cracked open. Sudden changes in temperature cause cracks.
- Avoid drafts in the kitchen
- Let it sit in the oven at least 30 minutes
- Don’t move it while hot
Nigella Chocolate Raspberry Pavlova Guide
Adding raspberries to a Nigella Chocolate Pavlova turns a rich dessert into something unforgettable. The sweetness of the meringue and cream pairs beautifully with the tart bite of raspberries. It adds color, freshness, and a little zing to each bite.
Raspberries also balance the richness of the chocolate. You get sweet, creamy, crunchy, and tangy in every forkful. This version is a favorite for summer gatherings, birthdays, or anytime you want a dessert that looks as good as it tastes.
Use fresh raspberries if possible, and scatter them generously over the whipped cream. You can also mash a few with sugar for a quick sauce.
Why raspberries complement rich chocolate
Chocolate can feel heavy, but raspberries cut through that. Their natural tartness lifts the flavor and keeps each bite interesting.
- Raspberries add contrast and brightness
- They create a more balanced dessert
- The juicy texture pairs well with the crunch of meringue
How to style raspberries for maximum impact
Don’t just pile them on. Try layering or making a design. You can ring the pavlova with berries or scatter them in clusters.
- Use mint leaves for added color
- Add a few on the side of the plate for a fresh touch
- A dusting of powdered sugar can make them pop
Balancing sweetness with fruit acidity
The base and cream are sweet, so raspberries add needed acidity. If your berries are very tart, mix them with a little sugar.
- Taste the berries before adding
- Sweeten gently to avoid overpowering flavor
- A raspberry coulis adds an elegant touch
Chocolate curls vs fresh shavings as garnish
Chocolate curls feel fancier, but shavings are quicker. Either way, they add texture and extra chocolate flavor.
- Use a vegetable peeler on a chocolate bar for curls
- Chop finely for shavings and sprinkle just before serving
- Chill curls slightly so they hold shape longer
Mini Nigella Chocolate Pavlovas
If you’re hosting a party or just want an easier way to serve dessert, Mini Nigella Chocolate Pavlovas are a smart and stylish solution. These single-serve versions offer the same crisp shell and soft center as the original, just in smaller portions.
They bake faster, cool quicker, and are perfect for portion control. Plus, guests love the individual touch. Whether you top them all the same or create a mix of toppings, they’re a guaranteed hit.
You don’t need to adjust the base recipe much. Just pipe or spoon smaller circles of meringue onto the baking sheet, spacing them a bit apart.
Perfecting texture in smaller portions
Mini pavlovas bake quicker, so it’s easier to get a crisp outside without overbaking the center. Keep an eye on them after 40 minutes.
- Make each pavlova roughly palm-sized
- Use the back of a spoon to create a small dip in the center
- Let them cool in the oven like you would with a full-size pavlova
Ideal bake times for mini pavlovas
Smaller pavlovas typically bake in 45 to 50 minutes at a low temperature. Always check the edges—they should feel dry and crisp.
- Preheat your oven fully before baking
- Avoid opening the oven mid-bake
- Let them sit in the oven after it’s off for at least 30 minutes
Creative ways to serve for parties
Mini Nigella Chocolate Pavlovas can be arranged on a platter or served on individual plates. You can even create a pavlova bar where guests add their own toppings.
- Offer a few fruit options like berries or sliced kiwi
- Provide whipped cream, yogurt, or mascarpone
- Add bowls of shaved chocolate, crushed nuts, or lemon zest
Whipped cream and fruit topping variations
While raspberries are classic, don’t be afraid to change things up. You can add tropical fruit, caramel drizzle, or even a dollop of Nutella.
- Try whipped coconut cream for a dairy-free twist
- Use strawberries, cherries, or blueberries
- Mix cream with cocoa or espresso for flavor
Make-Ahead Nigella Chocolate Pavlova
Planning ahead makes any meal smoother, and Nigella Chocolate Pavlova is a dessert that works beautifully when made in stages. The base can be baked the day before, and toppings prepped just before serving.
This flexibility makes it ideal for events, family dinners, or busy weekends. You get all the wow without the last-minute stress. The key is knowing how to store each part properly so nothing goes soggy or flat.
By keeping the meringue dry and the toppings cold, you’ll have a fresh and crisp pavlova ready to go.
Storing meringue base without losing crunch
Once the base is baked and cooled, store it in an airtight container at room temperature. Moisture is the enemy of crisp meringue.
- Avoid refrigerating the base
- Keep it away from heat or steam sources
- You can wrap it loosely in parchment before sealing
When to whip cream and prep toppings
Wait until the day you plan to serve to whip the cream. It holds its shape better when freshly made. Fruits can be rinsed and patted dry ahead of time.
- Chill the bowl and beaters before whipping cream
- Store fruit separately to avoid sogginess
- Don’t assemble until just before serving
Transporting pavlova safely for events
If you need to take your Nigella Chocolate Pavlova somewhere, pack the base and toppings separately. Assemble on-site for the best texture and look.
- Use a flat baking tray or cake box for the base
- Store cream in a cold container
- Bring fruit in small sealed bags or boxes
Day-before prep tips for stress-free serving
Baking the pavlova ahead means your oven is free for other dishes. Get your fruit washed and cream measured the night before.
- Make a checklist for toppings and tools
- Keep everything labeled and organized
- Let the base cool completely before storing
Tips For Baking Nigella-Style Pavlova
Making a perfect Nigella Chocolate Pavlova takes a bit of technique, but once you know the tricks, it’s a lot easier than it looks. Getting the texture right means focusing on your ingredients, oven behavior, and a few chemical reactions that help the meringue hold its shape.
Nigella’s pavlova stands out because it keeps a chewy center with a crisp crust. If you skip a step or rush the process, you could end up with a collapsed or sticky mess. But don’t worry—we’re breaking it all down so your next bake turns out just right.
Temperature control and oven settings
The oven should be fully preheated before you slide your pavlova in. Bake it low and slow. Too hot, and it browns too fast. Too cool, and it may not dry out properly.
- Set the oven to around 300°F then drop it to 250°F once the pavlova is in
- Avoid opening the oven during baking
- Let the pavlova cool inside with the door cracked open
Why vinegar and cornstarch are essential
Vinegar helps stabilize the egg whites while cornstarch keeps the center soft. These two ingredients are what give Nigella Chocolate Pavlova its marshmallow-like middle.
- Add vinegar and cornstarch once sugar is fully incorporated
- Use white vinegar or lemon juice for best results
- Sift cornstarch to avoid clumps
Preventing collapse and stickiness
Humidity, overbeating, or not cooling properly can lead to disaster. To keep your pavlova crisp and tall, you need a dry day and a gentle hand.
- Never make pavlova on a rainy or humid day if you can avoid it
- Let it cool completely before moving or decorating
- Don’t over-whip or it’ll deflate once baked
Avoiding over-beaten meringue
Stiff peaks are great, but dry and crumbly peaks are not. If your mixture looks grainy or breaks apart, it’s gone too far.
- Stop mixing as soon as it holds firm peaks
- The meringue should look glossy and smooth
- Rub a bit between your fingers to check for undissolved sugar
Creative Twists on Nigella’s Chocolate Pavlova
The original Nigella Chocolate Pavlova is a masterpiece, but that doesn’t mean you can’t have fun with it. Once you get the base recipe down, it becomes a perfect canvas for flavor experiments and seasonal upgrades.
You can change the fruit, mix in new flavors, or swap out the cream for something richer. These twists keep things exciting and let you match the dessert to different themes, moods, or holidays.
Adding espresso powder for mocha flavor
Just a teaspoon of espresso powder mixed into the cocoa can give your pavlova a deep, mocha-like taste that feels a little more grown-up.
- Add espresso powder when you add the cocoa
- Try topping it with chocolate-covered coffee beans
- Serve with coffee ice cream or affogato on the side
Using passion fruit instead of raspberry
Passion fruit adds a bright, tropical edge. Its tartness and texture pair beautifully with the sweet meringue and cream.
- Use fresh pulp or bottled puree
- Spoon over the cream just before serving
- Pairs well with mango or pineapple, too
Holiday version with nuts and spices
For a holiday spin, add cinnamon or nutmeg to the base and top with roasted pecans or hazelnuts. A dusting of powdered sugar makes it festive.
- Mix spices directly into the meringue before baking
- Decorate with sugared cranberries or orange zest
- Swap whipped cream for spiced mascarpone
Swapping cream for mascarpone or mousse
Want a richer topping? Mascarpone gives a denser bite while chocolate mousse adds even more decadence. Either way, it’s a tasty way to mix things up.
- Whip mascarpone with a bit of cream for spreadability
- For mousse, use a light recipe that sets quickly
- Balance rich toppings with fresh fruit to cut sweetness
Decorating Your Nigella Pavlova Like a Pro
A beautiful Nigella Chocolate Pavlova deserves an eye-catching finish. While it already tastes incredible, the way you decorate it can take it to the next level. With just a few tricks, you can make your pavlova look like it came from a bakery.
Think layers of cream, glistening fruit, and artistic drizzles. Even small touches like chocolate shavings or fresh herbs can make a big impact. Whether you’re serving a full pavlova or minis, these decorating ideas will help you serve a dessert that looks as good as it tastes.
Layering whipped cream with finesse
Whipped cream is the glue that brings it all together. It smooths over any surface cracks and gives the fruit something to rest on. Don’t just plop it on—spread it with care.
- Use an offset spatula for even spreading
- Create gentle waves and swirls for texture
- Avoid piling too high or the cream may slide off
Using seasonal fruits for visual pop
Seasonal fruit makes your Nigella Chocolate Pavlova more colorful and fresh. In summer, try berries or stone fruit. In winter, go for citrus slices or pomegranate seeds.
- Stick with fruits that contrast in color and taste
- Cut larger fruit into bite-sized pieces
- Layer fruit in rings or clusters for balance
Drizzling melted chocolate artfully
A drizzle of dark or white chocolate adds shine and flavor. It also pulls the whole look together. Melt the chocolate gently and use a spoon to create streaks.
- Let chocolate cool slightly before drizzling
- Hold spoon high for thin, delicate lines
- Drizzle just before serving so it doesn’t harden too much
Topping ideas for photo-worthy presentation
Finish strong with toppings that add texture, color, and sparkle. These extras make your pavlova pop in photos and wow your guests.
- Try edible flowers, mint leaves, or crushed pistachios
- Use gold leaf for a fancy touch
- Sprinkle powdered sugar or cocoa for a final dusting
FAQ
What makes Nigella chocolate pavlova so special?
How can I avoid my pavlova cracking or sinking?
What type of chocolate is best for Nigella’s recipe?
Can I make Nigella chocolate pavlova without fruit?
How far in advance can I prepare pavlova?
Can Nigella’s pavlova be made dairy-free?
Share Your Experience
Have you made this Nigella Chocolate Pavlova at home? Whether it was your first pavlova ever or you’ve baked it dozens of times, I’d love to hear how it turned out for you.
Did you try a twist with passion fruit or swap in mascarpone? Maybe you discovered the perfect way to stop those pesky cracks? Drop your tips, questions, or stories in the comments below. Your ideas might just help another baker get it right!


Just added this to my must-try list
I made this for a dinner party last night and everyone was obsessed! The texture was spot on—crunchy shell with that gooey, chocolatey center. Definitely saving this one for special occasions.