There is hardly a moment in cinema more memorable for food lovers than when a giant half giant bursts through a door to deliver a slightly squashed pink box. Inside that box sat a sticky, chocolatey, and misspelled birthday cake that changed the life of a young wizard forever. If you are planning a Harry Potter Theme Party or just want to add some magic to your weekend, this recipe is exactly what you need.
This is not just any dessert. It is a tribute to the Harry Potter Birthday Cake that started it all. We are talking about moist chocolate layers paired with a unique butterbeer flavored frosting that tastes absolutely magical. It is the ultimate centerpiece for a Harry Potter Marathon or a cozy Harry Potter Movie Night with friends and family.
Jump To:
Why You’ll Love This Recipe
You are going to fall in love with this birthday cake because it is incredibly forgiving. Unlike fancy French pastries that require absolute precision, this cake is meant to look a little messy. After all, Hagrid might have sat on it during his journey! This makes it the perfect project for beginners who want to create something impressive without the stress of perfection.
The flavor profile is another huge win. While the original movie prop was likely just a prop, we have upgraded the taste for real life. The sponge is a rich, dark chocolate that stays moist for days. But the real star is the frosting. We use melted butterscotch chips to create a butterbeer style buttercream that pairs perfectly with the cocoa. It is a step up from standard vanilla or Chocolate Cake Frosting.
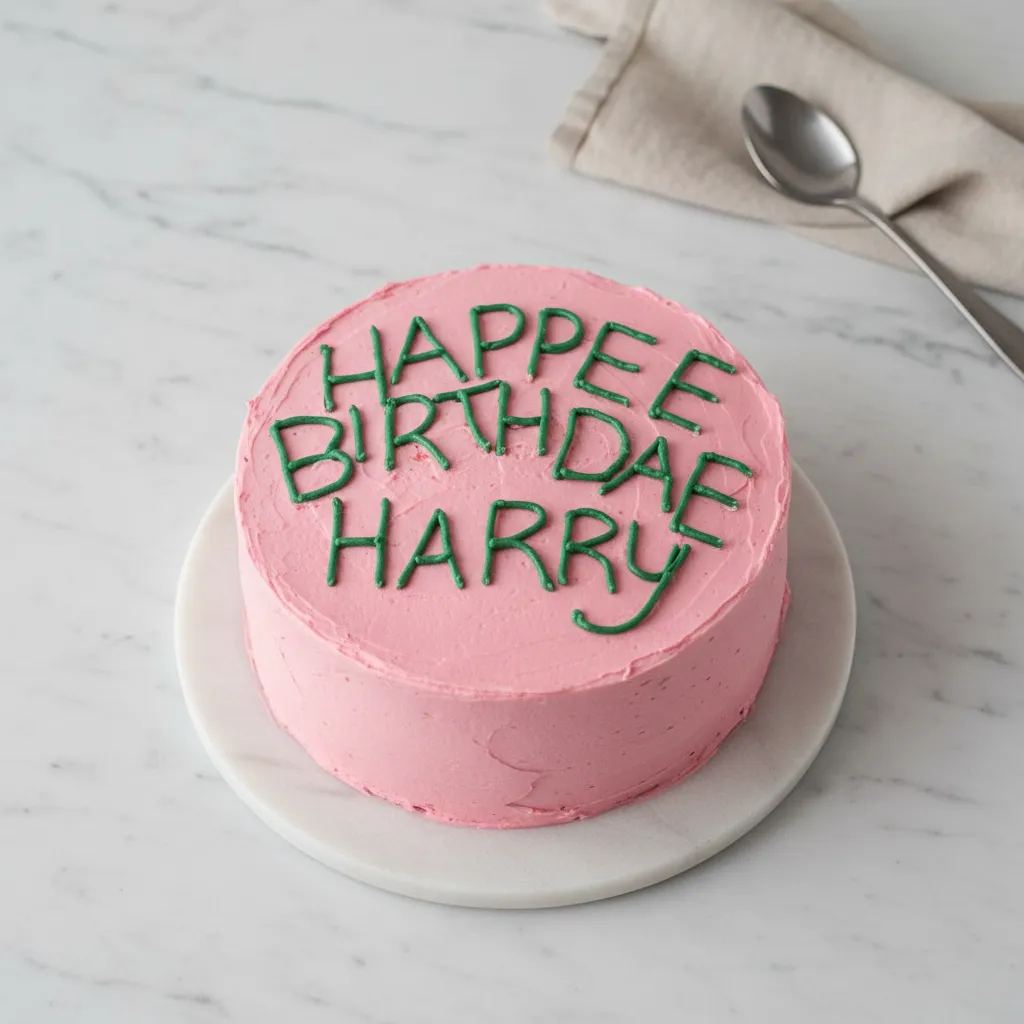
Finally, this recipe brings people together. Whether you are baking for a Harry Potter Bday or just want fun Harry Potter Snacks, decorating this cake is a blast. You get to write “Happee Birthdae Harry” in bright green icing, intentionally misspelling words and drawing cracks in the frosting. It is fun, nostalgic, and guaranteed to make everyone smile.
Ingredients
For the Chocolate Cake
- 2 cups all purpose flour, spooned and leveled
- 3/4 cup Dutch process cocoa powder
- 1 1/2 tsp baking powder
- 1/4 tsp baking soda
- 1/2 tsp salt
- 2 cups granulated white sugar
- 3/4 cup unsalted butter, softened
- 3 eggs, at room temperature
- 1 tsp vanilla extract
- 1 1/4 cups buttermilk, at room temperature
- 1/2 cup hot coffee
For the Butterbeer Buttercream
- 2 cups unsalted butter, softened
- 1/4 tsp salt
- 1 1/2 cups butterscotch chips, melted and slightly cooled
- 2 1/2 cups powdered sugar, measured then sifted
- 1 tsp butter extract
- 1 tsp vanilla extract
- Green food coloring
- Pink food coloring
Step-By-Step Instructions
Step 1: Prepare the Oven and Dry Ingredients
Start by preheating your oven to 350 degrees. This ensures the oven is at the right temperature when your batter is ready. Take two 8 inch cake pans and spray them generously with non stick spray. To guarantee your birthday cake comes out cleanly, line the bottoms of the pans with parchment paper.
Grab a medium bowl for your dry ingredients. Whisk together the flour, Dutch process cocoa powder, baking powder, baking soda, and salt. Make sure there are no large clumps of cocoa. Set this bowl aside for a moment.
Step 2: Cream Butter and Sugar
In a large mixing bowl, you need to cream the butter and sugar. Use an electric hand mixer on high speed. If you have a stand mixer, the paddle attachment works best here. Beat the softened butter and granulated sugar together for about 3 to 4 minutes.
You are looking for a texture that is fluffy and light. This step incorporates air into the batter, which helps the cake rise properly. Do not rush this part, as it builds the structure for a perfect birthday cake sponge.
Step 3: Add Eggs and Vanilla
Once the butter and sugar are fluffy, add the eggs and vanilla extract. Mix on medium speed, then increase to medium high. Continue mixing for another 2 to 3 minutes.
The mixture should look smooth, pale, and slightly fluffy. Remember to scrape down the sides of the bowl with a rubber spatula. This ensures all the ingredients are evenly incorporated and you do not get streaks of unmixed butter in your final bake.
Step 4: Combine Wet and Dry Ingredients
Now it is time to bring everything together. Add the dry ingredients and the buttermilk to the butter mixture in alternating batches. Add a little of the flour mix, then some buttermilk, and mix on low speed.
Repeat this until everything is added. Be careful not to overmix at this stage. You want to mix just until the batter is combined and smooth. Overmixing can make the cake tough instead of tender.
Step 5: Add Coffee and Bake
Pour in the hot coffee and mix on low speed just until it is dispersed through the batter. The coffee enhances the chocolate flavor without making the cake taste like a latte. Pour the batter evenly into your prepared pans.
Bake for 33 to 37 minutes. You will know the cakes are done when a toothpick inserted into the center comes out clean with just a few moist crumbs. Let the cakes cool in the pans for 5 minutes, then turn them out onto a wire rack to cool completely.
Step 6: Make the Butterbeer Frosting
While the cakes are cooling, prepare the frosting. In a large bowl, cream the softened butter and salt on high speed for 5 to 10 minutes until it is very pale and fluffy. Add the melted butterscotch chips and mix on medium speed until combined.
Sift in the powdered sugar gradually, mixing on low. Then add the butter extract and vanilla extract. Whip on high speed for another minute until light. Separate about 1 cup of frosting into a small bowl and dye it dark green. Dye the remaining large batch pink.
Step 7: Assemble and Decorate
If the cakes have domed tops, trim them flat with a knife. Place your first layer on a cake plate. Spread a generous amount of pink frosting on top. Add the second cake layer. Cover the entire cake in pink frosting.
You can use a piping bag to pipe frosting between layers and around the sides, then smooth it with a cake scraper. Remember, this Harry Potter Birthday Cake is supposed to look homemade and slightly messy, so do not stress about smooth edges!
Finally, trace “Happee Birthdae Harry” into the pink frosting with a toothpick. Use the green frosting in a piping bag to trace over your letters. Add the classic cracks between the words to mimic the movie version. Now it is ready to serve!


How To Store Leftovers
If you somehow have leftovers from your Harry Potter Theme Party, you need to store them correctly. Because this frosting is butter based, it is best to keep the cake in the fridge. Place slices in an airtight container to keep them from drying out.
The cake will stay fresh in the refrigerator for up to 4 days. When you are ready to eat a slice, let it sit on the counter for about 15 minutes. This allows the buttercream to soften up again, giving you the best texture and flavor.
You can also freeze slices of this birthday cake. Wrap individual slices tightly in plastic wrap and then foil. They will last in the freezer for up to 3 months. Thaw them in the fridge overnight before enjoying your late night Harry Potter Snacks.
Tips
One of the biggest secrets to a moist birthday cake is using room temperature ingredients. Make sure your eggs and buttermilk are not cold from the fridge. Room temperature ingredients emulsify better, creating a smoother batter and a lighter sponge.
Do not skip the hot coffee step. You might be worried that it will make your cake taste like a morning brew, but it will not. The hot liquid blooms the cocoa powder, making the chocolate flavor much more intense and rich. It is essential for a deep chocolate taste.
When melting the butterscotch chips for the frosting, let them cool slightly before adding them to the butter. If the chips are too hot, they will melt your butter and make the frosting greasy. You want them liquid but not scorching hot.
For the iconic green lettering on your Happee Birthdae Harry cake, try adding a tiny pinch of cocoa powder to the green frosting. This darkens the green slightly, making it look more like the rustic icing from the film rather than bright neon green.
If you are new to cake decorating, chilling the cake is your friend. After you apply the first layer of pink frosting (the crumb coat), put the cake in the fridge for 20 minutes. This hardens the frosting and makes it much easier to apply the final thick layer without crumbs getting mixed in.
Conclusion
Creating this Harry Potter Birthday Cake is about more than just baking; it is about bringing a piece of magic into your kitchen. The combination of rich chocolate and creamy butterbeer frosting is truly delicious, making it a standout dessert for any occasion. Whether you are celebrating a real birthday or just hosting a Harry Potter Marathon, this cake will be the highlight of the event.
We hope you have as much fun making this as you will eating it. It is messy, it is sweet, and it is full of character. So grab your apron (or your cloak), preheat that oven, and get ready to bake some magic. Don’t forget to share your Happee Birthdae Harry creations with us!
FAQ
Can I Make This Cake Gluten Free?
Yes, you can absolutely make this birthday cake gluten free. Simply swap the all purpose flour for a high quality gluten free 1 to 1 baking flour blend. Make sure the blend contains xanthan gum for the best texture. The rest of the ingredients are naturally free of gluten.
Can I Make the Cake Layers Ahead of Time?
You sure can. You can bake the chocolate cake layers up to two days in advance. Once they are completely cool, wrap them tightly in plastic wrap and store them at room temperature or in the fridge. This can actually make assembling your Harry Potter Birthday Cake easier since firm, cool cakes are easier to frost.
What If I Don’t Like Butterscotch?
If you are not a fan of butterscotch, you can easily swap it out. You can use melted white chocolate chips instead, or simply omit the chips and use a standard vanilla buttercream or a rich Chocolate Cake Frosting. However, the butterscotch is what gives it that signature “Butterbeer” flavor perfect for a Harry Potter Theme Birthday.
Do I Need a Stand Mixer?
While a stand mixer makes things easier, especially for the buttercream, you do not strictly need one. An electric hand mixer works perfectly fine for this recipe. Just be prepared to hold it for a few minutes while you whip the butter to get it nice and fluffy.
Harry Potter Birthday Cake
A moist chocolate birthday cake with a magical butterbeer flavored frosting, perfect for any Harry Potter fan. This forgiving recipe is easy for beginners and brings joy to any celebration.
Requirements


Ingredients
Instructions
- Start by preheating your oven to 350 degrees. Take two 8 inch cake pans and spray them generously with non stick spray. To guarantee your birthday cake comes out cleanly, line the bottoms of the pans with parchment paper.
- Grab a medium bowl for your dry ingredients. Whisk together the flour, Dutch process cocoa powder, baking powder, baking soda, and salt. Make sure there are no large clumps of cocoa. Set this bowl aside for a moment.
- In a large mixing bowl, you need to cream the butter and sugar. Use an electric hand mixer on high speed. If you have a stand mixer, the paddle attachment works best here. Beat the softened butter and granulated sugar together for about 3 to 4 minutes.
- You are looking for a texture that is fluffy and light. This step incorporates air into the batter, which helps the cake rise properly. Do not rush this part, as it builds the structure for a perfect birthday cake sponge.
- Once the butter and sugar are fluffy, add the eggs and vanilla extract. Mix on medium speed, then increase to medium high. Continue mixing for another 2 to 3 minutes.
- The mixture should look smooth, pale, and slightly fluffy. Remember to scrape down the sides of the bowl with a rubber spatula. This ensures all the ingredients are evenly incorporated and you do not get streaks of unmixed butter in your final bake.
- Now it is time to bring everything together. Add the dry ingredients and the buttermilk to the butter mixture in alternating batches. Add a little of the flour mix, then some buttermilk, and mix on low speed.
- Repeat this until everything is added. Be careful not to overmix at this stage. You want to mix just until the batter is combined and smooth. Overmixing can make the cake tough instead of tender.
- Pour in the hot coffee and mix on low speed just until it is dispersed through the batter. The coffee enhances the chocolate flavor without making the cake taste like a latte. Pour the batter evenly into your prepared pans.
- Bake for 33 to 37 minutes. You will know the cakes are done when a toothpick inserted into the center comes out clean with just a few moist crumbs. Let the cakes cool in the pans for 5 minutes, then turn them out onto a wire rack to cool completely.
- While the cakes are cooling, prepare the frosting. In a large bowl, cream the softened butter and salt on high speed for 5 to 10 minutes until it is very pale and fluffy. Add the melted butterscotch chips and mix on medium speed until combined.
- Sift in the powdered sugar gradually, mixing on low. Then add the butter extract and vanilla extract. Whip on high speed for another minute until light. Separate about 1 cup of frosting into a small bowl and dye it dark green. Dye the remaining large batch pink.
- If the cakes have domed tops, trim them flat with a knife. Place your first layer on a cake plate. Spread a generous amount of pink frosting on top. Add the second cake layer. Cover the entire cake in pink frosting.
- You can use a piping bag to pipe frosting between layers and around the sides, then smooth it with a cake scraper. Remember, this Harry Potter Birthday Cake is supposed to look homemade and slightly messy, so do not stress about smooth edges!
- Finally, trace “Happee Birthdae Harry” into the pink frosting with a toothpick. Use the green frosting in a piping bag to trace over your letters. Add the classic cracks between the words to mimic the movie version. Now it is ready to serve!
Notes
One of the biggest secrets to a moist birthday cake is using room temperature ingredients. Make sure your eggs and buttermilk are not cold from the fridge. Room temperature ingredients emulsify better, creating a smoother batter and a lighter sponge.
Do not skip the hot coffee step. You might be worried that it will make your cake taste like a morning brew, but it will not. The hot liquid blooms the cocoa powder, making the chocolate flavor much more intense and rich. It is essential for a deep chocolate taste.
When melting the butterscotch chips for the frosting, let them cool slightly before adding them to the butter. If the chips are too hot, they will melt your butter and make the frosting greasy. You want them liquid but not scorching hot.
For the iconic green lettering on your Happee Birthdae Harry cake, try adding a tiny pinch of cocoa powder to the green frosting. This darkens the green slightly, making it look more like the rustic icing from the film rather than bright neon green.
If you are new to cake decorating, chilling the cake is your friend. After you apply the first layer of pink frosting (the crumb coat), put the cake in the fridge for 20 minutes. This hardens the frosting and makes it much easier to apply the final thick layer without crumbs getting mixed in.
Nutrition
Calories
Sugar
Fat
Carbs