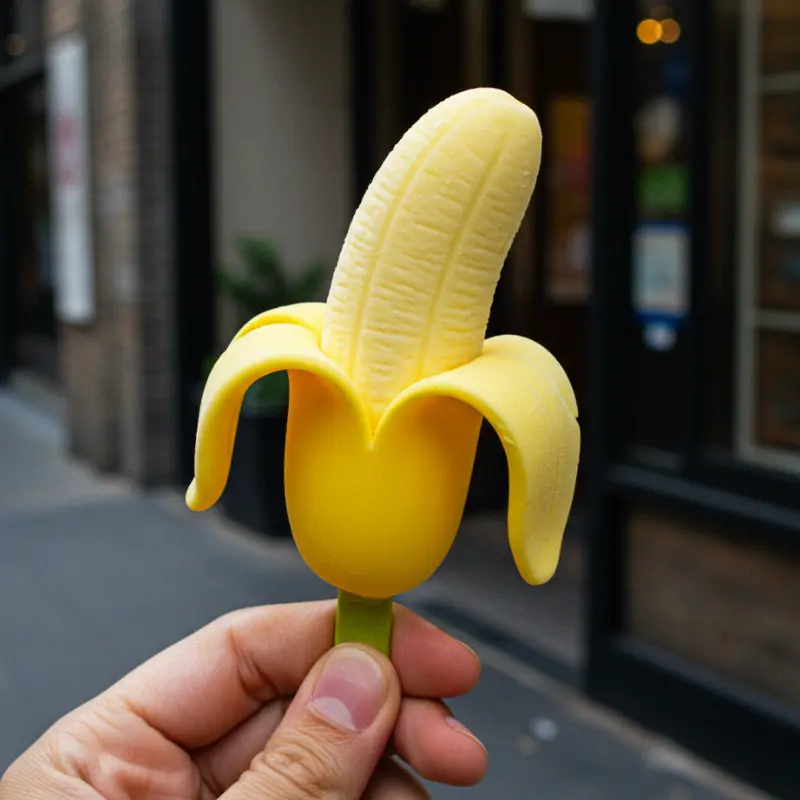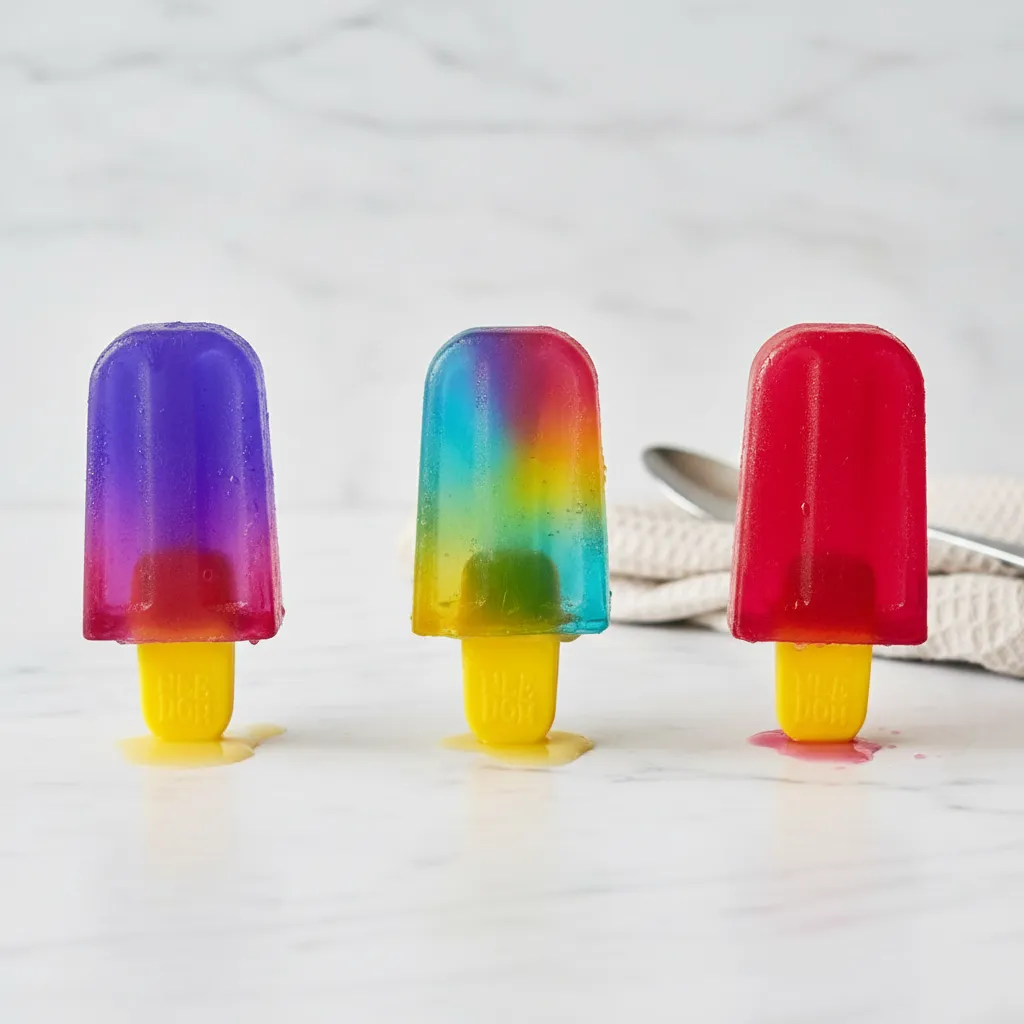
Have you ever seen a treat that looks just like a squishy toy? That is exactly what you get with needoh ice cream. It is the ultimate bright and jiggly dessert.
Kids absolutely go crazy for anything colorful and fun. When the weather gets warm, we all need a tasty and refreshing snack. This recipe is completely no fuss.
You might have seen those squishy toys at places like Learning Express. We decided to turn that fun texture into an edible delight. The result is a gorgeous translucent treat.
It is actually more of a Needoh Popsicle than actual dairy. The visual gradient layers are stunning. You get a vivid gummy texture that kids adore.
This family friendly dessert is incredibly easy to whip up. You do not need any fancy equipment. A simple mold and some bright gelatin will do the trick.
Making needoh ice cream is a great way to spend an afternoon. You just mix and pour. Then you let the freezer do all the hard work.
We all want speed and convenience when making snacks. This 30 minute prep activity is perfect for busy parents. You will love how simple the cleanup is.
Imagine relaxing with a cold treat in hand. You could be scrolling through pictures of Dream Beach Houses online. The kids are happily enjoying their jiggly desserts outside.
This needoh ice cream is sure to become a staple in your home. The bright colors are completely customizable. You can use pink or blue or yellow.
Let me explain why this works so well. The gelatin gives it that signature squishy look. It is almost like eating a sweet and fruity gem.
Are you ready to make your very own needoh ice cream today? Gather your simple ingredients. Let us dive into this tasty and comforting project.
We promise that this recipe will save your weeknight dessert routine. It is a fantastic one pot style recipe for your mixing pitcher. You will make it again and again.
Jump To:
Why You Will Love This Recipe
This needoh ice cream is incredibly visually appealing. The bright gradient layers look like a tropical sunset. Your family will be so impressed by the vivid colors.
You will also love how budget friendly this is. Gelatin boxes are very cheap at the grocery store. You can make a huge batch for just a few dollars.
It is a completely no fuss recipe. You only need one mixing pitcher to handle the liquids. The cleanup is practically nonexistent for busy families.
Kids love the squishy texture. It reminds them of their favorite fidget toys. A Needoh Popsicle is just plain fun to eat on a hot day.
While the layers freeze, you have plenty of downtime. You can sit back and share Funny Spanish Memes with your friends. It is all about stress free parenting.
You might even appreciate some good Spanish Humor while relaxing. Making snacks should never feel like a chore. This recipe keeps things light and enjoyable.
Plus, this treat is highly customizable. You can match the colors to a party theme. It is perfect for birthdays or casual summer barbecues.
If your kids love bright things, they will adore this. The colors might even match their bright Nails For Kids. It is a feast for the eyes.
You really cannot mess this up. Even beginners will get perfect results every time. Just follow the simple instructions for a tasty reward.
There is no need to turn on the oven. You will not heat up your house at all. It is the ultimate convenience for warm weather snacking.
The fruity flavors are incredibly refreshing. They cool you down instantly after a long day. It is a comforting treat that everyone will appreciate.
You can even let the kids help with the mixing. They will love watching the powder dissolve into bright colors. It is a wonderful family bonding activity.
Ingredients
Here is what you need to make your needoh ice cream at home. The list is very short and simple.
- 3 ounce box instant Jello mix in various colors
- 1 cup boiling water per flavor
- 1 cup cold water per flavor
- 1/2 cup granulated sugar per flavor
- 1 pinch salt per flavor
- Popsicle molds
- Popsicle sticks
You can use any bright colors you like. Pink and blue and yellow work beautifully together. They create that perfect gradient look.
Remember that each box makes a lot of liquid. You might need extra molds if you use three colors. It is always good to have backups ready.
The granulated sugar adds just the right amount of sweetness. The pinch of salt is a secret baker trick. It makes the fruity flavors pop even more.
Make sure you have a reliable heat proof pitcher. Pouring hot liquid can be tricky without a good spout. Safety is always our top priority in the kitchen.
Step By Step Instructions
Step 1 Mix Dry Ingredients
Start by setting out a large heat proof liquid measuring pitcher. This makes pouring much easier later on. Add your first color of gelatin mix into the pitcher.
Toss in the granulated sugar and a pinch of salt. The sugar helps sweeten the needoh ice cream. The salt balances out all those fruity flavors beautifully.
Having everything measured out beforehand saves time. It gives you the speed and convenience you need. This is truly a quick and easy process.
Step 2 Add Boiling Water
Carefully pour one cup of boiling water into your pitcher. Please be careful as the water is very hot. This step is crucial for dissolving the powder.
Stir the mixture continuously with a whisk or spoon. You want to make sure every single crystal is completely dissolved. A clear liquid ensures that perfect translucent look.
Take your time with the stirring process. If you leave undissolved sugar, the texture will be grainy. You want a perfectly smooth and gummy finish.
Step 3 Stir In Cold Water
Once the powder is fully dissolved, grab your cold water. Pour one cup of cold water into the pitcher. Give it another really good stir.
This brings the temperature down quickly. It makes the liquid safe to pour into your plastic molds. Your needoh ice cream base is now ready for the next step.
Cooling the mixture prevents your molds from melting or warping. It is a very important safety step. Never pour boiling liquid straight into thin plastic.
Step 4 Pour The First Layer
Carefully pour the mixture into your popsicle molds. To get that multi colored visual effect, do not fill them all the way. Fill each mold only a third full.
This leaves plenty of room for your other colors. The layered look is what makes a Needoh Popsicle so special and fun. Take your time pouring.
If you spill a little bit on the sides, just wipe it away. A clean mold ensures your final product looks neat. Precision makes a big difference here.
Step 5 Freeze The Base
Carefully transfer the filled molds into your freezer. You need to let this first layer firm up. Leave them in there for about thirty minutes.
This quick freeze ensures the colors will not bleed together. You want sharp and distinct lines between your bright layers. Patience pays off here.
Make sure your freezer shelf is completely flat. If the molds tilt, your layers will be diagonal. A flat surface guarantees perfectly straight color blocks.
Step 6 Add More Colors
While the first layer freezes, wash your pitcher. Repeat the exact same mixing process with your second color. Make sure the liquid is cool before pouring.
Pour the second color directly over the firm first layer. If you want a third color, repeat the freezing and mixing process again. The layers will look amazing.
Building the layers is the most fun part of making needoh ice cream. You get to watch the beautiful gradient come to life. It is like an edible art project.
Step 7 Insert Sticks
Once your final colorful layer is poured, it is time for sticks. Place the lid over the top of your mold carefully. Insert the sticks into each designated slot.
Make sure the sticks go deep enough into the needoh ice cream. You want them to hold all those beautiful layers together securely.
If your mold does not have a lid, wait ten minutes. Let the top layer freeze just a tiny bit. Then the sticks will stand up straight on their own.
Step 8 Final Freeze
Place the fully assembled molds back into the freezer. They need a good long chill now. Freeze them for at least four hours.
You want the treats to be completely solid. If you can leave them overnight, that is even better. A solid freeze guarantees they will pop out perfectly.
Do not be tempted to check on them too early. Opening the freezer door constantly slows down the freezing process. Just let the cold air do its magic.
Step 9 Unmold And Serve
When you are ready to enjoy, remove the molds from the freezer. Run warm water over the outside of the cavities. Do this for about thirty to forty five seconds.
Gently pull the sticks to release your bright treats. They should slide out easily. Now you can finally taste your gorgeous needoh ice cream creation.
Serve them immediately to your excited family. They will be amazed by the jiggly and gummy texture. It is the perfect reward for your simple prep work.


How To Store Leftovers
If you somehow have leftovers, storing them is very easy. You can just leave them right in the molds. Keep them in the freezer until you want another.
Alternatively, you can remove all of them at once. Wrap each individual needoh ice cream tightly in plastic wrap. This prevents freezer burn and sticking.
Place the wrapped treats into a large zip top freezer bag. They will stay fresh and tasty for up to a month. It is a great grab and go snack.
Having a stash in the freezer is incredibly convenient. Whenever the kids need a quick sweet treat, you are ready. It is the ultimate family friendly solution.
Just remember to keep them away from strong smelling freezer foods. You do not want your fruity dessert tasting like frozen onions. Proper storage is key.
If you are packing them for a picnic, use a good cooler. They will soften up faster than regular dairy treats. Keep them on plenty of ice until serving time.
This simple storage method guarantees you always have a comforting treat on hand. It makes weeknight dessert planning a total breeze. You will love the convenience.
Tips
For the absolute best visual effect, choose contrasting colors. Pink and bright blue look fantastic together. Yellow adds a wonderful sunny pop to the middle layer.
If you want to speed up the chilling process, use ice water. Swap half of the cold water for ice cubes. Stir until the ice is completely melted.
This trick cools the mixture instantly. It is a great 30 minute prep hack for busy parents. You will get to enjoy your needoh ice cream much faster.
While you wait for everything to freeze, have some fun. You could browse online for a beautiful Dream Beach. Imagine eating these bright treats on the warm sand.
Or you could sit back and scroll through Spanish Memes on your phone. A little laughter makes the waiting time fly by. We all need a good chuckle.
If you are hosting a summer party, these are perfect. You could even include a fun activity station. Let the kids show off their colorful Nails For Kids.
Make sure your molds are completely dry before you start. Any leftover water drops can mess up the smooth exterior. You want that perfect gummy like appearance.
Do not rush the freezing time between layers. If the bottom layer is soft, the new color will mix in. You will lose that distinct gradient effect.
If you have extra liquid, pour it into small cups. You can make mini versions of this tasty dessert. Nothing goes to waste with this simple recipe.
You can also add small edible glitter to the liquid. It makes the translucent layers sparkle in the sunlight. Kids go absolutely wild for shiny desserts.
Always use a pitcher with a very sharp pour spout. This prevents the sticky liquid from running down the sides. It keeps your kitchen counters completely clean.
Conclusion
Making your own needoh ice cream is a truly rewarding experience. The vibrant colors and fun texture bring so much joy. It is a treat that appeals to all ages.
You do not need to be a professional chef to make these. The process is completely no fuss and stress free. It is a perfect weekend activity for the family.
Every bite is tasty and comforting and incredibly refreshing. The gummy texture is completely unique. It really does look like a squishy toy come to life.
Next time you need a fun dessert, give this a try. Your kids will absolutely beg for these colorful layered treats. They are sure to become a summer tradition.
So grab your favorite flavors and get mixing. Enjoy the bright colors and the sweet fruity taste. You will be so proud of your beautiful homemade creations.
We hope you love making this recipe as much as we do. It brings a pop of color to any ordinary day. Share the joy with your friends and neighbors.
Thank you for trying out this fun and jiggly dessert. We know it will bring smiles to your kitchen. Happy mixing and happy freezing to you all.
FAQ
Can I Make This Sugar Free?
Yes, you absolutely can make sugar free needoh ice cream. Just buy the sugar free gelatin boxes at the store. You can omit the extra granulated sugar completely.
The treats will still have that amazing squishy texture. They will just be a little less sweet. It is a great option for a lighter snack.
You still get all the speed and convenience of the regular recipe. The prep time and freezing time remain exactly the same. It is a wonderful alternative.
How Long Does It Take To Freeze?
The individual layers only take about thirty minutes to set up. However, the final freeze requires at least four hours. You want them completely solid before unmolding.
Patience is very important for this recipe. If you try to pull them out too early, they might break apart. A solid freeze gives you the best results.
If your freezer is very full, it might take a bit longer. Make sure the cold air can circulate around the molds. This ensures an even and steady freeze.
Can I Use Different Molds?
You can use any plastic or silicone molds you have. Traditional shapes work great for a classic Needoh Popsicle look. Silicone makes the unmolding process even easier.
If you do not have molds, small paper cups work too. Just peel the paper away when they are frozen solid. It is a very versatile and easy recipe.
You can even use fun character molds for themed parties. The gelatin takes the shape of whatever you pour it into. Get creative with your presentation.
Is This Good For Making A Gift Basket?
While you cannot put frozen treats in a regular basket, you can gift the supplies. Making A Gift Basket with bright gelatin boxes and new molds is brilliant.
Add some fun summer items to the basket too. A complete DIY kit makes a wonderful birthday present. Kids will love making their own jiggly treats at home.
You could even include a cute recipe card. It is a thoughtful and creative gift idea. Everyone loves receiving a fun food project to try.
Needoh Ice Cream (Jiggly Popsicles)
This no-fuss Needoh Ice Cream recipe creates a bright, jiggly, and visually stunning layered dessert that kids adore. With just 30 minutes of active prep, it’s a family-friendly treat perfect for warm weather and easy cleanup.
Requirements


Ingredients
Instructions
- Start by setting out a large heat-proof liquid measuring pitcher. Add your first color of gelatin mix, granulated sugar, and a pinch of salt.
- Carefully pour one cup of boiling water into the pitcher. Stir continuously with a whisk or spoon until all crystals are dissolved and the liquid is clear.
- Pour one cup of cold water into the pitcher and stir again to cool the mixture down.
- Carefully pour the mixture into your popsicle molds, filling each mold only a third full to allow for layers.
- Transfer the filled molds to the freezer and let the first layer firm up for about thirty minutes. Ensure the freezer shelf is flat.
- While the first layer freezes, wash your pitcher and repeat the mixing process with your second color. Once cooled, pour it over the firm first layer. Repeat for a third color if desired.
- Once the final colorful layer is poured, place the lid over the mold and insert the popsicle sticks into each slot, ensuring they go deep enough. (If no lid, wait 10 mins for top layer to partially freeze before inserting sticks).
- Place the assembled molds back into the freezer for at least four hours, or preferably overnight, until completely solid.
- To unmold, run warm water over the outside of the cavities for 30-45 seconds. Gently pull the sticks to release your bright treats and serve immediately.
Notes
For the best visual effect, choose contrasting colors like pink, blue, and yellow to create a stunning gradient.
To speed up chilling, swap half of the cold water for ice cubes and stir until melted. This is a great 30-minute prep hack.
Ensure molds are completely dry before starting to prevent imperfections. Do not rush the freezing time between layers to maintain distinct color separation.
If you have extra liquid, pour it into small cups to make mini versions. Consider adding edible glitter to the liquid for extra sparkle.
Always use a pitcher with a sharp pour spout to prevent sticky liquid from spilling and keep counters clean.
If you have leftovers, you can remove them all at once and wrap each individual needoh ice cream tightly in plastic wrap. Place the wrapped treats into a large zip top freezer bag to stay fresh and tasty for up to a month.
Nutrition
Calories
Sugar
Fat
Carbs