There is something truly special about a homemade birthday cake that a store bought one just cannot match. It is not just about the sugar and the flour. It is about the time you spend thinking of the person who is celebrating another trip around the sun. When you walk into a room carrying a cake you made with your own hands, the look on their face makes every minute in the kitchen worth it. You do not need to be a professional baker to create something that looks like it belongs on a trendy social media feed. In fact, some of the most beautiful cakes are the ones that keep things simple and focus on a classic shape.
Lately, the trend of heart shapes has taken over the world of baking. Whether you are looking for Birthday Cake Ideas Heart Shape for a teenager or a young adult, the heart is a timeless symbol of affection. You might think you need a specific heart shaped pan to pull this off, but I have a secret for you. You can make a perfect heart using the round pans you already have in your cupboard. This method is easy, budget friendly, and yields a result that is absolutely stunning. Let us dive into why this specific style is capturing everyone’s attention and how you can master it at home without any stress.
Jump To:
Why You’ll Love This Recipe
You are going to fall in love with this birthday cake because it removes the intimidation factor from specialty baking. Many people see Heart shaped Cakes With Cute Designs online and assume they need years of training to recreate them. That is simply not true. This recipe uses a clever cutting technique that transforms a standard circle into a romantic heart. It is like a fun little geometry project that ends with a delicious dessert. Honestly, it is one of those tricks that makes you feel like a genius once you see the shape come together on your cake board.
Another reason to love this approach is the versatility it offers for different ages. If you are planning a 15th Birthday Heart Cake, you can use soft pastels and delicate piping. If you are aiming for a Heart Cake 17 Birthday or even a Heart Cake 19 Birthday, you can go for bolder colors like deep pink and fuchsia to match a more mature and vibrant aesthetic. The heart shape is incredibly adaptable. It fits the coquette aesthetic that is so popular right now, making it a hit for anyone who loves Aesthetic Heart Cakes Birthday vibes. It is a total crowd pleaser that feels personalized and thoughtful.
Furthermore, this recipe focuses on using a sturdy vanilla buttercream that is a dream to work with. Beginners often struggle with frosting that is too runny or too stiff, but this ratio is just right for smoothing and piping. You get to play with food color gels to create a custom look that matches the party decor perfectly. Since you are starting with round layers, you also do not have to worry about the uneven baking that sometimes happens in specialty pans. It is a reliable, consistent, and joyful way to celebrate someone you love with a Simple Heart Birthday Cake.
Ingredients
To get started on your birthday cake, you will need a few basic components. Most of these are likely already in your pantry or easily found at any local grocery store. Here is what you need to gather before you start the assembly process.
- 2 8 inch round cake layers, cooled and leveled
- 3 batches (about 9 cups) vanilla buttercream
- Food color gels in Deep Pink and Fuchsia
Make sure your cake layers are completely cold before you start cutting. If the cake is even slightly warm, it will crumble and fall apart when you try to shape it. I actually recommend baking your cakes the day before and keeping them in the fridge overnight. This makes the crumb much tighter and easier to work with. For the buttercream, having a large amount is key. You want plenty of frosting for filling, crumb coating, and the final decorative layer. It is always better to have a little left over than to run out halfway through smoothing the sides of your Simple Birthday Cake Heart.
Step By Step Instructions
Step 1: Prep The Base Layers
Start by placing your first 8 inch round cake layer onto a clean cutting board. You will want to use a long serrated knife for this part. Imagine a triangle shape at the bottom of the circle. You are going to make two diagonal cuts that meet at a point at the bottom edge of the cake. These cuts create the pointed bottom of your heart. Do not throw away the pieces you cut off. Those two smaller curved pieces are essential because they will become the rounded tops of the heart. Repeat this exact process with your second cake layer so they match perfectly.
Step 2: Assemble The Bottom Layer
Now take a cardboard cake base or a heavy cake drum and place it on your turntable. Spread a small dollop of buttercream in the center to act as glue. Place the main body of the first cake layer on top. Now, take the two curved pieces you cut earlier. Position them at the top of the main cake body to form the lobes of the heart. Use a bit of buttercream on the flat edges to adhere them to the main piece. You should now see a clear heart shape sitting on your board. It is okay if it looks a little rough right now because the frosting will hide the seams of your Cute Heart themed Birthday Cake.
Step 3: Add The Filling
Scoop a generous amount of your vanilla buttercream onto the center of the heart. Use an offset spatula to smooth it out until it is about one quarter inch thick. Make sure the filling goes all the way to the edges but does not spill over too much. This layer of frosting acts as the binder between your two cake tiers. If you want to add a little extra flavor, you could even sprinkle some berries or chocolate chips here, but keep it level so the next layer of cake sits flat. This is the foundation of your birthday cake, so take your time to get it even.
Step 4: Stack The Second Tier
Carefully pick up the main body of the second cake layer and place it directly on top of the first. Align the points at the bottom. Then, take the remaining two curved pieces and attach them at the top with more buttercream, just like you did for the bottom layer. Gently press down to ensure everything is secure. At this point, you might notice the shape is not perfectly sharp. If you want a more defined look, you can use your serrated knife to very carefully carve a deeper V shape at the top where the two lobes meet. This small adjustment makes a big difference in the final Aesthetic Heart Cakes Birthday look.
Step 5: The Crumb Coat
The crumb coat is a vital step for any birthday cake. Apply a very thin layer of buttercream over the entire surface of the heart. This layer does not need to look pretty. Its only job is to trap any loose crumbs and seal the shape. Use your spatula to push the frosting into the seams where the curved pieces meet the main cake. Once the cake is covered in this thin layer, place it in the refrigerator for at least 30 minutes. This allows the frosting to firm up, creating a solid base that will not move when you apply the final decorative layer of buttercream.
Step 6: Final Frosting And Smoothing
Once the crumb coat is chilled and firm, it is time for the final finish. Apply a thick layer of frosting to the top and sides of the cake. Use your turntable to help you get a smooth motion. As you smooth the sides, a small ridge of buttercream will likely form at the top edge. Swipe that ridge inward toward the center of the cake to create sharp, clean edges. This is where you can use your food color gels to add swirls of Deep Pink or Fuchsia if you want a marbled effect. Your Simple Birthday Cake Heart is now ready for any additional piping or decorations you have planned.


How To Store Leftovers
If you happen to have any of this delicious birthday cake left over, you want to make sure it stays fresh. The best way to store it is in the refrigerator. Because the cake is fully covered in buttercream, the frosting actually acts as a barrier that keeps the moisture inside the sponge. However, once you cut into it, the exposed cake can start to dry out. I suggest pressing a piece of plastic wrap directly against the cut surfaces before putting it back in the fridge. This keeps the air away from the cake layers.
You can also store individual slices in airtight containers. If you plan to keep the cake for more than a few days, you can even freeze it. Wrap the slices tightly in plastic wrap and then a layer of foil. When you are ready for a treat, just let a slice thaw on the counter for about an hour. It will taste almost as fresh as the day you made it. Just remember that buttercream can absorb smells from the fridge, so keep it away from anything pungent like onions or garlic. A well stored Simple Heart Birthday Cake can bring joy for several days after the party is over.
Tips
When working with food color gels for your birthday cake, remember that a little goes a long way. These gels are much more concentrated than liquid food coloring. Start with just a tiny drop on a toothpick and mix it into your white buttercream. You can always add more to reach that perfect shade of fuchsia, but you cannot take it away once it is mixed. This is especially important when you are trying to achieve Heart shaped Cakes With Cute Designs where color precision matters for the overall aesthetic.
Another tip is to keep your hands and tools cool. If your kitchen is very warm, the buttercream might start to melt or become too soft to hold its shape. You can run your metal spatula under cold water and dry it off before smoothing the cake. This helps the frosting set quickly. Also, do not be afraid to use a bench scraper for the sides. It provides a much smoother finish than a small spatula can. If you see any gaps or holes in the frosting, just fill them in with a little more buttercream and swipe again. Patience is your best friend when creating a Simple Birthday Cake Heart.
Lastly, if you are making this for a specific milestone like a Heart Cake 17 Birthday, consider the lighting of the party. Deep pinks and purples look amazing in photos, but they can look different under warm indoor lights versus natural sunlight. Test a small amount of your colored frosting on a plate to see how it looks in the room where the cake will be served. These small details are what take a home project and make it look like one of those Aesthetic Heart Cakes Birthday masterpieces you see online. You have got this.
Conclusion
Building a birthday cake from scratch is such a rewarding experience. It allows you to express your creativity and show someone how much you care in a very tangible way. By using the round cake method to create a heart, you have mastered a classic baker’s trick that will serve you well for years to come. Whether it is a 15th Birthday Heart Cake or a celebration for someone much older, the heart shape never goes out of style. It is playful, elegant, and full of personality.
I hope this guide has given you the confidence to pick up that spatula and try something new. Remember that it does not have to be perfect to be wonderful. A few wobbles in the frosting just prove that it was made with love by a real person. So, go ahead and gather your ingredients, turn on some music, and enjoy the process of decorating your Simple Heart Birthday Cake. Your friends and family will be so impressed with your skills, and you will have a beautiful centerpiece for your next big celebration.
FAQ
Can I Use Chocolate Cake Instead Of Vanilla?
Yes, you absolutely can use any flavor of cake you like. Whether you prefer chocolate, red velvet, or even lemon, the shaping technique remains the same. Just ensure the cake is sturdy enough to be cut and stacked. A very fluffy or crumbly cake might be a bit harder to manage when you are forming the heart shape, but with a good crumb coat, almost any flavor will work for your birthday cake.
How Do I Get The Frosting Really Smooth?
The secret to smooth frosting is a combination of the right tools and temperature. Using a turntable allows you to move the cake in one continuous motion while holding your scraper still. If the frosting feels grainy, try beating it on low speed for a few minutes to remove air bubbles. Also, dipping your metal scraper in warm water and then drying it can help glide over the buttercream for a glass like finish on your Simple Birthday Cake Heart.
What If My Cake Layers Break While Cutting?
Do not panic if a piece breaks. Buttercream is like the duct tape of the baking world. You can easily stick a broken piece back together with a bit of frosting. Once the cake is crumb coated and chilled, no one will ever know there was a break. This is why having plenty of buttercream is so important when making Birthday Cake Ideas Heart Shape. It hides all the little mistakes and keeps the structure sound.
Can I Make This Cake Gluten Free?
You certainly can. Simply use your favorite gluten free cake recipe or a box mix. Just be aware that some gluten free cakes can be more fragile than traditional ones. I highly recommend chilling the layers thoroughly before you attempt to cut the heart shape. This will help prevent the cake from falling apart and ensure your Cute Heart themed Birthday Cake looks fantastic.
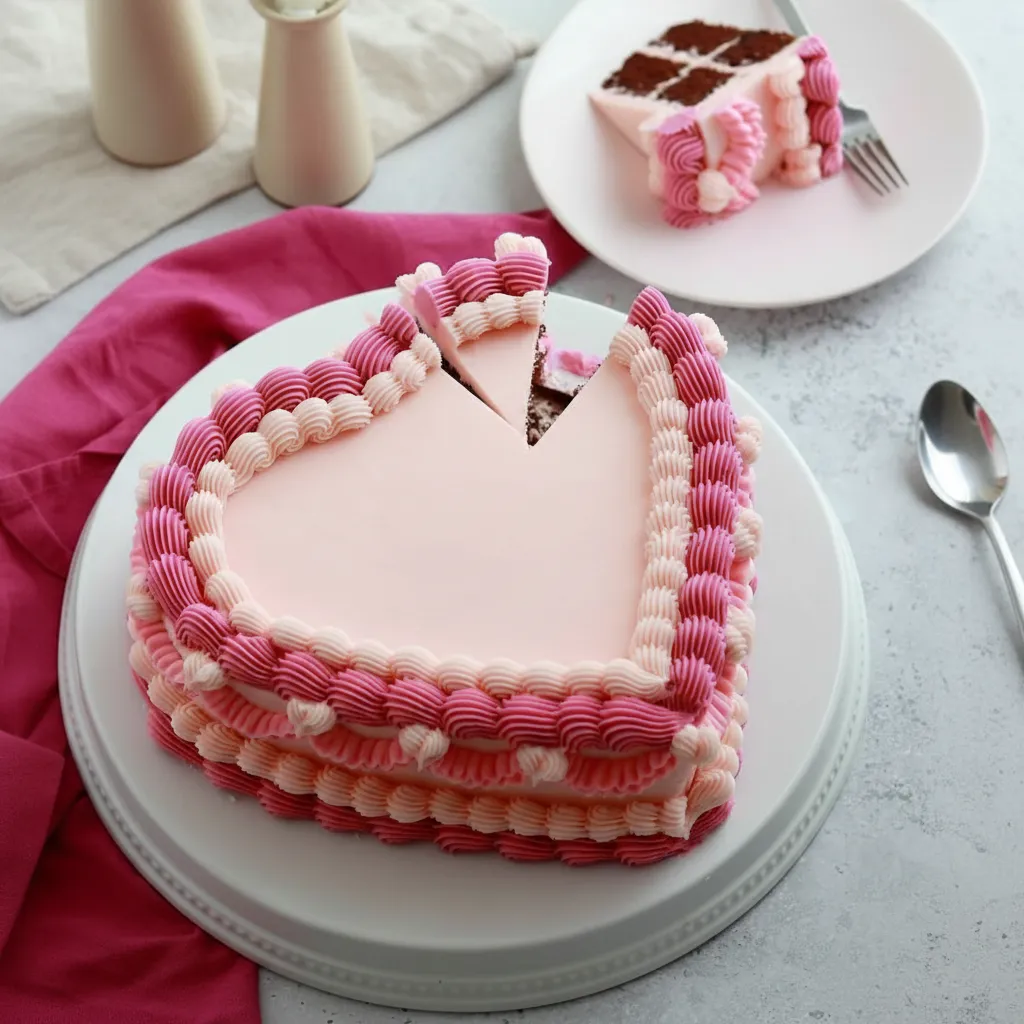
Easy Heart-Shaped Birthday Cake
Learn a simple trick to create a stunning heart-shaped birthday cake without a special pan! This no-fuss method uses two standard round cakes to form a perfect heart, ideal for celebrating someone special.
Requirements


Ingredients
Instructions
- Place one 8-inch round cake on a cutting board. Use a long serrated knife to make two diagonal cuts from the sides to the bottom center point, creating the point of the heart. The two cut-off pieces will be the top lobes. Repeat with the second cake layer.
- On a cake board, place the main body of the first cake layer. Use buttercream to “glue” the two curved pieces to the top flat edge, forming a heart shape.
- Spread a generous layer of buttercream filling evenly over the top of the first heart layer with an offset spatula.
- Carefully stack the second cake layer on top, aligning the pieces. You can use a knife to carve a deeper “V” at the top for a more defined shape.
- Apply a thin layer of buttercream over the entire cake for a crumb coat. Chill in the refrigerator for at least 30 minutes until firm.
- Apply a final, thick layer of buttercream to the top and sides. Use your spatula and a turntable to smooth the frosting for a clean finish.
Notes
Ensure cake layers are completely cold before cutting to prevent crumbling. Baking them a day ahead and refrigerating is ideal.
A little food color gel goes a long way. Add a tiny drop at a time to achieve your desired color.
For extra smooth frosting, use a bench scraper on the sides and dip your metal spatula in warm water (drying it before use).
Nutrition
Calories
Sugar
Fat
Carbs