I have to be honest with you. Finding a dessert that tastes amazing but still fits into a healthy lifestyle can be really hard. We all want that rich and creamy texture without all the extra sugar. That is exactly why I started exploring different ninja creami ice cream recipes.
There is something really special about making your own frozen treats at home. You control exactly what goes into the pint. You can skip the preservatives and the artificial flavors found in store bought tubs. Plus, it saves you money in the long run.
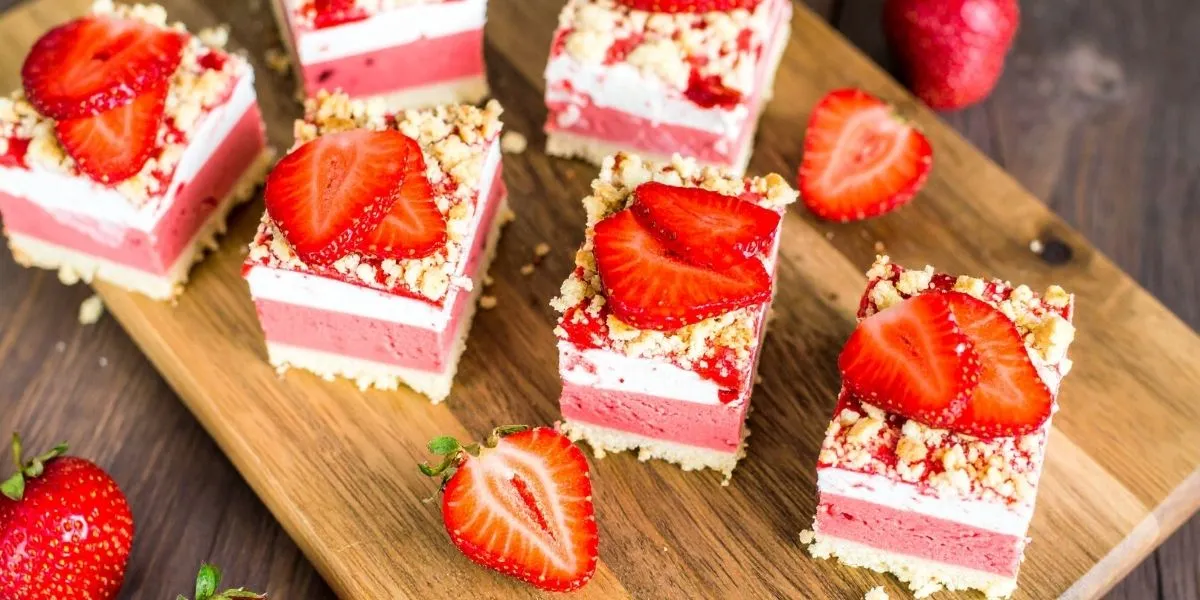
This specific recipe has become a staple in my kitchen. It is incredibly simple. You only need two ingredients to get started. It creates a base that is smooth, tangy, and satisfying. If you are looking for a High Protein Creami Ninja Recipe, this is the one you need to try.
The Ninja Creami machine does all the heavy lifting here. It turns a solid block of frozen yogurt into something that rivals your local ice cream shop. It is fun to watch and even more fun to eat. Let’s dive into how you can make this at home.
Jump To:
Why You’ll Love This Recipe
You might be wondering why this recipe stands out among other ninja creami ice cream recipes. The answer is simplicity. You do not need to cook a custard base on the stove. You do not need to separate eggs. You just mix and freeze.
Another reason is the health factor. This treat is packed with protein thanks to the Greek yogurt. It fits perfectly into Healthy Macro Recipes for those tracking their intake. It feels like an indulgence, but it fuels your body.
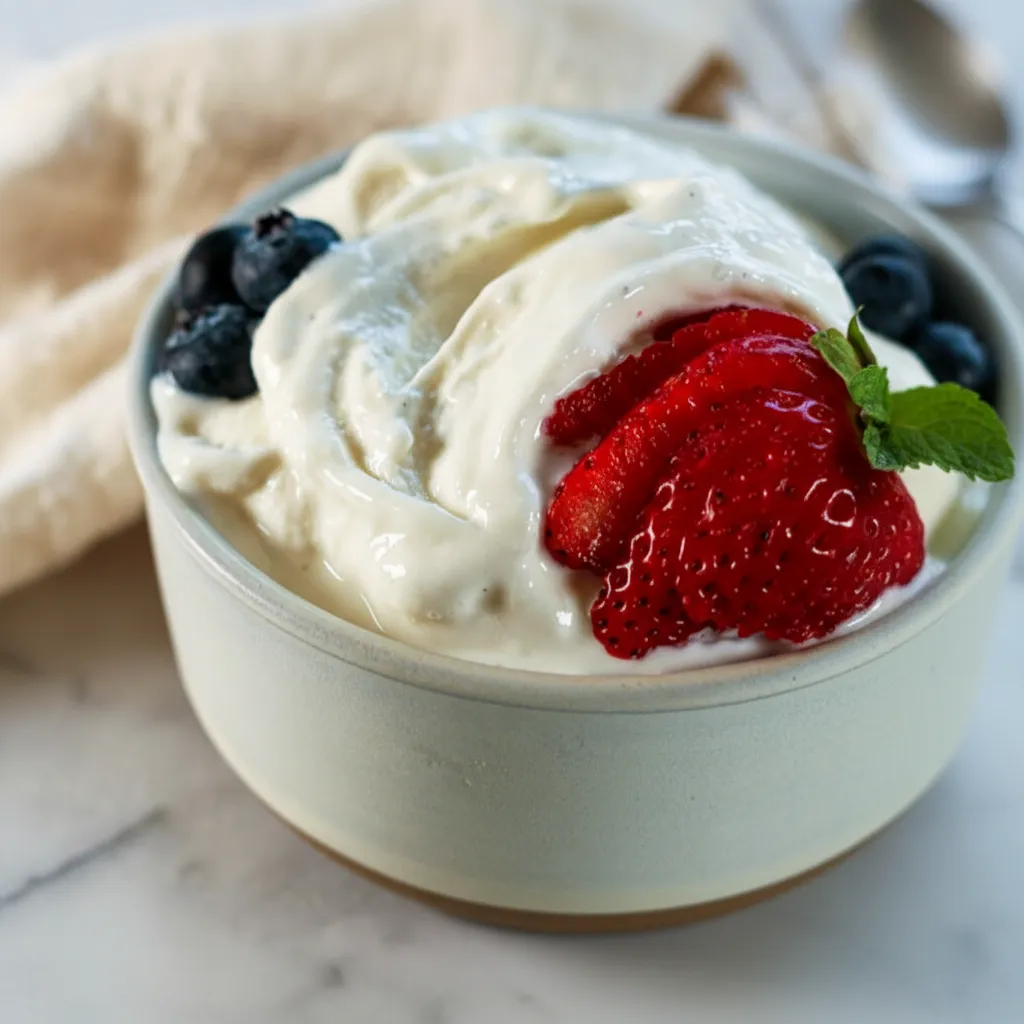
The texture is also a huge win. Many low calorie ice creams can be icy or gritty. This recipe uses the power of the Creami to whip the yogurt into a dense and luscious consistency. It feels heavy on the spoon in the best way possible.
Finally, it is completely customizable. The vanilla bean base works with almost anything. You can add fruit, chocolate chips, or nut butters. It is a blank canvas for your cravings. You never have to make the same flavor twice if you don’t want to.
Ingredients
The beauty of this recipe lies in its short shopping list. You probably already have these items in your fridge right now. Here is what you need to make one of the easiest ninja creami ice cream recipes.
- 2 cups Greek yogurt (nonfat, zero sugar vanilla)
- 2 teaspoons vanilla bean paste (optional)
That is really it. The Greek yogurt provides the body and the protein. Using a zero sugar vanilla variety keeps the calories low while adding sweetness. If you want a stronger vanilla flavor, the paste adds those lovely little specks and a deep aroma.
You can also swap the paste for extract if that is what you have on hand. However, paste often gives a richer flavor profile. It makes the final result feel a bit more fancy and established.
Step-By-Step Instructions
Making this frozen yogurt is a breeze. It mostly involves waiting for the freezer to do its job. Once the waiting is done, the actual work takes just a few minutes. Follow these steps for the best results with your Ninja Creami Recipes With Greek Yogurt.
Step 1: Prepare The Base
Grab your Ninja Creami pint container. Add the 2 cups of Greek yogurt directly into the pint. If you are using the vanilla bean paste, add that in now as well.
Use a spoon or a small whisk to stir everything together. You want to make sure the vanilla paste is evenly distributed throughout the yogurt. This ensures every bite tastes amazing.
Once it is mixed, use the back of your spoon to smooth the top. You want to create a flat surface. This helps the machine process the ice cream evenly later on.
Step 2: Freeze The Pint
Place the lid securely on the pint container. Put it in your freezer on a level surface. It is important that the pint freezes flat so the blade can spin correctly.
You need to freeze it for a full 24 hours. I know it is hard to wait. However, the core needs to be completely frozen for the Ninja Creami to work its magic. Patience is key here.
Step 3: Spin The Mixture
After 24 hours, take the pint out of the freezer. Remove the lid and place the pint into the outer bowl of the Ninja Creami. Lock the lid onto the outer bowl and slide it into the machine.
Turn the power on. Select the “Lite Ice Cream” cycle. This setting is designed for mixtures that are lower in fat and sugar, like our yogurt base.
The machine will make some noise as the blade descends. This is normal. It is shaving through the hard frozen block to create that creamy texture we love.
Step 4: The Re-Spin
Once the first cycle is done, open the lid and take a look. The frozen yogurt will likely look a little powdery or crumbly at this stage. Do not worry.
This is very common for ninja creami ice cream recipes that use low fat ingredients. It just needs a little more mixing. Place the bowl back into the machine.
Press the “Re-Spin” button. This cycle runs the blade through the mixture one more time. It brings everything together into a cohesive and smooth ball of frozen yogurt.
Step 5: Mix-Ins And Serve
Now check the texture. It should be creamy and soft. If you want to add any mix-ins like chocolate chips or crushed cookies, now is the time.
Create a small well in the center of the pint. Pour in your mix-ins. Put the pint back in the machine and select the “Mix-In” function. This gently folds your extras in.
Serve immediately. Scoop it into bowls and enjoy your homemade High Protein Creami Ninja Recipe.


How To Store Leftovers
Sometimes you might not finish the whole pint in one sitting. That is totally fine. Storing leftovers for ninja creami ice cream recipes is actually quite simple.
First, use a spoon to flatten the top of the remaining frozen yogurt inside the pint. You want it to be level again. This is crucial for the next time you want to eat it.
Place the lid back on the pint and return it to the freezer. It will freeze solid again. You cannot just scoop it out like traditional store bought ice cream.
When you are ready to eat it again, you have to process it. Place the pint back in the machine. You will likely need to use the same cycle you used originally.
Usually, a quick spin on the “Lite Ice Cream” setting or just a “Re-Spin” will restore that creamy texture. It tastes just as fresh the second time around.
Tips
I have learned a few tricks while experimenting with ninja creami ice cream recipes. These small adjustments can make a big difference in your final result. They help ensure you get the best texture every time.
Do not overfill the pint. There is a max fill line for a reason. The mixture expands slightly when it freezes. If you go over the line, the blade might not work correctly.
If your mixture is too powdery even after a re-spin, try adding a splash of liquid. A teaspoon of milk or water can help. Add it before you hit the re-spin button.
Let the pint sit out for a few minutes before spinning. Taking it straight from a very cold deep freezer can sometimes be tough on the machine. Five minutes on the counter softens the edges just enough.
Experiment with fat content. Nonfat Greek yogurt makes a great High Protein Creami Ninja Recipe. However, using 2% or 5% yogurt will yield an even richer mouthfeel if your macros allow it.
Clean the blade lid immediately. The mixture can get stuck in the crevices of the lid. Rinsing it right after you use it prevents the residue from hardening and becoming difficult to clean.
Sweetness levels vary by brand. Always taste your yogurt mixture before you freeze it. If it is not sweet enough for you, add a little stevia, maple syrup, or honey before freezing.
Conclusion
Making your own dessert does not have to be complicated. This Greek yogurt recipe proves that you can have a treat that is both healthy and delicious. It is one of the most versatile ninja creami ice cream recipes you will find.
It fits into busy schedules because the prep time is so short. The machine does the hard work for you. You get a high-quality frozen yogurt for a fraction of the price of a shop visit.
Whether you are looking for Healthy Macro Recipes or just a fun kitchen experiment, this recipe delivers. It satisfies that sweet tooth without the sugar crash. It is a reliable go-to for hot days or late-night snacks.
So grab your pint and some yogurt. Give this method a try. You might find yourself making a new batch every single week. Enjoy your homemade creation!
FAQ
Here are some common questions I get about making Ninja Creami Recipes With Greek Yogurt. Hopefully, these answers help you get the perfect scoop.
Can I use plain yogurt instead of vanilla?
Yes, absolutely. If you use plain yogurt, you will likely need to add a sweetener. You can use honey, maple syrup, or a sugar substitute. Taste the mixture before freezing to ensure it is sweet enough for your liking.
Is this recipe gluten-free?
Yes, the base ingredients are gluten-free. Greek yogurt and vanilla bean paste typically do not contain gluten. However, always check the labels on your specific ingredients. Also, be careful with any mix-ins you choose to add later.
Why is my frozen yogurt crumbly?
This is very common with low-fat recipes. It usually just means it needs to be processed more. Run the “Re-Spin” cycle. If it is still dry, add a teaspoon of milk or water and spin again.
Can I double the recipe?
The recipe is designed for one standard Ninja Creami pint. You cannot fit double the amount in one pint. If you want to make more, you will need to buy extra pint containers and freeze them separately.
Does this work for a high protein diet?
Yes, this is an excellent High Protein Creami Ninja Recipe. Greek yogurt is naturally high in protein. It is a great way to hit your macro goals while still enjoying a dessert.
High Protein Creami Vanilla Frozen Yogurt
A simple and satisfying high-protein frozen yogurt made with Greek yogurt in the Ninja Creami. This easy recipe offers a creamy texture and is perfect for a healthy dessert or snack, customizable with your favorite mix-ins.
Requirements


Ingredients
Instructions
- Grab your Ninja Creami pint container. Add 2 cups of Greek yogurt and 2 teaspoons of vanilla bean paste (if using) into the pint. Add a pinch of salt.
- Use a spoon or small whisk to stir everything together until the vanilla paste is evenly distributed and the mixture is smooth. Smooth the top with the back of your spoon.
- Secure the lid on the pint and place it in your freezer on a level surface. Freeze for a full 24 hours until completely solid.
- After 24 hours, remove the lid. Place the pint into the outer bowl of the Ninja Creami, secure the processing lid, and lock it into the machine. Turn the power on and select the “Lite Ice Cream” cycle.
- Once the first cycle is done, if the frozen yogurt looks powdery or crumbly, place the bowl back into the machine and press the “Re-Spin” button. If still dry, add about 1 teaspoon of milk or water and re-spin.
- For mix-ins (like chocolate chips or nut butters), create a small well in the center of the pint. Pour in your desired mix-ins. Put the pint back in the machine and select the “Mix-In” function. Serve immediately.
Notes
Taste the base before freezing and adjust sweetener if needed. Frozen desserts tastes less sweet, so aim for slightly sweeter than you prefer.
Do not fill the pint past the max fill line, as the mixture will expand during freezing and processing.
A full 24-hour freeze is essential for the best, creamiest texture. Rushing this step can result in an icy or soupy consistency.
If the mixture is too powdery after a re-spin, try adding a splash of liquid (1 teaspoon milk or water) before another re-spin.
Allow the pint to sit out for a few minutes before spinning, especially if coming from a deep freezer.
Experiment with fat content; 2% or 5% Greek yogurt can yield an even richer mouthfeel if your macros allow.
Clean the blade lid immediately after use to prevent residue from hardening.
For leftovers, flatten the top, cover, and refreeze. Re-spin on ‘Lite Ice Cream’ or ‘Re-Spin’ cycle to restore creaminess.
Nutrition
Calories
Sugar
Fat
Carbs