Have you ever felt that holiday cooking pressure? The oven is packed with side dishes, and the turkey takes what feels like an eternity to cook. It can be a little stressful, right?
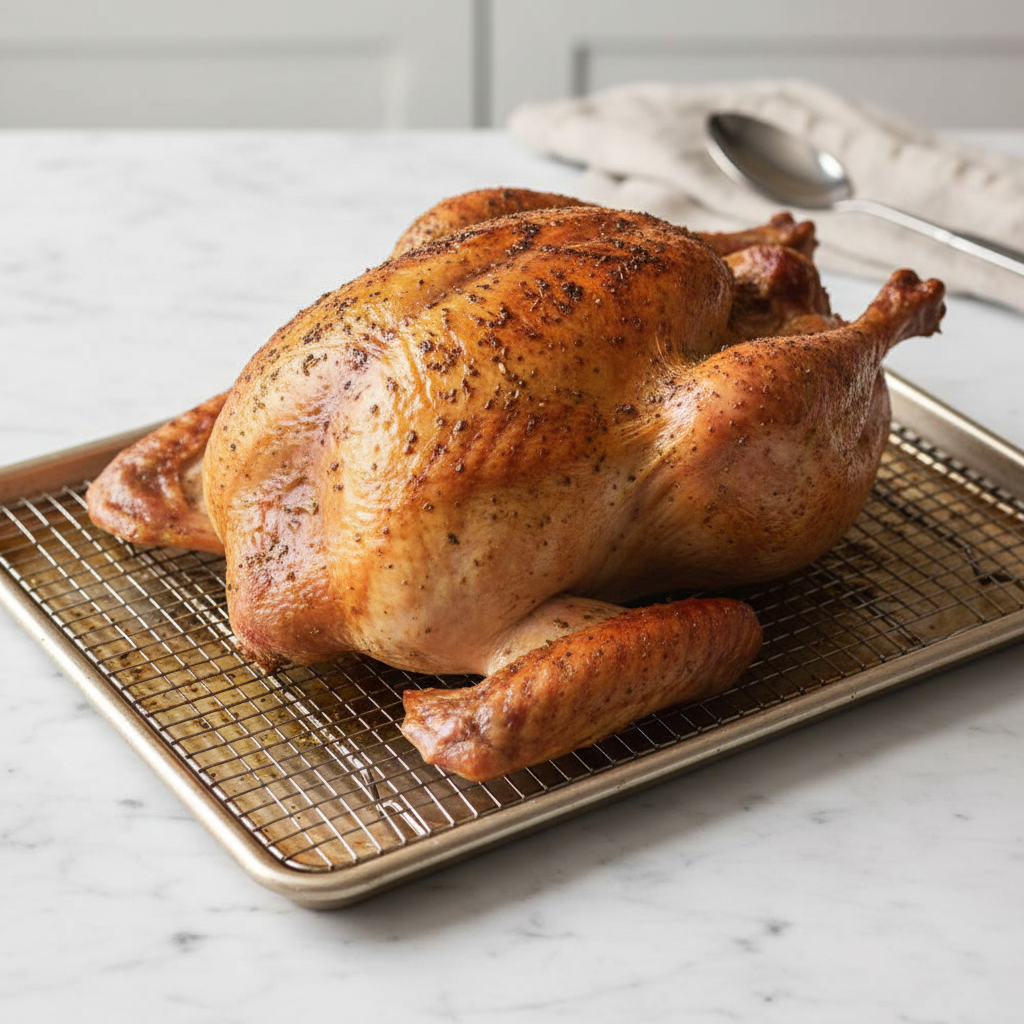
Well, what if I told you there’s a better way? Say hello to the Grilled Spatchcock Turkey. This method not only cooks the turkey in record time, but it also results in incredibly juicy meat and the crispiest skin you can imagine. Plus, it frees up your oven completely!
Jump To:
Why You’ll Love This Recipe
First off, the speed is amazing. A traditional turkey can take hours and hours to roast. By butterflying the bird, or spatchcocking it, you create a flat, even surface that cooks so much faster. We’re talking a beautiful Grilled Spatchcock Turkey in about 80 to 90 minutes.
The flavor is another huge win. Cooking on a grill imparts a subtle smokiness that you just can’t replicate in an oven. It adds a whole new layer of deliciousness to your Spatchcock Turkey Thanksgiving feast.
Even cooking is probably the biggest benefit. You know how the breast meat often dries out while you wait for the thighs to cook through? Spatchcocking solves that problem. Everything cooks uniformly, so every single piece is moist and tender.
And let’s not forget about that crispy skin. With the entire skin surface exposed to the direct heat of the grill, it gets unbelievably golden and crisp. No more pale, rubbery spots. It’s pure crunchy goodness all over.
Finally, you get your oven back! With the turkey cooking happily outside on the grill, your oven is free for all those important side dishes like green bean casserole, stuffing, and sweet potato pie. It makes timing your meal so much easier.
Ingredients
For The Turkey
- 1 whole turkey (12–14 lbs), butterflied/spatchcocked, backbone, neck, and giblets reserved
- 2 tablespoons vegetable oil, divided
- Kosher salt and freshly ground black pepper
For The Drip Pan Vegetables, Broth & Gravy
- 3 large onions, roughly chopped
- 3 large carrots, peeled and roughly chopped
- 4 stalks celery, roughly chopped
- 12 fresh thyme sprigs
- 1 ½ quarts low sodium homemade or store bought chicken or turkey broth
- 2 bay leaves
- 3 tablespoons unsalted butter
- 4 tablespoons all purpose flour
Step By Step Instructions
Step 1: Prep The Grill And Drip Pan
First things first, let’s get your grill ready. You’re aiming for two zone cooking, which means one side of the grill will be hot and the other will have no direct flame. For a gas grill, light one or two burners on one side to high, and leave the other side off. For a charcoal grill, pile your hot coals on one side.
Your target temperature inside the grill should be around 425°F to 450°F. Let it preheat with the lid closed. While it heats up, grab a large disposable aluminum pan to use as a drip pan. Scatter two thirds of the onions, carrots, celery, and thyme sprigs across the bottom. This pan will catch the drippings for our gravy.
Place the drip pan on the cooler, indirect heat side of the grill. You’ll place the turkey on the grate directly above this pan.
Step 2: How To Spatchcock A Turkey And Prep It
If your butcher hasn’t already done it, you’ll need to spatchcock the turkey. Place the turkey breast side down on a large cutting board. Using sturdy poultry shears, cut along both sides of the backbone to remove it. It takes a little muscle, but it’s straightforward. Don’t throw the backbone away, we need it for the gravy!
Flip the turkey over so it’s breast side up. Now, press down firmly on the breastbone with the heel of your hand. You should hear a crack. This flattens the bird so it will cook evenly. It’s that simple, you now know How To Spatchcock A Turkey.
Pat the entire turkey completely dry with paper towels. This is a very important step for getting that super crispy skin. Rub the turkey all over with about 1 tablespoon of vegetable oil. Season it generously with kosher salt and freshly ground black pepper. If you are using a pre brined turkey, you can skip the extra salt.
Finally, tuck the wing tips behind the back to prevent them from burning. This gives it a neat, tidy appearance for your Spatchcock Turkey Grilled presentation.
Step 3: Grill The Turkey
Carefully place your prepared turkey on the grill grate over the indirect heat zone, right above the drip pan. The legs should be pointing towards the hotter side of the grill as they can handle more heat.
Close the grill lid and let it cook. You’ll want to rotate the bird about halfway through the cooking time to ensure it browns evenly. This will take about 80 to 90 minutes in total.
The turkey is done when an instant read thermometer inserted into the thickest part of the breast reads 150°F, and the thighs register at least 165°F. The skin should be deep golden brown and crispy.
Step 4: Make The Gravy
While the turkey is on the grill, you can start the gravy on your stovetop. Take that reserved neck, backbone, and the giblets and give them a rough chop.
Heat the remaining 1 tablespoon of oil in a 3 quart saucepan over high heat until it shimmers. Add the chopped turkey parts and cook, stirring occasionally, until they are lightly browned. This should take about 5 minutes.
Add the rest of your onions, carrots, and celery to the saucepan. Cook them until they soften and start to brown, which is about 5 more minutes. This builds a rich flavor base.
Pour in the broth, then add the remaining thyme sprigs and the bay leaves. Bring the whole mixture to a boil, then reduce the heat to a simmer. Let it bubble away gently for about 45 minutes to let all those flavors meld together.
Strain the broth through a fine mesh strainer into a large measuring cup, pressing on the solids to get all the liquid out. You can discard the solids now. Skim any excess fat off the top of the broth.
To finish the gravy, melt the butter in a separate saucepan over medium high heat. Add the flour and whisk constantly until it forms a paste, called a roux, and turns a light golden brown. This takes about 3 minutes.
Slowly whisk the strained broth into the roux. Keep whisking to prevent lumps. Bring it to a boil, then reduce the heat and let it simmer until it has thickened and reduced slightly. Season with salt and pepper to taste, and keep it warm until you’re ready to serve.
Step 5: Rest, Carve, And Serve
Once your turkey reaches the right temperature, carefully remove it from the grill and transfer it to a clean cutting board or baking sheet. Let it rest for at least 20 minutes before carving. This is a vital step! It allows the juices to redistribute throughout the meat, keeping it moist.
While the turkey rests, carefully remove the drip pan from the grill. Strain the collected juices from the pan, skim off the fat, and whisk these flavorful drippings into your gravy. This is the final touch that makes the gravy so rich.
Now you can carve your beautiful Grilled Spatchcock Turkey. Serve it immediately with your warm, homemade gravy. Enjoy the applause!


How To Store Leftovers
If you’re lucky enough to have leftovers, storing them is easy. Once the turkey has cooled completely, remove the meat from the bones and place it in airtight containers or resealable plastic bags.
Leftover turkey will keep well in the refrigerator for about 3 to 4 days. It’s great for sandwiches, salads, or soups during the week.
For longer storage, you can freeze it. Store it in freezer safe bags or containers, and it will stay good for up to 3 months. Just thaw it in the fridge overnight before using.
Tips
Want to take your turkey to the next level? Try a dry brine. A day or two before grilling, season the turkey generously with salt and pepper and let it sit uncovered in the refrigerator. This helps dry out the skin for maximum crispiness and seasons the meat deeply.
Don’t guess, use a thermometer! An instant read meat thermometer is your best friend when cooking any large piece of meat. It’s the only way to know for sure when your turkey is cooked to a safe temperature without overcooking and drying it out.
Seriously, let it rest. I know it’s tempting to carve into that gorgeous bird right away, but resting is non negotiable. It makes all the difference between a juicy turkey and a dry one. Twenty minutes is a good amount of time.
Feeling short on time or just don’t want the hassle? Ask your local butcher to spatchcock the turkey for you. Most are happy to do it, and it saves you a step. It makes planning your Spatchcock Turkey Thanksgiving even easier.
Conclusion
Making a Grilled Spatchcock Turkey might sound fancy, but as you can see, it’s actually one of the simplest and most rewarding ways to prepare your holiday bird. It is faster, juicier, and has crispier skin than any other method I’ve tried.
So this year, why not free up your oven, step outside, and give this a try? You’ll be amazed at the results, and your family will be asking for it again and again. Happy grilling!
FAQ
What Size Turkey Works Best For Spatchcocking?
A turkey in the 12 to 14 pound range is ideal. Anything much larger can be difficult to handle on a standard grill and may not cook as evenly. A smaller turkey also works great!
Can I Use A Gas Grill Or A Charcoal Grill?
Absolutely! This recipe works beautifully on both. For a gas grill, set up a two zone fire by lighting the burners on one side only. For a charcoal grill, simply pile the hot coals to one side. The key is creating an indirect heat zone to cook the turkey without burning it.
What If I Don’t Have A Wire Rack For The Grill?
No problem at all. You can place the Grilled Spatchcock Turkey directly on the grill grates over the indirect heat side. Just make sure your grates are clean and lightly oiled to prevent sticking.
How Do I Know When The Turkey Is Done?
The most reliable way is to use an instant read thermometer. Do not rely on cooking time alone. The turkey is fully cooked and safe to eat when the thickest part of the thigh registers at least 165°F. The breast should be around 150°F when you pull it off the grill, as it will continue to cook as it rests.
Grilled Spatchcock Turkey
This simple method for grilling a spatchcock turkey results in incredibly juicy meat and crispy skin in record time. It’s a flavorful approach that frees up your oven for holiday side dishes.
Ingredients
Instructions
- Set up your grill for two-zone cooking (one side hot, one side cool) and preheat to 425°F-450°F. Scatter two-thirds of the onions, carrots, celery, and thyme in a large disposable aluminum drip pan and place it on the cooler side of the grill.
- Pat the spatchcocked turkey completely dry with paper towels. Rub all over with 1 tablespoon of vegetable oil and season generously with salt and pepper. Tuck the wing tips behind the back.
- Place the turkey on the grill grate directly above the drip pan, with the legs facing the hotter side. Close the lid and cook for 80-90 minutes, rotating halfway through, until a thermometer reads 150°F in the breast and at least 165°F in the thigh.
- While the turkey cooks, make the gravy base. Heat the remaining 1 tbsp of oil in a saucepan. Brown the chopped reserved turkey neck, backbone, and giblets (about 5 mins). Add the remaining vegetables and cook until softened (5 mins).
- Pour in the broth, add remaining thyme and bay leaves. Bring to a boil, then simmer for 45 minutes. Strain the broth through a fine-mesh strainer, discarding the solids.
- To finish the gravy, melt butter in a separate saucepan. Whisk in flour to make a roux, cooking until golden (about 3 mins). Slowly whisk in the strained broth until smooth. Simmer until thickened, then season with salt and pepper.
- Remove the turkey from the grill and let it rest on a cutting board for at least 20 minutes. This step is vital for a juicy bird.
- Carefully remove the drip pan from the grill. Strain the collected juices, skim off the fat, and whisk these flavorful drippings into your gravy. Carve the turkey and serve immediately with the warm, homemade gravy.
Notes
Try a dry brine a day or two before grilling for extra crispy skin and deeply seasoned meat.
Use an instant-read meat thermometer for accurate cooking. It’s the best way to ensure a juicy, safely cooked turkey.
Don’t skip the 20-minute resting period! It’s crucial for allowing the juices to redistribute throughout the meat.
Ask your butcher to spatchcock the turkey for you to save a step.
Nutrition
Calories
Sugar
Fat
Carbs