Graduation is one of those big life moments that stays with you forever. It marks the end of a long journey and the start of a brand new chapter. You want to celebrate this milestone with something special. While a big cake is nice, there is something truly charming about individual graduation cookies. They are personal and easy to share with friends and family.
Creating these treats at home might seem a bit scary if you are not a pro. However, you do not need a fancy kitchen or expensive tools to make beautiful Party Sweets. With a little patience and the right recipe, you can create professional looking results. These cookies are the perfect way to show your graduate how much you care without breaking the bank.
Jump To:
Why You’ll Love This Recipe
You are going to love this recipe because it is designed for real people with busy lives. We know that graduation season is hectic. You have ceremonies to attend and parties to plan. This recipe uses Easy Sugar Cookies that hold their shape perfectly in the oven. You will not have to worry about your graduation caps turning into blobs.
Another reason to love these graduation cookies is how much money they save you. Custom bakery cookies can cost a small fortune. By making them yourself, you can spend that extra cash on a great gift for the graduate. Plus, you can customize the colors to match the school perfectly. It is a win for your wallet and your creativity.
This process is also a great introduction to Cake Decorating For Beginners. You will learn the basics of royal icing without the pressure of a three tier cake. It is a fun project to do with siblings or friends. You can even turn it into a pre graduation activity. Everyone loves a hands on kitchen project that ends with a sweet reward.
Finally, these cookies are incredibly versatile. You can serve them on a platter at the party or wrap them up. They make wonderful Cookie Favors for guests to take home. There is nothing like a personalized treat to make people feel welcome. Honestly, they are often the first things to disappear from the dessert table because they look so cute.
Ingredients
For The No Spread Sugar Cookies
- 1 cup unsalted butter, softened
- 1 cup granulated sugar
- 1 large egg
- 1 teaspoon vanilla extract
- 1/2 teaspoon salt
- 2 1/2 cups all purpose flour, sifted
For The Royal Icing
- 4 cups powdered sugar, sifted
- 3 tablespoons meringue powder
- 9 to 10 tablespoons room temperature water
- 1 teaspoon clear vanilla extract
- Gel food coloring in purple, black, and gold
For Decorating
- Edible glitter or luster dust
- Clear high proof alcohol or lemon extract for painting
Step By Step Instructions
Step 1: Cream The Butter And Sugar
Start by grabbing a large mixing bowl. You want to cream together your softened butter and granulated sugar. Do this until the mixture is light and fluffy. This step is important for the texture of your Plain Cookies. It creates a smooth base for the other ingredients. Take your time here to ensure everything is well combined.
Step 2: Add The Wet Ingredients
Once your butter and sugar are happy, beat in the egg. Add your vanilla extract at the same time. This adds that classic flavor we all love in Easy Sugar Cookies. Make sure the egg is fully incorporated before moving on. You want a consistent dough that will bake evenly in the oven later.
Step 3: Mix The Dry Ingredients
In a separate bowl, whisk together your sifted flour and salt. Sifting is a small step that makes a big difference. It prevents lumps in your graduation cookies. Gradually add these dry ingredients to your wet mixture. Mix until just combined. You do not want to overmix the dough or it might get tough.
Step 4: Chill The Dough
Divide your dough in half and form two disks. Wrap them tightly in plastic wrap. This dough needs to chill for at least 3 to 4 hours. Chilling is the secret to graduation cookies that do not spread. It keeps the shapes sharp and clean. If you have time, leaving it overnight is even better for the best results.
Step 5: Roll And Cut
Preheat your oven to 350 degrees. Line your sheets with parchment paper. On a floured surface, roll out your dough to one fourth inch thickness. Use your graduation themed cutters to make shapes. You might want to make some Graduation Gown Cookies or little caps. Place them carefully on the prepared sheets.
Step 6: Bake And Cool
Bake the cookies for 8 to 10 minutes. You are looking for edges that are just lightly golden. Let them rest on the sheet for a few minutes first. Then transfer them to a wire rack to cool completely. They must be cold before you start any Cake Decorating For Beginners techniques with the icing.
Step 7: Prepare The Royal Icing
Mix your powdered sugar and meringue powder in a stand mixer. Slowly add the water and vanilla. Beat on medium high until you see stiff, glossy peaks. This takes about 2 to 4 minutes. If it is too thick, add a tiny bit more water. You want a consistency like honey for flooding your Graduation Desserts.
Step 8: Tint And Pipe
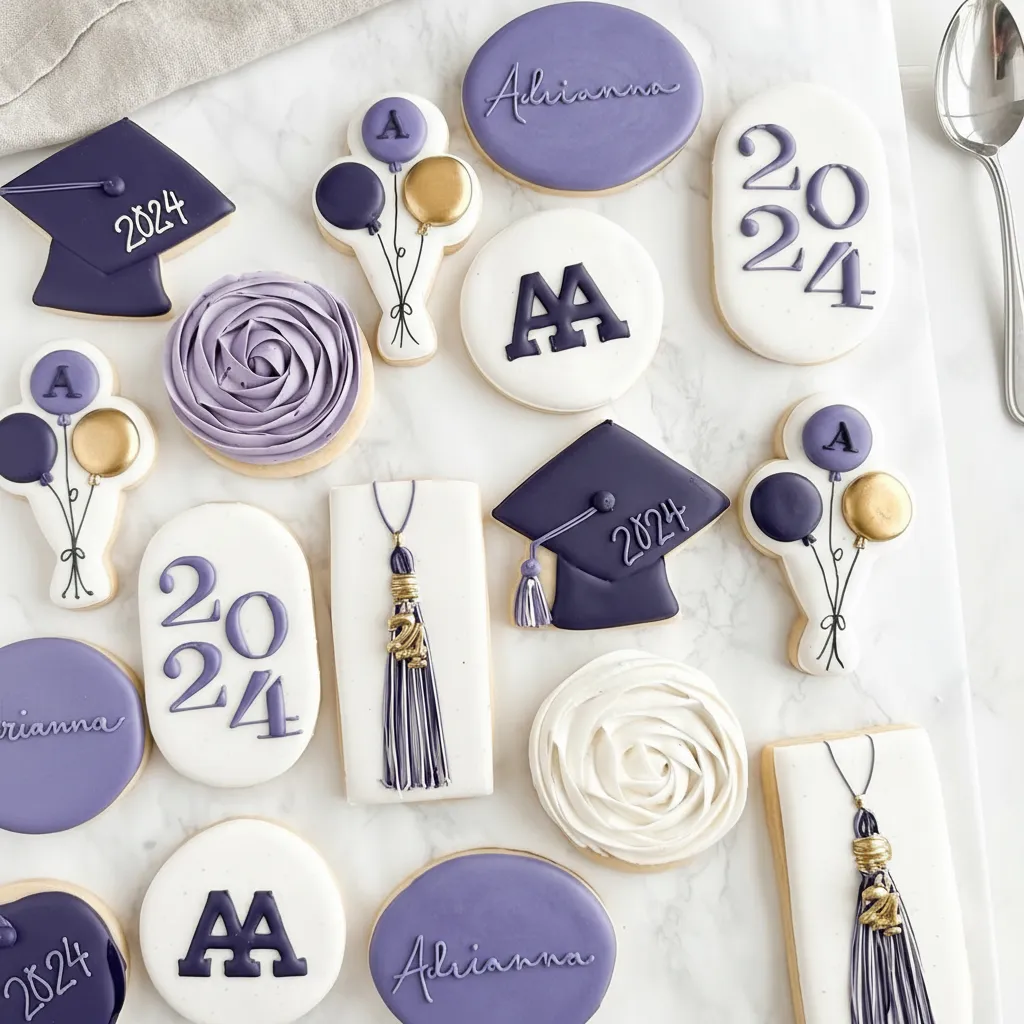
Divide your icing and add your gel colors. Purple, black, and gold are classic choices. Transfer the icing to piping bags. Outline your shapes first with thicker icing. Then fill the centers with the thinner flood icing. Use a toothpick to pop any bubbles. This is where your graduation cookies really start to come to life.
Step 9: Add The Details
Let the base layer dry for at least 6 to 8 hours. Once dry, you can add fine details on top. Mix gold luster dust with a drop of alcohol to make paint. Use a food safe brush to add shimmer to the tassels. You can also use Glitter Cake Ideas as inspiration for adding edible sparkles to the gowns.


How To Store Leftovers
Once your graduation cookies are completely dry, you need to store them correctly. The icing needs about 18 to 24 hours to fully harden. If you stack them too soon, the designs might get ruined. Always store them in an airtight container at room temperature. They will stay fresh for about one week this way.
If you need to keep them longer, you can actually freeze these Cookie Favors. Place them in a single layer in a freezer safe container. Use parchment paper between layers to protect the icing. They can last for up to two months in the freezer. When you are ready to serve, let them thaw at room temperature while still in the container.
Avoid putting decorated cookies in the refrigerator. The moisture inside a fridge can make the royal icing go soft or bleed. It is much better to keep them in a cool and dry spot in your pantry. This ensures the Graduation Desserts look just as good at the party as they did when you finished them.
Tips
One of the best tips for graduation cookies is to mix your dark colors early. Colors like black and navy blue need time to develop. If you mix them the day before, they will look much richer. This is a common trick in Cake Decorating For Beginners. It saves you from using too much food coloring, which can affect the taste.
If your dough gets too soft while rolling, just put it back in the fridge. Working with cold dough is much easier. It prevents the Easy Sugar Cookies from sticking to your counter. You can also roll the dough between two sheets of parchment paper. This trick keeps your kitchen cleaner and prevents you from adding too much extra flour.
For a beautiful finish, try using Glitter Cake Ideas on your cookies. A little bit of edible glitter goes a long way. You can sprinkle it on the wet icing for a subtle shimmer. Or use the luster dust paint for a bold metallic look. It makes the Graduation Gown Cookies look extra special for the big day.
Do not be afraid of imperfections. Hand decorated Party Sweets have a lot of character. Even if your lines are not perfectly straight, the graduate will love the effort. The goal is to celebrate their achievement with something made from the heart. Just have fun with the process and enjoy the creative journey.
Conclusion
Making your own graduation cookies is a rewarding experience. It allows you to contribute something unique to the celebration. These Graduation Desserts are more than just food. They are a symbol of hard work and success. Plus, they taste much better than anything you can buy at a store.
Whether you are making Graduation Gown Cookies or simple rounds with the year on them, they will be a hit. Remember to take your time and follow the steps for chilling the dough. This ensures your Easy Sugar Cookies come out perfectly every time. You might even find that you have a new favorite hobby in the kitchen.
So grab your supplies and start baking. Your graduate deserves a sweet celebration. These Cookie Favors will be a memorable part of their special day. Congratulations to the graduate and to you for taking on this fun project. Enjoy every bite of these delicious graduation cookies and the joy of the occasion.
FAQ
Can I Make These Cookies In Advance?
Yes, you definitely can. You can bake the Plain Cookies up to a week ahead of time. Just keep them in an airtight container. You can also decorate them a few days before the party. Just make sure the icing has plenty of time to dry before you pack them up for the event.
What If I Do Not Have Meringue Powder?
Meringue powder is best for graduation cookies because it is shelf stable. However, you can use pasteurized egg whites if you are in a pinch. Be careful with the consistency though. Meringue powder is generally more reliable for getting those stiff peaks. It is a staple for most Party Sweets that require detailed icing.
How Do I Get Vibrant Colors?
The secret is using gel food coloring. Liquid coloring can water down your icing and ruin the texture. Gel is very concentrated. You only need a tiny drop to get a bright color. This is a key lesson in Cake Decorating For Beginners. It helps you achieve those bold school colors for your graduation cookies.
Why Are My Cookies Spreading?
Cookies usually spread because the dough is too warm. Make sure you do not skip the chilling step. If the butter melts too fast in the oven, the cookie loses its shape. Also, ensure you are measuring your flour correctly. A sturdy dough is essential for successful graduation cookies with clean edges.
Can I Use Different Flavors?
Absolutely. While vanilla is classic for Easy Sugar Cookies, you can try almond or lemon extract. Just make sure the extract is clear if you want your icing to stay bright white. Changing the flavor is a fun way to personalize your Graduation Desserts. Just stick to the same proportions to keep the dough consistent.
Easy Graduation Cookies
Celebrate your graduate’s big day with these no-fuss sugar cookies! This simple recipe is perfect for beginners and creates delicious, shareable treats that hold their shape perfectly. A fun and tasty way to make the party extra special.
Requirements


Ingredients
Instructions
- In a large mixing bowl, cream together the softened butter and granulated sugar until light and fluffy.
- Beat in the egg and vanilla extract until fully incorporated.
- In a separate bowl, whisk together the sifted flour and salt. Gradually add the dry ingredients to the wet mixture, mixing until just combined.
- Divide the dough in half, form into two disks, wrap in plastic, and chill for at least 3-4 hours, or overnight.
- Preheat oven to 350°F. Roll dough to 1/4 inch thickness on a floured surface and cut out shapes. Place on parchment paper-lined baking sheets.
- Bake for 8-10 minutes, until edges are lightly golden. Let cool on the baking sheet for a few minutes before transferring to a wire rack to cool completely.
- To make the icing, mix powdered sugar and meringue powder in a stand mixer. Slowly add water and vanilla, then beat on medium-high for 2-4 minutes until stiff, glossy peaks form.
- Divide and tint the icing with gel food coloring. Transfer to piping bags, outline the cookies, then fill (“flood”) the centers.
- Let the base icing dry for at least 6-8 hours. Once dry, add details by painting with a mixture of gold luster dust and a drop of alcohol.
Notes
Mix dark icing colors like black the day before you need them for a richer, deeper color.
If dough becomes too soft while rolling, return it to the fridge to firm up.
Store fully dried cookies in an airtight container at room temperature for up to one week.
Nutrition
Calories
Sugar
Fat
Carbs