Graduation season is finally here and the air is full of excitement. You can feel the joy in every school hallway and home right now. It is a time to look back at all the hard work and long nights spent studying.
It is also a time to look forward to new beginnings and adventures. One of the best ways to celebrate this major milestone is with food. Specifically, you need some amazing graduation cookies for the big party.
You might think that making beautiful treats is hard. Honestly, it is much easier than you think to get great results. You do not need to spend hundreds of dollars at a fancy bakery this year.
You can make Simple Graduation Cookies right in your own kitchen. These treats are perfect for high school grads or college grads. They even work for little ones finishing their very first year of preschool.
In this guide, we will walk through everything you need. We will focus on the popular styles for Graduation Cookies 2025. You will learn how to use royal icing and gold accents like a pro.
Jump To:
Why You’ll Love This Recipe
You will love this recipe because it is very beginner friendly. You do not need any professional equipment to make these Graduate Cookies look great. Just a few simple tools will do the trick.
Another reason to love these is how customizable they are. You can change the colors to match any school. Whether it is blue and gold or red and white, the process stays the same.
These Grad Sugar Cookies are also very budget conscious. Buying custom treats from a shop can be very expensive. Making them at home saves you a lot of money for the graduation gift.
The texture of these cookies is perfect for parties. They are sturdy enough to be handled but soft enough to melt in your mouth. The icing adds a lovely crunch that everyone enjoys.
You can also make these Graduation Cookies Decorated 2025 style in advance. This is a huge help when you are busy planning a party. You can check one thing off your list early.
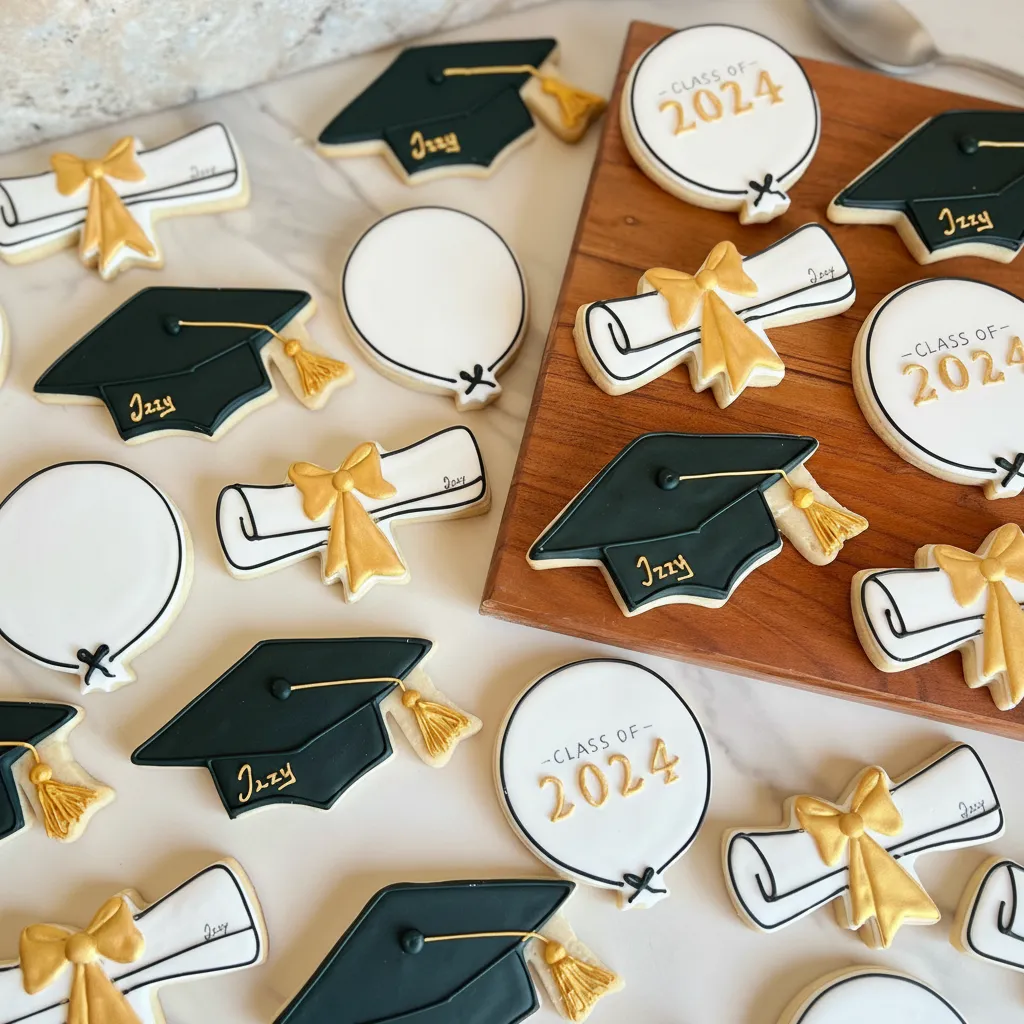
Kids and adults alike will gravitate toward the dessert table. There is something so classic about a graduation cap shape. It instantly signals a celebration of success and hard work.
Plus, the addition of gold lustre dust makes them look very special. It adds a touch of class without adding extra stress. You will feel so proud when you see them all finished.
Honestly, the best part is seeing the graduate’s face. They will know you put in the extra effort to make their day special. It is a sweet way to say you are proud.
Ingredients
To make these Graduation Decorated Cookies, you only need a few key items. Most of these can be found at any local grocery or craft store. Here is what you should gather.
- Your favorite sugar cookie dough cut into shapes
- White Royal Icing
- Gold Lustre Dust
- Piping Bags or squeeze bottles
- Icing tips for fine details
- Food safe paint brushes
- A small amount of clear vanilla extract or vodka for the dust
Make sure your sugar cookies are completely cool before you start. If the cookies are even a little warm, the icing will melt. That would be a real mess for your Grad Cookies Decorated 2025 project.
The white royal icing is the star of the show here. You can buy it premade or make it from scratch. If you make it, ensure it is smooth and free of any lumps.
Gold lustre dust is what gives that metallic shine. It comes in a small jar and lasts a long time. You only need a tiny bit to make a big impact on your Graduation Cookies 2024 or 2025 designs.
Step By Step Instructions
Step 1: Bake The Cookie Shapes
First, you need to bake your cookies in the right shapes. For this theme, you want to use Graduation Cap Cookies, diplomas, or even gown shapes. These are very classic and easy to recognize.
Roll out your dough to an even thickness. This ensures that they all bake at the same rate. You do not want some to be burnt while others are raw in the middle.
Once they are baked, let them cool on a wire rack. This is a very important step. If you rush this, your graduation cookies will not turn out right. Patience is key here.
Step 2: Prepare The White Royal Icing
Now it is time to get your icing ready. You will need two different consistencies. One should be thick like toothpaste for outlining. The other should be thinner for filling in.
To thin the icing, add just a few drops of water at a time. Stir it slowly so you do not create too many air bubbles. You want it to reach a flood consistency for your Grad Sugar Cookies.
Fill your piping bags with the thick icing first. If you are using squeeze bottles, they work great for beginners too. They are often easier to control for small hands.
Step 3: Outline And Flood The Cookies
Take your thicker icing and draw a line around the edge of the cookie. This creates a dam that holds the thinner icing inside. It makes your Graduation Cookies Decorated 2025 look very neat.
After you outline, wait just a minute for it to set. Then, take the thinned icing and fill in the center. You can use a toothpick to move the icing into the corners.
Let these sit until the surface is completely dry. This usually takes a few hours. Do not try to add details while the icing is still wet or they will sink in.
Step 4: Add The Gold Details
Once the base is dry, you can add the fun parts. Use your thick white icing to pipe on tassels or names. This adds a nice 3D effect to your Graduate Cookies.
Now, grab your gold lustre dust. Mix a tiny bit with a drop of clear extract. It should look like metallic paint. Use your food safe brush to paint the gold onto the tassels.
This step really makes the Graduation Decorated Cookies pop. The gold against the white is very elegant. It looks like you spent hours on each one, but it actually goes quite fast.


How To Store Leftovers
Storing your graduation cookies correctly is vital. You want them to stay fresh and crisp for the party. The first rule is to make sure the icing is 100 percent dry.
If you stack them too soon, the icing will smudge. That would be a tragedy after all your hard work! Give them at least twelve to twenty four hours to dry completely.
Once dry, place them in an air tight container. You can use parchment paper between layers to be extra safe. This prevents any sticking or scratching of the gold paint.
Keep the container in a cool and dry place. Do not put them in the fridge. The moisture in a refrigerator can make royal icing go soft or bleed.
These cookies will stay fresh for about one week. This means you can make them a few days before the graduation. It is a great way to manage your time during a busy week.
If you want to keep them longer, you can actually freeze them. Put them in a freezer safe bag and lay them flat. When you want to eat them, let them thaw inside the bag at room temperature.
Tips
Here is a tip for the perfect icing. If you see air bubbles, pop them with a needle while the icing is wet. This keeps the surface of your Simple Graduation Cookies smooth.
When using lustre dust, less is more. You can always add another layer of gold if it is not bright enough. Starting with a thin layer helps it dry faster and stay in place.
If you are making Graduation Cap Cookies, try adding a small candy for the button on top. A tiny chocolate drop or a pearl sprinkle looks very cute. It adds another layer of detail.
Do not be afraid to practice on a piece of parchment paper first. Testing your piping skills before hitting the cookie is a smart move. It builds your confidence quickly.
You can also use different colors for the tassels. Use the school colors to make them more personal. This is a big trend for Graduation Cookies 2025 and looks very festive.
If your hand is shaky, try resting your elbow on the table. This provides a steady base while you pipe the fine lines. It makes a world of difference for your Grad Cookies Decorated 2025.
Always make a few extra cookies just in case. Accidents happen in the kitchen. Having a few spares means you will not stress if one breaks or the icing smudges.
Finally, have fun with it! These do not have to be perfect to be loved. The fact that you made them by hand is what matters most to your graduate.
Conclusion
Making graduation cookies is such a rewarding project. It is a creative way to celebrate a huge life event. These treats are sure to be the highlight of any graduation party.
By following these steps, you can create Graduation Cookies Decorated 2025 that look professional. You saved money and added a personal touch that everyone will appreciate. That is a win in my book.
Remember to take plenty of photos before they all get eaten! They look so good that people might not believe you made them yourself. You deserve to show off your hard work.
Congratulations to your graduate and to you for making such a sweet tribute. Enjoy the party and the delicious Grad Sugar Cookies you created. It is time to celebrate a job well done!
FAQ
Can I Make These Cookies In Advance?
Yes, you can definitely make these ahead of time. In fact, it is better to give the icing plenty of time to dry. You can bake and decorate them three days before the event.
What If My Royal Icing Is Too Thin?
If your icing is too runny, just add a little more powdered sugar. Stir it in slowly until you reach the right thickness. It is much easier to thicken icing than it is to thin it out.
How Do I Get The Gold To Shine?
The secret is using a high quality lustre dust mixed with a tiny bit of clear alcohol or extract. The liquid evaporates quickly and leaves behind a bright and shiny gold finish on your cookies.
Simple Graduation Cookies
Celebrate your graduate’s big day with these Simple Graduation Cookies! This easy, no-fuss recipe walks you through creating beautifully decorated sugar cookies with royal icing and elegant gold accents, perfect for any graduation party.
Requirements


Ingredients
Instructions
- Bake your sugar cookies in graduation-themed shapes (caps, diplomas) after rolling the dough to an even thickness. Let them cool completely on a wire rack.
- Prepare two consistencies of white royal icing: a thick one for outlining and a thinner, flood-consistency one for filling.
- Using a piping bag, outline the edges of each cookie with the thick icing to create a dam.
- Fill the center of the outlined cookies with the thinner icing. Use a toothpick to guide it into the corners. Let the icing dry for a few hours until the surface is hard.
- Once the base is dry, use the thick icing to pipe details like tassels or names.
- Mix a small amount of gold lustre dust with a drop of clear vanilla extract to create a metallic paint.
- Using a food-safe brush, paint the gold details onto the piped icing. Let everything dry completely before storing.
Notes
Ensure cookies are completely cool before icing to prevent melting.
To store, let the icing dry for 12-24 hours. Place in an airtight container with parchment paper between layers. Store at room temperature, not in the fridge.
If you see air bubbles in your flood icing, pop them with a needle while it’s still wet for a smooth finish.
Nutrition
Calories
Sugar
Fat
Carbs