Graduation day is a huge milestone, isn’t it? It’s a moment packed with pride, joy, and a whole lot of celebrating. And what’s a celebration without a show stopping cake? You might think creating a beautiful graduation cake is only for the pros, but guess what? You absolutely can bake a gorgeous, personalized, and simple graduation cake right in your own kitchen!
Forget the stress and sky high prices of custom bakery orders. This guide is all about empowering you to craft a memorable treat that’s not just delicious, but also a heartfelt expression of your love and effort. Whether you are looking for Graduation Ideas Party treats or specific Graduate Cake Ideas, this recipe is your secret weapon.
Jump To:
Why You’ll Love This Recipe
Honestly, who doesn’t love a good cake? Especially one that looks like it took hours but was actually pretty straightforward. This recipe for simple graduation cakes hits all the right notes for your big day.
First off, it is incredibly tasty. We are talking moist vanilla cake layers paired with a dreamy, vintage style vanilla buttercream. It is a classic combo that everyone adores. No weird flavors or complicated techniques here, just pure, comforting deliciousness.
Then there is the aesthetic. If you are aiming for an Aesthetic Graduation Cake that looks elegant and picture perfect, this is it. It has that timeless, charming look that is currently so popular, making it ideal for any Grad Party Theme.
Plus, making it yourself adds such a special touch. Imagine the look on your graduate’s face when they see a cake made just for them, by you! It is a fantastic way to add a personal flair to your Graduation Ideas Party without breaking the bank.
You will gain serious bragging rights, too. Seriously, when people ask where you got such a beautiful Graduation Cake, you can proudly say, “I made it!” It is surprisingly easy to achieve that polished, bakery worthy finish with our step by step instructions.
This recipe is also super customizable. Want to change the colors? Add different toppers? Go for it! It is a fantastic base for all your creative Graduation Cake Ideas. You are the artist, after all!
Ingredients
For the Vanilla Cake Layers
- 3 and 2/3 cups (433g) cake flour (spooned & leveled)
- 1 teaspoon salt
- 2 teaspoons baking powder
- 3/4 teaspoon baking soda
- 1 and 1/2 cups (340g) unsalted butter, softened to room temperature
- 2 cups (400g) granulated sugar
- 3 large eggs + 2 additional egg whites, at room temperature
- 1 Tablespoon pure vanilla extract
- 1 and 1/2 cups (360ml) buttermilk, at room temperature
For the Vintage Vanilla Buttercream
- 2 cups (450g) unsalted butter, softened
- 7-8 cups (900g) confectioners’ sugar, sifted
- 1/4 cup (60ml) heavy cream
- 2 teaspoons clear vanilla extract (to keep the color white)
- Pinch of salt
- Optional: Black gel food coloring (for writing)
For the Decoration
- Thin black satin ribbon (non-edible, for the bows)
- White fondant (approx. 100g for the scroll and cap)
- Black fondant (approx. 50g for the cap)
- Edible black marker or black buttercream for the text
Step By Step Instructions
Ready to get baking? This is where the magic happens! Follow these steps closely for a beautiful and delicious grad cake.
Step 1: Get Your Oven And Pans Ready
Preheat your oven to 350°F (177°C). Go ahead and grease and lightly flour three 8 Inch Cake pans. This helps prevent sticking and ensures your cake layers come out perfectly every time. It is a small step that makes a big difference!
Step 2: Whisk Up The Dry Ingredients
In a large bowl, whisk together the cake flour, salt, baking powder, and baking soda. Make sure everything is well combined. This is your foundation for light and fluffy cake layers. Set this dry mix aside for a moment.
Step 3: Cream The Butter And Sugar
Now for the wet ingredients. In a stand mixer fitted with the paddle attachment, beat the softened unsalted butter and granulated sugar on high speed. You want it to be light, fluffy, and creamy, which usually takes about three minutes. Don’t forget to scrape down the sides of the bowl!
Step 4: Add Eggs And Vanilla
Add the three large eggs and two additional egg whites one at a time to your butter and sugar mixture. Beat well after each addition to ensure everything is fully incorporated. Once those are in, mix in the pure vanilla extract. This gives your simple graduation cakes that classic, comforting flavor.
Step 5: Alternate Dry And Wet
Switch your mixer to low speed. Now, you will gradually add the dry ingredients in three additions, alternating with the buttermilk. Start and end with the dry ingredients. Be careful not to overmix here; just mix until combined. Overmixing can lead to a tough cake, and we want it tender!
Step 6: Bake Those Beautiful Layers
Divide your batter evenly among the three prepared 8 Inch Cake pans. Pop them into your preheated oven and bake for 23 to 26 minutes. You will know they are done when a toothpick inserted into the center comes out clean. Each layer is a step closer to your amazing simple graduation cakes!
Step 7: Cool It Down
Once baked, let the cakes cool in their pans for about 10 minutes. Then, carefully transfer them to a wire rack to cool completely. Patience is key here; trying to frost warm cakes is a recipe for a melty mess!
Step 8: Make The Vintage Vanilla Buttercream
In a large bowl, beat the softened butter on medium speed until it is creamy, which takes about two minutes. Gradually add the sifted confectioners’ sugar, one cup at a time, mixing on low speed until combined. This is the heart of your Aesthetic Graduation Cake.
Once all the sugar is in, increase the speed to high and beat for another two minutes until the buttercream is light and fluffy. Finish by adding the heavy cream, clear vanilla extract (to keep it nice and white), and a pinch of salt. Beat for another minute. Adjust consistency as needed: more sugar for stiffer frosting, more cream for softer.
Step 9: Level And Stack Your Cake
Using a serrated knife, level your cooled cake layers. This creates a flat surface for stacking, ensuring your Graduation Cake stands tall and even. Place your first layer on a cake stand or serving plate.
Spread an even layer of your delicious buttercream over the first cake layer. Repeat this process with the remaining layers, stacking them carefully. This is where your simple graduation cakes starts to take shape!
Step 10: Crumb Coat And Chill
Apply a thin layer of frosting all over the entire cake. This is called a “crumb coat,” and its job is to trap any loose crumbs, giving you a super smooth final finish. Refrigerate the cake for about 20 minutes to let the crumb coat set.
Step 11: Final Frosting Flourish
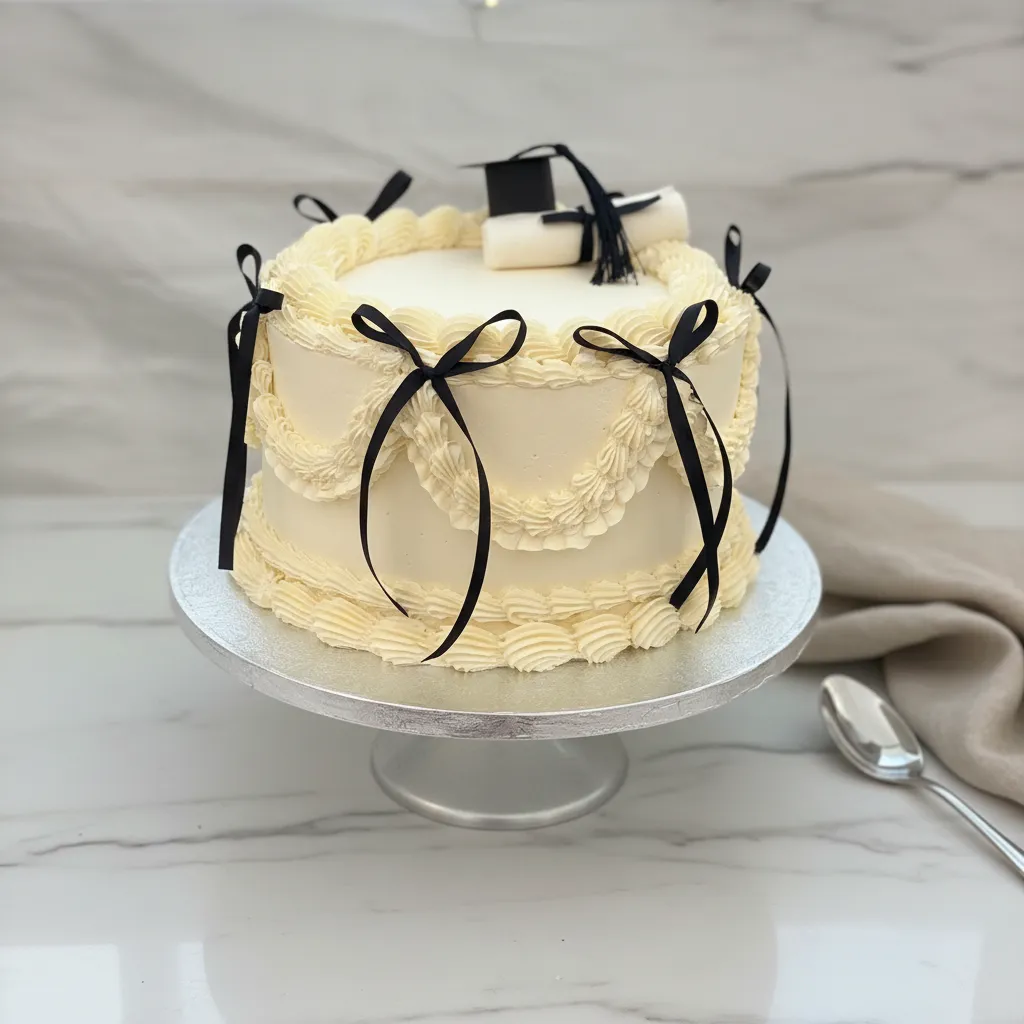
Once chilled, apply a thicker, smooth final coat of buttercream. Use a bench scraper to get those perfectly clean sides and a nice flat top. This is key for that professional Aesthetic Graduation Cake look.
Step 12: Pipe Those Pretty Details
Fill a piping bag fitted with a star tip (like Wilton 4B or 1M) with some buttercream. Pipe a lovely shell border around both the top and bottom edges of your cake. This adds a classic, elegant touch to your simple graduation cakes.
Step 13: Add Charming Swags
To create the vintage swag look, lightly mark the sides of your cake at even intervals. Then, using a smaller star or round tip, pipe draped, curved lines (swags) connecting your marks around the middle of the cake sides. This detail really elevates your Graduation Cake Ideas.
Step 14: Fondant Toppers And Text
Roll out white fondant to create a small scroll. Shape black fondant into a square and a small cylinder for the graduation cap. Gently place these on top of your cake. Then, use an edible black marker or a piping bag with a very fine tip to write “She’s a Graduate” (or your chosen message!) on the top center. This personalizes your Graduation Cake beautifully.
Step 15: Finish With Ribbons
Tie small bows using your thin black satin ribbon. Gently press these bows into the top points of the piped swags on the sides of your cake. Remember, these ribbons are likely non edible, so make sure to remove them before eating. If you prefer, you can create edible bows from black fondant for a fully edible design. This step really brings together your Aesthetic Graduation Cake.


How To Store Leftovers
So, you have got a few slices of your incredible simple graduation cakes left? Lucky you! Proper storage is key to keeping it fresh and delicious.
If your cake has been sitting out at room temperature for a few hours at your Graduation Ideas Party, that is usually fine. For longer storage, you will want to get it into the fridge.
The best way to store leftover cake is in an airtight container. This prevents it from drying out and absorbing any fridge odors. You can also wrap individual slices tightly in plastic wrap before placing them in the container.
Your cake will stay fresh in the refrigerator for up to 3 to 4 days. When you are ready to enjoy a slice, take it out of the fridge about 30 minutes before serving. This allows the buttercream to soften slightly, bringing it back to its best texture and flavor.
If you want to keep it even longer, you can freeze individual slices. Wrap them tightly in plastic wrap, then aluminum foil, and place them in a freezer safe bag or container. It will last in the freezer for up to 2 to 3 months. Thaw in the refrigerator overnight before bringing to room temperature to serve.
Tips
Want to make your simple graduation cakes even better? Here are a few extra tips and tricks that home bakers swear by. These little nuggets of wisdom can really elevate your baking game and ensure your Graduation Cake is a huge success!
Room Temperature Ingredients Are Your Friend: This is not just a suggestion; it is a rule! Softened butter, eggs, and buttermilk at room temperature emulsify better, creating a smoother, more uniform batter and a lighter cake texture. Plan ahead and take them out of the fridge at least an hour before you start.
Achieving That Perfect White Buttercream: For that crisp, pale white look seen in many Aesthetic Graduation Cake designs, clear vanilla extract is a must. Regular vanilla can tint your frosting slightly yellow. For an even whiter shade, a tiny dot of violet food coloring can neutralize any yellow tones from the butter. Just a tiny, tiny drop!
Stabilize Your Frosting for Hot Weather: If you are planning a summer Grad Party Theme or live in a warm climate, your buttercream might get a little soft. To combat this, try replacing about 1/2 cup of the butter in your frosting recipe with vegetable shortening. It helps the piped details hold their sharp shape beautifully.
Don’t Overmix the Batter: Once you add the dry ingredients and buttermilk, mix only until just combined. Overmixing develops the gluten in the flour, leading to a denser, tougher cake. We are going for light and fluffy here!
Leveling is a Game Changer: Seriously, a level cake makes all the difference in the final look of your Graduation Cake Ideas. If you don’t have a fancy cake leveler, a long serrated knife works perfectly. Just take your time and use a steady hand.
Practice Your Piping: If you are new to piping, do a quick practice run on a piece of parchment paper before piping directly onto the cake. You can scrape the practice frosting back into the bag. This builds confidence and ensures those shell borders and swags look fantastic on your Graduation Cake.
Edible Decorations vs. Non Edible: While the black satin ribbons look super cute, remember they are non edible. Always inform your guests to remove them before eating. For a fully edible option, create bows from black fondant. This is a great tip for any Graduation Party Planning.
Personalize It: This is your chance to shine! Change the color of the buttercream to match school colors, add different fondant shapes, or write a personalized message. Make this simple graduation cakes truly unique to your graduate.
Conclusion
There you have it! A comprehensive guide to baking a truly beautiful and simple graduation cakes that will be the talk of the celebration. It is more than just a dessert; it is a labor of love, a centerpiece for joy, and a delicious way to honor an incredible achievement.
Baking this Graduation Cake yourself gives you complete control over the taste, the ingredients, and the final look. You get to infuse it with all your personal touches, making it uniquely special for your graduate. Plus, it is a fantastic way to stretch your budget while still delivering big on impact for your Graduation Ideas Party.
So, gather your ingredients, put on your favorite apron, and get ready to create a masterpiece. Whether it is a small family gathering or a larger Grad Party Theme, this homemade Grad Cake will surely make the day even sweeter. Happy baking, and congratulations to all the graduates out there!
FAQ
Can I Use All Purpose Flour Instead of Cake Flour?
You can, but the texture of your simple graduation cakes will be a bit different. Cake flour has a lower protein content, which results in a softer, more tender crumb. If you use all purpose flour, your cake might be slightly denser.
However, you can make a DIY cake flour substitute: for every cup of cake flour, remove 2 tablespoons of all purpose flour and replace them with 2 tablespoons of cornstarch. Sift them together thoroughly before using.
How Do I Prevent My Cake Layers From Sticking To The Pan?
The key is proper preparation! Always grease your 8 Inch Cake pans thoroughly with butter or a nonstick baking spray. Then, lightly flour them, tapping out any excess. You can also line the bottoms with parchment paper for extra insurance. This helps your Graduation Cake Ideas come to life smoothly.
Can I Make This Cake Ahead Of Time?
Absolutely! You can bake the cake layers up to two days in advance. Once completely cooled, wrap them tightly in plastic wrap and store them at room temperature or in the refrigerator. The buttercream can also be made a day or two ahead and stored in an airtight container in the fridge. Just re whip it briefly before using for your Grad Cake assembly.
What If My Buttercream Is Too Soft Or Too Stiff?
This is a common issue with homemade buttercream, but it is easy to fix! If your buttercream is too soft for piping or spreading, gradually add more sifted confectioners’ sugar, a quarter cup at a time, until it reaches the desired consistency. For a buttercream that is too stiff, add heavy cream or milk, one teaspoon at a time, until it loosens up. Adjusting these will perfect your Aesthetic Graduation Cake frosting.
Can I Decorate With Different Colors For A Specific Grad Party Theme?
Yes, please do! This recipe is a fantastic canvas for customization. You can easily add gel food coloring to your buttercream to match school colors or your specific Grad Party Theme. Just remember that gel colors are more concentrated than liquid ones, so start with a tiny amount and add more as needed to achieve your desired shade for your Graduation Party Planning.
Simple Graduation Cake
Celebrate your milestone with a beautiful, personalized, and no-fuss graduation cake. This moist vanilla cake paired with vintage buttercream is a tasty, family-friendly treat that adds a special touch to your big day without the bakery price tag!
Requirements


Ingredients
Instructions
- Preheat your oven to 350°F (177°C). Grease and lightly flour three 8-inch cake pans to ensure easy removal.
- In a large mixing bowl, whisk together the cake flour, salt, baking powder, and baking soda.
- Using a hand mixer, beat the softened butter and granulated sugar on high speed for 3 minutes until light and creamy.
- Add the eggs and egg whites one at a time, beating well after each. Mix in the vanilla extract.
- On low speed, gradually add the dry ingredients alternating with the buttermilk. Mix until just combined to keep the cake tender.
- Divide the batter among the prepared pans and bake for 23-26 minutes. A toothpick should come out clean.
- Cool in the pans for 10 minutes, then move to a wire rack to cool completely before frosting.
- For the buttercream, beat softened butter until creamy. Gradually add sifted powdered sugar, then beat on high with heavy cream and clear vanilla.
- Level your cooled cake layers with a serrated knife for a flat stacking surface.
- Stack the layers with buttercream and apply a thin crumb coat. Chill the cake for 20 minutes to set.
- Apply a smooth final coat of buttercream with an offset spatula. Pipe shell borders around the top and bottom.
- Pipe vintage swags on the sides and place your fondant scroll and graduation cap on top.
- Personalize with a message using an edible marker and finish with decorative black ribbons.
Notes
Always use room temperature ingredients; they emulsify better for a light and fluffy cake texture.
Use clear vanilla extract in your buttercream to achieve a crisp, pale white aesthetic look.
If baking in hot weather, replace 1/2 cup of butter with shortening to help the piped details hold their shape.
Leveling your cake layers is a game changer for a professional, tall, and even finish.
Remember that satin ribbons are non-edible; ensure they are removed before serving your guests.
Nutrition
Calories
Sugar
Fat
Carbs