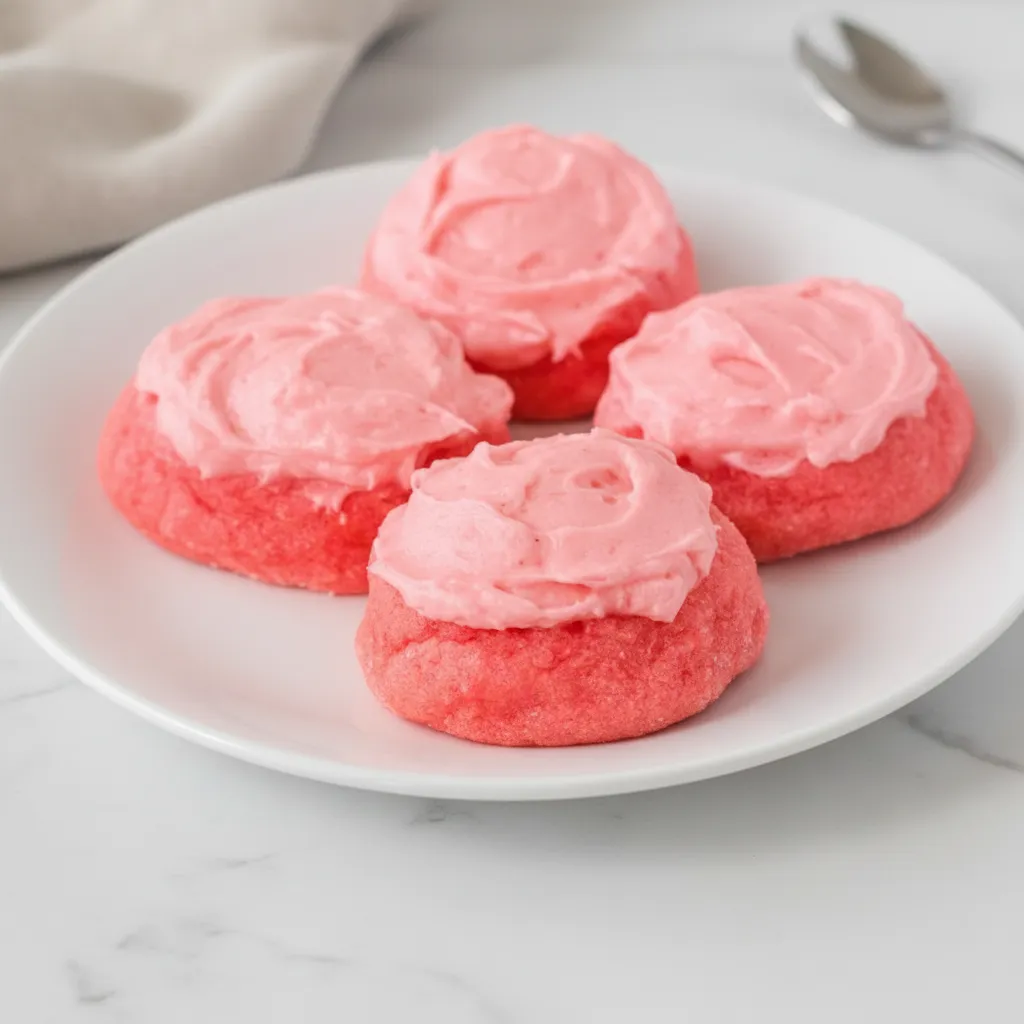
Have you ever spent hours baking beautiful sugar cookies, only to have the icing smudge and smear? It’s a common frustration. You want that crisp, clean look you see in bakeries, where every line is defined and the surface is perfectly smooth. What you need is a reliable Sugar Cookie Icing Recipe That Hardens.
Well, you’ve come to the right place! This is a simple, no fuss recipe that delivers a beautiful, firm finish every single time. It creates the ideal canvas for all your creative cookie decorating ideas, from simple sprinkles to intricate designs. It really is the Best Icing For Sugar Cookies.
Jump To:
Why You’ll Love This Recipe
First off, this recipe is incredibly straightforward. With just four basic ingredients that you might already have in your pantry, you can whip this up in minutes. There’s no need for special ingredients like meringue powder or egg whites, making it a very accessible Easy Icing Recipe For Cookies.
Another great thing is the texture. This icing dries to a firm, matte finish with a gentle sheen, which means your cookies are stackable and transportable. No more worrying about ruined designs! It’s the kind of Cookie Glaze That Hardens just enough to protect your art while still having a soft bite.
Finally, it’s completely customizable. You can color it any shade you like with gel food coloring. It’s a fantastic base recipe that gives you total creative freedom. This is the Sugar Cookie Icing Recipe That Hardens that will become your go to for holidays, birthdays, and any special occasion.
Ingredients
The magic behind this simple icing comes from a few pantry staples. Each one plays an important role in creating that flawless, hard finish.
- 4 cups powdered sugar (480 grams)
- 5 to 6 tablespoons milk, divided, plus more if needed (75 to 90 ml)
- 4 teaspoons light corn syrup
- 1 teaspoon pure or clear vanilla extract
- Optional: Gel or liquid food coloring
Step By Step Instructions
Making this icing involves two main consistencies: a thicker one for outlining and a thinner one for filling, or ‘flooding’. Don’t worry, it’s easier than it sounds! Let’s walk through it.
Step 1: Combine The Main Ingredients
Grab a large mixing bowl. Add your powdered sugar, 5 tablespoons of milk, the light corn syrup, and the vanilla extract. Whisk everything together until it’s smooth and you don’t see any lumps. The mixture will be quite thick at this stage, almost like a paste. This is exactly what you want to start with.
Step 2: Create The Outline Icing
Now it’s time to get the consistency just right for outlining your cookies. Add one extra teaspoon of milk at a time to your thick mixture, whisking well after each addition. You are aiming for what decorators call an ‘outline’ consistency.
How do you test it? Lift your whisk or a spoon from the bowl. Watch the ribbon of icing that falls back into the bowl. It should hold its shape for about 3 to 4 seconds before melting back in. If it’s too thick, add a tiny bit more milk. If it’s too thin, add a little more powdered sugar. This is your foundation for a great Sugar Cookie Icing Recipe That Hardens.
Step 3: Make The Flood Icing
Once your outline icing is ready, pour about one third of it into a separate small bowl or piping bag. This will be used for creating the borders on your cookies. Set it aside for a moment.
With the remaining two thirds of the icing in the main bowl, you’ll create the ‘flood’ icing. This is the thinner icing used to fill in the outlines. Add milk, just a half teaspoon at a time, mixing until it thins out. The test here is different. When you lift your whisk, the icing ribbon should melt back into the bowl almost immediately. This thinner consistency is what makes a great Cookie Glaze That Hardens so smoothly.
If you’re using food coloring, now is the time to add it. Separate your icing into bowls for each color you want to make, then mix in the color. Remember that a little gel coloring goes a long way!
Step 4: Decorate Your Cookies
Time for the fun part! Place your outline icing and your flood icing into separate piping bags. Snip a very small piece off the tip of each bag. You can always make the hole bigger if you need to.
Take a cookie and, using the thicker outline icing, draw a border around the edge or around any section you want to fill. This little wall will hold the thinner flood icing in place.
Next, grab your flood icing and fill in the areas you just outlined. Use a toothpick or a scribe tool to gently nudge the icing into any empty spots or corners and to pop any air bubbles. This is the key to a perfectly smooth surface.
Step 5: Let The Icing Harden
Once your cookies are all decorated, you need to let them be. Place them in a single layer on a baking sheet or in an airtight container. The most important part of this Sugar Cookie Icing Recipe That Hardens is giving it time. Allow the icing to fully harden for about 20 to 24 hours before you think about stacking or packing them.


How To Store Leftovers
If you have leftover icing, you can save it. Place it in a small airtight container. Press a piece of plastic wrap directly onto the surface of the icing before putting the lid on. This prevents a crust from forming. It can be stored in the refrigerator for up to a week.
For your decorated cookies, once the icing is completely hard, you can store them in an airtight container at room temperature. Place parchment paper between the layers to be extra safe. They should stay fresh for up to a week. This is truly the Best Icing For Sugar Cookies when it comes to storage.
Tips
To ensure your icing is super smooth, consider sifting your powdered sugar before you start. This removes any small lumps and makes mixing much easier.
When coloring your icing, gel food coloring is usually the best choice. It provides vibrant color without adding too much extra liquid, which can affect the consistency of your icing.
Achieving the right consistency can feel tricky at first. Go slowly when adding more milk or powdered sugar. It’s always easier to add a little more than to try and fix icing that has become too thin.
Work with one cookie at a time. Outline it, then immediately flood it. This helps the outline and flood icings merge together seamlessly for a professional look. This Easy Icing Recipe For Cookies is forgiving, so have fun with it!
Conclusion
There you have it! A simple and reliable Sugar Cookie Icing Recipe That Hardens into a beautiful, smooth surface. It’s the perfect way to make your homemade cookies look like they came from a fancy bakery. No more smudges, just beautiful, stackable treats.
Whether you’re decorating for a holiday, a party, or just for fun, this recipe will give you the confidence to create amazing designs. It’s the Best Icing For Sugar Cookies for both beginners and experienced bakers alike. Happy decorating!
FAQ
How Long Does It Take For This Icing To Harden?
This icing needs ample time to dry completely. For a fully hardened, stackable finish, you should allow the cookies to air dry for about 20 to 24 hours at room temperature. Humidity can affect dry times, so it might take a little longer in a humid environment.
Can I Use A Different Kind Of Milk?
Yes, absolutely. While the recipe calls for standard milk, you can substitute it with almond milk, soy milk, or even water. Just add the liquid slowly to get the right consistency, as different liquids can have slightly different effects. It remains a very adaptable Easy Icing Recipe For Cookies.
Why Is My Icing Too Thin Or Too Thick?
The consistency of this icing is all about the ratio of powdered sugar to liquid. If your icing is too thin, simply whisk in more powdered sugar, a tablespoon at a time. If it’s too thick, add more milk, just a half teaspoon at a time, until you reach the desired consistency.
What Is The Purpose Of Corn Syrup In This Sugar Cookie Icing Recipe That Hardens?
The light corn syrup is a key ingredient here. It adds a beautiful sheen to the dried icing, giving it a professional look. It also helps keep the icing from becoming rock hard, ensuring a softer bite that won’t crack when you eat the cookie. It helps create the perfect Cookie Glaze That Hardens.
Sugar Cookie Icing Recipe That Hardens
A simple, no fuss recipe that delivers a beautiful, firm finish every single time. It creates the ideal canvas for all your creative cookie decorating ideas.
Requirements


Ingredients
Instructions
- Grab a large mixing bowl. Add your powdered sugar, 5 tablespoons of milk, the light corn syrup, and the vanilla extract. Whisk everything together until it’s smooth and you don’t see any lumps. The mixture will be quite thick at this stage, almost like a paste.
- Now it’s time to get the consistency just right for outlining your cookies. Add one extra teaspoon of milk at a time to your thick mixture, whisking well after each addition. You are aiming for what decorators call an ‘outline’ consistency. Test by lifting your whisk; the ribbon of icing should hold its shape for about 3 to 4 seconds before melting back in.
- Once your outline icing is ready, pour about one third of it into a separate small bowl or piping bag. With the remaining two thirds of the icing, you’ll create the ‘flood’ icing. Add milk, just a half teaspoon at a time, mixing until it thins out. When you lift your whisk, the icing ribbon should melt back into the bowl almost immediately. If using food coloring, add it now.
- Place your outline icing and your flood icing into separate piping bags. Snip a very small piece off the tip of each bag. Take a cookie and, using the thicker outline icing, draw a border around the edge or any section you want to fill.
- Next, grab your flood icing and fill in the areas you just outlined. Use a toothpick or a scribe tool to gently nudge the icing into any empty spots or corners and to pop any air bubbles.
- Once your cookies are all decorated, place them in a single layer on a baking sheet or in an airtight container. Allow the icing to fully harden for about 20 to 24 hours before you think about stacking or packing them.
Notes
Taste the base before freezing and adjust sweetener if needed. Frozen desserts tastes less sweet, so aim for slightly sweeter than you prefer.
Do not fill the pint past the max fill line, as the mixture will expand during freezing and processing.
A full 24-hour freeze is essential for the best, creamiest texture. Rushing this step can result in an icy or soupy consistency.
Feel free to experiment with other flavors like vanilla protein with frozen berries or adding mint extract for a mint-chip version.
Nutrition
Calories
Sugar
Fat
Carbs