Let’s talk turkey. For so many of us, the holiday table centerpiece can be a source of stress. Will it be dry? Will it cook on time? What if the skin is pale and rubbery? I’ve been there, and I have a wonderful solution for you.
The Spatchcock Turkey Oven method is my favorite way to prepare a holiday bird. By removing the backbone and flattening the turkey, you expose more surface area to the oven’s heat. This means it cooks faster and more evenly, giving you juicy meat and wonderfully crispy skin all over. It’s a fantastic technique, especially if you are new to cooking large roasts.
Jump To:
Why You’ll Love This Recipe
Honestly, once you try this method, you might never go back to the old way. The biggest win is the cooking time. A 12 pound turkey can be ready in about 90 minutes. That’s a huge time saver on a busy cooking day.
Plus, the results are just so good. Because the turkey lies flat, the dark meat and the breast meat finish cooking at roughly the same time. No more overcooked breast meat while you wait for the thighs to be done. It’s one of the best Oven Roasted Turkey Recipes Thanksgiving celebrations deserve.
And that skin! Oh, that golden brown, crispy skin is something to behold. With the entire surface exposed to direct heat, every single bite of skin is delightfully crunchy. It also makes for a beautiful presentation. The rich herb butter we use seeps into the meat, making every slice incredibly flavorful and moist.
Ingredients
Here is what you’ll need to gather for your Spatchcock Turkey Oven adventure. The ingredients are simple, but together they create a truly memorable meal.
- 1 cup salted butter, softened
- 2 tablespoons Dijon mustard
- 1 ½ tablespoons chopped fresh thyme leaves
- 1 tablespoon fresh lemon juice
- 1 teaspoon grated lemon zest
- 1 teaspoon chopped fresh rosemary
- 1 teaspoon kosher salt, divided, plus more to taste
- 1 teaspoon ground black pepper, divided, or more to taste
- 3 cups coarsely chopped sweet onion
- 2 cups coarsely chopped carrot
- 2 cups coarsely chopped celery
- 1 (12 pound) turkey, thawed if purchased frozen
- 2 tablespoons finely chopped shallot
- ¼ cup all purpose flour
- 5 cups chicken stock, or more as needed
Step By Step Instructions
Ready to get started? We will walk through this together. Just follow these steps for a stunning Spatchcock Turkey Thanksgiving meal. Don’t worry, it’s easier than it sounds!
Step 1: Get The Oven And Pan Ready
First things first, let’s get your oven going. You want to preheat it to 450 degrees F. Make sure you have an oven rack positioned in the lower third of the oven. This helps the turkey cook evenly.
Next, grab a large rimmed baking sheet. Find a wire rack that fits nicely inside it. This setup is key. The turkey will sit on the rack, allowing hot air to circulate all around it for that crispy skin we love.
Step 2: Mix The Flavorful Herb Butter
In a medium bowl, combine your softened butter, Dijon mustard, thyme, lemon juice, lemon zest, and rosemary. Add about half a teaspoon each of salt and pepper. Stir it all together until it’s well blended. This fragrant butter is going to make our turkey so delicious. Set it aside for now.
Now, take your chopped onion, carrots, and celery and spread them in an even layer on the baking sheet. Place the wire rack right on top of the vegetables. This vegetable bed will flavor the drippings for our gravy.
Step 3: Prepare The Spatchcock Turkey
This is the main event of the prep work. To spatchcock turkey, you’ll want a stable workspace. I like to place a clean kitchen towel under a large cutting board to prevent it from slipping.
Place your thawed turkey on the board and pat it as dry as you can with paper towels. A dry bird means crispy skin. Turn the turkey so the backbone is facing up.
Using a sharp pair of poultry shears, cut along one side of the backbone, from the tail end up to the neck. You’ll be cutting through rib bones, so use a firm hand. If the turkey is slippery, use a paper towel for a better grip.
Once one side is cut, repeat on the other side of the backbone to completely remove it. Don’t throw it away! Cut the backbone into a few pieces and set it aside. We will use it for the gravy.
Now, flip the turkey over so the breast side is up. Place your hands, with fingers interlaced, on the center of the breast. Press down firmly and quickly. You should hear a little crack as the breastbone breaks, allowing the bird to flatten out.
Step 4: Butter And Season The Bird
Place your flattened turkey, breast side up, on the wire rack over the vegetables. Pat the outside dry one more time. Tuck the wing tips underneath the bird to prevent them from burning.
Gently slide your fingers under the skin of the breasts and thighs, being careful not to tear it. Take about half of your herb butter mixture and spread it evenly under the skin. Use your other hand to press on top of the skin to help distribute the butter.
Melt the remaining half of the herb butter in the microwave for about 20 seconds. Brush some of this melted butter all over the surface of the turkey. Sprinkle it with the remaining salt and pepper. The process to bake turkey in oven with this much flavor is so rewarding.
Step 5: Roast The Turkey
It’s time for the Spatchcock Turkey Oven magic. Place the baking sheet with the turkey into your preheated oven. Let it roast until a meat thermometer inserted into the thickest part of the thigh reads 165 degrees F. This should take about 90 minutes.
To ensure even browning, turn the baking sheet around about halfway through cooking. Every 30 minutes, baste the turkey with more of the melted herb butter. If any part of the skin starts to get too dark, you can loosely tent it with some foil.
Step 6: Begin The Gravy
While the turkey roasts, we can get a head start on the gravy. Remember that reserved backbone? Let’s use it. Place a large saucepan over medium high heat and add a tablespoon of the reserved melted herb butter.
Add the backbone pieces to the pan and cook, stirring often, until they are browned all over. This usually takes about 8 minutes. Reduce the heat to low, add enough water to barely cover the bones, and cover the saucepan. Let this simmer on the lowest heat while the turkey finishes roasting.
Step 7: Rest The Turkey And Finish The Gravy
Once the turkey is cooked, carefully transfer the rack with the turkey to a cutting board. Let it rest, tented with foil, for at least 15 to 20 minutes. This is a very important step for a juicy bird.
Spoon the vegetables and all the drippings from the baking sheet into the saucepan with the simmering backbone. Now, place the empty baking sheet over two burners on your stove over medium heat. Carefully pour in 1 cup of chicken stock and scrape up all those delicious browned bits from the bottom. Pour this liquid into your saucepan too.
Add 2 more cups of chicken stock to the saucepan and bring it to a boil. Cook for about 15 minutes to let the flavors meld together.
Strain the gravy through a fine mesh strainer into a large bowl. Press on the solids to get all the liquid out, then discard the solids. Let the liquid sit for a few minutes and then skim the fat from the top. Keep about 3 tablespoons of that flavorful fat.
Wipe your saucepan clean, add the reserved fat, and place it over medium high heat. Add the chopped shallots and cook until soft. Whisk in the flour and cook for about a minute. Slowly whisk in the strained liquid and enough extra chicken stock to make a total of 6 cups. Bring it to a boil, then reduce the heat and simmer until it thickens, about 25 minutes. Season with more salt and pepper if needed.
Step 8: Carve And Serve
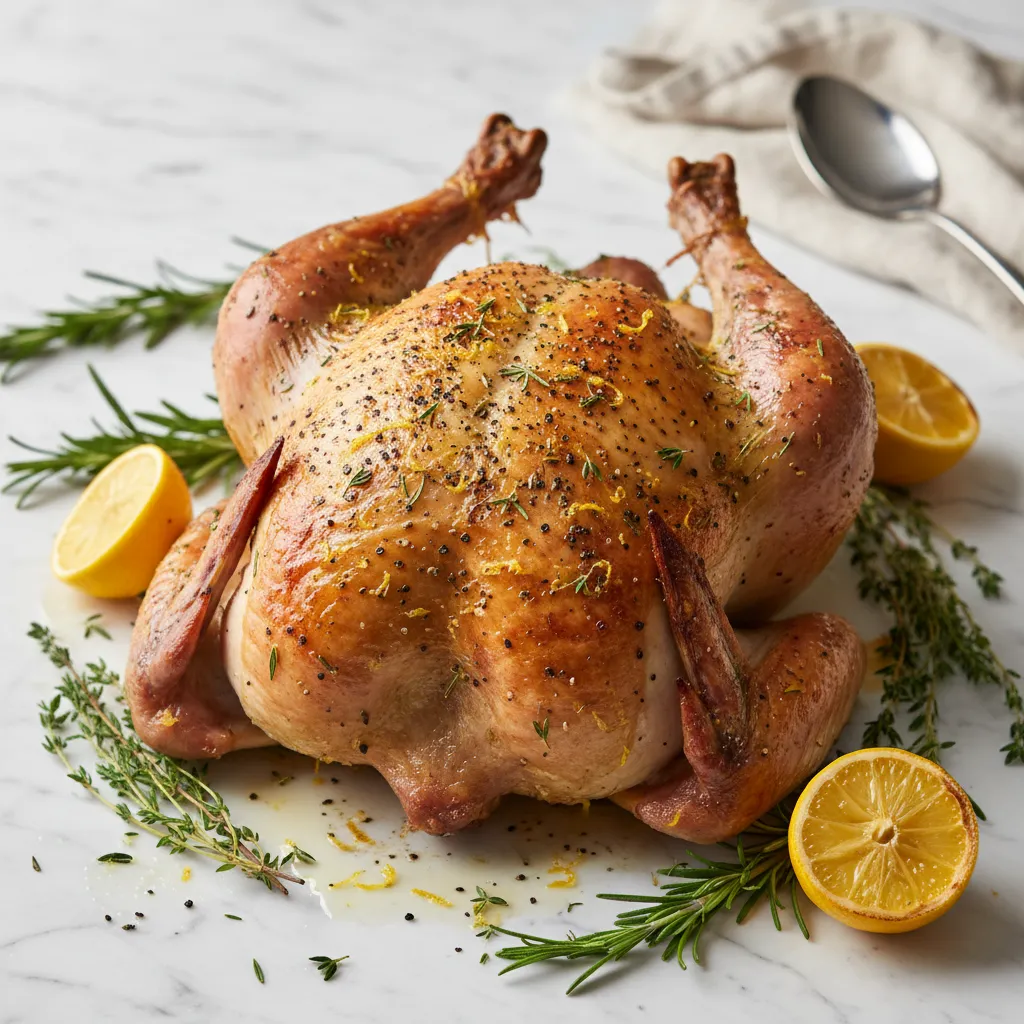
Your beautiful spatchcock turkey has rested and is ready to be carved. Slice it as you wish and serve it immediately with that hot, homemade gravy. Your guests will be so impressed!


How To Store Leftovers
If you have leftovers, which you might not, storing them is easy. Let the turkey cool completely. Carve any remaining meat off the bones and place it in an airtight container. It will keep in the refrigerator for 3 to 4 days.
You can also freeze the leftover turkey. Place it in a freezer safe bag or container. It will be good for up to 3 months. It’s great for sandwiches, soups, or casseroles later on.
Tips
A good pair of poultry shears is your best friend for this recipe. They make cutting through the backbone so much easier than with a knife. It is a worthwhile investment for your kitchen.
Make sure your turkey is completely thawed before you start. A partially frozen bird will not cook evenly. The safest way to thaw a turkey is in the refrigerator, which can take a few days depending on its size.
Don’t skip resting the turkey. This allows the juices to redistribute throughout the meat, ensuring every slice is moist and tender. If you cut into it right away, all those lovely juices will run out onto the cutting board.
Feel free to get creative with your herb butter. Sage, parsley, or even a little bit of orange zest would be delicious additions. This is one of those Oven Roasted Turkey Recipes Thanksgiving cooks can really make their own.
Conclusion
And there you have it. A delicious, juicy, and beautiful Spatchcock Turkey Oven recipe that’s sure to be a hit. It might seem like a lot of steps, but it’s a straightforward process that delivers amazing results every single time.
Cooking a holiday meal should be enjoyable, not stressful. This method to bake turkey in oven saves time and takes the guesswork out of achieving a well cooked bird. I hope you and your family love this recipe as much as I do. Happy cooking!
FAQ
What Is A Spatchcock Turkey?
A spatchcock turkey is a turkey that has had its backbone removed, allowing it to be flattened. This technique is also known as butterflying. It helps the turkey cook much faster and more evenly than a traditional whole roasted bird.
Can I Use A Different Herb Butter?
Absolutely! The herb butter in this recipe is a classic combination, but you can easily customize it. Try adding fresh sage for a traditional holiday flavor, or a bit of smoked paprika for a smoky twist. Use your favorite herbs and spices.
How Do I Know The Turkey Is Cooked?
The most reliable way to know if your turkey is done is by using a meat thermometer. Insert it into the thickest part of the thigh, being careful not to touch the bone. The temperature should read 165 degrees F (74 degrees C). The juices should also run clear when pierced.
Do I Really Need A Rack For This Recipe?
Using a rack is highly recommended. It elevates the turkey off the baking sheet, which allows the hot air to circulate underneath the bird. This is crucial for getting that crispy skin on all sides of your spatchcock turkey. If you don’t have one, you can create a makeshift rack with thick slices of onion or sturdy celery stalks.
Flavorful Spatchcock Turkey Oven Recipe
This spatchcock turkey recipe is a holiday favorite, creating a wonderfully juicy bird with crispy skin all over. By flattening the turkey, it cooks faster and more evenly, making for a stress-free and delicious centerpiece.
Requirements


Ingredients
Instructions
- Preheat oven to 450°F with a rack in the lower third. Place a wire rack inside a large rimmed baking sheet.
- In a bowl, combine softened butter, Dijon mustard, thyme, lemon juice, zest, rosemary, and ½ tsp each of salt and pepper.
- Spread chopped onion, carrots, and celery on the baking sheet and place the wire rack on top.
- To spatchcock the turkey, place it breast-down. Use poultry shears to cut along both sides of the backbone to remove it. Reserve the backbone for gravy.
- Flip the turkey over and press firmly on the breastbone to flatten it.
- Place the turkey on the wire rack. Gently separate the skin from the meat and spread half the herb butter underneath. Melt the remaining butter and brush it over the skin. Season with remaining salt and pepper.
- Roast for about 90 minutes, or until a thermometer in the thigh reads 165°F. Baste every 30 minutes.
- While roasting, brown the reserved backbone in a large saucepan. Add water to cover and simmer on low.
- Rest the cooked turkey on a cutting board, tented with foil, for 15-20 minutes.
- Add vegetables and drippings from the baking sheet to the saucepan. Deglaze the baking sheet with 1 cup chicken stock and add it to the pan.
- Add 2 more cups of stock, bring to a boil, and cook for 15 minutes. Strain the liquid through a fine mesh strainer, discarding solids. Skim fat, reserving 3 tbsp.
- In the clean saucepan, cook shallots in the reserved fat. Whisk in flour, then slowly whisk in the strained liquid and remaining stock. Simmer until thickened, about 25 minutes. Season to taste.
- Carve the rested turkey and serve with the homemade gravy.
Notes
A good pair of poultry shears makes cutting through the backbone much easier.
Ensure your turkey is completely thawed before starting for even cooking.
Don’t skip resting the turkey. This allows the juices to redistribute, ensuring moist meat.
Feel free to customize the herb butter with sage, parsley, or orange zest.
Nutrition
Calories
Sugar
Fat
Carbs