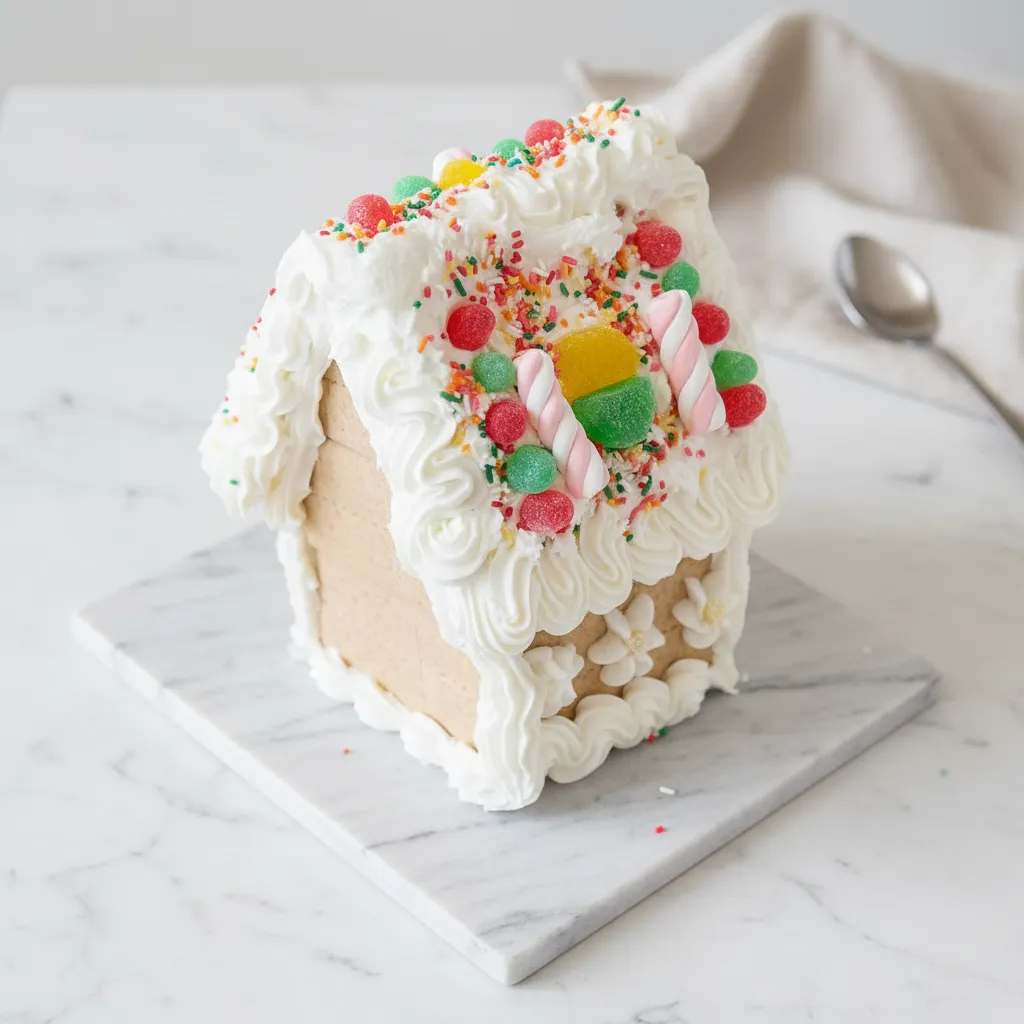
Have you ever spent hours baking gingerbread pieces, only to watch your creation slowly slide apart? It’s a holiday tragedy we’ve all faced. The secret isn’t in the walls, but in the mortar. You need a truly dependable Gingerbread House Icing.
Well, your search is over. This recipe is the real deal. It’s the structural cement of the cookie world. It dries hard, pipes beautifully, and holds everything together so your masterpiece can stand tall all season long.
Jump To:
Why You’ll Love This Recipe
First off, it’s incredibly simple. You only need three basic ingredients that you might already have in your pantry. There are no complicated steps, making this a fantastic Ginger Bread House Icing Recipe Easy enough for total beginners.
The real star of the show is its strength. This isn’t just a decorative frosting. This is construction grade icing. It creates a powerful bond that hardens quickly, securing your gingerbread walls and roof panels with confidence. No more leaning towers of gingerbread!
Beyond its strength, this icing is also wonderful for decorating. It holds its shape perfectly when piped, allowing you to create lovely swirls, delicate icicles, and sharp lines. It’s the key to achieving that beautiful Gingerbread House Inspo look you see online.
Honestly, once you try this Gingerbread House Icing, you will never go back to another recipe. It takes all the stress out of the assembly process, letting you focus on the fun part: decorating!
Ingredients
This Royal Icing Recipe For Gingerbread House construction is so simple. Here is what you will need to gather.
- 3 large egg whites, at room temperature (or 1/2 cup liquid egg whites)
- 1/2 teaspoon cream of tartar
- 5 cups powdered sugar (also called confectioners’ sugar)
A quick note on the ingredients. Using room temperature egg whites helps them whip up to a greater volume. The cream of tartar is a stabilizer, which gives the icing its strong structure. Don’t skip it!
Step By Step Instructions
Ready to make the best Gingerbread House Icing ever? Let’s get started. It comes together very quickly.
Step 1: Combine Egg Whites And Cream Of Tartar
Grab a large bowl and your electric mixer. Make sure the bowl is completely clean and dry. Any grease can prevent the egg whites from whipping properly.
Fit the mixer with the whisk attachment. Add your room temperature egg whites and the cream of tartar to the bowl. Beat them together on medium speed until they become frothy.
Step 2: Gradually Add The Powdered Sugar
Now it’s time for the sugar. With the mixer still running on medium, start adding the powdered sugar. Don’t dump it all in at once! Add it one cup at a time.
Adding the sugar slowly allows it to dissolve properly. This creates a smoother, stronger icing. It prevents the sugar from flying everywhere too!
Continue beating for about 3 to 4 minutes. You will see the mixture transform. It will become thick, white, and very fluffy. This is your Gingerbread House Icing coming to life.
Step 3: Check For Stiff Peaks
This is the most important part. You need to achieve stiff peaks. What does that mean? When you lift the beaters out of the icing, the peak that forms should stand straight up. It shouldn’t flop over.
Make sure to stop the mixer and scrape down the sides of the bowl a few times. This ensures everything is fully combined. It’s a key step for a consistent Gingerbread House Icing.
Another great test is the knife test. Run a butter knife through the middle of the icing. If the line you created stays put and doesn’t run back together, your icing is ready for construction.
Step 4: Adjust The Consistency
Sometimes, things like humidity can affect your icing. If it seems too loose or runny, don’t worry. It’s an easy fix for your Gingerbread House Icing.
Just add more powdered sugar, about a quarter cup at a time. Keep beating and checking until you get those stiff peaks. We usually find that 4 and a half to 5 cups does the trick.
What if it’s too thick to pipe? That can happen too. Simply add a tiny bit of water, just a teaspoon at a time, until it reaches a good piping consistency. Go slow with the water!
Step 5: Use It Right Away
This Gingerbread House Icing starts to dry very quickly. It’s best to use it immediately. Load it into your piping bags and start building and decorating.
If you are working, keep the bowl of icing covered with a damp cloth. This prevents a crust from forming on top. If it starts to stiffen while you work, just give it a good stir to soften it back up.
This is the icing that will help you create all that amazing Gingerbread House Inspo you’ve saved. It pipes beautifully and holds every detail.


How To Store Leftovers
Got some leftover Gingerbread House Icing? No problem. The key is to keep air away from it. Air is what makes it hard.
Transfer the leftover icing to an airtight container. Before you put the lid on, place a piece of plastic wrap directly on the surface of the icing. Press it down gently to remove any air bubbles.
Then, seal the container tightly. You can store it in the refrigerator for up to three days. When you’re ready to use it again, let it come to room temperature on the counter. You may need to give it a quick whip with your mixer to bring it back to the right consistency.
Tips
Here are a few extra tips to make your gingerbread experience even better with this awesome Royal Icing Recipe For Gingerbread House.
- Color Your Icing: Want to add some color? Use gel food coloring. Liquid coloring can make your icing too runny. Add the gel color after you’ve reached the stiff peak stage and mix it in gently.
- Piping Bags Are Your Friend: For the cleanest lines, use piping bags. You can use disposable ones or reusable ones. Different tips will give you different decorative effects for your Gingerbread House Icing.
- Work In Batches: If you are making a large or complex house, consider making the icing in two smaller batches. This ensures you always have fresh, workable icing ready to go.
- Clean As You Go: This icing hardens like cement, so clean up any drips or smudges on your gingerbread pieces with a damp cloth before they dry completely.
Conclusion
There you have it! A straightforward, dependable recipe for Gingerbread House Icing that will hold your creations together. No more structural worries, just pure creative fun.
This recipe gives you the confidence to build the gingerbread house of your dreams. It’s strong enough for assembly and pretty enough for all the fine details. Get ready to impress everyone this holiday season!
FAQ
Can I Use Something Besides Raw Egg Whites?
Absolutely. If you are concerned about using raw egg whites, you can use pasteurized liquid egg whites from a carton. Meringue powder is another great alternative. Just follow the instructions on the meringue powder container to make the royal icing.
How Long Does This Icing Take To Dry Completely?
The surface will start to set very quickly, within about 15 to 20 minutes. For structural pieces to be fully hardened and strong, it’s best to let the icing dry for at least 4 to 6 hours. Leaving it overnight is even better for maximum strength.
Is This Gingerbread House Icing Safe To Eat?
Yes, it is edible. However, if you are using raw egg whites, there is a small risk of salmonella. To be extra safe, especially if young children will be eating it, use pasteurized egg whites or meringue powder instead.
My Icing Is Too Runny, What Happened?
If your icing is runny, it likely just needs more powdered sugar. This is a common issue and a very easy fix. Keep adding powdered sugar, a little at a time, until you get the stiff consistency needed for this Ginger Bread House Icing Recipe Easy.
Gingerbread House Icing
A dependable gingerbread house icing that dries hard, pipes beautifully, and holds all your festive creations together for a stunning masterpiece.
Requirements


Ingredients
Instructions
- Combine egg whites and cream of tartar in a large, clean bowl with an electric mixer until frothy.
- Gradually add powdered sugar, one cup at a time, beating for 3-4 minutes until thick and fluffy.
- Check for stiff peaks; the peak should stand straight up when beaters are lifted. Scrape bowl sides for consistency.
- Adjust consistency by adding more powdered sugar if too loose, or a teaspoon of water if too thick.
- Use immediately, keeping the bowl covered with a damp cloth to prevent drying.
Notes
Taste the base before freezing and adjust sweetener if needed. Frozen desserts tastes less sweet, so aim for slightly sweeter than you prefer.
Do not fill the pint past the max fill line, as the mixture will expand during freezing and processing.
A full 24-hour freeze is essential for the best, creamiest texture. Rushing this step can result in an icy or soupy consistency.
Feel free to experiment with other flavors like vanilla protein with frozen berries or adding mint extract for a mint-chip version.
Nutrition
Calories
Sugar
Fat
Carbs