Ever get that craving for something sweet, something comforting, but just don’t have the energy or time to fire up the oven? You know the feeling, right? That’s where the magic of no bake desserts swoops in to save the day!
Today, we’re diving into one of the absolute best quick desserts out there: our incredibly delicious Chocolate Peanut Butter Balls. These aren’t just any treats; they are little bites of pure joy, perfect for easy snacks, unexpected guests, or even as delightful holiday treats.
They are so simple to whip up, you’ll wonder why you haven’t been making them forever. No fancy equipment, no complicated steps, just pure, unadulterated deliciousness waiting to happen. Let’s get cooking, or rather, not cooking!
Jump To:
Why You’ll Love This Recipe
Honestly, what’s not to love about a recipe that delivers big on flavor with minimal effort? These Chocolate Peanut Butter Balls are truly a game changer for anyone who loves sweets but is short on time.
First off, they are quintessential no bake desserts. That means no oven needed, which is a huge win, especially on those hot summer days or when your oven is already occupied with dinner. It’s all about keeping things cool and convenient.
Then there’s the flavor. Oh, the flavor! The classic combination of rich chocolate and creamy peanut butter is simply irresistible. It hits all the right notes, making these Peanut Butter Balls a guaranteed crowd pleaser for all ages.
For busy parents, these are fantastic. You can even get the kids involved in rolling the balls, making it a fun family activity. Plus, they make for perfect easy snacks to grab and go, or a comforting treat after a long day.
Are you looking for impressive yet effortless holiday treats? Look no further. These little beauties look festive and taste amazing, making them ideal for sharing at parties or gifting to friends and neighbors. They are a real testament to how simple recipes can still be spectacular.
Another great thing? They are super budget friendly. Most of the ingredients are pantry staples you probably already have on hand. It’s a sweet indulgence that won’t break the bank, which is always a bonus, right?
And let’s not forget the customization! While the base recipe is perfect as is, you can totally get creative. Add different toppings, use various chocolate types, or even try different nut butters. We’ll talk more about that in our tips section.
So, whether you’re a beginner in the kitchen or just seeking a fuss free, delicious option, these quick desserts are calling your name. They truly embody the spirit of tasty, comforting, and no fuss treats.
Ingredients
Getting started with these amazing Chocolate Peanut Butter Balls is a breeze because the ingredient list is short and sweet. You likely have most of these items chilling in your pantry already, which makes this one of those truly simple recipes.
Here’s what you’ll need to gather for these delightful no bake desserts:
- 1½ cups chunky or creamy peanut butter (your choice, both work wonderfully for these Peanut Butter Balls!)
- ½ cup butter, softened (this helps everything come together smoothly)
- 2 cups powdered sugar (for that perfect sweetness and texture)
- 1 teaspoon vanilla extract (a little goes a long way for flavor)
- 12 oz bag of chocolate chips (semisweet is classic, but milk or dark are great too)
- 2 tablespoons coconut oil (the secret to a super smooth, shiny coating that sets fast)
- Sprinkles (optional, but they add such a fun, festive touch, especially for holiday treats!)
See? Nothing too wild or hard to find. These are all common items that come together to create something truly special. The beauty of these quick desserts lies in their simplicity, both in ingredients and method.
Step-By-Step Instructions
Alright, let’s get down to business! Making these Chocolate Peanut Butter Balls is genuinely one of the easiest kitchen adventures you’ll embark on. Just follow these straightforward steps, and you’ll have delicious no bake desserts in no time.
Step 1: Prepare the Peanut Butter Mixture
Grab a large mixing bowl. This is where all the magic starts for your Peanut Butter Balls. Add your chosen peanut butter, the softened butter, powdered sugar, and vanilla extract. Now, get ready to mix!
You’ll want to combine these ingredients thoroughly until everything is smooth and well blended. Use a sturdy spoon or even a stand mixer if you have one. The goal is a consistent mixture that’s firm enough to hold its shape when you roll it. If it seems a little too soft, don’t fret; a quick chill in the fridge for about 15 minutes can work wonders.
Step 2: Form the Balls
This is the fun part, especially if you have little helpers around! Take small portions of the peanut butter mixture and roll them between your palms to form approximately 25 equal sized balls. Think of them as miniature golf balls, maybe a little smaller.
Arrange these perfectly formed Peanut Butter Balls on a clean plate or a tray. A small cookie scoop can also help ensure uniform size, but honestly, a little variation adds character, right? Just make sure they are roughly the same size so they chill and coat evenly.
Step 3: Melt the Chocolate
Time for the luscious chocolate coating! The best way to achieve a silky smooth melt is by using a double boiler. If you don’t have one, no worries. Simply place a heatproof bowl over a pot of simmering water. Make sure the bottom of the bowl doesn’t touch the water.
Add your chocolate chips and the coconut oil to the bowl. Stir continuously. This gentle heat will melt the chocolate slowly and evenly, preventing it from seizing or burning. Keep stirring until it’s completely smooth and glossy. The coconut oil is key here; it helps the chocolate become wonderfully dippable and set beautifully.
Step 4: Coat the Balls
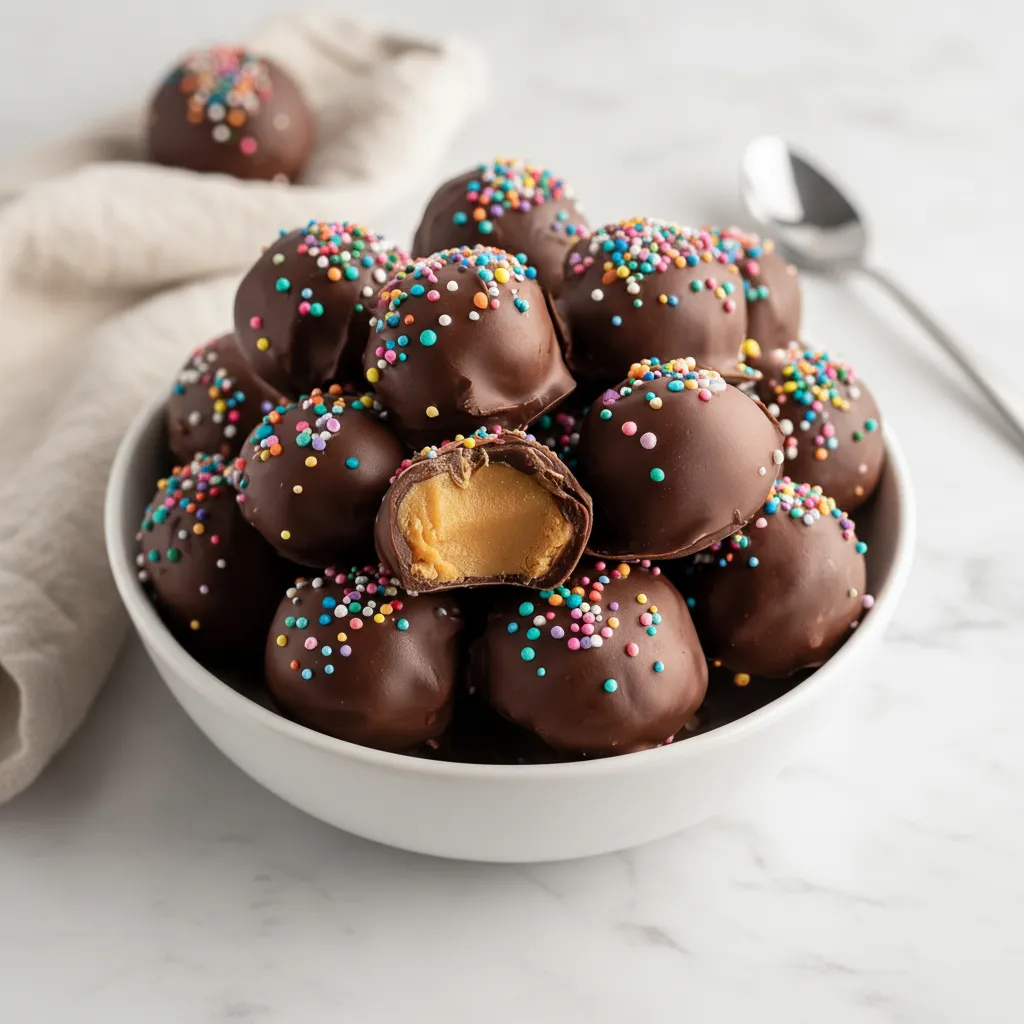
Now for the grand finale! Carefully dip each peanut butter ball into the melted chocolate. You can use a fork or a dipping tool to fully submerge and then lift each ball, allowing any excess chocolate to drip off. You want a nice, even coating.
As you coat them, place the finished Chocolate Peanut Butter Balls on a rimmed sheet pan lined with parchment paper or a silicone baking mat. This makes for easy cleanup and ensures your beautiful Chocolate Peanut Butter Balls don’t stick to the pan. The rimmed pan is great for catching any rogue drips, keeping your counter tidy.
Step 5: Add Sprinkles & Chill
If you’re feeling fancy, or making these for a special occasion like holiday treats, now’s the time to add sprinkles! Gently sprinkle them over the still wet chocolate coating. Colorful sprinkles really make these no bake desserts pop and add an extra layer of fun.
Once all your Peanut Butter Balls are coated and decorated, transfer the entire tray to the freezer. Let them chill for about 30 minutes. This quick freeze time is perfect for setting that chocolate coating, making it firm and ready to enjoy. They are truly quick desserts from start to finish!
How To Store Leftovers
One of the best things about these Chocolate Peanut Butter Balls, besides how easy they are to make, is how well they store. You can make a big batch and enjoy them for days, or even weeks!
Once the chocolate coating is completely set, transfer your delicious no bake desserts to an airtight container. You can store them in the refrigerator for up to one week. This keeps them firm and fresh, ready whenever a craving strikes.
For longer storage, these Peanut Butter Balls freeze beautifully. Place them in a single layer in an airtight freezer safe container or a freezer bag. They’ll keep wonderfully for several months. Just pull them out a few minutes before you want to enjoy them, or eat them straight from the freezer for a super chilled treat!
Having a stash of these easy snacks in the freezer is a real lifesaver for unexpected sweet cravings or when you need a last minute treat to bring to a gathering. They are truly versatile.
Tips
Want to make your Chocolate Peanut Butter Balls even better, or just ensure everything goes smoothly? Here are a few insider tips and tricks to help you master these delightful no bake desserts.
Chill the Mixture First: For a firmer texture and easier rolling, pop your peanut butter mixture into the fridge for about 15 minutes before you start shaping the balls. This little step can make a big difference, especially on warmer days or if your butter was extra soft.
Peanut Butter Preference: The recipe works great with either chunky or creamy peanut butter. If you love a little texture in your Peanut Butter Balls, go for chunky. If you prefer a super smooth, melt in your mouth experience, creamy is your friend. Both are fantastic for these simple recipes.
The Magic of Coconut Oil: Don’t skip the coconut oil when melting your chocolate! It’s not just for flavor; it helps thin out the chocolate, making it easier to dip, and ensures a beautiful, shiny, and quick setting coating. It’s a secret weapon for perfect quick desserts.
Chocolate Choices: While semisweet chocolate chips are a classic choice, feel free to experiment! Dark chocolate will give a more intense, less sweet flavor, while milk chocolate will make them even richer and sweeter. White chocolate could be a fun twist too, especially with some festive sprinkles for holiday treats.
Get Creative with Toppings: Sprinkles are just the beginning! Consider a drizzle of contrasting chocolate, finely chopped nuts, shredded coconut, or even a tiny pinch of sea salt on top for a gourmet touch. These little touches elevate your no bake desserts.
Temperature Matters: Ensure your butter is truly softened, not melted, for the peanut butter mixture. This helps create the right consistency. Also, when melting chocolate, keep the heat gentle to prevent it from seizing. Low and slow is the way to go.
Batch Size Flexibility: This recipe is easily doubled or halved. Making them for a big party? Double it! Just want a small batch for yourself? Halve it! These easy snacks are incredibly forgiving.
Cleanup Made Easy: Line your sheet pan with parchment paper or a silicone baking mat before coating. This makes cleanup a breeze and prevents your beautiful Chocolate Peanut Butter Balls from sticking to the pan. Nobody likes a sticky situation after making delicious quick desserts!
Following these simple tips will ensure your Peanut Butter Balls turn out perfectly every single time, making you a superstar in the kitchen without breaking a sweat.
Conclusion
Well, there you have it, folks! A truly fantastic recipe for Chocolate Peanut Butter Balls that proves you don’t need to be a pastry chef or spend hours in the kitchen to create something utterly delicious. These no bake desserts are a testament to the power of simplicity and incredible flavor.
Whether you’re whipping them up as easy snacks for the family, preparing a batch of impressive holiday treats, or just satisfying a sweet tooth with a quick dessert, these Peanut Butter Balls are sure to become a cherished addition to your recipe collection. They embody everything we love about fuss free, comforting sweets.
So go ahead, give them a try! You’ll love how straightforward these simple recipes are and how incredibly satisfying the results are. Happy no baking!
FAQ
Can I Make These Gluten Free?
Absolutely! The beauty of these no bake desserts is that they are naturally gluten free, as long as your peanut butter and chocolate chips are certified gluten free. Most brands are, but it’s always a good idea to check the labels to be sure. Enjoy your gluten free Peanut Butter Balls without a worry!
What If My Peanut Butter Mixture Is Too Sticky?
If your mixture feels a bit too sticky to roll, don’t panic! This can happen if your butter was very soft or if your kitchen is warm. The easiest fix is to pop the bowl into the refrigerator for about 15 to 30 minutes. The mixture will firm up, making it much easier to handle and roll into perfect Chocolate Peanut Butter Balls. You can also add a tiny bit more powdered sugar, a tablespoon at a time, until the consistency is right.
Can I Use Other Nut Butters?
Yes, you certainly can! While the classic Chocolate Peanut Butter Balls are divine, you can experiment with almond butter, cashew butter, or even sunflower seed butter for a nut free option. Just be aware that the texture and flavor might vary slightly, but they will still make delicious no bake desserts. Just ensure the consistency is similar to regular peanut butter.
How Long Do They Need to Chill?
After coating your Peanut Butter Balls in chocolate, they typically need about 30 minutes in the freezer to fully set. If you’re chilling them in the refrigerator, it might take a bit longer, perhaps an hour or so, until the chocolate is firm to the touch. This quick chill time is one reason why these are such fantastic quick desserts.
Are These Good for Gifting?
Absolutely! These Chocolate Peanut Butter Balls make wonderful edible gifts. Package them in a pretty box or cellophane bag, perhaps tied with a festive ribbon. They are especially popular as homemade holiday treats, bringing a smile to anyone’s face. Who wouldn’t love a handcrafted sweet treat?
Easy No-Bake Chocolate Peanut Butter Balls
Whip up these incredibly delicious no-bake Chocolate Peanut Butter Balls in minutes! Perfect for quick snacks, easy desserts, or festive holiday treats.
Requirements


Ingredients
Instructions
- Grab a large mixing bowl. Add your chosen peanut butter, the softened butter, powdered sugar, and vanilla extract. Combine these ingredients thoroughly until everything is smooth and well blended. Use a sturdy spoon or even a stand mixer. If it seems a little too soft, don’t fret; a quick chill in the fridge for about 15 minutes can work wonders.
- Take small portions of the peanut butter mixture and roll them between your palms to form approximately 25 equal sized balls. Arrange these perfectly formed Peanut Butter Balls on a clean plate or a tray.
- Time for the luscious chocolate coating! The best way to achieve a silky smooth melt is by using a double boiler. If you don’t have one, no worries. Simply place a heatproof bowl over a pot of simmering water. Make sure the bottom of the bowl doesn’t touch the water. Add your chocolate chips and the coconut oil to the bowl. Stir continuously until it’s completely smooth and glossy.
- Now for the grand finale! Carefully dip each peanut butter ball into the melted chocolate. You can use a fork or a dipping tool to fully submerge and then lift each ball, allowing any excess chocolate to drip off. You want a nice, even coating. As you coat them, place the finished Chocolate Peanut Butter Balls on a rimmed sheet pan lined with parchment paper or a silicone baking mat.
- If you’re feeling fancy, or making these for a special occasion like holiday treats, now’s the time to add sprinkles! Gently sprinkle them over the still wet chocolate coating. Once all your Peanut Butter Balls are coated and decorated, transfer the entire tray to the freezer. Let them chill for about 30 minutes.
- One of the best things about these Chocolate Peanut Butter Balls, besides how easy they are to make, is how well they store. You can make a big batch and enjoy them for days, or even weeks! Once the chocolate coating is completely set, transfer your delicious no bake desserts to an airtight container. You can store them in the refrigerator for up to one week. For longer storage, these Peanut Butter Balls freeze beautifully. Place them in a single layer in an airtight freezer safe container or a freezer bag. They’ll keep wonderfully for several months.
Notes
Chill the mixture first for about 15 minutes before rolling for easier handling.
The recipe works great with either chunky or creamy peanut butter.
Don’t skip the coconut oil when melting chocolate; it helps create a smooth, shiny coating that sets fast.
Feel free to experiment with different chocolate types or add toppings like chopped nuts or shredded coconut.
Ensure your butter is softened, not melted, for the peanut butter mixture. Gentle heat is key when melting chocolate.
This recipe is easily doubled or halved.
Line your sheet pan with parchment paper or a silicone mat for easy cleanup.
Nutrition (Estimated per ball)
Calories
Sugar
Fat
Carbs