Are you looking for a showstopping centerpiece for your Halloween party? Something that is both delicious and delightfully spooky? Well, you have come to the right place. We are diving into the wonderful world of the Halloween Charcuterie Board, a creation that is as much fun to make as it is to eat. It is the kind of party food that gets everyone talking.
This is not just a plate of food. It is an edible work of art. A fantastic Halloween Food Board brings together savory, sweet, and spooky elements. It is a creative project for anyone who loves hosting. You do not need to be a professional chef to build a board that will wow your guests. Honestly, it is all about having fun with it. Let’s get started on this amazing edible adventure.
Jump To:
Why You’ll Love This Recipe
First off, this Halloween Charcuterie Board is incredibly easy to assemble. There is no real cooking involved, which is a huge plus when you are busy with other party preparations. It is all about arranging beautiful ingredients on a board. You get to play with colors, textures, and flavors. It is a wonderful way to express your creative side without any of the stress that comes with complicated recipes.
Another great thing is how customizable it is. You can easily swap ingredients based on what you love or what you have on hand. Don’t like a certain cheese? Change it for another. Want to add some different fruits or nuts? Go for it. This flexibility makes it a great option for catering to different tastes and dietary needs. You can truly make this Spooky Charcuterie Board your own.
It is also a fantastic conversation starter. When your guests see a board loaded with tasty meats, cheeses, and fun Halloween Treats, they will gather around it immediately. The little spooky details like candy eyeballs and plastic spiders add a playful touch that both kids and adults will adore. It becomes a central point for mingling and snacking throughout your event.
Let’s not forget the balance of flavors. While Halloween is often associated with sugar overload from candy, this board offers a delicious savory alternative. The rich meats, sharp cheeses, and fresh fruits provide a welcome contrast. It ensures there is something for everyone to enjoy, balancing out all the sweet Halloween Treats that are sure to be around.
Finally, it just looks amazing. The visual appeal is off the charts. The deep colors of blackberries and salami next to bright green grapes and orange cheddar create a festive palette. Adding a skeleton hand or a skull centerpiece really takes it to another level. It is an edible decoration that will make your party feel extra special and thoughtfully planned.
Ingredients
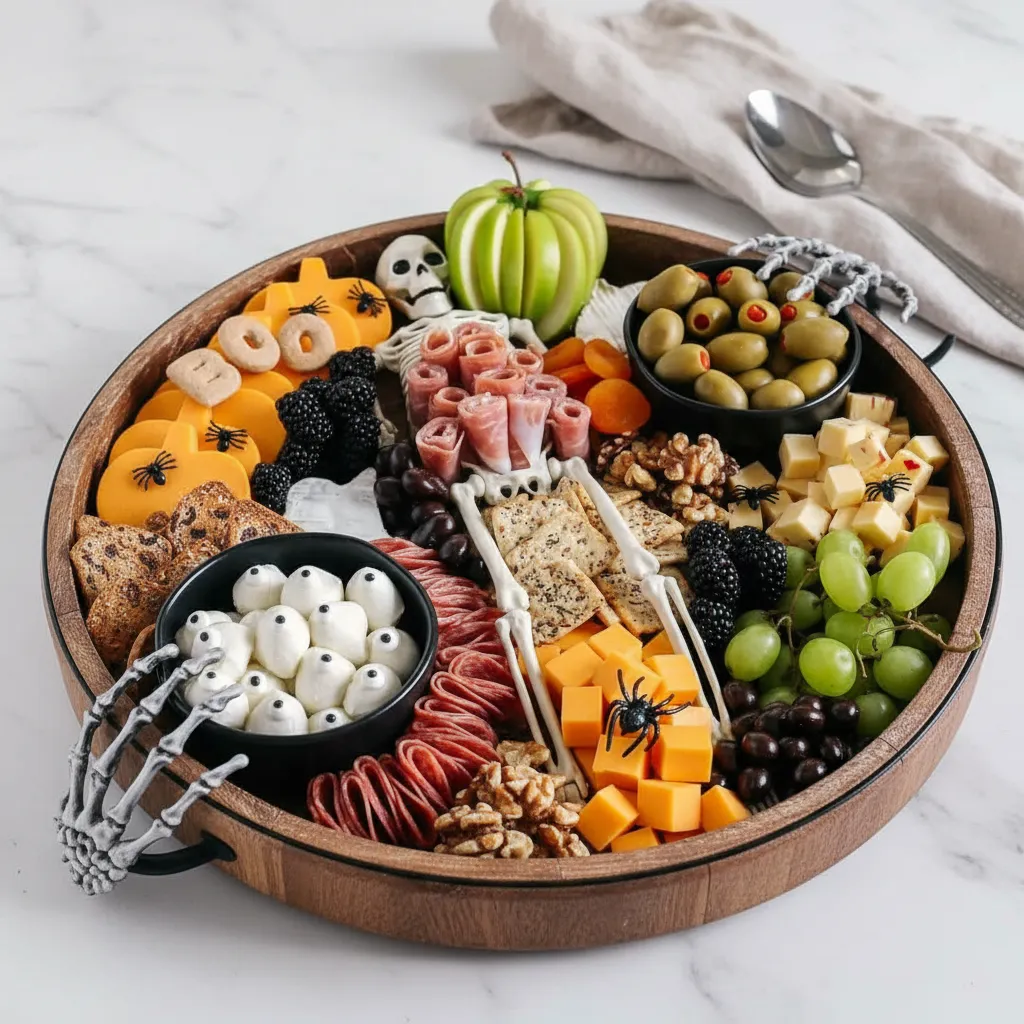
The key to a great charcuterie board is a variety of high quality ingredients. For this Halloween Charcuterie Board, we are focusing on a mix of colors and textures that feel festive and spooky. Here is what you will need to create this masterpiece. Think of this list as a starting point. Feel free to get creative and add your own favorite bites.
When choosing your cheeses, aim for a mix of hard, soft, and crumbly options. Sharp cheddar brings a beautiful orange color perfect for the theme. Creamy brie is always a crowd pleaser, offering a mild, buttery flavor. A jalapeño pepper jack adds a little kick and visual interest with its specks of green and red. And fresh mozzarella balls are the ideal canvas for our spooky eyeballs.
For the meats, select a couple of different types to offer variety. Turkey prosciutto is a leaner option with a delicate flavor. Beef salami provides a classic, robust taste that pairs so well with cheese. You can fold them into fun shapes like roses or fans to add dimension to your Halloween Food Board.
Fruits bring freshness and a touch of sweetness to balance the salty meats and cheeses. Blackberries and green grapes fit the spooky color scheme nicely. Green apple slices add a tart crunch, and dried apricots provide a chewy texture and a pop of orange. They really help to brighten up the board.
- 16 oz sharp cheddar cheese, cubed or sliced
- 8 oz creamy brie cheese round
- 8 oz jalapeño pepper jack cheese, sliced
- 8 oz fresh mozzarella balls, ciliegine size
- 4 oz turkey prosciutto
- 4 oz beef salami
- 1 cup blackberries
- 1 cup green grapes
- 1 green apple, thinly sliced
- 1/2 cup dried apricots
- 1 box everything bagel seasoned crackers
- 1 box fig and olive crisps
- 1/2 cup walnuts
- 1/2 cup pimento stuffed green olives
- 1/2 cup chocolate covered peanuts
- Decorations like plastic spiders, candy eyeballs, and a skeleton centerpiece
Step By Step Instructions
Building your Halloween Charcuterie Board is a fun and creative process. Think of it like painting a picture, but with food. There are no strict rules, but following these steps will help you create a balanced and visually stunning board. Let’s get to it.
Step 1: Place Your Anchors
First, choose your board. A large wooden cutting board, a slate tile, or even a clean baking sheet will work. Start by placing your largest items. These are the anchors of your design. If you are using any small bowls for things like olives or nuts, put them on the board now. This is also the time to position your main decoration, like the skeleton centerpiece. Placing these first helps you build everything else around them and creates a strong focal point.
Step 2: Arrange The Cheeses
Now it is time for the cheese. Space the different cheeses out across the board. Do not put them all in one corner. Place the round of brie in one area, a pile of cubed cheddar in another, and the slices of pepper jack fanned out somewhere else. Distributing the cheeses ensures that guests can easily access them from any side of the board. This also creates visual balance for your Spooky Charcuterie Board.
Step 3: Add The Meats And Fruits
Next up are the meats. You can fold the salami slices into quarters to create texture or even roll them into rosettes. Drape the prosciutto in loose ribbons. Arrange the meats near the cheeses they pair well with. A good trick is to create a salami river that flows through the middle of the board. After the meats are placed, add the fruits. Create clusters of blackberries and grapes to add pops of dark color. Fan out the apple slices near the cheddar. The fruit adds a fresh, vibrant element.
Step 4: Fill In The Gaps
Your board should be starting to look full, but there will be empty spaces. Now is the time to fill them in. Use your crackers to fill the larger gaps. Fan them out in different directions for visual appeal. Then, pour the walnuts and chocolate covered peanuts into the smaller empty spots. Add the olives to one of your small bowls or directly onto the board. The goal is to make the Halloween Food Board look abundant and overflowing with delicious things. No empty space should be left behind.
Step 5: Add The Spooky Decorations
This is the final touch and the most fun part. It is time to make your charcuterie board spooky. Stick the candy eyeballs onto the fresh mozzarella balls using a tiny bit of cream cheese if needed. Scatter the plastic spiders across the board, crawling over cheeses and fruits. If you have other decorations like skeleton hands, nestle them among the food. These little details are what transform a regular charcuterie board into a fantastic Halloween Charcuterie Board.


How To Store Leftovers
If you somehow have leftovers from your amazing Halloween Charcuterie Board, you will want to store them properly to enjoy later. The best way to do this is to disassemble the board. Storing everything together is not ideal, as the crackers will get soggy and the flavors will meld in an unpleasant way.
First, remove all the non edible decorations like the plastic spiders and skeleton. Wrap each type of cheese separately in plastic wrap or wax paper. This prevents them from drying out and absorbing flavors from other cheeses. The meats can be stored together in an airtight container or a resealable bag. Store both the cheese and meat in the refrigerator.
For the crackers and nuts, place them in separate airtight containers and keep them at room temperature. This will help them stay crunchy. The fresh fruit should be stored in a container in the fridge. Any leftover olives can also go into an airtight container in the refrigerator. By storing each component separately, you can enjoy the delicious elements of your board for another day or two.
Tips
Want to make your Halloween Charcuterie Board even better? Here are a few extra tips to help you along the way. Little details can make a big difference, turning a good board into a great one. These suggestions are all about adding that extra touch of flair and flavor.
Consider the board itself. The foundation of your charcuterie board matters. A dark slate board can make the colors of the food pop and adds to the spooky vibe. A rustic wood board gives a warm, autumnal feel. If you do not have a dedicated board, a large tray or even a clean, parchment lined baking sheet can work in a pinch. The size should be large enough to hold everything without looking too crowded.
Think about a color theme. We leaned into black, orange, and green for a classic Halloween look. You can enhance this by adding other themed items. Think about black olives, orange bell pepper strips, or even some purple cabbage for color. Sticking to a palette makes your Halloween Food Board look more cohesive and professional.
Play with textures and shapes. Use cookie cutters to cut cheeses into fun Halloween shapes like bats, ghosts, or pumpkins. This is a simple trick that adds a huge amount of festive charm. Also, ensure you have a good mix of textures: creamy cheese, crunchy crackers, soft fruits, and chewy meats. This variety makes each bite more interesting.
You can prepare some elements ahead of time to save yourself stress on party day. The cheeses can be sliced or cubed a day in advance and stored in the fridge. You can wash the fruits and have them ready to go. The nuts and crackers can be set out. This means that when it is time to assemble, all you have to do is arrange everything on the board, which is the fun part.
Don’t be afraid to add some sweet Halloween Treats directly onto the board. A small pile of candy corn, some gummy worms peeking out from behind a piece of cheese, or some chocolate skulls can be fun additions. It ties the savory board into the sweeter side of the holiday seamlessly.
Conclusion
Creating a Halloween Charcuterie Board is a wonderfully creative and delicious way to celebrate the holiday. It is an approachable project for any skill level, and the result is always a crowd pleasing centerpiece. You get to combine amazing flavors and textures while adding a dose of spooky fun that your guests will absolutely love.
Remember, the recipe and tips here are just a guide. The real joy comes from making it your own. Experiment with different cheeses, add your favorite spooky candies, or try a new way of arranging the meats. The most important thing is to have fun with the process. Your enthusiasm will shine through in the final creation.
So this year, instead of just a bowl of candy, why not offer your guests a beautiful and bountiful Spooky Charcuterie Board? It is a festive, flavorful, and memorable addition to any Halloween gathering. Happy haunting and happy snacking.
FAQ
What Kind Of Board Should I Use?
You can use any large, flat surface that is food safe. Large wooden cutting boards are a popular choice. Slate or marble slabs also look fantastic and help keep the cheese cool. If you do not have a dedicated board, a large ceramic platter or a rimmed baking sheet lined with parchment paper works just as well.
How Far In Advance Can I Make This?
You can do most of the prep work one day ahead. Slice your cheeses and meats, wash your fruits, and portion out your nuts and olives. Store everything in separate airtight containers in the refrigerator. However, for the best results, you should assemble the full Halloween Charcuterie Board just before your guests arrive. This keeps the crackers from getting soft and the fruit looking fresh.
Can I Make This A Vegetarian Board?
Absolutely. To make a vegetarian version, simply omit the meats. You can replace them with extra cheeses, a bowl of hummus or another dip, roasted chickpeas, marinated artichoke hearts, or a variety of colorful vegetable sticks like carrots, cucumbers, and bell peppers. It will still be a delicious and impressive Halloween Food Board.
Where Can I Find The Spooky Decorations?
You can find spooky decorations like plastic spiders, candy eyeballs, and skeleton hands at most party supply stores, craft stores like Michaels, or even in the seasonal aisle of your local grocery store around Halloween. Online retailers are also a great source for a wide variety of fun and spooky accessories for your board.
How Much Food Do I Need Per Person?
A good rule of thumb is to plan for about 2 to 3 ounces of cheese and 2 ounces of meat per person if the board is an appetizer. If the charcuterie board is the main meal, you should increase that to 4 to 5 ounces of cheese and 3 to 4 ounces of meat per person. Always know your crowd; it is better to have a little extra than to run out.
Halloween Charcuterie Board
A festive and fun Halloween Charcuterie Board, perfect for parties. This spooky board combines savory meats, a variety of cheeses, fresh fruits, and crunchy crackers for a showstopping centerpiece that’s as delicious as it is decorative.
Requirements


Ingredients
Instructions
- Choose a large board or platter. Place your largest items first, such as any small bowls for olives or nuts and your main decoration, like a skeleton centerpiece. These will act as anchors for your design.
- Arrange the different cheeses across the board, spacing them out to create balance. This ensures guests can easily access them from all sides.
- Add the meats and fruits. Fold salami into rosettes or create a ‘salami river’. Drape prosciutto in loose ribbons. Place clusters of blackberries and grapes and fan out apple slices near the cheeses.
- Fill in all the empty spaces. Use crackers to fill larger gaps, then pour nuts and chocolate covered peanuts into the smaller spots. The goal is to make the board look abundant and full.
- Add the final spooky decorations. Stick candy eyeballs onto the fresh mozzarella balls. Scatter plastic spiders over the cheeses and fruits to complete the Halloween theme.
Notes
Use cookie cutters to cut cheeses into fun Halloween shapes like bats, ghosts, or pumpkins for extra festive charm.
Prepare elements ahead of time. Cheeses can be sliced, fruits washed, and nuts portioned out a day in advance to make assembly quick and easy.
Stick to a color theme like black, orange, and green to make your board look cohesive. Consider adding items like black olives or orange bell pepper strips.
Nutrition
Calories
Sugar
Fat
Carbs