Graduation season is finally here and it is time to celebrate all those years of hard work. Whether you are planning a Senior Graduation Party or a small gathering, food is key.
You want something that looks great but does not take all day to make. That is where these graduation cookies come in handy for any busy host or parent.
These treats are perfect for a College Grad Party because they look like tiny little caps. You can even match the frosting to the school colors for a personal touch.
It adds a nice touch to your College Grad Party Decor without costing a fortune. Everyone loves a good theme and these fit right in with any Grad Party Theme.
Jump To:
Why You’ll Love This Recipe
You are going to love these graduation cookies because they require absolutely no baking. That is a huge win when you have a million other things to do for the party.
Honestly, who has time to preheat an oven when you are busy hanging up banners and balloons? These are the ultimate time savers for any Graduation Food spread you are planning.
Another reason to love them is how customizable they are. If you are celebrating a Nursing School Graduation Party, you can use red or white frosting to match the medical theme.
For an Mba Graduation, maybe you want to go with classic gold and black. The possibilities are endless when it comes to matching these to your specific Degree Party colors.
They are also very budget friendly. You only need a few simple ingredients from the store. You do not need any fancy tools or professional equipment to make these look amazing.
Kids and adults alike will find them adorable. They are the perfect size for popping into your mouth while you mingle with guests. They truly are the best Graduation Desserts around.
Plus, they are a great way to get the whole family involved. Even the youngest kids can help assemble these. It makes the preparation part of the celebration itself for everyone.
Ingredients
Before you get started, make sure you have everything you need. These items are easy to find at any local grocery store. Here is your shopping list for these fun treats.
- 24 miniature peanut butter cups
- 1 tube of decorating frosting in the color of your choice
- 24 After Eight thin mints
- 24 milk chocolate M&M’s in color of your choice or 24 semisweet chocolate chips
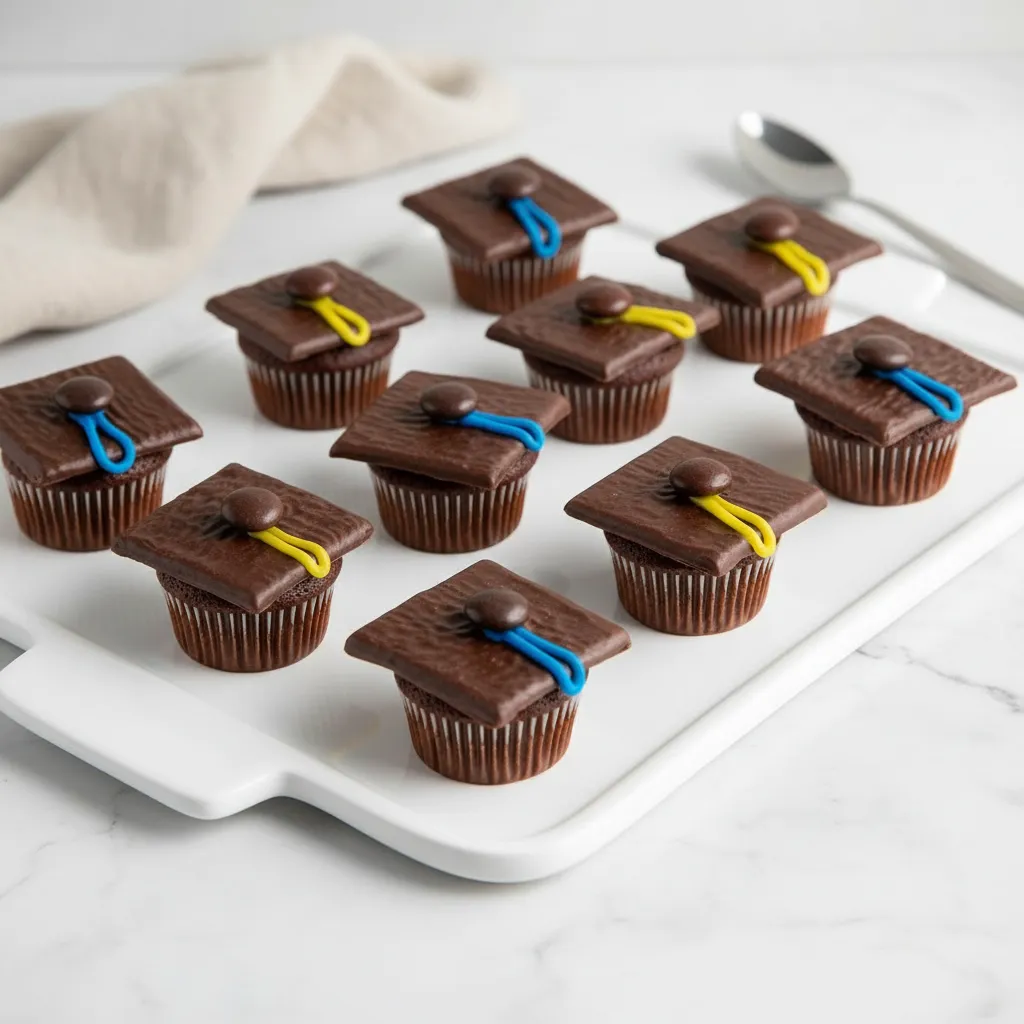
Make sure the peanut butter cups are the miniature size. The regular ones will be too big for the thin mints. You want that classic mortarboard shape for your graduation cookies.
The frosting tube usually comes with a small tip already. If not, you can easily use a plastic bag. Just snip the corner off and you are good to go for decorating.
Step By Step Instructions
Follow these simple steps to create your masterpieces. It is a very straightforward process that yields impressive results. Let us walk through the assembly together so everything goes perfectly.
Step 1: Prep The Base
Start by removing the paper liners from all 24 peanut butter cups. This can be a bit tedious but it is important. Place the mini cups upside down on waxed paper.
The wider part of the cup should be on the bottom. This creates a sturdy base for the rest of the cap. Make sure they are lined up and ready for the next step.
Step 2: Add The Mortarboard
Place a small amount of frosting on the top of each peanut butter cup. This acts like glue. You do not need much, just enough to hold the mint in place.
Center a thin mint on each cup. Press down gently so it sticks well. Now you can see the shape of the graduation cookies really starting to take form on your counter.
Step 3: Create The Tassel
Using the frosting tube, make a small loop on top of each mint. This represents the tassel. Start from the center and pull the frosting toward one of the corners.
This is where you can really show off those school colors. Use a bright color that pops against the dark chocolate. It makes the Graduation Desserts look very professional and festive.
Step 4: Secure The Button
Place an M&M or a chocolate chip right on top of the frosting loop in the center. This looks like the button that holds the tassel on a real cap.
If you are using M&M’s, you can match the color to the frosting or use a contrasting one. This final touch completes the look of your graduation cookies perfectly for the party.


How To Store Leftovers
If you happen to have any leftovers, storing them is quite simple. Place them in an airtight container in a single layer. You do not want to stack them too high.
Stacking might crush the frosting tassels or cause the mints to slide off. If you must stack them, put a piece of parchment paper between the layers for protection.
Keep them in a cool and dry place. Chocolate can melt easily if it gets too warm. A pantry or a kitchen counter away from the stove is usually a safe bet.
You can also keep them in the refrigerator if your house is particularly warm. Just be aware that the chocolate might get a white film if it stays in there too long.
They should stay fresh for about a week. This means you can make them a day or two before the Senior Graduation Party to save yourself some stress on the big day.
Tips
Here is a great tip for the frosting. A pastry bag with a very small tip works best for those fine lines. It gives you much more control over the tassel shape.
If you do not have one, do not worry at all. Just cut the very tip off the corner of a storage bag. Fill it with frosting and use that instead.
Another tip is to make sure your peanut butter cups are chilled before you start. This makes them easier to handle and prevents them from melting in your warm hands.
When you are picking out your M&M’s, you might want to buy a large bag and sort out the colors you need. This is a fun task for kids to help with.
If you are worried about the mints sliding, let the frosting set for a few minutes before moving the cookies. This ensures everything stays exactly where you put it.
For a College Grad Party Decor idea, place these on a platter surrounded by confetti. You could even use a small graduation cap as a centerpiece for the tray.
Remember that these are meant to be fun and festive. Do not worry if every tassel is not perfectly identical. The handmade look adds to the charm of the celebration.
Conclusion
Making these graduation cookies is a wonderful way to celebrate a major milestone. They are simple to put together and look absolutely fantastic on any dessert table.
Whether you are hosting a Degree Party or just want a special treat for your grad, these are sure to be a hit. They prove you do not need to spend hours baking.
With just a few ingredients and a little bit of time, you can create something memorable. Your guests will be impressed by your creativity and the festive spirit you brought.
So go ahead and grab those peanut butter cups and mints. It is time to get decorating and celebrate the success of your favorite graduate in a very sweet way.
Congratulations to all the graduates out there. May your future be as bright and sweet as these delightful little treats you are about to enjoy with your friends.
FAQ
Can I Make These Gluten Free?
Yes you certainly can. Just make sure that the peanut butter cups and mints you buy are certified gluten free. Most major brands are, but always check the label first.
How Far In Advance Can I Make Them?
You can easily make these two or three days before the College Grad Party. Just keep them in a cool place in an airtight container so they stay fresh.
What If I Cannot Find After Eight Mints?
Any thin square chocolate will work. You could use small chocolate bars or even square crackers dipped in chocolate if you are feeling extra creative with your Graduation Food.
Can I Use Different Candy For The Top?
Absolutely. If you do not like M&M’s, you can use Skittles for a fruitier taste. You could even use a small dot of frosting if you want to keep it simple.
Will The Frosting Harden?
Most decorating frostings will crust over after a few hours. This helps the tassels stay in place and makes the graduation cookies much easier to transport to the party.
No-Bake Graduation Cap Cookies
Celebrate your favorite graduate with these incredibly easy and adorable no-bake graduation cap cookies! A perfect, no-fuss dessert for any graduation party that comes together in minutes.
Requirements


Ingredients
Instructions
- Remove the paper liners from all 24 peanut butter cups and place them upside down on waxed paper to create the base of the cap.
- Place a small dot of frosting on top of each peanut butter cup. Center a thin mint on each cup and press down gently to secure it.
- Using the frosting tube, draw a small loop on top of each mint, starting from the center and pulling towards a corner to create the tassel.
- Place an M&M or a chocolate chip on top of the frosting loop in the center to complete the graduation cap look. Let set before serving.
Notes
For easier handling, make sure your peanut butter cups are chilled before you start assembling the cookies.
If you don’t have a pastry bag for the frosting, you can fill a plastic storage bag and snip off a tiny piece from the corner.
Let the frosting set for a few minutes before moving the cookies. This helps the mints and M&M’s stay securely in place.
Nutrition
Calories
Sugar
Fat
Carbs