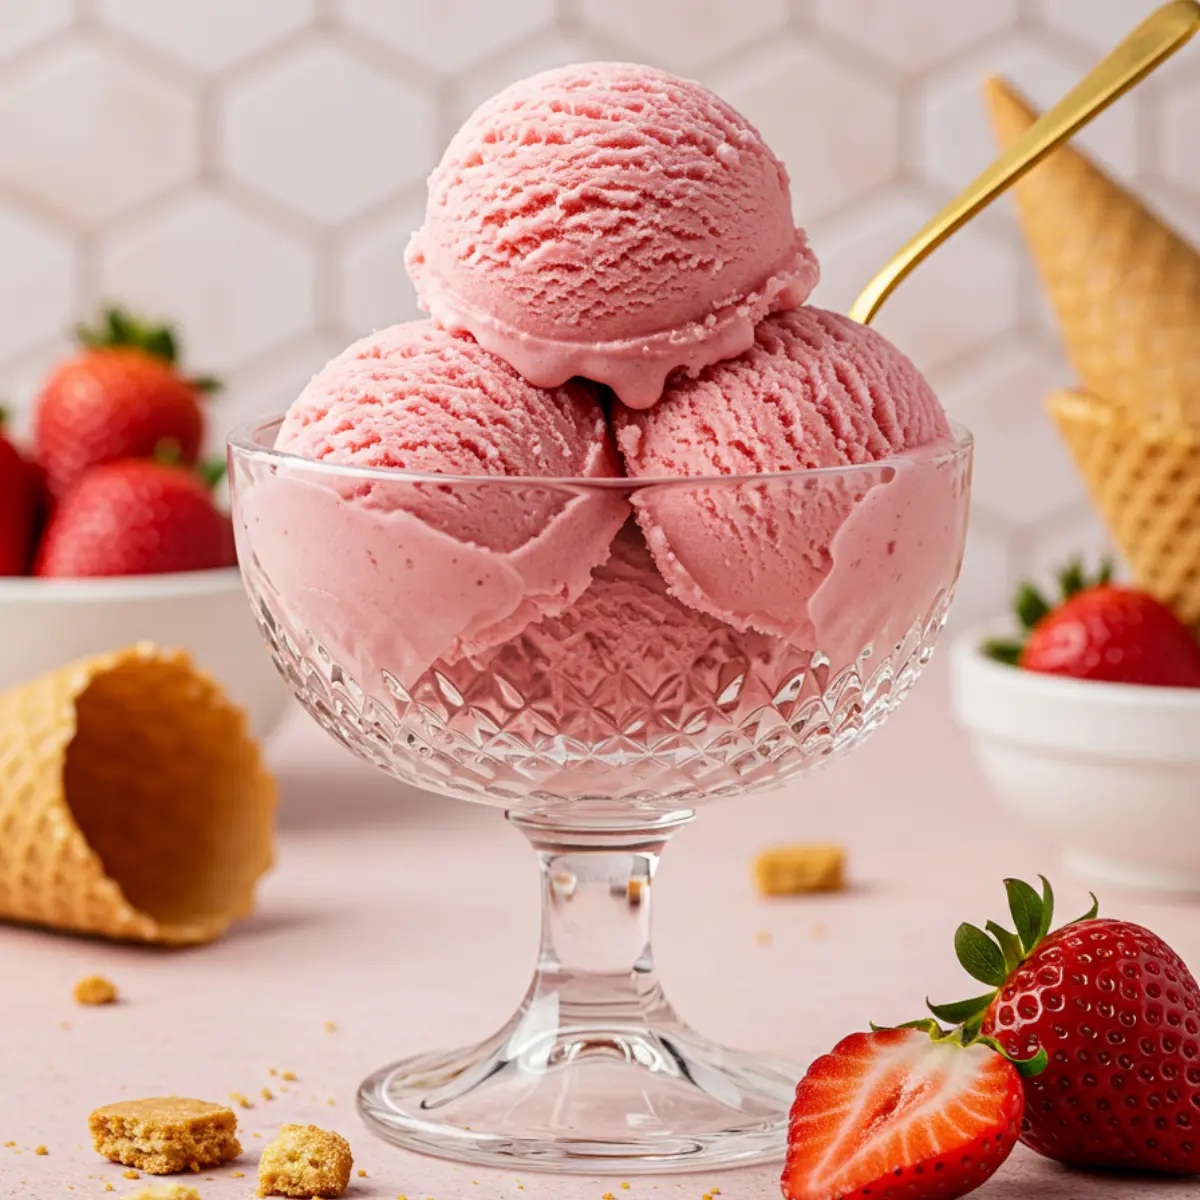
Have you ever wanted to eat ice cream for breakfast? Honestly, I have been there too. We all crave something sweet and creamy that does not wreck our nutrition goals. That is exactly where this ninja creami protein ice cream recipe saves the day.
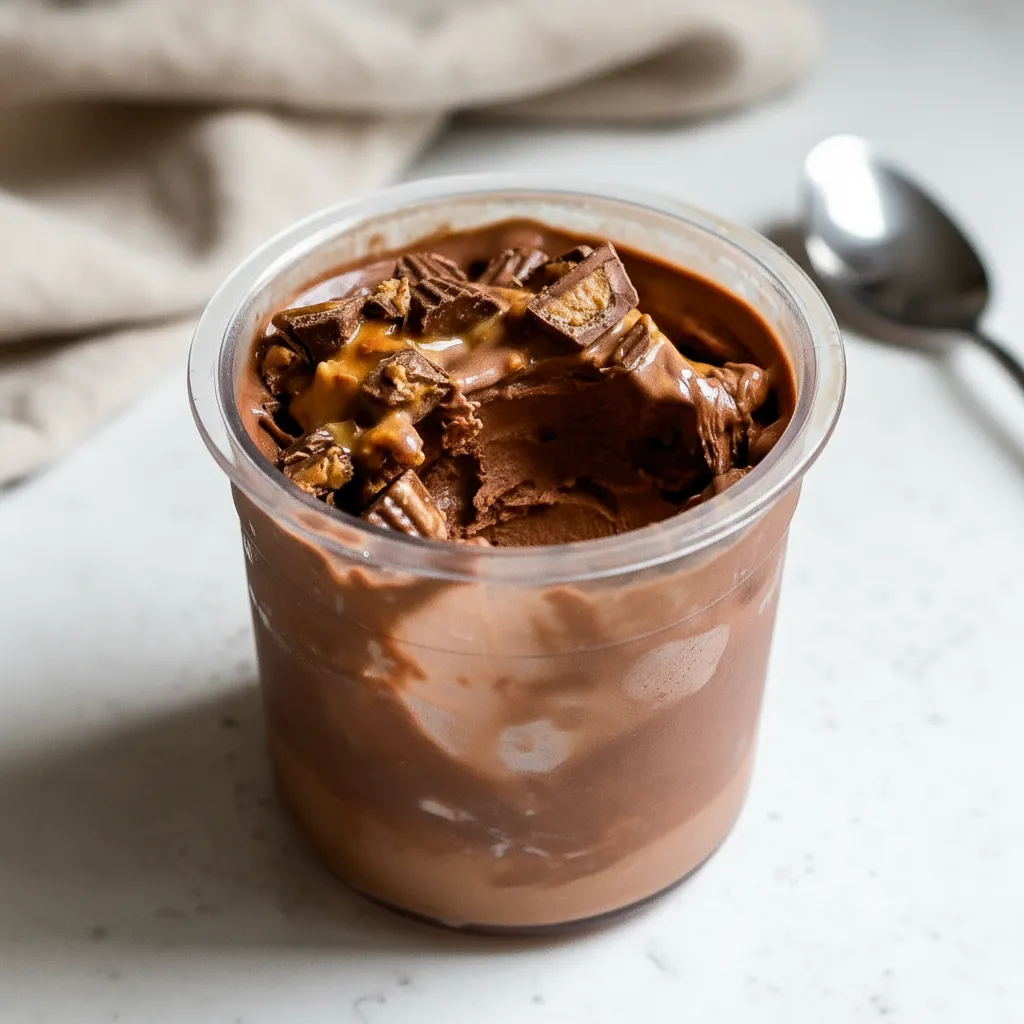
It is rich and indulgent. It tastes just like a chocolate peanut butter cup. Yet it is packed with protein. You can enjoy a whole pint without feeling sluggish afterwards. This might just be the best way to use your Ninja Creami.
The texture is smooth and velvety. You would never guess it is a healthy dessert. If you have been hunting for Healthy Protein Ice Cream Recipes, you are in the right place. Let me walk you through how to make this delicious treat at home.
Jump To:
Why You’ll Love This Recipe
First of all, the flavor is incredible. The combination of chocolate and peanut butter is a classic for a reason. This recipe balances those flavors perfectly. It is not too sweet but it satisfies that dessert craving instantly.
Another huge plus is the simplicity. You do not need a culinary degree to make this. You just dump the ingredients into the pint and mix. The machine does all the heavy lifting for you. It is a fantastic option for beginners.
The macros are also a major win. This is a **High Protein Creami Ninja Recipe** that actually delivers on nutrition. Using Fairlife milk and protein powder boosts the protein content significantly. It keeps you full for hours.
Cost is another factor. Buying protein pints at the store gets expensive fast. Making this **ninja creami protein ice cream recipe** at home is much cheaper in the long run. You control the ingredients and the quality.
Lastly, it is customizable. While this version focuses on chocolate peanut butter, you can easily tweak it. But honestly, once you try this version, you might not want to change a thing. It is that good.
Ingredients
To make this creamy delight, you need just a handful of simple ingredients. You can find most of these at any local grocery store. Here is what you need to gather.
- 1 cup Fairlife chocolate milk
- 3/4 cup unsweetened almond milk
- 1 scoop chocolate protein powder
- 2 tbsp pbfit powder
- 1 tbsp sugar free chocolate jello pudding mix
- 1/4 tsp salt
- 8 mini peanut butter cups
Let’s talk about the milk choice. Fairlife is excellent for this. It is ultra filtered and has more protein than regular milk. It also has less sugar. This helps create a really creamy base for your ice cream.
The unsweetened almond milk cuts the calories down slightly. It balances out the richness of the chocolate milk. You get a nice volume without adding too many extra calories. It is a smart swap for **Healthy Protein Ice Cream Recipes**.
For the protein powder, use your favorite brand. A whey casein blend often works best for texture. However, pure whey works too. Just make sure you enjoy the flavor of the powder itself. It heavily influences the final taste.
Pbfit powder is a game changer here. It gives you that strong peanut butter taste with a fraction of the fat. It mixes easily into liquids. You get all the flavor without the heaviness of regular peanut butter.
The pudding mix is the secret weapon. It acts as a stabilizer. It helps the ice cream stay creamy and prevents it from getting too icy. Do not skip this ingredient if you want the best texture possible.
Step-By-Step Instructions
Making this **ninja creami protein ice cream recipe** is straightforward. The hardest part is waiting for it to freeze. Here is exactly how to do it.
Step 1: Mix The Base
Grab your Ninja Creami pint container. Pour in the Fairlife chocolate milk and the unsweetened almond milk. Add the sugar free pudding mix, chocolate protein powder, and pbfit powder. Toss in the salt too.
Use a hand held frother to mix everything. You want it smooth. Make sure there are no clumps of powder left. Ensure the liquid does not go past the max fill line. This prevents overflow during freezing.
Step 2: Freeze The Pint
Place the lid on the pint container. Put it in your freezer on a level surface. This is very important. If the surface is uneven, the blade might get damaged later. Let it freeze for a full 24 hours.
Patience is key here. If you spin it too early, it will be slushy. You want a solid block of ice for the machine to work its magic. Trust me on waiting the full time.
Step 3: Prep For Spinning
Remove the pint from the freezer after 24 hours. Remove the lid. Take the container to your sink. Run hot water over the outside of the pint for about 60 seconds.
This helps release the icy edges. It prevents the outside from being too hard for the blade. It ensures a smoother process for your machine. It is a small step that makes a big difference.
Step 4: The First Spin
Place the pint into the outer bowl of the machine. Lock the lid in place. Install the bowl into the Ninja Creami base. Turn the power on.
Select the “Lite Ice Cream” button. Let the machine run its cycle. It will be loud, but that is normal. The blade is shaving through the frozen block to create that creamy texture.
Step 5: Check Texture And Respin
Once the cycle stops, remove the bowl. Open the lid and check the texture. It might look a bit powdery or crumbly at first. This is very common for low fat recipes.
If it is powdery, put the lid back on. Place it back in the machine. Press the “Respin” button. This usually fixes the texture completely. If it is still dry, add a splash of milk before respinning.
Step 6: Add Mix Ins
Now for the fun part. The ice cream should be creamy and smooth. Use a spoon to make a small hole in the center of the pint. Drop in your mini peanut butter cups.
Place the pint back into the machine. Press the “Mix-In” button. This cycle gently folds the candy into the ice cream. Once done, serve immediately and enjoy your **ninja creami protein ice cream recipe**.


How To Store Leftovers
Sometimes you might not finish the whole pint. I know it is rare, but it happens. Storing the leftovers correctly is important if you want to enjoy it later.
Take a spoon and smooth out the top of the remaining ice cream. You want a flat surface again. This helps it freeze evenly. Put the lid back on tight.
Place it back in the freezer on a level surface. When you are ready to eat it again, you will notice it is frozen solid. You cannot just scoop it out like store bought ice cream.
You will need to spin it again. Run the pint under hot water for a minute just like before. Place it in the machine. Use the same setting you used originally.
Usually, a single respin is enough for leftovers. It brings that creamy texture right back. It tastes just as fresh as the first time you made it.
Tips
Creating the perfect **ninja creami protein ice cream recipe** takes a little practice. I have learned a few tricks along the way. These tips will help you get the best results every time.
First, never fill past the max fill line. The mixture expands when it freezes. If you overfill it, the blade can not spin correctly. It could even break your machine.
Always dissolve your powders well. If you leave clumps of protein powder, they freeze into hard rocks. You will bite into dry powder later. Use a frother or a blender to ensure it is smooth.
Do not be afraid of the respin button. **Creami Recipes Protein** often need that extra spin. Because there is less fat than traditional ice cream, it needs more mechanical force to get creamy.
Experiment with your protein powder flavors. Chocolate is great, but vanilla or peanut butter flavored powder works too. The base recipe is very versatile.
If you want it extra rich, use all milk instead of almond milk. It adds more calories but makes it even creamier. It is all about your personal preference.
Conclusion
There you have it. A simple, delicious, and nutritious way to enjoy dessert. This **ninja creami protein ice cream recipe** is a staple in my kitchen. It satisfies the sweet tooth without derailing my diet.
The combination of chocolate and peanut butter is timeless. The creamy texture rivals anything you can buy at the store. Plus, you get a massive protein boost with every bite.
I encourage you to try this out. Grab your ingredients and get that freezer stocked. Once you start making your own high protein pints, you will never look back. It really is a fantastic way to treat yourself.
FAQ
Can I Make This Gluten Free?
Yes, absolutely. Most of the ingredients are naturally gluten free. Just check the labels on your protein powder and pudding mix to be safe. Also ensure your peanut butter cups are certified gluten free.
Do I Need To Use Fairlife Milk?
You do not have to, but it is recommended. Fairlife creates a creamier texture due to the filtration process. If you use regular milk, the flavor is fine, but it might be slightly icier.
Why Is My Ice Cream Crumbly?
This happens often with low fat recipes. It just means it is too cold. Put it back in the machine and hit respin. Adding a tablespoon of liquid before respinning helps too.
Can I Use Different Mix Ins?
Of course. You can add chocolate chips, crushed cookies, or nuts. Just make sure to add them after the base is spun. Use the mix in setting to incorporate them gently.
Is This A Good Post Workout Snack?
Yes, it is excellent for post workout. The protein helps with muscle recovery. The carbs from the milk help replenish energy. It is a tasty reward after a hard gym session.
Chocolate Peanut Butter Protein Ice Cream
This rich and indulgent Ninja Creami protein ice cream tastes just like a chocolate peanut butter cup. Packed with protein, you can enjoy a whole pint without feeling sluggish, making it a delicious and healthy dessert.
Requirements


Ingredients
Instructions
- In a Ninja Creami pint container, pour in the Fairlife chocolate milk and unsweetened almond milk. Add the sugar free pudding mix, chocolate protein powder, pbfit powder, and salt.
- Use a hand held frother to mix all ingredients thoroughly until smooth, ensuring no clumps of powder remain and the liquid does not go past the max fill line.
- Place the lid on the pint container and put it in your freezer on a level surface for a full 24 hours until frozen solid.
- After 24 hours, remove the pint from the freezer, remove the lid, and run hot water over the outside of the pint for about 60 seconds to release icy edges.
- Place the pint into the outer bowl of the machine, lock the lid in place, and install the bowl into the Ninja Creami base. Turn the power on and select the “Lite Ice Cream” button.
- Once the cycle stops, check the texture. If it looks powdery or crumbly, put the lid back on, place it back in the machine, and press the “Respin” button. If still dry, add a splash of milk before respinning.
- Once the ice cream is creamy and smooth, use a spoon to make a small hole in the center of the pint. Drop in the 8 mini peanut butter cups.
- Place the pint back into the machine and press the “Mix-In” button. Serve immediately and enjoy.
Notes
Taste the base before freezing and adjust sweetener if needed. Frozen desserts tastes less sweet, so aim for slightly sweeter than you prefer.
Do not fill the pint past the max fill line, as the mixture will expand during freezing and processing.
A full 24-hour freeze is essential for the best, creamiest texture. Rushing this step can result in an icy or soupy consistency.
Feel free to experiment with other flavors like vanilla protein with frozen berries or adding mint extract for a mint-chip version.
Nutrition
Calories
Sugar
Fat
Carbs