There is something truly special about the smell of cookies baking in the oven. It is a scent that feels like a warm hug, promising a moment of pure comfort and joy. It brings back memories and creates new ones all at the same time.
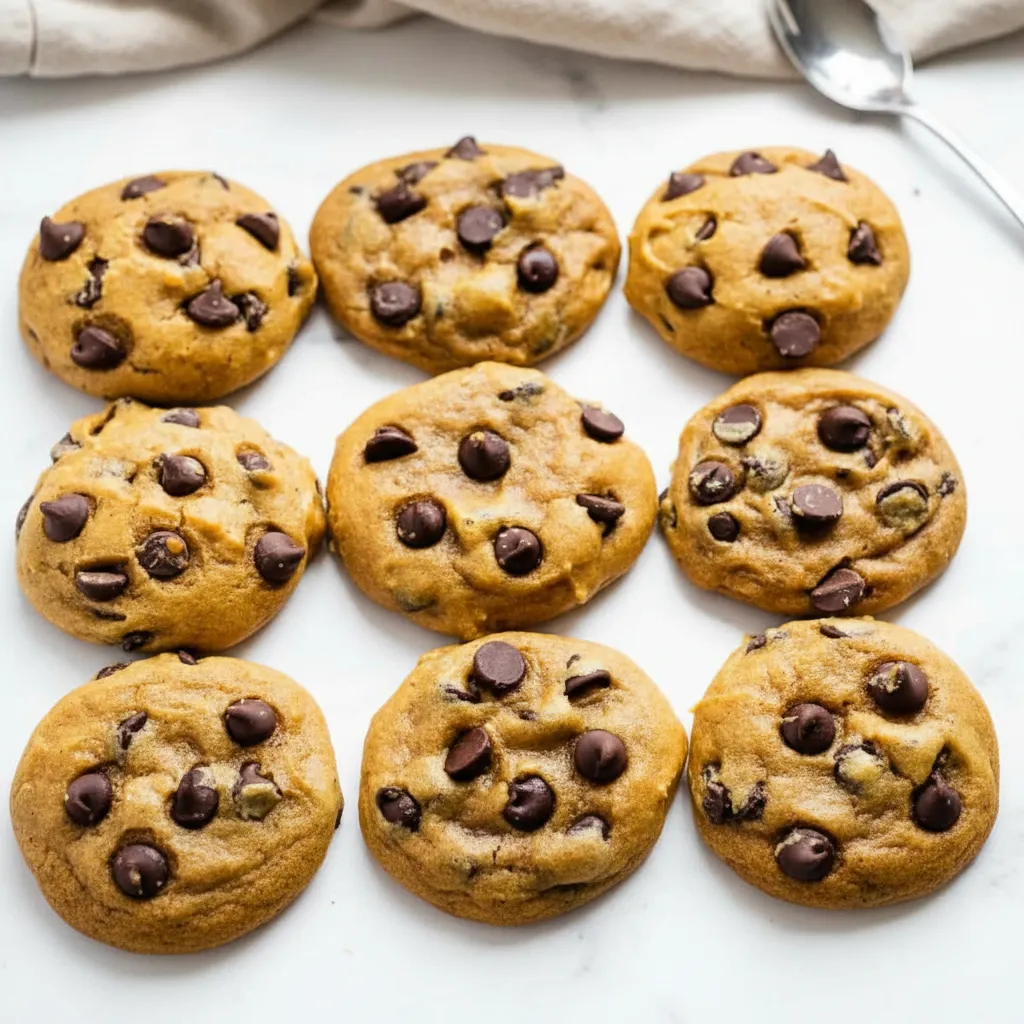
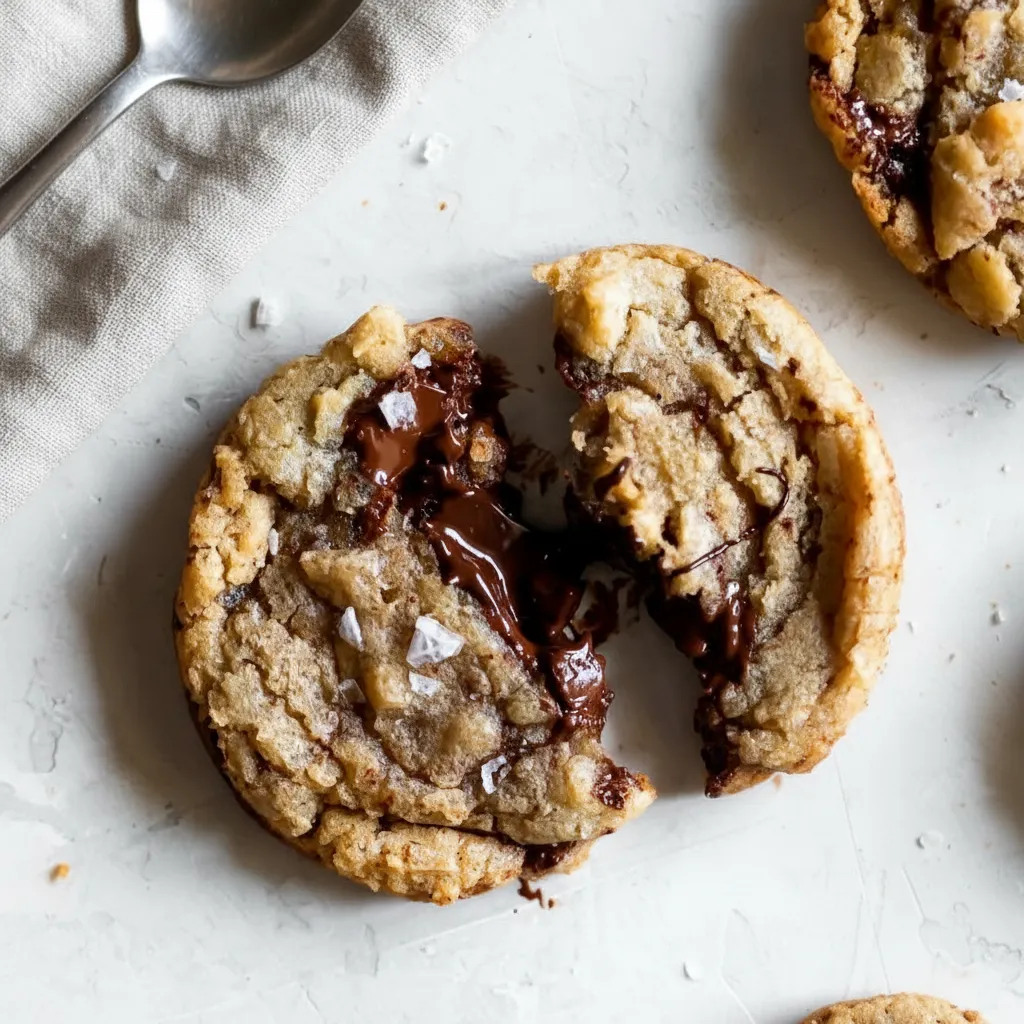
If you have been searching for one of those truly reliable Cookie Recipes, you have come to the right place. This recipe is straightforward, uses simple ingredients, and produces the most wonderful chocolate chunk cookies with chewy centers and slightly crisp edges. It is one of my all time favorite Easy Dessert Recipes.
Jump To:
Why You’ll Love This Recipe
First off, this recipe is incredibly easy to follow. You do not need any fancy equipment or professional baking skills to get amazing results. It is a fantastic starting point for anyone new to baking. It is a simple, no fuss process that delivers every single time.
The texture of these cookies is just divine. We use melted butter which creates an incredibly chewy and moist cookie. You get those delightfully crisp edges that give way to a soft, gooey center. It is a wonderful combination that will have everyone reaching for another one.
Another reason to love these is the flavor. The mix of brown and white sugar gives them a rich, caramel like taste that pairs beautifully with the dark chocolate. A little sprinkle of flaky sea salt on top really makes the flavors pop. It balances the sweetness perfectly.
These are also highly customizable. You can swap the dark chocolate for milk chocolate, white chocolate, or even a mix of all three. Add some nuts or different extracts to make them your own. This is one of those Baking Ideas that you can truly get creative with.
Finally, they look as good as they taste. Just imagine a tray of golden brown cookies, with big pools of melted chocolate and a delicate sparkle of sea salt on top. They are the kind of treat that looks like it came from a fancy bakery, but you made it right in your own kitchen.
Ingredients
Let’s talk about what you will need. The list is simple, and you probably have most of these ingredients in your pantry already. Each one plays a key role in creating the best cookie recipes experience.
- 1/2 cup unsalted butter, melted
- 3/4 cup brown sugar, packed
- 1/2 cup granulated sugar
- 1 large egg
- 1 teaspoon vanilla extract
- 1 1/3 cup all purpose flour
- 1/2 teaspoon baking soda
- Pinch of salt
- 1 cup chopped dark chocolate, or any chocolate of your choice
- Flaky sea salt for garnish, optional
Using melted butter is key for that chewy texture. It coats the flour differently than softened butter, leading to a denser, fudgier cookie. The combination of brown sugar and granulated sugar provides both moisture and that classic cookie crispness.
Step By Step Instructions
Ready to get started? This process is so simple. Just follow along, and you will have delicious cookies in no time. This is one of the most straightforward Cookie Recipes you will find.
Step 1: Mix The Wet Ingredients
In a large bowl, or the bowl of a stand mixer, combine your melted butter with both the brown sugar and the granulated sugar. Mix them together until they are well combined. It should look like wet sand.
Now, add the large egg and the vanilla extract. Mix everything again until the mixture is smooth and glossy. You want to make sure the egg is fully incorporated to help bind the dough together. This creates a solid foundation for your cookies.
Step 2: Add The Dry Ingredients
To the same bowl, add your all purpose flour, baking soda, and the pinch of salt. Mix on a low speed or with a spatula until the dry ingredients are just barely combined. This is a very important part.
The biggest tip here is to not over mix the dough. Over mixing develops the gluten in the flour, which can lead to tough, dense cookies instead of soft and chewy ones. Stop mixing as soon as you no longer see streaks of flour.
Step 3: Fold In The Chocolate
Now for the best part. Gently fold in your chopped dark chocolate. Using a spatula is great for this, as it prevents you from overworking the dough. Just fold until the chocolate pieces are evenly distributed throughout the cookie dough.
Chopping your own chocolate from a bar creates those lovely pools of melted chocolate you see in bakery cookies. Of course, chocolate chips work great too. It is all about personal preference.
Step 4: Scoop And Chill The Dough
Using a cookie scoop, form the dough into balls. Each ball should be about one and a half tablespoons of dough. This helps ensure all your cookies are the same size and bake evenly.
Place the dough balls onto a plate or a small baking sheet and put them in the fridge to chill for at least 20 minutes. Honestly, the longer you can let them chill, the better. An hour is great, and even overnight is fantastic.
Chilling the dough is a crucial step. It solidifies the butter, which prevents the cookies from spreading too much in the oven. It also allows the flavors to deepen, resulting in a much richer tasting cookie. Do not skip this!
Step 5: Bake To Golden Brown
When you are ready to bake, preheat your oven to 350 degrees Fahrenheit. Line a large baking sheet with parchment paper. This prevents the cookies from sticking and makes cleanup a breeze.
Place the chilled dough balls onto the prepared baking sheet, leaving a few inches of space between each one to allow for some spreading. Bake for 10 to 11 minutes. You are looking for edges that are set and a lovely golden brown color.
The centers might look a little underdone, but that is exactly what you want. The cookies will continue to bake on the hot pan as they cool, which gives you that perfect soft center.
Step 6: Cool And Enjoy
As soon as you take the cookies out of the oven, sprinkle them with a little flaky sea salt if you are using it. This is a small touch that makes a huge difference in flavor.
Let the cookies cool on the baking sheet for about 5 minutes. This allows them to set up before you try to move them. After 5 minutes, transfer them to a wire rack to cool completely. Or, you know, just eat one while it is still warm and gooey.


How To Store Leftovers
If you somehow have any cookies left over, storing them properly will keep them fresh and delicious. For baked cookies, let them cool completely first. Then, store them in an airtight container at room temperature.
They will stay fresh for up to 5 days. A fun trick to keep them soft is to add a small piece of bread to the container. The cookies will absorb moisture from the bread, keeping them wonderfully chewy.
You can also freeze the cookie dough for later. After you scoop the dough into balls, place them on a baking sheet and freeze until solid. Then, transfer the frozen dough balls to a freezer safe bag or container.
They will last in the freezer for up to 3 months. When you want a fresh cookie, you can bake them directly from frozen. Just add an extra minute or two to the baking time. It is a fantastic way to have one of the best cookie recipes ready to go anytime a craving strikes.
Tips
Want to make your cookies even better? Here are a few extra tips. First, do not be afraid to experiment with your chocolate. A mix of dark and milk chocolate is amazing. Or try adding some chopped caramel pieces or butterscotch chips.
For perfectly round cookies, here is a little trick. As soon as they come out of the oven, take a round cookie cutter that is slightly larger than the cookie and gently swirl it around the cookie. This will tuck in any uneven edges, giving you a perfect circle.
Make sure your oven temperature is accurate. An oven thermometer is a cheap and useful tool. If your oven runs hot, your cookies might spread too much or burn on the bottom. If it runs cool, they may not bake properly in the center.
Finally, always use room temperature eggs. A cold egg can cause the melted butter to seize up, creating a lumpy batter. To quickly warm up an egg, just place it in a bowl of warm water for a few minutes before you use it. This is a great tip for many Baking Ideas.
Conclusion
There you have it. A simple, delicious, and reliable recipe for chocolate chunk cookies. This is truly one of those foundational Cookie Recipes that everyone should have. It is perfect for a quiet afternoon, a celebration, or just because.
Baking should be fun and rewarding, not stressful. This recipe is all about bringing that joy into your kitchen. So go ahead, gather your ingredients, and treat yourself to a batch of these amazing cookies. You deserve it.
FAQ
Can I Use A Different Kind Of Chocolate?
Absolutely. This recipe is very flexible. You can use milk chocolate, semi sweet chocolate, white chocolate, or a combination. Chocolate chips also work well if you do not have a chocolate bar to chop.
Why Do I Need To Chill The Dough?
Chilling the dough is important for two reasons. First, it solidifies the fat in the butter. This prevents the cookies from spreading too thin while baking. Second, it allows the flavors in the dough to meld and deepen, resulting in a more flavorful cookie.
Can I Make These Gluten Free?
Yes, you can try making these gluten free. Substitute the all purpose flour with a good quality one to one gluten free baking flour blend. Make sure the blend contains xanthan gum. The texture might be slightly different, but they should still be delicious.
How Do I Know When The Cookies Are Done?
The cookies are done when the edges are set and a light golden brown. The centers will still look a bit soft and undercooked. That is what you want. They will finish baking on the hot pan after you remove them from the oven, ensuring a soft and chewy middle.
Chocolate Chunk Cookies
This easy recipe creates comforting chocolate chunk cookies with delightful chewy centers and slightly crisp edges, perfect for a cozy treat or gathering.
Requirements


Ingredients
Instructions
- In a large bowl, or the bowl of a stand mixer, combine your melted butter with both the brown sugar and the granulated sugar. Mix them together until they are well combined. It should look like wet sand.
- Now, add the large egg and the vanilla extract. Mix everything again until the mixture is smooth and glossy. You want to make sure the egg is fully incorporated to help bind the dough together. This creates a solid foundation for your cookies.
- To the same bowl, add your all purpose flour, baking soda, and the pinch of salt. Mix on a low speed or with a spatula until the dry ingredients are just barely combined. This is a very important part. The biggest tip here is to not over mix the dough. Over mixing develops the gluten in the flour, which can lead to tough, dense cookies instead of soft and chewy ones. Stop mixing as soon as you no longer see streaks of flour.
- Gently fold in your chopped dark chocolate. Using a spatula is great for this, as it prevents you from overworking the dough. Just fold until the chocolate pieces are evenly distributed throughout the cookie dough. Chopping your own chocolate from a bar creates those lovely pools of melted chocolate you see in bakery cookies. Of course, chocolate chips work great too. It is all about personal preference.
- Using a cookie scoop, form the dough into balls. Each ball should be about one and a half tablespoons of dough. Place the dough balls onto a plate or a small baking sheet and put them in the fridge to chill for at least 20 minutes. Honestly, the longer you can let them chill, the better. An hour is great, and even overnight is fantastic. Chilling the dough is a crucial step. It solidifies the butter, which prevents the cookies from spreading too much in the oven. It also allows the flavors to deepen, resulting in a much richer tasting cookie. Do not skip this!
- When you are ready to bake, preheat your oven to 350 degrees Fahrenheit. Line a large baking sheet with parchment paper. This prevents the cookies from sticking and makes cleanup a breeze. Place the chilled dough balls onto the prepared baking sheet, leaving a few inches of space between each one to allow for some spreading. Bake for 10 to 11 minutes. You are looking for edges that are set and a lovely golden brown color. The centers might look a little underdone, but that is exactly what you want. The cookies will continue to bake on the hot pan as they cool, which gives you that perfect soft center.
- As soon as you take the cookies out of the oven, sprinkle them with a little flaky sea salt if you are using it. This is a small touch that makes a huge difference in flavor. Let the cookies cool on the baking sheet for about 5 minutes. This allows them to set up before you try to move them. After 5 minutes, transfer them to a wire rack to cool completely. Or, you know, just eat one while it is still warm and gooey.
Notes
If you have any cookies left over, store them in an airtight container at room temperature for up to 5 days. Adding a small piece of bread to the container helps keep them wonderfully chewy.
For future enjoyment, you can freeze the scooped cookie dough balls on a baking sheet until solid. Then, transfer them to a freezer-safe bag or container and store for up to 3 months. Bake directly from frozen, adding an extra minute or two to the baking time.
For perfectly round cookies, as soon as they come out of the oven, take a round cookie cutter set that is slightly larger than the cookie and gently swirl it around the cookie. This will tuck in any uneven edges, giving you a perfect circle.
An accurate oven temperature is key. An oven thermometer is a useful tool to prevent uneven baking or burning. Always use room temperature eggs; a cold egg can cause melted butter to seize, resulting in a lumpy batter. To quickly warm an egg, place it in a bowl of warm water for a few minutes before use.
Nutrition
Calories
Sugar
Fat
Carbs