Weekends are for slowing down, right? And what better way to celebrate that relaxed vibe than with some truly delicious food? If you’re anything like me, you love the idea of a leisurely brunch but maybe don’t always have the time or the energy for complicated cooking.
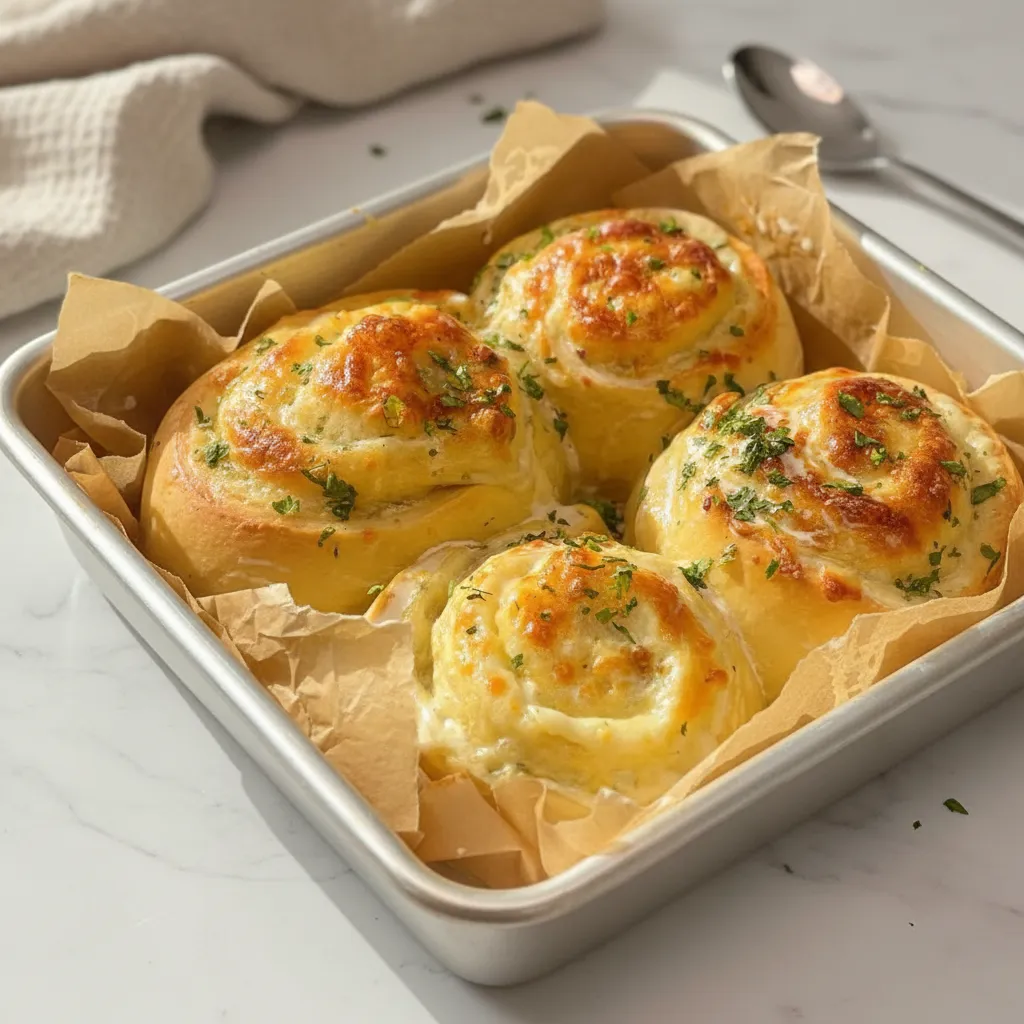
Well, good news! Today, we’re talking about embracing the joy of easy brunch recipes. We’re going to dive into making something absolutely amazing: Cheesy Garlic Bread Rolls. These aren’t just any rolls; they’re soft, fluffy, packed with garlic goodness, and loaded with melty cheese. Seriously, they’re a game changer.
Jump To:
Why You’ll Love This Recipe
You’re going to adore these Cheesy Garlic Bread Rolls for so many reasons. They’re incredibly simple to put together, making them perfect for beginners or anyone who wants a tasty treat without a fuss.
Plus, they’re super versatile. Need a quick snack? Done. Want to impress guests without breaking a sweat? These rolls are your answer. They’re the kind of food that just makes people happy, and honestly, that’s what cooking is all about.
Ingredients
For the Garlic Butter
- 1 garlic head
- Sprinkle of salt
- 3 tbsp olive oil
- 50 grams (1/4 cup) butter
- 1 tablespoon fresh parsley
For the Dough
- 90 grams (1/3 cup) warm milk (whole milk makes them extra soft!)
- 7 grams (2 1/4 tsp) active dry yeast
- 1 tbsp honey
- 200 grams (1 1/2 cups) all purpose flour
- 50 grams (1/2 cup) bread flour (all purpose works too if you don’t have bread flour)
- 20 grams (3 tbsp) milk powder (this is optional, but adds richness)
- 25 grams (2 tbsp) butter (margarine is a fine substitute)
- 2 egg yolks (or one whole egg)
- 1 1/2 teaspoon salt
- 1 tablespoon sugar (helps with color and proofing)
For the Filling
- 200 grams (2 cups) mozzarella cheese (or your favorite cheese blend)
- Prepared garlic butter
For the Egg Wash
- 1 egg
Step-By-Step Instructions
Step 1: Roast the Garlic
First things first, let’s get that garlic ready. Cut the top off a whole garlic head, place it in a small oven safe dish, drizzle with olive oil, and add a pinch of salt. Cover it up with foil.
Pop it into a preheated oven at 320°F (160°C) for about 2 hours. You want it to be super soft and spreadable. Let it cool down completely before moving on.
Step 2: Mix Up the Garlic Butter
Once your roasted garlic is cool, mash it up in a bowl. Add the softened butter, chopped fresh parsley, and about 2 tablespoons of the flavorful oil from the roasted garlic. Mix it all together until it’s well combined.
This garlic butter is pure gold. Set it aside for now; we’ll use it to make our rolls incredibly delicious.
Step 3: Get the Yeast Going
In a small bowl, combine your warm milk, active dry yeast, and honey. Give it a gentle stir and let it sit for about 10 minutes. You’re looking for a nice frothy top, which means your yeast is alive and ready to work its magic.
Step 4: Combine Dough Ingredients
Now, let’s bring the dough together. In a larger mixing bowl, combine your all purpose flour, bread flour (if using), sugar, milk powder (if you have it), softened butter, salt, and the egg yolks.
Pour in that frothy yeast mixture. It’s starting to look like dough already!
Step 5: Knead the Dough
Time to get your hands (or a mixer) in there. Knead the dough for about 15 to 20 minutes. If you’re using a stand mixer with a dough hook, medium speed is your friend here. You want a dough that’s soft, smooth, and elastic.
This step is crucial for getting those wonderfully soft and fluffy rolls. Don’t rush it!
Step 6: The First Proof
Place your kneaded dough into a lightly oiled bowl. Cover it with plastic wrap or a damp cloth. Let it rest in a warm spot for about 1 hour and 30 minutes. It needs to double in size.
Patience here is key. A well-proofed dough is the secret to light and airy rolls. This is a great time to prep other things for your brunch.
Step 7: Assemble Your Rolls
Once the dough has doubled, punch it down gently. Roll it out on a lightly floured surface into a rectangle, about 1/4 cm or 1/8 inch thick. Spread that amazing garlic butter you made all over the surface, leaving a small border.
Now, sprinkle a generous amount of mozzarella cheese over the butter. Tightly roll up the dough into a log, just like you’re making cinnamon rolls. This is where the magic happens for those cheesy centers!
Step 8: Cut the Rolls
Using a sharp knife or even some unflavored dental floss (for cleaner cuts!), divide the dough log into 6 equal portions. Dental floss works surprisingly well for this!
Step 9: The Second Proof
Arrange your cut rolls on a baking sheet lined with parchment paper. Make sure they have a little space between them. Cover them loosely and let them proof for another 30 minutes. They should look nice and puffy.
Step 10: Bake to Perfection
Preheat your oven to 350°F (175°C). While it’s heating, whisk up your egg wash (just one egg) and brush it over the tops of the proofed rolls. This gives them a lovely golden sheen.
Bake for 20 to 25 minutes. Keep an eye on them, as ovens can vary. You want them golden brown and beautifully baked through.
Step 11: Garnish and Serve
As soon as they come out of the oven, brush them with any leftover garlic butter you might have. A final sprinkle of fresh parsley looks beautiful and adds a burst of freshness.
Serve these warm and watch them disappear! They are perfect as one of your easy brunch recipes.


How To Store Leftovers
Got any leftover Cheesy Garlic Bread Rolls? Lucky you! Store them in an airtight container at room temperature for up to two days. For longer storage, you can refrigerate them.
To reheat, pop them in a warm oven for a few minutes until they’re soft and gooey again. They’re almost as good the second time around!
Tips
- Don’t skip the proofing times! Proper proofing is essential for light, fluffy rolls. It’s worth the wait.
- Roasting garlic can be done ahead of time. Make the garlic butter mixture the day before to save precious time on brunch day.
- For an extra golden top, you can carefully broil the rolls for a minute or two at the very end of baking, but watch them closely to prevent burning.
- Feel free to mix up the cheese! Cheddar, Parmesan, or a blend can be just as delicious as mozzarella.
Conclusion
So there you have it – a fantastic addition to your repertoire of easy brunch recipes! These Cheesy Garlic Bread Rolls are proof that you don’t need to be a pro chef to create something truly special and delicious for your family and friends.
They’re fun to make, even more fun to eat, and they’re perfect for any occasion that calls for a little comfort and cheesy goodness. Give them a try this weekend!
FAQ
Can I make these rolls ahead of time?
You can prepare the dough and let it do its first proof. Then, assemble the rolls, place them on the baking sheet, cover them, and refrigerate them overnight. In the morning, let them sit at room temperature for about 30 minutes before baking as directed. The second proof might take a little longer.
What if I don’t have bread flour?
No worries at all! You can simply use all purpose flour for the entire recipe. While bread flour can contribute to a slightly chewier texture, using only all purpose flour will still yield wonderfully soft and delicious rolls.
How do you make garlic bread rolls easy recipes?
The key to making garlic bread rolls easy recipes is to break down the steps and have all your ingredients prepped. Roasting the garlic ahead of time is a huge help, and following clear, simple instructions like these makes the whole process manageable and enjoyable.
Can I freeze the dough?
Yes, you can freeze the shaped rolls before the second proof. Place them on a baking sheet and freeze until solid, then transfer them to a freezer bag. To bake, thaw them in the refrigerator overnight, let them come to room temperature for about 30 minutes, then proof and bake as usual.
What can I serve with these rolls?
These rolls are fantastic on their own, but they also pair wonderfully with a hearty soup, a fresh salad, or as a side to your favorite brunch dishes. They’re a great way to add a little something special to any meal.
Cheesy Garlic Bread Rolls
Soft, fluffy, and packed with garlic goodness and melty cheese, these Cheesy Garlic Bread Rolls are an easy brunch recipe perfect for a relaxed weekend or a fuss-free snack.
Requirements


Ingredients
For the Garlic Butter
For the Dough
For the Filling
For the Egg Wash
Instructions
- First things first, let’s get that garlic ready. Cut the top off a whole garlic head, place it in a small oven safe dish, drizzle with olive oil, and add a pinch of salt. Cover it up with foil.
- Pop it into a preheated oven at 320°F (160°C) for about 2 hours. You want it to be super soft and spreadable. Let it cool down completely before moving on.
- Once your roasted garlic is cool, mash it up in a bowl. Add the softened butter, chopped fresh parsley, and about 2 tablespoons of the flavorful oil from the roasted garlic. Mix it all together until it’s well combined. This garlic butter is pure gold. Set it aside for now; we’ll use it to make our rolls incredibly delicious.
- In a small bowl, combine your warm milk, active dry yeast, and honey. Give it a gentle stir and let it sit for about 10 minutes. You’re looking for a nice frothy top, which means your yeast is alive and ready to work its magic.
- Now, let’s bring the dough together. In a larger mixing bowl, combine your all purpose flour, bread flour (if using), sugar, milk powder (if you have it), softened butter, salt, and the egg yolks. Pour in that frothy yeast mixture. It’s starting to look like dough already!
- Time to get your hands (or a mixer) in there. Knead the dough for about 15 to 20 minutes. If you’re using a stand mixer with a dough hook, medium speed is your friend here. You want a dough that’s soft, smooth, and elastic. This step is crucial for getting those wonderfully soft and fluffy rolls. Don’t rush it!
- Place your kneaded dough into a lightly oiled bowl. Cover it with plastic wrap or a damp cloth. Let it rest in a warm spot for about 1 hour and 30 minutes. It needs to double in size. Patience here is key. A well-proofed dough is the secret to light and airy rolls. This is a great time to prep other things for your brunch.
- Once the dough has doubled, punch it down gently. Roll it out on a lightly floured surface into a rectangle, about 1/4 cm or 1/8 inch thick. Spread that amazing garlic butter you made all over the surface, leaving a small border. Now, sprinkle a generous amount of mozzarella cheese over the butter. Tightly roll up the dough into a log, just like you’re making cinnamon rolls. This is where the magic happens for those cheesy centers!
- Using a sharp knife or even some unflavored dental floss (for cleaner cuts!), divide the dough log into 6 equal portions. Dental floss works surprisingly well for this!
- Arrange your cut rolls on a baking sheet lined with parchment paper. Make sure they have a little space between them. Cover them loosely and let them proof for another 30 minutes. They should look nice and puffy.
- Preheat your oven to 350°F (175°C). While it’s heating, whisk up your egg wash (just one egg) and brush it over the tops of the proofed rolls. This gives them a lovely golden sheen.
- Bake for 20 to 25 minutes. Keep an eye on them, as ovens can vary. You want them golden brown and beautifully baked through.
- As soon as they come out of the oven, brush them with any leftover garlic butter you might have. A final sprinkle of fresh parsley looks beautiful and adds a burst of freshness. Serve these warm and watch them disappear! They are perfect as one of your easy brunch recipes.
Step 1: Roast the Garlic
Step 2: Mix Up the Garlic Butter
Step 3: Get the Yeast Going
Step 4: Combine Dough Ingredients
Step 5: Knead the Dough
Step 6: The First Proof
Step 7: Assemble Your Rolls
Step 8: Cut the Rolls
Step 9: The Second Proof
Step 10: Bake to Perfection
Step 11: Garnish and Serve
Notes
Don’t skip the proofing times! Proper proofing is essential for light, fluffy rolls. It’s worth the wait.
Roasting garlic can be done ahead of time. Make the garlic butter mixture the day before to save precious time on brunch day.
For an extra golden top, you can carefully broil the rolls for a minute or two at the very end of baking, but watch them closely to prevent burning.
Feel free to mix up the cheese! Cheddar, Parmesan, or a blend can be just as delicious as mozzarella.
Nutrition
Calories
Sugar
Fat
Carbs