There’s something truly special about a warm bowl of baked beans. It’s the kind of dish that just screams comfort and togetherness, isn’t it? It’s a staple at any good barbeque or potluck.
But let’s be honest, sometimes the thought of making them from scratch can feel a little daunting. You might be picturing hours in the kitchen or a complicated process. Well, I’m here to tell you that making incredibly delicious homemade baked beans is totally achievable, even for beginners!
Jump To:
Why You’ll Love This Recipe
This recipe is a real winner. It’s straightforward, packed with amazing flavor, and results in a dish that’s so much better than anything you can get from a can. It’s the perfect example of how simple ingredients can create something truly satisfying.
You’ll love how adaptable it is too. Whether you’re serving it up for a casual weeknight dinner or bringing it to a big family gathering, these baked beans are always a hit. Plus, knowing you made them yourself? That’s a whole other level of satisfaction.
Ingredients
- 4 cups dry navy beans
- Water for soaking and cooking
- 1 cup brown sugar
- 1/2 cup molasses
- 2 tablespoons yellow mustard
- 1 cup finely chopped onion
- 2 cloves garlic, minced
- 1 tablespoon salt
- 1 teaspoon black pepper
Step-By-Step Instructions
Step 1: Prepare The Beans
First things first, give those dry navy beans a good rinse. You’ve got a couple of options for soaking. You can let them soak overnight in plenty of water.
Or, if you’re short on time, try the quick soak method. Boil them for about 2 minutes, then let them sit for an hour. Either way, drain and rinse them well afterward.
Step 2: Partially Cook The Beans
Pop the soaked beans into a big pot. Cover them with fresh water. Let them simmer for around 30 minutes. We want them tender, but not completely mushy.
Once they’re just right, drain them, but hang onto some of that cooking liquid. You might need it later!
Step 3: Mix The Sauce
Grab a separate bowl. It’s time to whip up that amazing sauce. Mix together the brown sugar, molasses, yellow mustard, salt, and black pepper.
Stir it all up until it’s nice and smooth. This is where a lot of that classic baked beans flavor comes from.
Step 4: Combine Everything
Now, let’s bring it all together. In a large pot, combine your partially cooked beans with the finely chopped onion and minced garlic.
Pour in that delicious sauce mixture you just made. Stir it all up. If it looks a bit thick, add in some of that reserved cooking liquid until you get a nice, loose consistency. Remember, they’ll thicken up as they cook and cool.
Step 5: Gentle Simmer
Heat the bean mixture over a gentle simmer for about 5 to 10 minutes. You just want to warm everything through and let those flavors start mingling beautifully.
Step 6: Prepare For Canning
If you’re canning these beauties, start by ladling the hot beans into sterilized jars. Make sure to leave about 1 inch of headspace at the top.
Carefully remove any air bubbles you see. Wipe the rims of the jars clean. This is super important for a good seal.
Apply the lids and tighten the bands just fingertip tight. You don’t want them super snug, just snug enough.
Step 7: Pressure Canning Process
This step is crucial: pressure canning is required for baked beans. Do not use a water bath canner for this recipe.
Process your jars in a pressure canner. Use 10 PSI for a weighted gauge or 11 PSI for a dial gauge. Remember to adjust these pressure levels if you’re at a high altitude.
Process pints for 75 minutes and quarts for 90 minutes. Follow your canner’s specific instructions and altitude adjustments carefully.
Step 8: Cooling And Checking Seals
Once the processing time is up, let the pressure return to zero naturally. Don’t rush it!
Carefully remove the jars from the canner and let them cool undisturbed for 12 to 24 hours. You’ll hear them popping as they seal, which is a great sound!
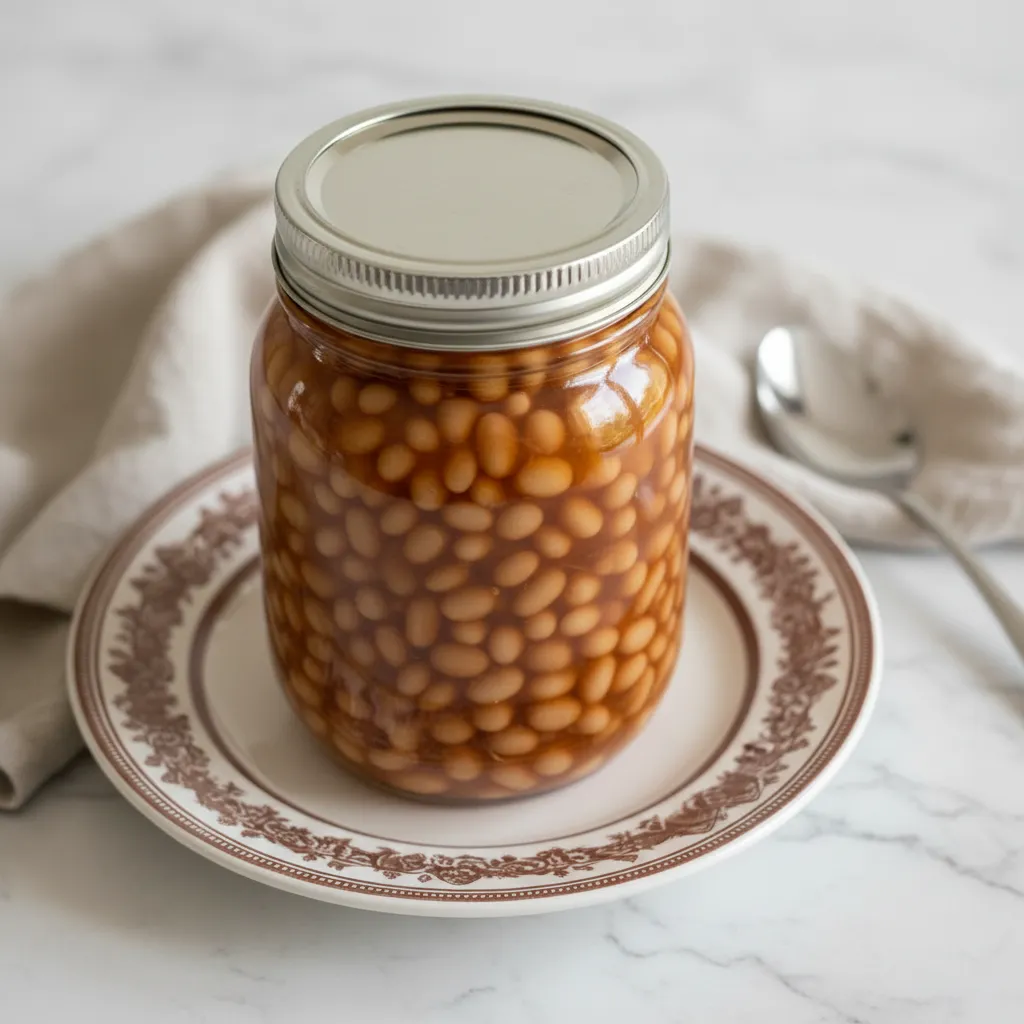
After they’ve cooled, check each seal to make sure it’s good and tight. Properly sealed jars can be stored in a cool, dark pantry for up to 12 months. That means delicious homemade baked beans are ready whenever you are!


How To Store Leftovers
If you happen to have any leftover baked beans that aren’t canned, just pop them into an airtight container. They’ll keep well in the refrigerator for about 3 to 4 days.
When you’re ready to enjoy them again, just gently reheat them on the stovetop or in the microwave. They taste just as good, if not better, the next day!
Tips
A little tip for you: don’t fully cook the beans before canning. This prevents them from getting too mushy during the canning process. We want them tender, not paste!
Also, keep that sauce a tad thinner than you think you want it. The beans will absorb liquid and thicken considerably during storage. It’s better to start a little looser.
For the best results, always adjust your pressure canning levels according to altitude guidelines. Safety first, always!
Conclusion
See? Making your own baked beans isn’t rocket science! This easy baked beans recipe is perfect for anyone looking to create a fantastic bbq side dish or a comforting bowl of homemade goodness.
Whipping up a batch of these homemade baked beans is a rewarding experience. They’re a true comfort food that brings smiles to the table, making them an ideal potluck recipe. Give this canned beans recipe a try; you won’t regret it!
FAQ
Can I use different types of beans?
While this recipe is perfected for navy beans, you can experiment with other dried beans like great northern or even pinto beans. Just be sure to adjust soaking and cooking times as needed, as different beans have varying textures and cooking requirements.
Why do I need a pressure canner?
Pressure canning is essential for low-acid foods like baked beans. It reaches temperatures high enough to destroy harmful bacteria, like Clostridium botulinum, ensuring your canned beans are safe to eat. Water bath canning doesn’t get hot enough for safety.
How can I make these beans sweeter or spicier?
You can easily adjust the sweetness by adding more brown sugar or a touch of maple syrup. For a spicy kick, try adding a pinch of cayenne pepper or a dash of your favorite hot sauce to the sauce mixture.
What if I don’t want to can them?
If you’re not canning, simply store the finished beans in an airtight container in the refrigerator for 3-4 days. You can also freeze them in portions for longer storage. Just thaw and reheat when ready to serve.
Homemade Baked Beans
This homemade baked beans recipe is a no-fuss comfort food staple. Perfect for family gatherings, it beats canned beans every time with its rich flavor and simple ingredients.
Requirements


Ingredients
Instructions
- Rinse the dry navy beans. You can soak them overnight in plenty of water or use the quick soak method: boil for 2 minutes, then let sit for 1 hour. Drain and rinse well afterward.
- Place the soaked beans into a large pot. Cover with fresh water and simmer for about 30 minutes. They should be tender but not mushy. Drain, but reserve some cooking liquid.
- In a separate bowl, mix the brown sugar, molasses, yellow mustard, salt, and black pepper until smooth.
- In a large pot, combine the partially cooked beans, chopped onion, and minced garlic. Pour in the sauce mixture and stir. If it’s too thick, add reserved cooking liquid for a loose consistency.
- Simmer the mixture gently for 5 to 10 minutes to warm everything through and blend the flavors.
- Ladle the hot beans into sterilized jars, leaving 1 inch of headspace. Remove air bubbles, wipe the rims, and tighten lids fingertip tight.
- Process in a pressure canner at 10 PSI (weighted gauge) or 11 PSI (dial gauge). Process pints for 75 minutes and quarts for 90 minutes. Adjust for altitude if necessary.
- Let the pressure return to zero naturally. Remove jars and cool undisturbed for 12 to 24 hours. Check seals before storing in the pantry.
Notes
Do not fully cook the beans before the canning step; they will finish cooking in the jars and we want to avoid mushy beans.
Keep the sauce slightly thinner than you’d expect, as the beans will absorb liquid and thicken during storage.
Pressure canning is required for safety with low-acid foods like beans. Do not use a water bath canner.
Leftover uncanned beans can be stored in an airtight container in the refrigerator for 3 to 4 days.
Nutrition
Calories
Sugar
Fat
Carbs