There is something magical about the smell of warm apples and cinnamon filling the kitchen. It instantly makes a house feel like a home. Honestly, it is one of my favorite things about the cooler months.
You might think making a classic dessert requires hours of work. But here is the thing. You can make incredible Apple Pie Filling right on your stovetop in just about 15 minutes.
Forget the canned stuff from the grocery store. Homemade filling tastes fresher, has better texture, and lets you control the sweetness. It is a game changer for your holiday baking or weekend treats.
This recipe is not just for pies, either. You can spoon this warm, gooey goodness over vanilla ice cream or swirl it into your morning oatmeal. It is versatile, budget friendly, and absolutely delicious.
Jump To:
Why You’ll Love This Recipe
You are going to fall in love with this recipe for so many reasons. First off, it is incredibly fast. We are talking about 15 to 20 minutes from start to finish. It fits perfectly into a busy weeknight schedule.
The flavor is another huge win. Because you are using fresh apples, the taste is bright and comforting. It beats anything you will find in a metal can. You get that authentic homemade taste without the hassle.
This is also a fantastic Apple Pie Recipe Easy Homemade style that saves you money. Apples are generally affordable, especially when they are in season. You likely have the spices and sugar in your pantry already.
Finally, it is foolproof. You do not need fancy equipment or advanced skills. If you can slice an apple and stir a pot, you can nail this recipe. It is perfect for beginners who want to impress.
Ingredients
The beauty of this Apple Pie Filling lies in its simplicity. You only need a handful of common ingredients to create something spectacular.
- 2 ½ pounds baking apples (about 6 to 7 medium apples like Granny Smith, Gala, Honeycrisp, or Pink Lady)
- ¼ cup granulated sugar
- 2 tablespoons lemon juice
- ¼ cup salted butter (½ stick)
- ½ cup packed light brown sugar
- ¼ cup water (plus an extra 3 tablespoons for the slurry)
- 2 teaspoons vanilla extract
- 1 ½ teaspoon ground cinnamon
- 1 pinch of salt
- 2 tablespoons cornstarch (or cook type Clear Jel if you plan on canning)
Step-By-Step Instructions
Making this filling is a breeze. I will walk you through it so you get perfect results every single time. Let’s get cooking.
Step 1: Prep The Apples
Start by washing your apples thoroughly. Peel the skin off, remove the cores, and slice them thinly. You want to cut the slices into roughly bite sized pieces so they cook evenly.
Grab a large bowl and toss the apple pieces with the granulated sugar and lemon juice. This step is important. It helps draw out excess moisture and keeps the apples from browning.
Let the apples sit in the bowl for at least five minutes. You will notice some liquid forming at the bottom, which is exactly what we want for a flavorful sauce later.
Step 2: Create The Sauce Base
While the apples are resting, place a large pan over medium heat. Add the butter, packed light brown sugar, vanilla extract, ground cinnamon, salt, and ¼ cup of water.
Stir everything gently as the butter melts. You want the sugars to dissolve and the spices to bloom. The smell at this point is going to be absolutely amazing.
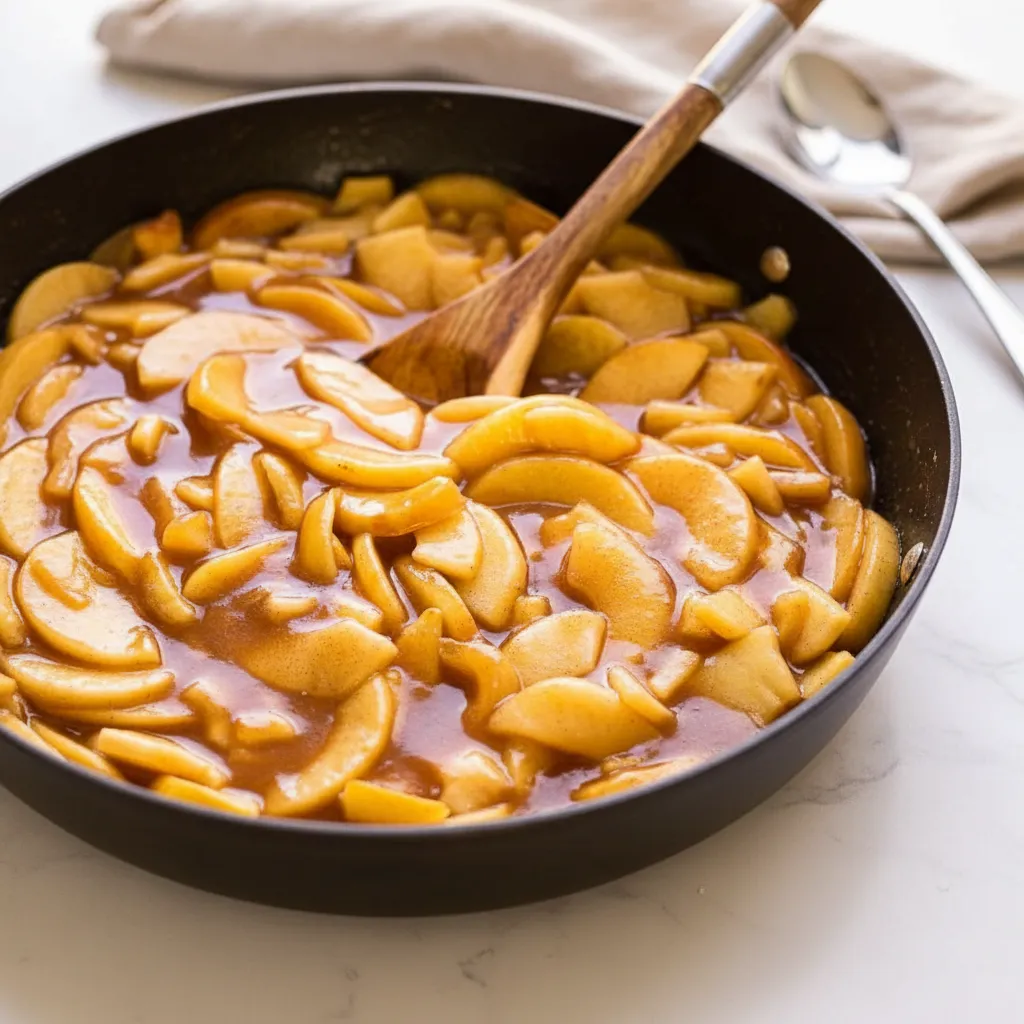
Step 3: Cook The Apples
Keep the heat at medium. Stir in the prepared apple slices along with all the juices that gathered in the bowl. Do not throw that liquid away as it is packed with flavor.
Cover the pan with a lid. Let it cook for about 6 minutes. You should stir it occasionally to ensure nothing sticks to the bottom. You are looking for the apples to become slightly softened and fragrant.
Step 4: Thicken The Filling
While the apples simmer, grab a small bowl. Stir together the 2 tablespoons of cornstarch and the remaining 3 tablespoons of water. Mix it until it is a smooth, thin slurry.
Remove the lid from your pan. Pour the cornstarch mixture into the pan while stirring. It is crucial to keep stirring so the thickener distributes evenly throughout the Apple Pie Filling.
Bring the mixture to a light boil. Cook it uncovered, stirring constantly, for about 1 minute more. You will see the sauce transform into a glossy, thick coating that clings to the apples.
Remove the pan from the heat. Let it cool slightly before you use it. This Homemade Apple Pie Recipe component is now ready for your crust, ice cream, or spoon.


How To Store Leftovers
If you manage not to eat all of this delicious filling straight from the pan, storing it is simple. Proper storage ensures you have a quick treat ready for later in the week.
Let the filling cool down completely to room temperature first. Transfer it into an airtight container. It will stay fresh in the refrigerator for up to one week.
You can also freeze this filling. Place the cooled mixture into a freezer safe bag or container. It freezes well for up to three months. Just thaw it in the fridge overnight before using.
When you are ready to eat, you can warm it up on the stove or in the microwave. It tastes just as fresh as the day you made it. This makes it one of the best Apple Filling Recipes Easy for meal prepping.
Tips
Choosing the right apples makes a difference. A mix of tart and sweet apples, like Granny Smith and Honeycrisp, gives the filling a more complex flavor profile.
Cut your apples into uniform sizes. If some pieces are huge and others are tiny, they will cook at different rates. You want every bite to be tender but not mushy.
Do not skip the lemon juice. It adds a subtle brightness that balances the sugar. Plus, it really does help keep the fruit from turning brown while you prep.
Adjust the spices to your liking. If you love nutmeg or allspice, feel free to add a pinch. This Apple Pie Filling is very forgiving and easy to customize.
If the sauce gets too thick, you can stir in a splash of water or apple cider to loosen it up. If it is too thin, simmer it for another minute or two.
Conclusion
Making your own Apple Pie Filling is one of those simple kitchen wins that feels huge. It tastes so much better than anything you can buy at the store.
Whether you are baking a pie for a holiday dinner or just want a sweet topping for Saturday pancakes, this recipe delivers. It is quick, affordable, and full of that cozy comfort we all crave.
Give this recipe a try next time you have a few apples on hand. I promise you will never want to go back to the canned version again. It really is that good.
FAQ
What are the best apples for pie filling?
Firm apples that hold their shape are best. Granny Smith is a classic choice for tartness. Honeycrisp, Gala, and Pink Lady are excellent for sweetness and texture. Mixing two types gives the best flavor.
Can I use this filling for canning?
Yes, but you must use Clear Jel (cook type) instead of cornstarch. Cornstarch does not hold up well during the canning process and can break down. Follow safe canning procedures for fruit fillings.
Is this recipe gluten free?
Yes, this recipe is naturally gluten free as long as your cornstarch is certified gluten free. It is a great dessert option for those with dietary restrictions.
Can I make this ahead of time?
Absolutely. You can make this filling up to three days in advance. Store it in the fridge and simply pour it into your pie crust when you are ready to bake.
Easy Stovetop Apple Pie Filling
Forget the canned stuff! This quick and easy homemade Apple Pie Filling is ready in about 15 minutes right on your stovetop. It’s the perfect no-fuss recipe for pies, topping ice cream, or swirling into oatmeal.
Requirements


Ingredients
Instructions
- Peel, core, and thinly slice the apples into bite-sized pieces. In a large bowl, toss the apple pieces with granulated sugar and lemon juice. Let sit for at least five minutes.
- In a large pan over medium heat, melt the butter. Stir in the packed light brown sugar, vanilla extract, ground cinnamon, salt, and ¼ cup of water until the sugar dissolves.
- Add the prepared apple slices and all their juices to the pan. Cover and cook for about 6 minutes, stirring occasionally, until the apples are slightly softened.
- In a small bowl, whisk together the cornstarch and the remaining 3 tablespoons of water to create a smooth slurry.
- Uncover the pan and pour in the cornstarch slurry while stirring continuously.
- Bring the mixture to a light boil and cook, stirring constantly, for 1 more minute until the sauce thickens and becomes glossy.
- Remove from heat and let it cool slightly before using.
Notes
A mix of tart and sweet apples, like Granny Smith and Honeycrisp, gives the filling the best flavor.
Cut your apples into uniform sizes to ensure they cook evenly and have a consistent texture.
If the filling gets too thick, you can stir in a splash of water to loosen it up. If it’s too thin, just simmer it for another minute or two.
Nutrition
Calories
Sugar
Fat
Carbs