Have you ever spent hours tending to a giant turkey, only to find the breast is dry while the legs are still not quite done? It’s a common story. But what if I told you there’s a much simpler way to get a beautifully cooked bird every single time?
Let’s talk about the Spatchcock Turkey. It might sound fancy, but it’s an incredibly straightforward technique that gives you an amazing result, especially on the grill. Get ready for the juiciest turkey you have ever made.
Jump To:
Why You’ll Love This Recipe
Honestly, once you try a Spatchcock Turkey, you might never go back to the old way. The biggest reason is that it cooks so much more evenly. By flattening the bird, you expose all the parts to a consistent heat source.
This means no more juggling cooking times. The breast and thighs finish at roughly the same time. This is a huge win for any home cook.
Another great benefit is the skin. Because the entire surface is facing up, it gets uniformly golden brown and crispy. There are no pale, soft spots hiding underneath. Every bite has that wonderful texture.
Plus, a spatchcock turkey cooks way faster than a traditional whole bird. You can shave a significant amount of time off the total cook, which is always a bonus, especially during busy holidays.
Ingredients
You will be amazed at how few ingredients you need for this recipe. The magic is all in the technique, not a long list of fancy items. Here’s what you’ll need to get started.
- 1 tablespoon granulated sugar
- Kosher salt and freshly ground black pepper
- One turkey weighing 12 to 14 pounds, butterflied (your butcher can remove the back and breast bones for you)
Step By Step Instructions
Following these steps will give you a fantastic Grilled Spatchcock Turkey. We will walk through it together, from seasoning the bird to letting it rest before carving. It’s easier than it looks!
Step 1: Season The Turkey
Your journey to a delicious turkey begins the day before you plan to cook it. This step is all about getting that flavor deep into the meat. It’s a simple dry brine.
In a small bowl, mix together the granulated sugar, one quarter cup of kosher salt, and two teaspoons of black pepper. This simple combination works wonders.
Now, rub this salt mixture all over the spatchcock turkey. Make sure you get it everywhere, on top of the skin and underneath. Be generous!
Place the seasoned turkey on a baking sheet and put it in the refrigerator. Leave it uncovered. This helps the skin dry out, which is a key for getting it crispy later.
Let it sit in the fridge for at least eight hours, or even overnight. This gives the salt and sugar time to work their magic, making the meat tender and flavorful.
Step 2: Prepare The Turkey And Grill
The next day, it’s time to get ready for grilling. Take the turkey out of the refrigerator. You’ll want to give it a good rinse under cool water to remove the excess salt mixture from the surface.
After rinsing, it is very important to pat the bird completely dry with paper towels. A dry surface is essential for achieving that beautifully browned, crispy skin we all love.
Let the turkey sit at room temperature for about 30 minutes. This helps it cook more evenly once it hits the grill. Never put a very cold bird on a hot grill.
While the turkey rests, prepare your grill for medium indirect heat. This setup is crucial for a Grilled Spatchcock Turkey because it prevents burning.
For a gas grill with three or more burners, turn all burners to medium high heat. After about 15 minutes, turn off one of the middle burners. Then, turn the remaining burners down to medium. You will cook the turkey over the burner that is off.
For a charcoal grill, light a full chimney starter of charcoal. Once the briquettes have ashed over, bank them all to one side of the grill. This creates a hot zone and a cool zone. Place a drip pan on the cooler side to catch any drippings and avoid flare ups.
Step 3: Grill The Turkey
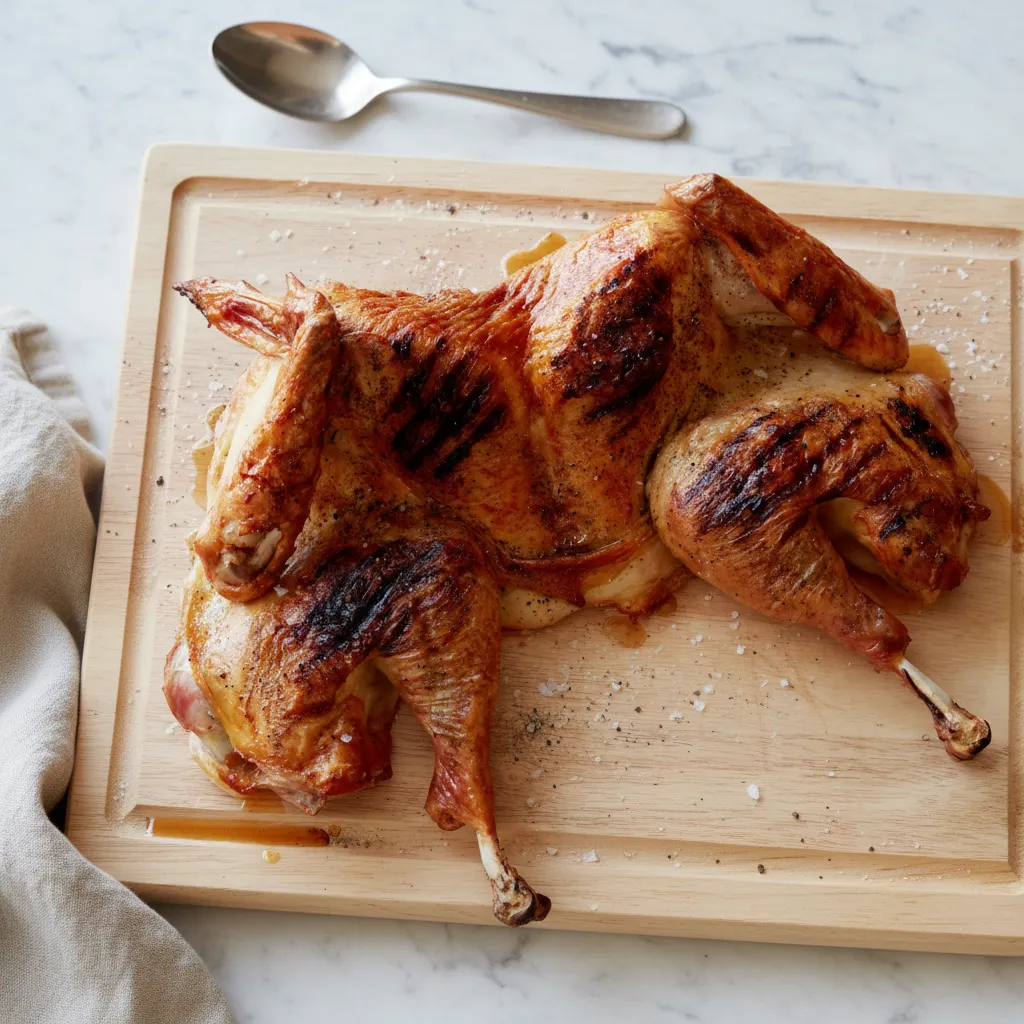
It’s finally time to cook. Place your Spatchcock Turkey on the grill grates, with the breast side facing up. Position it over the drip pan, in the indirect heat zone.
Close the grill lid and let it cook. You will want to let it go for about 50 minutes. During this time, the turkey will start cooking through gently and evenly.
After 50 minutes, carefully turn the turkey. This helps ensure both sides are getting even exposure to the heat. It can be a little awkward, so use sturdy tongs or spatulas.
Continue cooking with the lid closed for about 50 more minutes. The total time will vary based on your grill and the size of your bird. The best way to check for doneness is with a thermometer.
Step 4: Brown The Skin And Rest
Check the temperature. Insert an instant read thermometer into the deepest part of the thigh, making sure not to touch the bone. You’re looking for a reading of 170 degrees F.
During the last 10 minutes of cooking, you can move the spatchcock turkey over to the direct heat side of the grill. This is your chance to get that skin extra brown and crispy.
Keep a close eye on it and rotate it as needed to brown it evenly. This part happens fast, so don’t walk away! You don’t want to burn the skin after all your hard work.
Once it’s beautifully browned and cooked through, transfer the turkey to a cutting board. Cover it loosely with foil and let it rest for at least 10 minutes before you start carving. This step is so important for a juicy bird!


How To Store Leftovers
If you happen to have any leftovers from your amazing Spatchcock Turkey, storing them is easy. First, make sure the turkey has cooled down completely before you put it away.
Carve the remaining meat off the bones. It stores much more easily this way. Place the leftover turkey in an airtight container or a resealable plastic bag.
You can keep it in the refrigerator for up to four days. It’s great for sandwiches, salads, or just reheating for another meal. For longer storage, you can freeze it for up to three months.
Tips
Want to make your turkey experience even better? Here are a few simple tips. First, don’t be afraid to ask your butcher to spatchcock the turkey for you. They have the right tools and it saves you a lot of effort.
A good instant read thermometer is your best friend. It’s the only reliable way to know for sure when your turkey is done. Guessing can lead to dry or undercooked meat.
Don’t skip the resting period. When meat cooks, the juices move toward the center. Letting it rest allows those juices to redistribute throughout the meat, making every slice tender and moist.
Feel free to get creative with your seasonings. While the simple salt and sugar rub is delicious, you can also add herbs like rosemary and thyme, or spices like smoked paprika and garlic powder.
Conclusion
Making a Spatchcock Turkey on the grill is a fantastic way to cook a holiday bird or just a special weeknight meal. It’s faster, easier, and yields a wonderfully juicy bird with crispy skin.
This method removes a lot of the usual stress associated with cooking a large turkey. Give this Grilled Spatchcock Turkey a try for your next gathering. I am sure you and your guests will be very happy with the results.
FAQ
What Does Spatchcock Mean?
Spatchcock is a term for preparing poultry for cooking. It involves removing the backbone from the bird, which allows it to be flattened out. This technique is also sometimes called butterflying.
Can I Do This In An Oven Instead Of A Grill?
Absolutely! The Spatchcock Turkey method works wonderfully in the oven. Just place the prepared turkey on a rack set inside a baking sheet and roast it at around 425 degrees F until it reaches the correct internal temperature.
Why Is My Turkey Skin Not Crispy?
The most common reason for soft skin is moisture. It is very important to pat the turkey completely dry before seasoning and grilling. Letting it sit uncovered in the fridge overnight also helps to dry out the skin for maximum crispiness.
What Kind Of Wood Chips Are Good For A Spatchcock Turkey Grilled?
For a Spatchcock Turkey Grilled with extra smoky flavor, fruit woods are a great choice. Woods like apple or cherry add a mild, slightly sweet smoke that complements the turkey without overpowering it. Hickory or pecan also work well for a more traditional smoke flavor.
Grilled Spatchcock Turkey
Once you try a Spatchcock Turkey, you might never go back to the old way. This incredibly straightforward technique gives you an amazing result, especially on the grill, yielding a wonderfully juicy bird with crispy skin.
Requirements


Ingredients
Instructions
- Season The Turkey (Day Before): In a small bowl, mix together 1 tablespoon granulated sugar, 1/4 cup kosher salt, and 2 teaspoons black pepper. Rub this mixture generously all over the spatchcock turkey, on top of and underneath the skin. Place the seasoned turkey on a baking sheet and refrigerate uncovered for at least eight hours, or overnight, to dry brine and tenderize the meat.
- Prepare The Turkey And Grill: The next day, remove the turkey from the refrigerator, rinse it under cool water to remove excess salt, and pat it completely dry with paper towels. Let the turkey sit at room temperature for about 30 minutes. While it rests, prepare your grill for medium indirect heat (e.g., for a gas grill, turn off a middle burner after 15 minutes on medium-high; for charcoal, bank briquettes to one side with a drip pan on the cooler side).
- Grill The Turkey: Place the spatchcock turkey on the grill grates, breast side up, over the drip pan in the indirect heat zone. Close the grill lid and cook for about 50 minutes. Carefully turn the turkey and continue cooking with the lid closed for about 50 more minutes. It can be a little awkward, so use sturdy tongs or spatulas.
- Brown The Skin And Rest: Insert an instant read thermometer into the deepest part of the thigh, avoiding the bone; you’re looking for 170 degrees F. During the last 10 minutes of cooking, move the turkey over to the direct heat side of the grill to brown the skin until extra crispy, rotating as needed. Once cooked and browned, transfer the turkey to a cutting board, cover loosely with foil, and let rest for at least 10 minutes before carving to ensure a juicy bird.
Notes
Ask your butcher to spatchcock the turkey for you to save effort.
A good instant read thermometer is your best friend. It’s the only reliable way to know for sure when your turkey is done. Guessing can lead to dry or undercooked meat.
Don’t skip the resting period. When meat cooks, the juices move toward the center. Letting it rest allows those juices to redistribute throughout the meat, making every slice tender and moist.
Feel free to get creative with your seasonings. While the simple salt and sugar rub is delicious, you can also add herbs like rosemary and thyme, or spices like smoked paprika and garlic powder.
Nutrition
Calories
Sugar
Fat
Carbs