When you think of Thanksgiving dessert, what comes to mind? Probably pumpkin pie, maybe a pecan pie, or an apple crumble. They are classics for a reason, right? But what if this year, we added a little extra fun to the dessert table? Something colorful, creative, and seriously tasty.
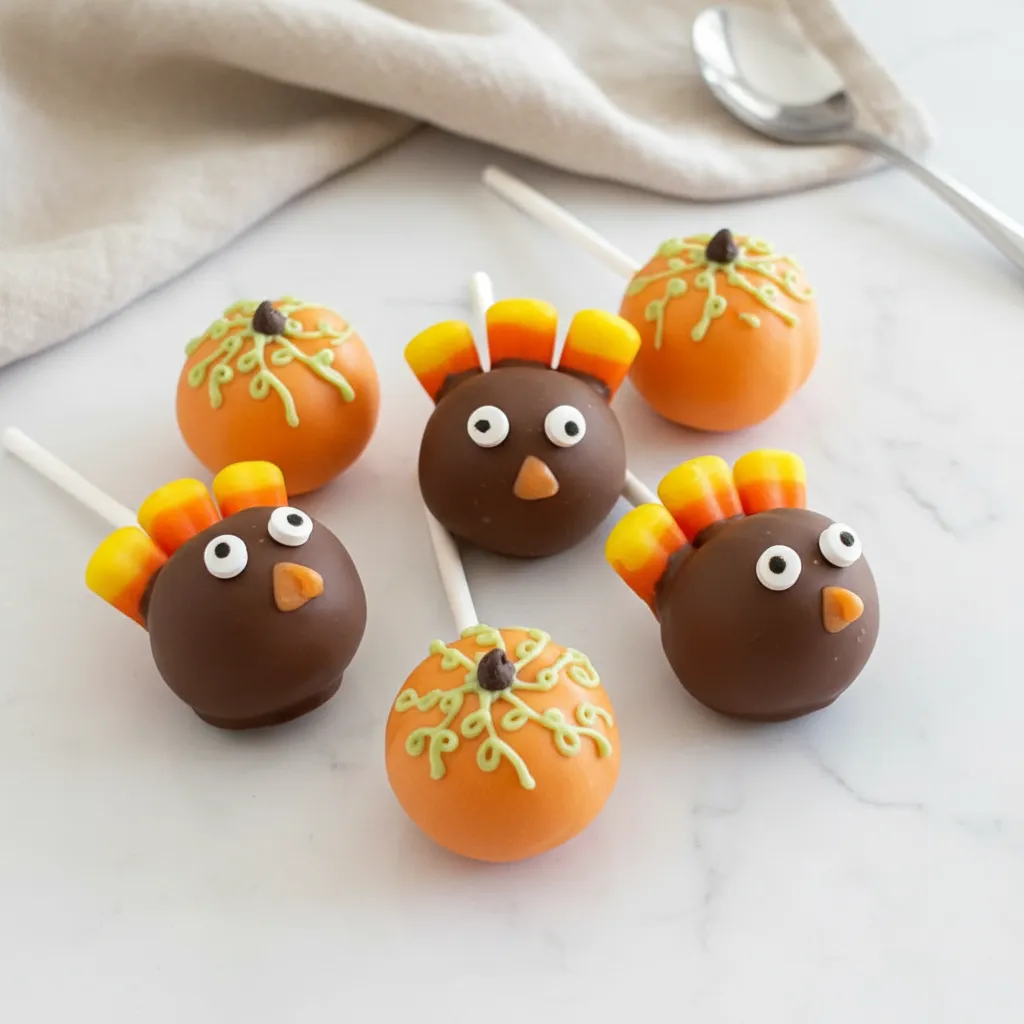
I’m talking about these adorable Turkey and Pumpkin Cake Pops. They are the definition of fun Thanksgiving desserts. They’re a fantastic way to get everyone, especially the little ones, excited about helping in the kitchen. Plus, they look so festive and are much easier to make than you might think. Let’s get started!
Jump To:
Why You’ll Love This Recipe
Honestly, there are so many reasons to fall in love with these little treats. First off, they are incredibly versatile. You start with a simple cake mix base, which means you can pick your favorite flavor. Chocolate, vanilla, spice cake, you name it. It’s a great way to use a box mix you already have in the pantry.
Another big win? They are a fantastic make ahead option. Thanksgiving day can be a whirlwind of cooking and timing everything just right. You can make these cake pops a day or two in advance, which frees up so much time and oven space. It’s a little bit of dessert prep that goes a long way.
They are also one of the best Thanksgiving desserts for kids. Little hands are great at crumbling cake, rolling dough into balls, and of course, the decorating part. It’s a wonderful activity to keep them busy and involved in the holiday preparations. They will be so proud to show off their turkey and pumpkin creations.
Let’s not forget the wow factor. These are truly unique Thanksgiving desserts that will stand out. Guests always love seeing something different and creative. Imagine a platter of these next to the pies. They bring a pop of color and personality to your holiday spread. They are delightful little bites of cake, and they make for some great photos too.
Finally, these are such fun Thanksgiving desserts to customize. You can play with different candy colors, sprinkles, and expressions on your turkeys. Every single one can be unique, which is part of the charm. It’s a recipe that encourages creativity, and that’s always a good thing in my book. These are truly great Thanksgiving themed desserts.
Ingredients
- 1 15.25 oz box cake mix (any flavor)
- 3 eggs
- 1¼ cup water
- ½ cup vegetable oil
- 1 cup frosting (canned or homemade)
- 2 cups white chocolate chips, divided
- 12 oz orange candy melts
- ½ cup green candy melts
- 12 oz brown candy melts
- Candy eyeballs
- Candy corn
Step By Step Instructions
Ready to make some of the most fun Thanksgiving desserts ever? Let’s walk through it together. Don’t worry, it’s a straightforward process!
Step 1: Prepare And Bake The Cake
First things first, we need some cake. Grab your favorite box cake mix. I love using a simple vanilla or yellow cake mix because it’s a great neutral base for all the candy coating flavors. Of course, chocolate cake is also a fantastic choice, especially for the turkeys.
Prepare and bake the cake mix exactly as the box tells you to for a 9×13 inch pan. Follow the ingredient amounts for eggs, water, and oil listed on your specific box. Once it’s baked and smelling wonderful, let the cake cool down completely. This is very important. A warm cake will just turn into a mushy mess when you add the frosting.
Step 2: Make The Cake Dough
Once your cake is totally cool, it’s time for the fun part. Break the cake up into small pieces and place them in a large mixing bowl. You can use your hands for this, it’s quite satisfying. You want to get it into a fine crumb consistency.
Now, add your frosting. About a cup should do it. Start mixing it all together. I find using my hands is the best way to really combine everything. You’re looking for a thick, dough like consistency that holds together when you squeeze it. If it feels too dry, add a tiny bit more frosting. If it feels too wet, you might have to bake another small cake or some cupcakes to add to the mix.
Step 3: Form And Chill The Cake Pops
Take your cake dough and start rolling it into balls about 1 inch in size. Try to make them as uniform as possible so they all look cohesive. Place the finished balls onto a baking sheet lined with wax paper or parchment paper. This prevents them from sticking.
Next, we need to get the sticks ready. Melt just a couple of tablespoons of the brown candy melts. Take a cake pop stick, dip one end into the melted candy, and then gently push the stick about halfway into a cake ball. The melted candy acts like glue, holding the stick in place.
Repeat this for all the cake balls. Once they all have sticks, pop the baking sheet into the refrigerator for about an hour. You want them to be firm, but not frozen. This chilling step is key to making sure they hold their shape when you dip them later.
Step 4: Time To Decorate The Pumpkins
Let’s start with the pumpkins, one of my favorite Thanksgiving themed desserts to make. Take your chilled cake pops. Gently press a toothpick into the sides of the cake pop, from top to bottom, to create those classic pumpkin grooves. Don’t press too hard, just enough to make an indent.
Now, melt your orange candy melts. The best way to do this is in the microwave in 30 second intervals. Stir well after each interval until it’s completely smooth. This prevents the candy from scorching. Dip each pumpkin shaped cake pop into the orange candy, making sure to coat it evenly. Let any excess drip off.
Place the dipped pops onto your wax paper or a cake pop stand to firm up. Once the orange coating is set, melt your green candy melts. You can use a piping bag or a small ziplock bag with the corner snipped off to pipe on some little green vines at the top. For a finishing touch, stick a mini chocolate chip on top for the stem. So cute!
Step 5: Let’s Make Some Turkeys
Now for the gobble gobble part. These are such fun Thanksgiving desserts. Melt your brown candy melts using the same 30 second interval method. Dip the remaining cake pops into the brown candy, coating them evenly. Let the excess drip off.
Before the coating firms up completely, gently press two candy eyeballs onto the front of the cake pop. Let the coating set fully before moving on. Now for the feathers. Dip the wide end of a piece of candy corn into the remaining melted brown candy. Press it firmly onto the back of the cake pop. Hold it for about 30 seconds until the candy ‘glue’ sets.
Repeat this two or three more times, fanning the candy corn out to create the turkey’s tail feathers. For the beak, use a toothpick and some of the leftover melted orange candy melts to draw a small triangle on the turkey’s face below the eyes. And there you have it, a whole flock of adorable turkey cake pops!


How To Store Leftovers
If you happen to have any of these little guys left over, storing them is simple. You can keep them at room temperature for a day or so if your house isn’t too warm. For longer storage, it’s best to place them in an airtight container and keep them in the refrigerator.
In the fridge, they will stay fresh for up to a week. Just be sure the container is sealed well to keep them from drying out or absorbing any other food odors. You can also freeze undecorated cake pops for up to a month. Just thaw them in the fridge before you decorate and serve them.
Tips
Here are a few extra pointers to make your cake pop adventure a total success. These tips will help you create the best fun Thanksgiving desserts with ease. First, remember that ingredients can vary slightly with different brands of cake mix, so you might need to adjust your frosting amount a little.
Always melt your candy coating and chocolate in the microwave in short bursts. Going too long can burn it, and there’s no coming back from that. Slow and steady wins the race here. Stirring between each interval is the key to a smooth, creamy consistency.
A big tip to prevent cracking: don’t over chill your cake pops. You want them firm, but not frozen solid. If the cake balls are too cold when you dip them in the warm candy coating, the temperature difference can cause the coating to crack as it sets. An hour in the fridge is usually plenty.
Let the candy coating dry before adding all the decorations. For the turkey eyeballs, you can add them when the coating is partially set so they stick well. If you don’t have a fancy piping bag for the pumpkin vines, no worries. A simple ziplock bag with a tiny corner snipped off works just as well for creating these Thanksgiving themed desserts.
If you’re short on time or just don’t feel like baking, you can absolutely use store bought cake or even unfrosted cupcakes. It’s a great shortcut. This recipe for unique Thanksgiving desserts is all about being adaptable and fun, not stressful. These are supposed to be thanksgiving desserts for kids and adults to enjoy making.
Conclusion
And there you have it. A platter full of the most charming Turkey and Pumpkin Cake Pops. These are more than just a sweet treat; they are a fun activity, a conversation starter, and a new tradition waiting to happen. They prove that fun Thanksgiving desserts can be simple and accessible for everyone.
Whether you’re looking for unique Thanksgiving desserts to impress your guests or just some fun Thanksgiving desserts for kids to make, this recipe is a clear winner. I hope you and your family have a wonderful time making, decorating, and of course, eating these festive little cake pops. Happy Thanksgiving!
FAQ
Can I Use A Different Flavor Of Cake Mix?
Absolutely! That’s one of the best parts about this recipe. You can use any flavor you like. A spice cake mix would be delicious for the pumpkins, and a rich chocolate or red velvet cake would be amazing for the turkeys. Feel free to experiment with your favorite flavors.
What If My Candy Melts Are Too Thick?
If your melted candy seems too thick for dipping, you can add a tiny amount of coconut oil or paramount crystals. Start with just half a teaspoon, stir it in completely, and see if that helps. A little goes a long way, so add it gradually until you get a smooth, dippable consistency.
Do I Need A Special Stand For The Cake Pops?
A special stand is helpful but not necessary. You can easily make your own by poking holes in a block of styrofoam or even a sturdy cardboard box. You can also let them set by laying them on their side on wax paper, though this will create one flat spot on the back of the cake pop.
How Far In Advance Can I Make These?
You can make these fun Thanksgiving desserts one to two days ahead of time. Once they are fully decorated and set, store them in an airtight container in the refrigerator. This is a great way to get some of the holiday baking done before the big day arrives.
Turkey and Pumpkin Cake Pops
Make Thanksgiving dessert fun with these adorable Turkey and Pumpkin Cake Pops. They’re easy to make, festive, and perfect for getting kids involved in holiday baking.
Requirements


Ingredients
Instructions
- First things first, we need some cake. Grab your favorite box cake mix. I love using a simple vanilla or yellow cake mix because it’s a great neutral base for all the candy coating flavors. Of course, chocolate cake is also a fantastic choice, especially for the turkeys. Prepare and bake the cake mix exactly as the box tells you to for a 9×13 inch pan. Follow the ingredient amounts for eggs, water, and oil listed on your specific box. Once it’s baked and smelling wonderful, let the cake cool down completely. This is very important. A warm cake will just turn into a mushy mess when you add the frosting.
- Once your cake is totally cool, it’s time for the fun part. Break the cake up into small pieces and place them in a large mixing bowl. You can use your hands for this, it’s quite satisfying. You want to get it into a fine crumb consistency. Now, add your frosting. About a cup should do it. Start mixing it all together. I find using my hands is the best way to really combine everything. You’re looking for a thick, dough like consistency that holds together when you squeeze it. If it feels too dry, add a tiny bit more frosting. If it feels too wet, you might have to bake another small cake or some cupcakes to add to the mix.
- Take your cake dough and start rolling it into balls about 1 inch in size. Try to make them as uniform as possible so they all look cohesive. Place the finished balls onto a baking sheet lined with wax paper or parchment paper. This prevents them from sticking. Next, we need to get the sticks ready. Melt just a couple of tablespoons of the brown candy melts. Take a cake pop stick, dip one end into the melted candy, and then gently push the stick about halfway into a cake ball. The melted candy acts like glue, holding the stick in place. Repeat this for all the cake balls. Once they all have sticks, pop the baking sheet into the refrigerator for about an hour. You want them to be firm, but not frozen. This chilling step is key to making sure they hold their shape when you dip them later.
- Let’s start with the pumpkins, one of my favorite Thanksgiving themed desserts to make. Take your chilled cake pops. Gently press a toothpick into the sides of the cake pop, from top to bottom, to create those classic pumpkin grooves. Don’t press too hard, just enough to make an indent. Now, melt your orange candy melts. The best way to do this is in the microwave in 30 second intervals. Stir well after each interval until it’s completely smooth. This prevents the candy from scorching. Dip each pumpkin shaped cake pop into the orange candy, making sure to coat it evenly. Let any excess drip off. Place the dipped pops onto your wax paper or a cake pop stand to firm up. Once the orange coating is set, melt your green candy melts. You can use a piping bag or a small ziplock bag with the corner snipped off to pipe on some little green vines at the top. For a finishing touch, stick a mini chocolate chip on top for the stem. So cute!
- Now for the gobble gobble part. These are such fun Thanksgiving desserts. Melt your brown candy melts using the same 30 second interval method. Dip the remaining cake pops into the brown candy, coating them evenly. Let the excess drip off. Before the coating firms up completely, gently press two candy eyeballs onto the front of the cake pop. Let the coating set fully before moving on. Now for the feathers. Dip the wide end of a piece of candy corn into the remaining melted brown candy. Press it firmly onto the back of the cake pop. Hold it for about 30 seconds until the candy ‘glue’ sets. Repeat this two or three more times, fanning the candy corn out to create the turkey’s tail feathers. For the beak, use a toothpick and some of the leftover melted orange candy melts to draw a small triangle on the turkey’s face below the eyes. And there you have it, a whole flock of adorable turkey cake pops!
Notes
If you happen to have any of these little guys left over, storing them is simple. You can keep them at room temperature for a day or so if your house isn’t too warm. For longer storage, it’s best to place them in an airtight container and keep them in the refrigerator.
In the fridge, they will stay fresh for up to a week. Just be sure the container is sealed well to keep them from drying out or absorbing any other food odors. You can also freeze undecorated cake pops for up to a month. Just thaw them in the fridge before you decorate and serve them.
Here are a few extra pointers to make your cake pop adventure a total success. These tips will help you create the best fun Thanksgiving desserts with ease. First, remember that ingredients can vary slightly with different brands of cake mix, so you might need to adjust your frosting amount a little.
Always melt your candy coating and chocolate in the microwave in short bursts. Going too long can burn it, and there’s no coming back from that. Slow and steady wins the race here. Stirring between each interval is the key to a smooth, creamy consistency.
A big tip to prevent cracking: don’t over chill your cake pops. You want them firm, but not frozen solid. If the cake balls are too cold when you dip them in the warm candy coating, the temperature difference can cause the coating to crack as it sets. An hour in the fridge is usually plenty.
Let the candy coating dry before adding all the decorations. For the turkey eyeballs, you can add them when the coating is partially set so they stick well. If you don’t have a fancy piping bag for the pumpkin vines, no worries. A simple ziplock bag with a tiny corner snipped off works just as well for creating these Thanksgiving themed desserts.
If you’re short on time or just don’t feel like baking, you can absolutely use store bought cake or even unfrosted cupcakes. It’s a great shortcut. This recipe for unique Thanksgiving desserts is all about being adaptable and fun, not stressful. These are supposed to be thanksgiving desserts for kids and adults to enjoy making.
Nutrition
Calories
Sugar
Fat
Carbs