There is just something truly special about a homemade treat, isn’t there? Especially when it is a gorgeous mothers day cake baked with love. Forget those store bought options; today, we are diving into a recipe that is not only super simple but also incredibly rewarding. It is time to whip up a delightful cake that will make any mum feel cherished.
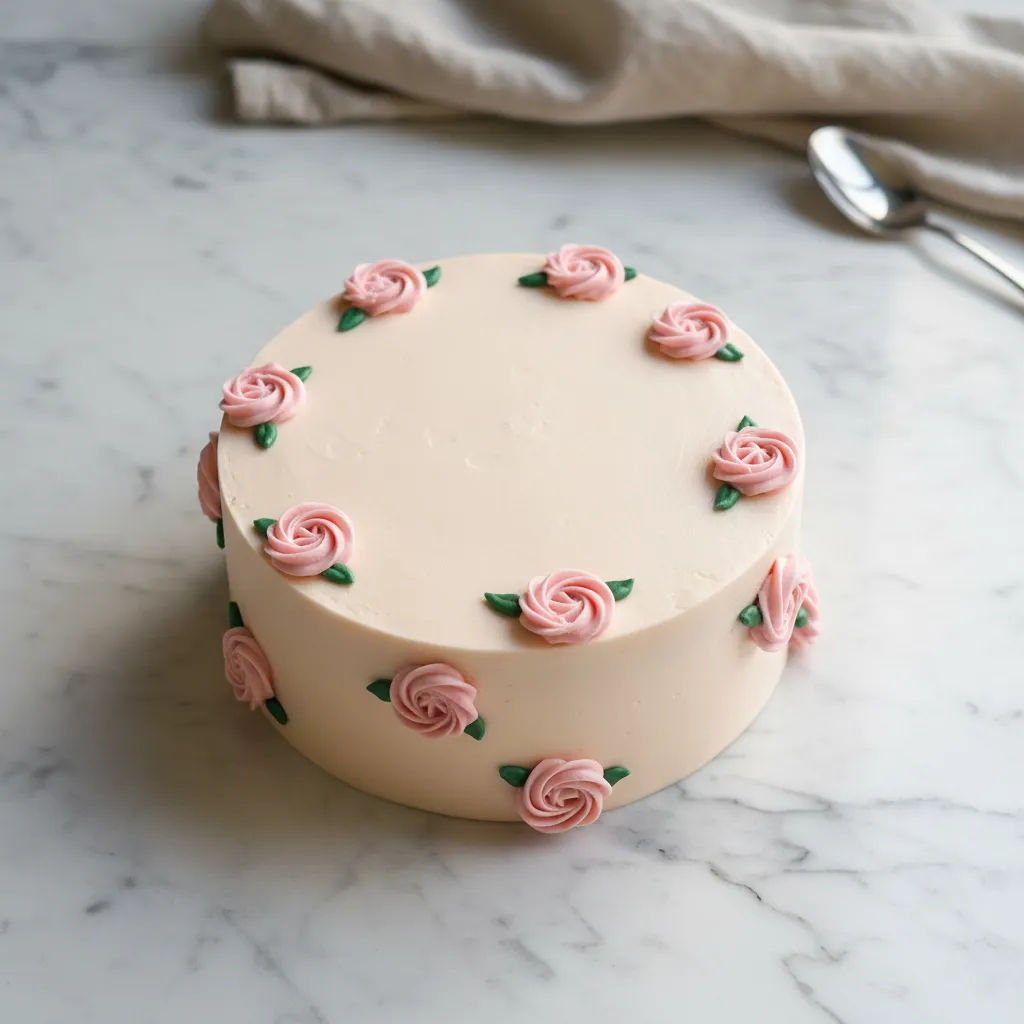
Whether you are celebrating Mother’s Day, planning a Birthday Cake For Mum, or just want to show appreciation, this recipe is your new best friend. We are talking about a beautiful, light pink cake adorned with pretty roses and green leaves. It is truly a showstopper, and guess what? You can totally do it, even if you are new to baking!
Jump To:
Why You’ll Love This Recipe
Okay, let us be real. We all want to impress our loved ones, but sometimes the thought of baking a fancy cake feels a bit daunting. That is where this amazing mothers day cake recipe swoops in to save the day! It is designed for home bakers, meaning no complicated techniques or expensive equipment are needed.
This cake is wonderfully moist, boasts a light, fluffy texture, and the frosting is just dreamy. Plus, it is completely customizable. Want to make a Birthday Cake For Mom that stands out? You have got it. Looking for Girly Birthday Cakes with a personal touch? This is your canvas.
One of the best parts is how straightforward the process is. From mixing the batter to the final touches of decoration, every step is easy to follow. You will be amazed at the professional looking results you can achieve right in your own kitchen. It truly is a no fuss way to create a memorable treat.
It is also a fantastic recipe if you are on a budget. Making a cake from scratch often costs less than buying one, and the joy of creating something beautiful yourself is priceless. You are not just baking a cake; you are crafting a moment, a memory, and a whole lot of love.
Ingredients
Gathering your ingredients is the first step to baking success. Make sure everything is at room temperature before you start. This really makes a difference in the final texture of your cake and frosting. Trust me on this one; it is a game changer for a truly comforting and tasty cake.
- 2 ½ cups all purpose flour
- 2 ¾ teaspoons baking powder
- 1 teaspoon salt
- 1 cup unsalted butter, softened
- 1 ½ cups granulated sugar
- 4 large eggs
- 1 tablespoon vanilla extract (for cake)
- 1 cup whole milk
- 1 ½ cups powdered sugar (for frosting)
- 1 teaspoon vanilla extract (for frosting)
- 1 3 teaspoons milk (for frosting)
- Pink food coloring
- Green food coloring
Step By Step Instructions
Alright, let us get baking! Follow these simple steps to create your magnificent mothers day cake. Remember, baking should be fun, so do not stress too much. Just enjoy the process!
Step 1: Prep Your Oven and Pans
First things first, preheat your oven to 350°F. Then, grease and flour two 9 inch round cake pans. This little step is crucial for ensuring your beautiful cakes do not stick. A quick spray with baking nonstick spray works wonders too!
Step 2: Whisk Dry Ingredients
In a medium sized bowl, whisk together the all purpose flour, baking powder, and salt. Give it a good mix to make sure everything is evenly distributed. This helps your cake rise beautifully and evenly.
Step 3: Cream Butter and Sugar
Now for the wet ingredients. In a large bowl, beat the softened butter and granulated sugar with an electric mixer. You want to beat it until it is light and fluffy, which usually takes about 5 minutes. This creaming process incorporates air, giving your cake a wonderfully tender crumb.
Step 4: Add Eggs and Vanilla
Add the eggs one at a time to the butter mixture, beating well after each addition. This ensures each egg is fully incorporated. Then, mix in the vanilla extract. That lovely aroma is already starting, isn’t it?
Step 5: Combine Wet and Dry
Gradually add the dry ingredients to the wet ingredients in two additions, alternating with the milk. Beat on low speed until everything is just combined. Be careful not to overmix; overmixing can lead to a tough cake, and we definitely do not want that!
Step 6: Bake Your Cakes
Pour the batter evenly into your prepared cake pans. Bake for 30 35 minutes, or until a wooden skewer inserted into the center comes out clean. Every oven is a little different, so keep an eye on them!
Step 7: Cool Down
Let the cakes cool in the pans for about 10 minutes. This helps them firm up a bit. Then, carefully invert them onto a wire rack to cool completely. Patience is key here; frosting a warm cake is a recipe for disaster!
Step 8: Make the Frosting
While your cakes are cooling, let us make that delicious frosting. Beat the softened butter in a medium bowl until it is creamy. Gradually add the powdered sugar, beating until well combined. It will look a bit thick at first.
Step 9: Perfect the Frosting Consistency
Beat in the vanilla extract and 1 teaspoon of milk. Add more milk, 1 teaspoon at a time, until the frosting reaches a pipeable consistency. You want it smooth and easy to work with, but not too runny.
Step 10: Color Your Frosting
To decorate, transfer a small amount of the white frosting to a separate bowl. This is for your inscription. Divide the remaining frosting into two bowls. Add a few drops of pink food coloring to one bowl and a drop of green food coloring to the other. Mix until you get the perfect hues. For a soft look, use just a tiny bit of pink.
Step 11: Frost the Cake
Once your cake is completely cool, frost the entire cake with your light pink or off white frosting. Do not worry about perfection; rustic charm is totally in! This forms your base for the beautiful decorations to come.
Step 12: Pipe the Roses
Using a piping bag fitted with a rose tip, pipe pink roses on the top and sides of the cake. If you are new to piping, practice on a piece of parchment paper first. It is all about gentle pressure and a steady hand. These roses really make it a Girly Birthday Cake!
Step 13: Add Green Leaves
Next, grab your piping bag with a leaf tip. Pipe green leaves next to the roses. These little green accents bring the whole floral design to life. It is like a tiny garden on your cake!
Step 14: Write Your Message
Finally, using a small round piping tip, write your desired message on top of the cake with the reserved white frosting. “Happy Mother’s Day,” “Love You, Mum,” or even a sweet term of endearment like “Mamie” (a lovely French word for Grandma) would be perfect. This is where your Simple Cake Designs truly shine!


How To Store Leftovers
Let us be honest, there might not be many leftovers when you make a cake this good! But if you do find yourself with a slice or two of this amazing mothers day cake, you will want to store it properly to keep it fresh and delicious.
The best way to store your frosted cake is in an airtight container at room temperature for up to 2 3 days. If your kitchen runs warm, or if it is a particularly humid day, popping it in the fridge is a good idea. Just remember to bring it back to room temperature before serving for the best flavor and texture. Nobody likes a cold, hard cake!
Tips
Making a show stopping mothers day cake is all about those little details. Here are a few extra tips to help you nail this recipe and make your baking experience even more enjoyable and successful.
Room Temperature Ingredients Are a Must: Seriously, this is not just a suggestion. Softened butter, eggs, and milk at room temperature emulsify better, creating a smoother batter and a more tender, even textured cake. Plan ahead and take them out of the fridge at least an hour before you start.
Do Not Overmix: When combining your wet and dry ingredients, mix just until they are combined. Overmixing develops the gluten in the flour too much, which can lead to a tough, dense cake. A light hand is your friend here.
Cool Cakes Completely: I know, I know, it is tempting to start frosting as soon as the cakes are out of the oven. But a warm cake will melt your frosting into a runny mess. Patience is a virtue, especially in baking!
Food Coloring Control: When adding food coloring, start with just a tiny drop and mix well. You can always add more to achieve a deeper shade, but you cannot take it away. For that lovely light pink, a very small amount is usually all you need. This is great for Simple Cake Designs.
Practice Your Piping: If you are new to piping, grab some parchment paper and practice your roses and leaves before you go for the actual cake. It helps build confidence and refine your technique. Even without fancy tools, you can create beautiful effects, making for Easy Cake Decorating.
Make Mini Cakes: This recipe is super versatile! To make Mini Cakes Birthday style or Small Birthday Cakes, you can use smaller cake pans or even a muffin tin for cupcakes. Just adjust the baking time accordingly; smaller cakes will bake much faster. Keep an eye on them!
Conclusion
And there you have it! A truly special, homemade mothers day cake that is sure to bring a smile to anyone’s face. Baking is more than just following a recipe; it is about creating joy, showing love, and making memories. This cake is a perfect embodiment of all those wonderful things.
Whether it is for Mother’s Day, a Mother Birthday Cake, or just because, the effort and love you put into this cake will truly shine through. So, roll up your sleeves, gather your ingredients, and get ready to bake something truly magical. Happy baking, friends!
FAQ
Can I make this a Birthday Cake For Mum?
Absolutely! This recipe is perfect for any celebration. Just change the inscription on top to “Happy Birthday, Mum” or “Happy Birthday, Mom” to make it a wonderful Birthday Cake For Mum.
What if I do not have piping bags for Easy Cake Decorating?
No worries! You can use a sturdy Ziploc bag. Just snip a tiny corner off for a small round tip, or cut a V shape for a basic leaf. For roses, you can spread frosting with an offset spatula for a rustic look. It is all about being creative with your Easy Cake Decorating.
Can I make Small Birthday Cakes with this recipe?
Yes, you definitely can! This recipe scales well. You could use 6 inch cake pans for smaller layers, or even bake cupcakes. Just remember to adjust your baking time accordingly. This is a great way to make Small Birthday Cakes or Mini Cakes Birthday style.
Is this recipe good for beginners?
Yes, it is fantastic for beginners! The instructions are clear and straightforward, and the decorating techniques are very forgiving. Even if your roses are not perfect, they will still look charming and homemade. It is a very rewarding recipe for those new to baking.
Can I use a different flavor for the cake?
Certainly! While vanilla is a classic, you could experiment. For instance, you could add a little lemon zest to the batter for a lemon infused cake, or even a touch of almond extract instead of some vanilla. If you are feeling adventurous, you could even try to adapt it into a Pastel De Naranja by adding orange zest and orange juice instead of milk.
Simple Mother’s Day Rose Cake
This tasty, no-fuss pink cake is perfect for celebrating Mom. It’s a simple, family-friendly recipe that yields a moist, fluffy cake decorated with beautiful frosting roses.
Requirements


Ingredients
Instructions
- Preheat oven to 350°F. Grease and flour two 9-inch round cake pans for a professional finish.
- In a medium bowl, whisk together the flour, baking powder, and salt.
- In a large bowl, beat softened butter and sugar with an electric mixer until light and fluffy (about 5 minutes).
- Add eggs one at a time, beating well, then stir in the vanilla extract.
- Gradually add dry ingredients alternating with milk, mixing until just combined. Do not overmix!
- Pour batter into pans and bake for 30-35 minutes until a skewer comes out clean.
- Cool in pans for 10 minutes, then transfer to a wire rack to cool completely.
- Beat butter for frosting, then add powdered sugar, vanilla, and milk until smooth and pipeable.
- Color portions of frosting pink and green for the floral decorations.
- Frost the cooled cake, then pipe pink roses and green leaves on top.
- Write your sweet message using a small round piping tip and enjoy!
Notes
Always use room temperature ingredients for a smoother batter and better cake texture.
Be careful not to overmix the batter after adding flour to keep the cake light and fluffy.
Ensure cakes are completely cool before frosting to prevent the butter from melting.
For a fun variation, use a muffin tin to make adorable mini birthday cakes or cupcakes.
Nutrition
Calories
Sugar
Fat
Carbs