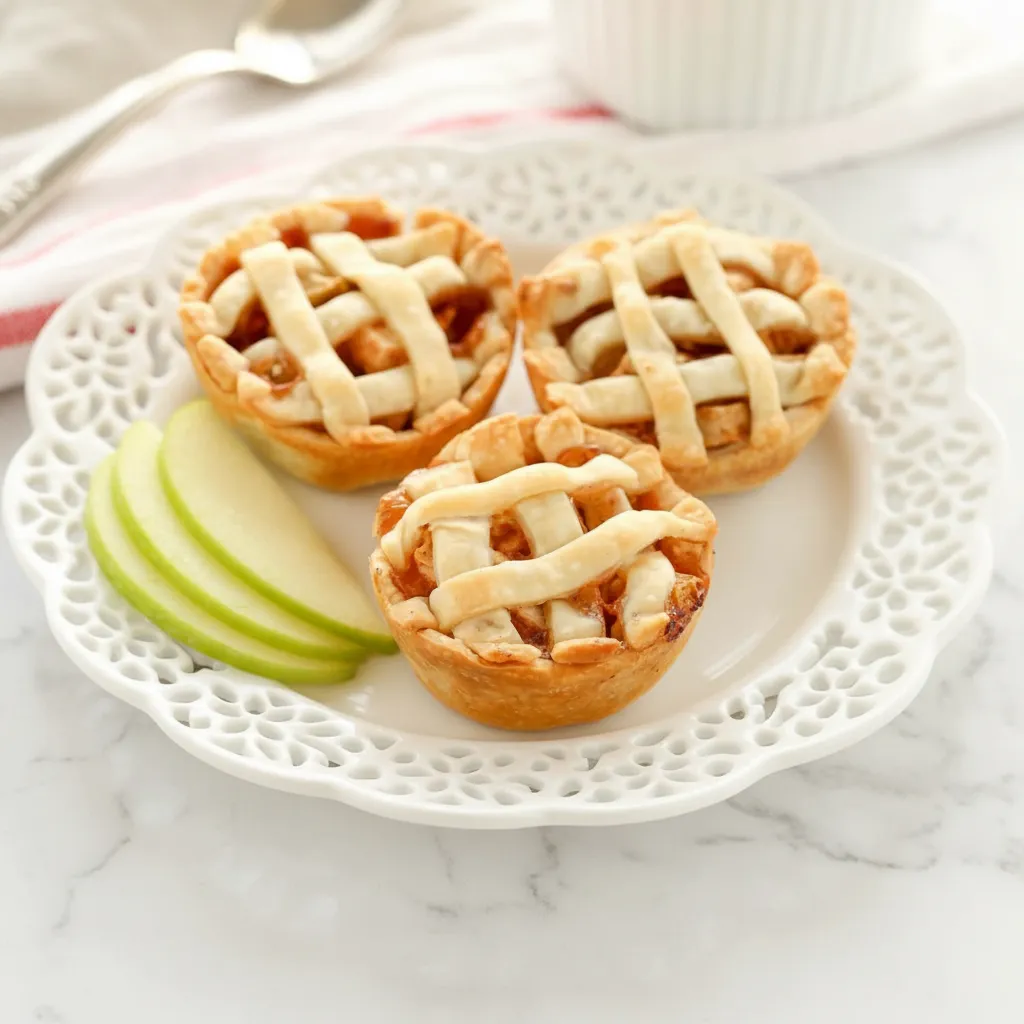
There is something remarkably comforting about the smell of warm apples and cinnamon filling the kitchen. It brings back memories of family gatherings and cozy afternoons. However, making a full sized pie can sometimes feel like a huge project. You have to worry about the bottom crust getting soggy or slicing it neatly. That is where these mini apple pies come in to save the day. They capture all that classic flavor in a manageable, hand held size.
If you are on the hunt for Easy Food Recipes that deliver big flavor without the stress, you have found a winner. These little pies are baked right in a muffin tin, making them incredibly simple to assemble. You do not need fancy equipment or advanced pastry skills to pull this off. It is just good, honest baking that results in a treat everyone will want to grab.
This recipe is great for beginners who want to try their hand at working with dough but feel intimidated by a standard nine inch pie. It is also fantastic for those who want portion controlled desserts. Honestly, having a whole tiny pie to yourself feels special. Whether you are planning a holiday dessert table or just want a sweet snack for the weekend, this recipe fits the bill perfectly.
Jump To:
Why You’ll Love This Recipe
You might be wondering why you should choose mini pies over a traditional one. First off, the crust to filling ratio is spot on. Every bite gives you that flaky, buttery crunch mixed with tender, spiced apples. It is a texture lover’s dream. Plus, they bake faster than a large pie, meaning you get to eat them sooner.
Another reason this is one of our favorite Easy Food Recipes is the versatility. You can serve them warm with ice cream or pack them in a lunchbox for a midday treat. They hold up remarkably well. If you often look for Easy Food Ideas to bring to potlucks or parties, these are a total hit because guests can just grab one without needing a fork and plate.
Finally, this recipe is budget friendly. You can use store bought crusts to save time, or use a homemade dough if you have staples like flour and butter on hand. It proves that Yummy Food Recipes do not need to be expensive or complicated. You get a bakery quality result right in your own kitchen.
Ingredients
To get started with one of the most delightful Easy Food Recipes, you need a few simple ingredients. Most of these are likely already in your pantry or fridge.
- 2 pie crusts (homemade or store bought works equally well)
- 2 ½ cups chopped apples (about 315 grams)
- ¼ cup granulated sugar (50 grams)
- 2 tablespoons all purpose flour (15 grams)
- 1 teaspoon ground cinnamon
- 1 teaspoon pure vanilla extract
- ⅛ teaspoon ground nutmeg
- 1 tablespoon unsalted butter (15 grams, optional but recommended)
When selecting apples, try to go for a mix of sweet and tart varieties. Granny Smith apples are sturdy and hold their shape, while Honeycrisp or Fuji apples add a lovely natural sweetness. Mixing them gives the filling a more complex flavor. If you only have one type on hand, that is totally fine too. That is the beauty of Easy Yummy Recipes; they are forgiving.
Step-By-Step Instructions
Making these pies is a fun process. It is a great activity to do with kids or friends because there are plenty of simple tasks to share. Here is how you bring this Easy Food Recipes candidate to life.
Step 1: Preheat and Prep
Start by preheating your oven to 425°F (220°C). A hot oven is crucial for pie crust because it helps the fat melt quickly, creating those flaky layers we all love. Make sure your oven rack is in the center position for even baking.
Step 2: Cut the Dough
Roll your pie crusts out on a lightly floured surface. You want them to be about 1/8 inch thick. Using a 3.5 inch cookie cutter, or even a wide mouth glass, cut out 12 circles. You might need to gather the scraps and reroll the dough gently to get all 12 circles. Try not to overwork the dough, as keeping it cool ensures a tender crust.
Step 3: Line the Muffin Tin
Take each dough circle and place it into a cavity of a standard 12 count muffin pan. Gently press the dough down into the bottom and up the sides. You want it to fit snugly without tearing. Once all the cavities are lined, place the entire muffin pan in the refrigerator. This step is vital. Chilling the dough prevents it from shrinking when it hits the hot oven.
Step 4: Mix the Filling
While the crust chills, grab a large mixing bowl. Combine your chopped apples, granulated sugar, flour, cinnamon, vanilla extract, and nutmeg. Toss everything together until the apples are evenly coated. The sugar will start to draw some juices out of the apples, which mixes with the flour to create a thick, delicious sauce.
Step 5: Fill the Pies
Retrieve your muffin pan from the fridge. Evenly distribute the apple mixture among the 12 crusts. It usually comes out to about 3 tablespoons of filling per pie. Mound them slightly in the center, as the apples will cook down a bit in the oven.
Step 6: Add Butter
Dice the tablespoon of butter into 12 tiny pieces. Place one small piece on top of the apple filling in each pie. As it melts, it adds a rich, buttery flavor that makes the filling incredibly luxurious. It is a small step that makes a big difference in Tasty Recipes Videos you might see online.
Step 7: Add the Tops
Use the remaining pie dough to create tops for your mini pies. You can cut out full circles, use small cookie cutters for fun shapes like hearts or stars, or cut strips to make a mini lattice. Place your chosen top over the filling. If you use a full circle, make sure to cut a small slit for steam to escape.
Step 8: Bake and Cool
Bake the pies for 18 to 23 minutes. You are looking for the crust to turn a light golden brown and for the filling to bubble visibly. Once done, remove them from the oven. Let them cool in the pan for about 10 to 15 minutes. This resting period helps the crust firm up so they do not crumble when you take them out. Transfer them to a wire rack to finish cooling.


How To Store Leftovers
One of the best things about these mini pies is how well they store. If you have leftovers, you can keep them in the refrigerator for up to 5 days. Just make sure they are in an airtight container so the crust does not absorb weird fridge smells.
To reheat, simply pop one in the microwave for about 20 to 30 seconds. If you want to crisp the crust back up, you can warm them in a toaster oven or regular oven at 300°F until heated through. They taste almost as good as fresh.
For longer storage, these freeze beautifully. Wrap each pie tightly in plastic wrap and place them in a freezer safe bag or container. They will stay good for up to 3 months. When you are ready to eat, thaw them overnight in the fridge or on the counter for a few hours. This makes them one of the most convenient Easy Food Recipes for meal prepping desserts.
Tips
Here are a few pointers to ensure your mini pies turn out amazing every single time.
- Greasing the Pan: Pie crust contains a good amount of fat, so it usually does not stick. However, if you are using an older pan or just want to be safe, feel free to use a little nonstick spray or butter on the muffin tin before adding the dough.
- Topless Option: You can skip the top crust entirely to make this even simpler. It becomes an open faced tart. If you do this, I highly recommend serving it with a drizzle of salted caramel sauce. It turns it into one of those fancy looking Easy Food Ideas.
- Watch the Browning: If the tops of your pies are getting dark before the 18 minutes are up, loosely cover the pan with a sheet of aluminum foil. This protects the crust while allowing the apples to finish cooking.
- Egg Wash: I usually skip the egg wash for these to keep it quick. But if you want a shiny, golden finish, whisk one egg with a tablespoon of milk and brush it gently over the top crusts before baking.
- Dice Size: Make sure you chop your apples into small, uniform pieces. Since the pies are small, large chunks of apple will make it hard to fill the cups properly and might not cook through in time.
Conclusion
These Mini Apple Pies are a testament to the fact that baking does not have to be a headache. They are fun, manageable, and absolutely delicious. By using a muffin tin, you eliminate the stress of forming a large pie while still getting all the glory of a homemade dessert. It is recipes like this that truly define what Easy Food Recipes should be: accessible, reliable, and satisfying.
Whether you are a seasoned baker looking for a quick fix or a complete novice wanting to impress your family, this recipe is for you. The combination of warm spices, tender apples, and flaky crust is timeless. You might even find yourself making these more often than the traditional version simply because they are so easy to serve and eat.
So, grab some apples and preheat that oven. You are about to make a dessert that will likely become a staple in your home. If you enjoy watching cooking tutorials, you have probably seen similar concepts in Tasty Recipes Videos, but nothing beats making it yourself. Enjoy the process and the delicious results!
FAQ
We know that even with the simplest Easy Food Recipes, questions can pop up. Here are some answers to common queries about these mini pies.
Can I Make This Gluten Free?
Yes, you absolutely can. Simply swap the regular pie crust for a certified gluten free brand or homemade gluten free dough. Also, ensure your all purpose flour in the filling is replaced with a gluten free 1:1 baking flour blend. The apples and spices are naturally safe.
Do I Need To Blind Bake The Crust?
No, you do not need to blind bake the crust for this recipe. Since the filling and the crust cook for the same amount of time and the pieces are small, the bottom crust cooks through perfectly without pre baking. This is one reason why this is one of our favorite Easy Food Ideas.
Can I Use Other Fruits?
Definitely. This method works well with pears, peaches, or even berries. If you use berries, you might want to increase the flour slightly as they tend to release more juice than apples. It is a flexible template for all kinds of Easy Yummy Recipes.
Can I Use Canned Apple Pie Filling?
If you are really short on time, canned filling can work. However, canned filling is often very sweet and soft. You might want to chop the apple pieces in the can smaller so they fit into the muffin cups better. Homemade filling offers better texture, but canned is a valid shortcut for ultra fast Easy Food Recipes.
Why Is My Filling Runny?
If your filling is runny, it might be because the apples released a lot of juice that did not thicken. Make sure you measure your flour correctly. Also, letting the pies cool completely helps the filling set. If you cut into them while they are piping hot, the juices will run out.
Mini Apple Pies
Enjoy these mini apple pies, a comforting classic dessert in a convenient handheld size. Baked in a muffin tin, they are easy to assemble and perfect for any occasion, offering a delightful flaky crust and tender, spiced apple filling.
Requirements


Ingredients
Instructions
- Preheat your oven to 425°F (220°C). Position oven rack in the center.
- Roll pie crusts out on a lightly floured surface to about 1/8 inch thick. Using a 3.5 inch cookie cutter, cut out 12 circles. Gently reroll scraps if needed.
- Place each dough circle into a cavity of a standard 12 count muffin pan. Gently press the dough down into the bottom and up the sides. Chill the entire muffin pan in the refrigerator.
- While the crust chills, combine chopped apples, granulated sugar, flour, cinnamon, pure vanilla extract, and nutmeg in a large mixing bowl. Toss until apples are evenly coated.
- Retrieve your muffin pan. Evenly distribute the apple mixture among the 12 crusts (about 3 tablespoons per pie). Mound them slightly in the center.
- Dice the tablespoon of butter into 12 tiny pieces. Place one small piece on top of the apple filling in each pie.
- Use the remaining pie dough to create tops for your mini pies. You can cut out full circles, use small cookie cutters for fun shapes, or cut strips for a mini lattice. If using full circles, cut a small slit for steam to escape.
- Bake for 18 to 23 minutes, until the crust is golden brown and the filling bubbles. Remove from oven and cool in the pan for 10 to 15 minutes before transferring to a wire rack to finish cooling.
Notes
Pie crust usually doesn’t stick, but for extra safety or with an older pan, lightly grease the muffin tin before adding dough.
For an open-faced tart, skip the top crust entirely. Consider serving with a drizzle of salted caramel sauce.
If pie tops brown too quickly, loosely cover the pan with a sheet of aluminum foil to protect the crust while apples finish cooking.
For a shiny, golden finish, whisk one egg with a tablespoon of milk and gently brush over the top crusts before baking.
Chop apples into small, uniform pieces for even filling and consistent cooking in the small pie cups.
Nutrition
Calories
Sugar
Fat
Carbs