Halloween is just around the corner, and you know what that means. It is time for spooky movies, creative costumes, and of course, festive food. If you are hosting a party or just want a fun snack for the family, I have something special for you.
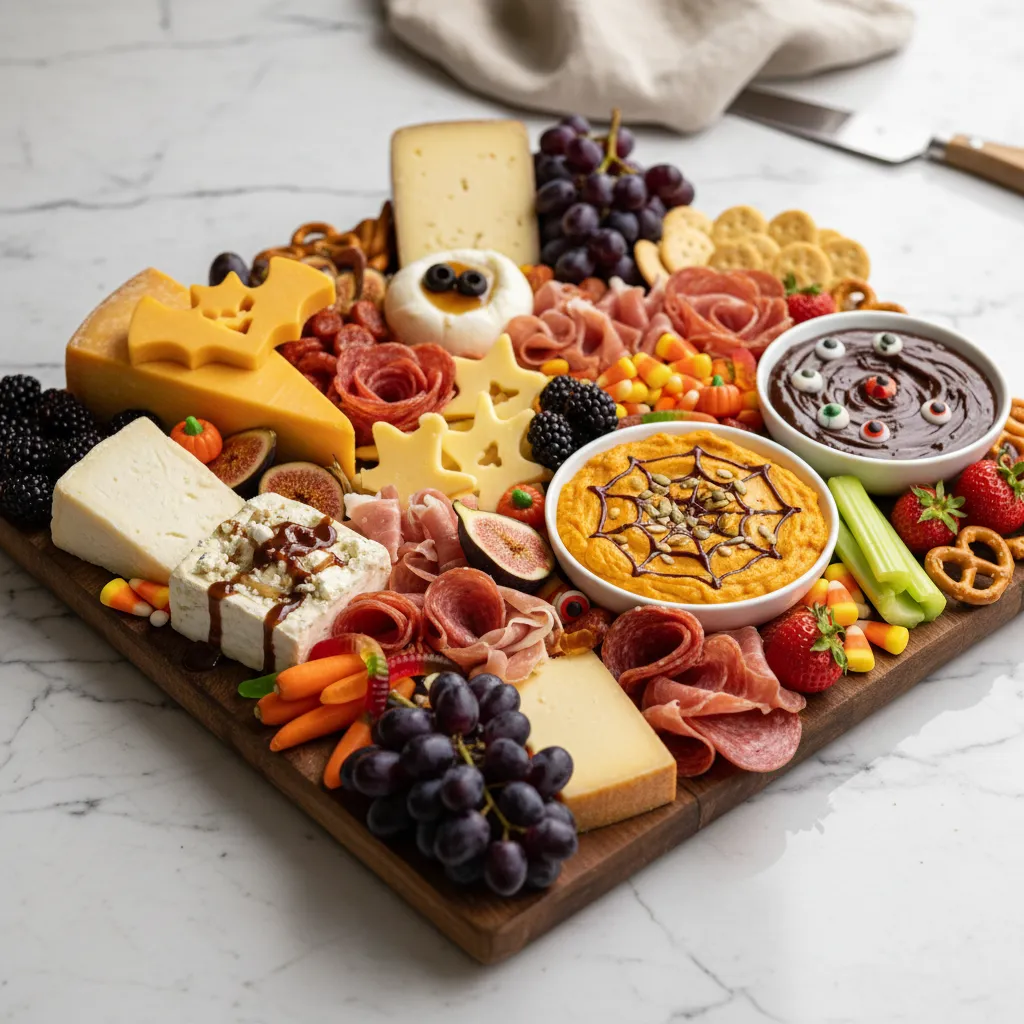
Forget complicated recipes that keep you in the kitchen for hours. We are talking about a beautiful, delicious, and incredibly easy Halloween Charcuterie Board. It is a total showstopper that requires zero cooking. Just some fun assembly!
Jump To:
Why You’ll Love This Recipe
Honestly, what’s not to love about a giant platter of snacks? This Halloween Food Board is a winner for so many reasons. First off, it is endlessly customizable. You can swap ingredients based on what you love or what you find at the store.
It is also a fantastic project for beginners. There is no right or wrong way to build a charcuterie board. The whole point is to have fun with it. Let your creativity run wild and create your own edible masterpiece.
This board is also a visual centerpiece. The vibrant colors of the fruits, the deep reds of the meats, and the fun shapes of Halloween candies make it a feast for the eyes. Your guests will be snapping pictures before they even take a bite.
Plus, it caters to everyone. With a mix of savory, sweet, crunchy, and creamy, there is a little something for every palate. It takes the guesswork out of party planning. It’s a full spread all on one board.
Making a Spooky Charcuterie Board is also a great activity to do with kids. They will have a blast arranging the ghost shaped potato snacks and sneaking a few gummies along the way. It’s a wonderful way to make memories together.
Ingredients
The key to a great charcuterie board is variety. You want a mix of flavors, textures, and colors. Here is what we are using for our festive creation. Feel free to use this as a starting point and make it your own.
The Cheeses
Cheese is the heart of any good board. For our Halloween Cheese Board, we are using a mix of hard and soft cheeses with some seasonal flair.
- Autumn Chimay: A flavorful cheese that pairs well with fruits.
- White Stilton with Apricots: The bits of apricot add a lovely sweetness and color.
- Creamy Toscano: Cubed for easy grabbing, it is a nice, crowd pleasing cheese.
The Dips
Dips provide a creamy element and are great for filling small bowls to anchor your board. They add another layer of flavor for dipping crackers and veggies.
- Spicy Hummus: The orange color fits the Halloween theme, and the spice is a nice touch.
- Chocolate Almond Spread: A sweet dip for fruits and pretzels. You could also use Nutella.
Savory Meats
Cured meats bring a salty, savory balance to the sweetness of the fruits and candies. They also add a wonderful texture.
- Beef Salame Secchi: Sliced thin, it has a rich and robust flavor.
- Turkey Calabrese Salami: This one is great for folding into fun shapes to fill in gaps on the board.
Crackers And Carbs
You need vehicles for all those cheeses and dips. A good mix of crackers and other crunchy items is essential for a satisfying charcuterie board.
- Seed Sweet Potato Crackers: Their orange color is very festive for Halloween.
- Ghost & Bat Potato Snacks: These are a must for a Spooky Charcuterie Board.
- Baked Cheese Crunchies: Because you can never have too much cheese.
- Pretzel Sticks: Great for dipping into the chocolate spread.
- Candy Corn Popcorn: A sweet and salty treat that screams Halloween.
Fresh Produce
Fresh fruit and veggies add brightness, color, and a healthy touch. They cut through the richness of the cheeses and meats beautifully.
- Les Petits Carrots of Many Colors: We are just using the orange and purple ones to stick with the theme.
- Thomcord Grapes: Their dark color adds a spooky vibe.
- Strawberries, Blackberries, and Raspberries: Berries add beautiful color and freshness.
Spooky Sweets And Treats
This is where the Halloween theme really comes to life. A little bit of candy makes the board extra fun and festive for everyone.
- Halloween Gummies: Think gummy worms, bats, or pumpkins.
- Peanut Butter Cups: A classic treat that everyone loves.
- Dried Orange Slices: These look like little wheels and add a nice chewy texture.
- Chocolate Mousse Pumpkins: A cute and delicious decorative element.
Step By Step Instructions
Assembling your Halloween Charcuterie Board is the best part. Think of yourself as an artist and the board as your canvas. Let’s get started.
Step 1: Anchor Your Board
First things first, grab your board. Any large cutting board, platter, or even a clean baking sheet will work. Now, find some small bowls for your dips and any loose items like the popcorn.
Fill your bowls with the spicy hummus and chocolate almond spread. Place them on the board. Scatter them a bit so they are not all clumped together. I like to place one near the center and others toward the corners. These bowls act as anchors and create structure.
If you have a decorative item, like the chocolate mousse pumpkin, place it on the board now as well. This gives you a great starting point to build around.
Step 2: Place The Cheeses
Next up is the cheese. The cheeses are the next biggest items, so you want to give them plenty of space. Place your chunks of Autumn Chimay and White Stilton with Apricots around the board.
Then, add your cubed Creamy Toscano. You can group the cubes in a pile or scatter them in a few different spots. Try to space the cheeses out evenly so that no matter where someone reaches from, a good cheese is nearby.
Step 3: Arrange Snacks And Berries
Now it is time to start filling in the larger empty spaces. Create piles and rivers of your snacks and berries. Arrange the ghost shaped potato snacks near the hummus for easy dipping. Do the same with the carrots.
Place handfuls of berries and pretzels near the chocolate dip. This is a key part of building a user friendly charcuterie board. You want to place items that taste good together close to one another. Think about creating little flavor stations.
Fan out your crackers in a few spots. This makes them easy to grab and looks really nice. Don’t be afraid to let things overlap and touch. A full board looks abundant and inviting.
Step 4: Fill In The Gaps
Look at your board. You will likely have some small empty spaces left. This is where the smaller items come in. Tuck the folded salami into any little nooks and crannies. You can fold the slices in half and then in half again to create a ruffled look.
Fill any remaining spots with your Halloween gummies, peanut butter cups, and blackberries. These small items are great for making the board look incredibly full.
Finally, arrange the dried orange slices along the edge of the board for a beautiful finish. And there you have it. A stunning and delicious Halloween Charcuterie Board ready for its debut.


How To Store Leftovers
If you somehow have leftovers, storing them properly is key. The different components need to be stored separately to maintain their freshness. It only takes a few minutes and is well worth the effort.
First, remove all the crackers, pretzels, and popcorn. These will get soggy if stored with moist items. Place them in an airtight container or a zip top bag at room temperature. They should stay crisp for a few days.
Next, wrap each cheese separately in wax paper or parchment paper, then place them in a container in the fridge. The meats can be stored in a separate airtight container in the refrigerator as well.
The fresh fruit and veggies should go into their own containers in the fridge. The dips can be covered with plastic wrap or transferred to airtight containers. This way, you can enjoy a mini Halloween Cheese Board the next day.
Tips
Want to make your Halloween Food Board even better? Here are a few extra tips and tricks I have learned over the years. They can help you with planning and execution.
Choose the right board. A large wooden board is classic, but a dark slate board can look extra spooky for Halloween. If you do not have one, a large tray or even a clean baking sheet lined with parchment paper works great.
Add some non edible decorations. A few plastic spiders or a small skull tucked among the snacks can really enhance the spooky theme. Just make sure your guests know they are not for eating.
Think about height. Using small bowls or even a small cake stand for one of the items can add dimension to your board and make it look more dynamic and interesting.
Prep ahead of time. You can wash and cut your fruits and veggies a day in advance. You can also portion out your dips into their bowls. This saves you a lot of time on the day of your party. All you have to do is assemble.
Don’t overthink it. The charm of a charcuterie board is its rustic, slightly messy look. There is no need for everything to be perfectly lined up. Just have fun with it and trust your creative instincts.
Conclusion
And there you have it. Everything you need to know to create a fantastic Halloween Charcuterie Board. It is such a fun and stress free way to feed a crowd and add a festive touch to your celebration.
Remember, this recipe is just a guide. The best part about making a Spooky Charcuterie Board is that you can make it completely your own. So head to the store, grab your favorite spooky snacks, and get creative.
I hope you have as much fun making and eating this board as I do. Happy Halloween!
FAQ
What Size Board Should I Use?
The size of the board depends on how many people you are serving. For a small group of 4 to 6 people, a 10 by 14 inch board is usually sufficient. For a larger party, you will want to go bigger, or you can even create multiple smaller boards.
Can I Make This Halloween Cheese Board Ahead Of Time?
You can do most of the prep work ahead of time, like washing produce and portioning dips. However, it is best to assemble the board right before serving to keep everything fresh, especially the crackers. You can assemble it up to an hour before guests arrive.
Are There Any Nut Free Options?
Absolutely. To make this board nut free, simply swap the chocolate almond spread for a seed butter based chocolate spread. Also, be sure to omit the peanut butter cups and check the labels of your other packaged snacks to ensure they are free from nuts.
How Do I Make The Salami Look Like A Flower?
A salami rose is easier than it looks. You can create one by layering slices of salami around the rim of a small wine glass, overlapping as you go. Continue layering towards the center. Once full, flip the glass over onto the board, and you will have a beautiful meat rose.
Where Can I Find Halloween Themed Snacks?
Most grocery stores have a seasonal aisle that is full of Halloween themed snacks and candies starting in September. You can find things like ghost shaped chips, gummy worms, and candy corn. Party stores are also a great place to look for unique spooky treats.
Easy Halloween Charcuterie Board
This festive Halloween Charcuterie Board is a show-stopping appetizer that requires no cooking. It’s a fun, customizable platter filled with a tasty mix of savory meats, cheeses, sweet treats, and spooky-themed snacks perfect for any gathering.
Requirements


Ingredients
Instructions
- Anchor your board by placing small bowls of dips (spicy hummus, chocolate almond spread) and any large decorative items like a chocolate mousse pumpkin onto your platter first.
- Arrange the cheeses. Place the Autumn Chimay, White Stilton, and cubed Creamy Toscano around the board, spacing them out evenly.
- Fill in the larger spaces. Create piles and flowing ‘rivers’ of snacks and berries. Place crackers, carrots, and ghost-shaped snacks near the dips. Fan out crackers for easy grabbing.
- Fill in all remaining gaps. Tuck folded salami, Halloween gummies, peanut butter cups, and blackberries into any small empty spaces to make the board look full and abundant. Arrange dried orange slices along the edges as a final touch.
Notes
Choose the right board. A large wooden board is classic, but a dark slate board can look extra spooky for Halloween.
Add some non-edible decorations like plastic spiders to enhance the theme. Just ensure guests know they aren’t for eating!
Use small bowls or a cake stand to add height and dimension to your board, making it look more dynamic.
You can prep ahead by washing and cutting fruits and veggies, and portioning dips into bowls to save time on party day.
Nutrition
Calories
Sugar
Fat
Carbs