The holiday season is here, and my kitchen is already filled with the sweet smell of baking. Or in this case, the sweet smell of melting chocolate! It is a busy time of year for everyone. Sometimes you just need a recipe that is both delicious and straightforward.
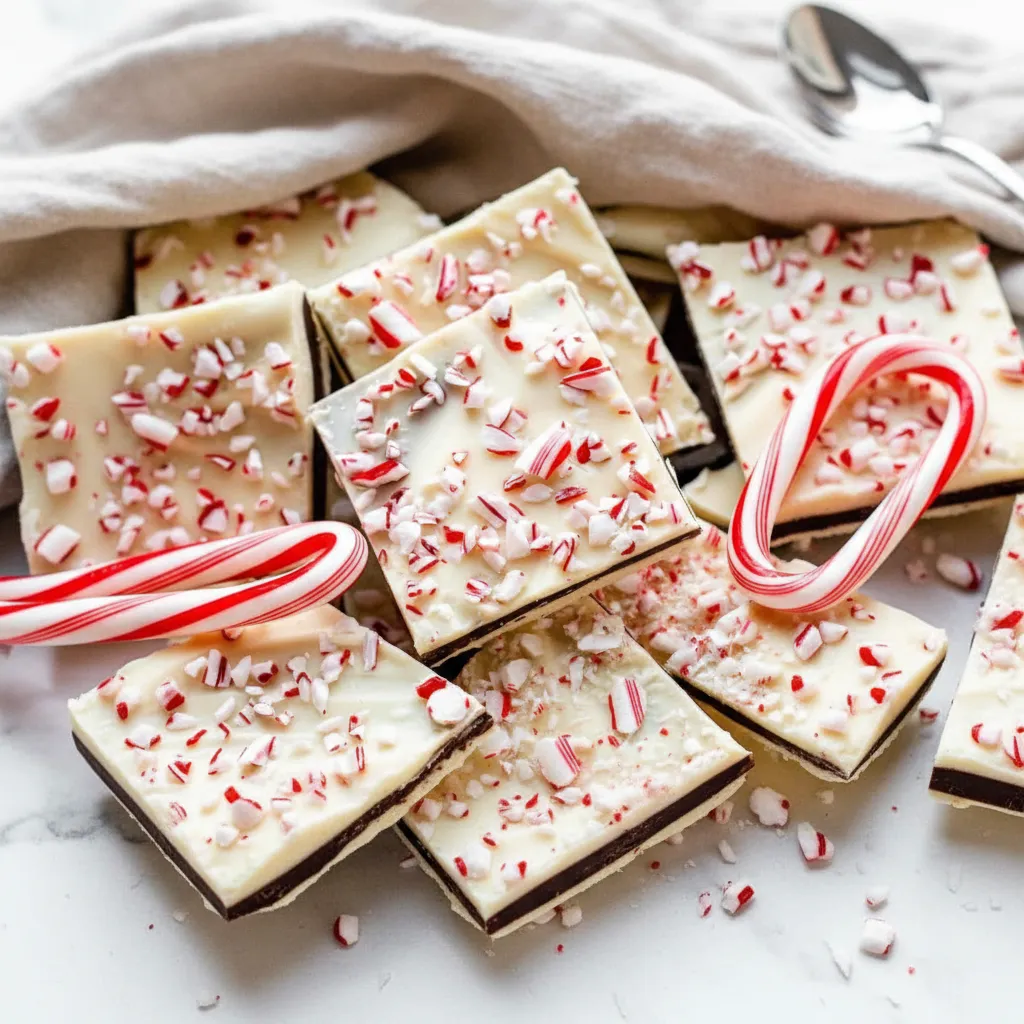
That is where this amazing peppermint bark comes in. It is one of my favorite Easy Christmas Sweets to make. It looks so impressive with its clean layers, but honestly, it is incredibly simple to put together. You do not even need to turn on your oven. Let’s get started!
Jump To:
Why You’ll Love This Recipe
First off, this recipe is a lifesaver during the holidays. It’s one of those no bake Quick Christmas Desserts that saves you so much time. You get all the festive cheer without spending hours in the kitchen. It’s a win win.
The visual appeal is a huge plus. The layers of dark and white chocolate topped with crushed candy canes look so professional. People will think you bought it from a fancy candy shop. It makes for a beautiful addition to any dessert platter.
It also makes a wonderful homemade gift. Pack it in a clear bag with a pretty ribbon, and you have a thoughtful present. It is one of the most versatile Christmas Sweet Snacks you can make for sharing with friends, family, and neighbors.
And let’s talk about the flavor. The combination of rich semi sweet chocolate, creamy white chocolate, and cool peppermint is a classic for a reason. It just tastes like Christmas. This is truly one of the best Simple Christmas Treats for a reason.
Finally, it is a fun activity. You can get the kids involved in crushing the candy canes or spreading the chocolate. Making memories in the kitchen is what the season is all about. These are truly Easy Christmas Sweets for the whole family.
Ingredients
The ingredient list for this is short and sweet, which is just what you want for Easy Christmas Sweets. The key is to use good quality chocolate. It really makes a difference in the final taste and texture of your bark.
You can find good chocolate bars or wafers in the baking aisle of most grocery stores. I recommend using chocolate you would enjoy eating on its own. Now, here is what you will need for these fantastic Christmas Sweet Snacks.
- 12 ounces (339g) white chocolate, coarsely chopped and divided
- 6 ounces (170g) semi sweet or bittersweet chocolate, coarsely chopped
- 1 and 1/2 teaspoons vegetable oil or coconut oil, divided
- 1/2 teaspoon peppermint extract, divided
- 2–3 regular size candy canes (24–36g total), crushed
Step-By-Step Instructions
Ready to make some magic? Following these steps will give you beautiful, distinct layers. The trick is to work at a steady pace and not let the layers set completely before adding the next one. This helps them stick together perfectly.
Step 1: Prepare Your Pan
First, get your pan ready. An 8 inch or 9 inch square pan works well. You can also use a baking sheet if you prefer a thinner bark. Line it with parchment paper or aluminum foil. Make sure to smooth out the wrinkles.
Let the parchment hang over the sides a little. This will create little handles that make it much easier to lift the finished bark out of the pan later. Set your prepared pan aside for now.
Step 2: Melt The First White Chocolate Layer
Now for the fun part, melting chocolate. We will start with the bottom layer. Place 6 ounces of your white chocolate in a heatproof bowl. Add 1/2 teaspoon of oil. The oil helps make the chocolate smooth and shiny.
The easiest way to melt it is in the microwave. Heat it in 20 second bursts. Stir really well with a spatula after each one. It is important not to overheat white chocolate, as it can get clumpy. Patience is key here.
Once it is completely smooth, stir in 1/4 teaspoon of peppermint extract. Pour this mixture into your prepared pan. Use an offset spatula or the back of a spoon to spread it into a thin, even layer. Your first step to amazing Easy Christmas Sweets is done.
Pop the pan in the refrigerator for about 10 to 15 minutes. You want it to be almost set, but still a little tacky. This helps the next layer adhere without melting into the first one.
Step 3: Add The Semi Sweet Chocolate Layer
Next up is the middle layer. Take your 6 ounces of semi sweet chocolate and place it in another heatproof bowl. Add the next 1/2 teaspoon of oil to it. Just like before, we are going to melt it carefully.
Use the same microwave method. Heat in 20 second increments and stir vigorously each time until it is totally melted and glossy. Darker chocolate is a bit more forgiving than white chocolate, but you still want to be careful.
Once melted, stir in the remaining 1/4 teaspoon of peppermint extract. Take your pan out of the fridge. Pour this rich, dark chocolate over the chilled white chocolate layer. Gently spread it into an even layer.
Back into the refrigerator it goes. Give it another 10 to 15 minutes to set up. Remember, you are looking for almost set, not rock solid. This recipe is a great example of how Quick Christmas Desserts can look so elegant.
Step 4: Finish With The Top White Chocolate Layer
We are on the home stretch. It is time for the final layer. Take the remaining 6 ounces of white chocolate and the last 1/2 teaspoon of oil. Melt them together just like you did for the first layer.
Once your white chocolate is smooth, pour it over the semi sweet layer. This top layer will not have any peppermint extract in it. This allows the candy cane flavor on top to really shine through.
Spread it out evenly. Now, while it is still wet, sprinkle your crushed candy canes all over the top. You can crush them by placing them in a sealed bag and gently rolling over them with a rolling pin.
Step 5: Chill And Break
Now for the final chill. Place the pan back in the refrigerator for about an hour, or until the bark is completely firm. This is the hardest part, waiting for these Simple Christmas Treats to be ready.
Once it is solid, use the parchment paper handles to lift the whole block out of the pan. Peel away the paper. Now you can break it into pieces. You can make them as large or as small as you like.
A little tip. If the bark has been chilling for a long time, let it sit at room temperature for 10 minutes before breaking. This helps prevent the layers from separating. And there you have it, gorgeous homemade peppermint bark.


How To Store Leftovers
If you somehow have leftovers, storing them is easy. Place the bark pieces in an airtight container. Keep it in the refrigerator for the best results. It will stay fresh and delicious for up to three weeks this way.
You can also leave it at room temperature for a few days, but only if your house is cool. If it gets too warm, the chocolate will soften. Storing it properly keeps these Christmas Sweet Snacks perfect for enjoying later.
Tips
Want to make your peppermint bark even better? Here are a few little pointers. When melting chocolate, make sure your bowl and utensils are completely dry. Even a tiny drop of water can cause the chocolate to seize up and become grainy.
Feel free to get creative with the toppings. While crushed candy canes are classic, you could also add some festive sprinkles, a drizzle of a different colored chocolate, or even some finely chopped nuts for extra crunch.
For a different look, you can create swirls instead of layers. After pouring the chocolate layers, gently drag a skewer or toothpick through them to create a marbled effect. It is another way to make your Easy Christmas Sweets look unique.
If you do not have an offset spatula, the back of a regular spoon works just fine for spreading the chocolate. The goal is just to get a reasonably even layer. Do not stress about it being completely flat. The rustic look is part of its charm.
Conclusion
And there you have it. A beautiful, festive, and incredibly tasty treat that is surprisingly easy to make. This peppermint bark is proof that you do not need complicated recipes to create wonderful holiday memories in the kitchen.
It is one of the most rewarding Easy Christmas Sweets to make, perfect for parties, gifts, or just a cozy night in. I hope you and your loved ones enjoy this delightful recipe as much as my family does. Happy holidays and happy treat making!
FAQ
Can I Use Different Types Of Chocolate?
Absolutely. You can easily swap the semi sweet chocolate for milk chocolate if you prefer a sweeter bark. You could also use all dark chocolate or all white chocolate if you like. The method stays the same, so feel free to experiment.
What If I Don’t Have A Microwave?
No problem at all. A double boiler works wonderfully. If you do not have one, you can create your own. Simply place your heatproof bowl of chocolate over a small pot of barely simmering water. Make sure the bottom of the bowl does not touch the water.
Why Did My Chocolate Layers Separate?
This usually happens for two reasons. The layers may have been chilled for too long in between, causing them to set too firmly. Or, the bark was too cold when you broke it apart. Letting it warm up a bit at room temperature first really helps.
Can I Add Other Toppings?
For sure! This is a great base for many Quick Christmas Desserts. Try adding festive sprinkles, chopped pistachios for color, or a sprinkle of sea salt on the dark chocolate layer. The possibilities are endless, so have fun with it.
Easy Peppermint Bark
A delicious and straightforward no-bake peppermint bark recipe perfect for the holidays. With layers of dark and white chocolate topped with crushed candy canes, it looks impressive yet is incredibly simple to make.
Requirements


Ingredients
Instructions
- Prepare Your Pan: Line an 8 or 9-inch square pan or baking sheet with parchment paper, leaving an overhang for handles.
- Melt The First White Chocolate Layer: In a heatproof bowl, melt 6 ounces of white chocolate with 1/2 teaspoon of oil in 20-second microwave bursts, stirring until smooth. Stir in 1/4 teaspoon peppermint extract. Pour into the prepared pan and spread evenly. Refrigerate for 10-15 minutes until almost set but still tacky.
- Add The Semi Sweet Chocolate Layer: In another heatproof bowl, melt 6 ounces of semi sweet chocolate with 1/2 teaspoon of oil using the same microwave method until smooth and glossy. Stir in the remaining 1/4 teaspoon peppermint extract. Pour over the chilled white chocolate layer and spread evenly. Refrigerate for another 10-15 minutes until almost set.
- Finish With The Top White Chocolate Layer: Melt the remaining 6 ounces of white chocolate with the last 1/2 teaspoon of oil until smooth. Pour over the semi sweet layer and spread evenly. While still wet, sprinkle crushed candy canes over the top. You can crush them by placing them in a sealed bag and gently rolling over them with an adjustable rolling pin.
- Chill And Break: Refrigerate for about an hour, or until completely firm. Use the parchment paper handles to lift the bark out of the pan. Peel away the paper and break into pieces. If too cold, let it sit at room temperature for 10 minutes before breaking.
Notes
When melting chocolate, ensure your bowl and utensils are completely dry. Even a tiny drop of water can cause the chocolate to seize up and become grainy.
Feel free to get creative with the toppings. While crushed candy canes are classic, you could also add some festive sprinkles, a drizzle of a different colored chocolate, or even some finely chopped nuts for extra crunch.
For a different look, you can create swirls instead of layers. After pouring the chocolate layers, gently drag a skewer or toothpick through them to create a marbled effect. It is another way to make your easy Christmas sweets look unique.
If you do not have an offset spatula, the back of a regular spoon works just fine for spreading the chocolate. The goal is just to get a reasonably even layer. Do not stress about it being completely flat. The rustic look is part of its charm.
If you somehow have leftovers, storing them is easy. Place the bark pieces in an airtight container. Keep it in the refrigerator for the best results. It will stay fresh and delicious for up to three weeks this way.
Nutrition
Calories
Sugar
Fat
Carbs