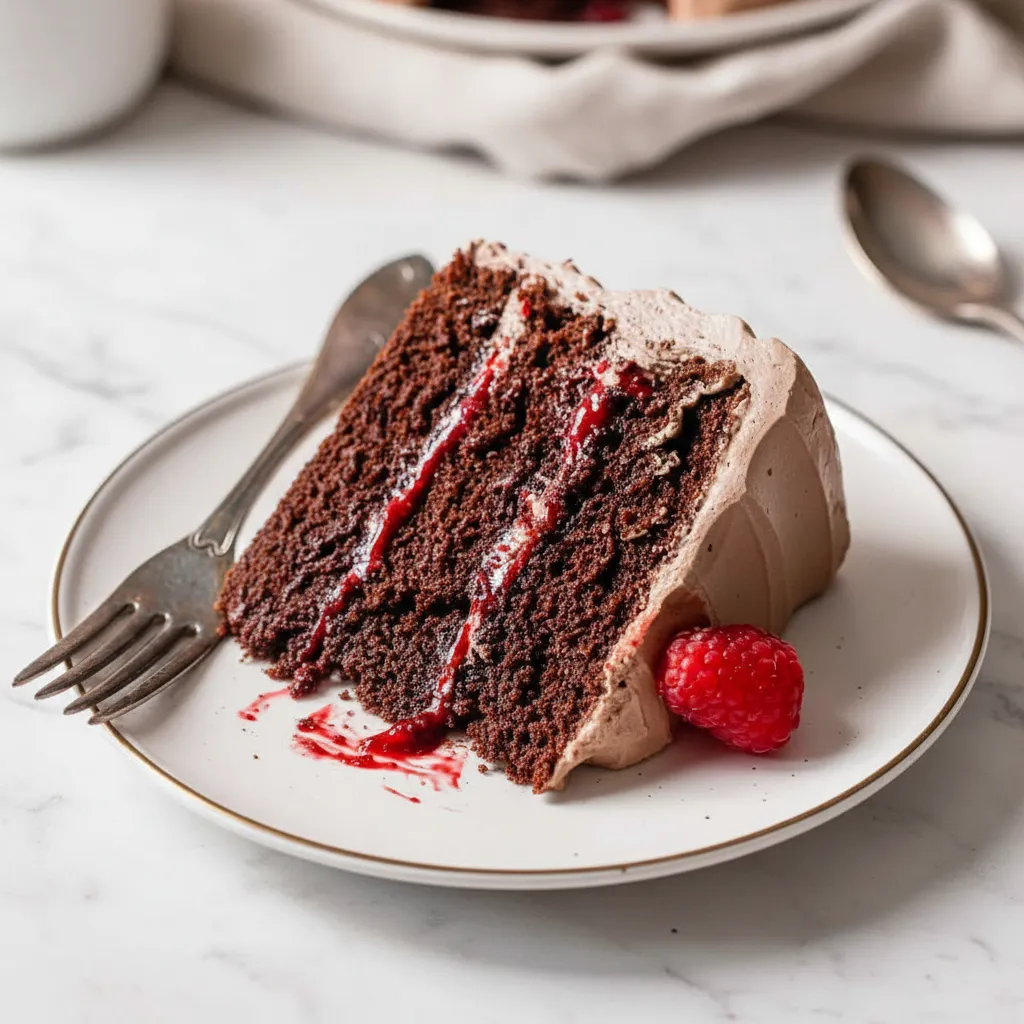
Turning eighteen is a huge milestone in life. It marks the official transition from childhood to adulthood. A moment this significant deserves a celebration that feels just as special. If you are on the hunt for the ideal 18Th Birthday Cake, you have found the right place. This chocolate raspberry cake is elegant, sophisticated, and packed with flavor. It balances the deep richness of dark cocoa with the bright and zesty tang of homemade raspberry jam. It is the kind of dessert that looks like it came from a high end bakery, yet you can make it right in your own kitchen.
Many people feel intimidated by the idea of baking a layer cake for such a big event. You might think you need professional skills to pull off Pretty Birthday Cakes. The truth is much simpler. This recipe is designed to be accessible for beginners while delivering results that will impress every guest. The moist chocolate sponge pairs beautifully with the smooth buttercream, and the hidden raspberry center adds a lovely surprise when you slice into it. It is a fantastic option when you are brainstorming unique Birthday Cake Ideas that feel grown up yet fun.
Jump To:
Why You’ll Love This Recipe
You are going to fall in love with this recipe for so many reasons. First and foremost, the texture is incredible. The addition of hot coffee to the batter blooms the cocoa powder. This means the chocolate flavor becomes intense and the crumb stays moist for days. You do not taste the coffee at all, but it adds a depth that plain water or milk cannot achieve.
Another reason this makes a fantastic 18Th Birthday Cake is the balance of sweetness. American buttercream can sometimes be too sugary. However, the tart raspberry filling cuts through that sweetness perfectly. The dark cocoa powder in the frosting also adds a bittersweet note that feels very mature and refined. It is a great choice if you want 18Th Cake Ideas that appeal to adult palates while still satisfying a sweet tooth.
Finally, this cake is visually stunning with minimal effort. The contrast between the dark chocolate frosting and the bright red fresh raspberries on top is naturally beautiful. You do not need fancy piping skills or fondant to make it look great. A simple swirl of the spatula and a handful of berries create a rustic yet chic look. It is one of those Pretty Birthday Cakes that relies on quality ingredients rather than complicated decoration techniques.
Ingredients
Here is everything you need to make this delicious 18Th Birthday Cake.
Chocolate Cake Batter
- 1 3/4 cups all purpose flour
- 3/4 cup unsweetened cocoa powder
- 1 1/2 teaspoons baking powder
- 1/2 teaspoon baking soda
- 1 teaspoon fine sea salt
- 2 cups granulated sugar
- 1/2 cup vegetable oil
- 2 large whole eggs, room temperature
- 1 teaspoon vanilla extract
- 1 cup whole or 2% milk, room temperature
- 2/3 cup hot coffee (recommended) or hot water
Raspberry Jam Filling
- 3 cups frozen raspberries (or fresh berries)
- 1/3 cup granulated sugar
- 2 tablespoons lemon juice
- 2 tablespoons corn starch
- 2 tablespoons water
Chocolate Buttercream
- 1 1/2 cups unsalted butter, room temperature
- 2 cups powdered sugar
- 2 tablespoons unsweetened dark cocoa powder
- 2 tablespoons heavy cream or milk
- 2 teaspoons vanilla extract
- Fresh raspberries, for decorating
Step-By-Step Instructions
Follow these steps to create your masterpiece. This process ensures you get a bakery quality result for your 18Th Birthday Cake.
Step 1: Make the Raspberry Filling
Start by placing your raspberries, sugar, and lemon juice in a saucepan. Cook this mixture over medium heat for about 10 to 12 minutes. You want to see it boiling and the fruit breaking down. Use a spoon or spatula to mash the berries frequently as they cook.
While the fruit cooks, whisk together the cornstarch and water in a small bowl to create a slurry. Pour this into the boiling jam and stir immediately. Continue cooking for another 1 to 2 minutes until the mixture has thickened significantly. Once thick, push the filling through a fine mesh strainer to remove the seeds. Set this smooth puree aside to cool completely before you use it.
Step 2: Prepare the Pans and Dry Ingredients
Preheat your oven to 325F (165C). Grease the sides of three 8 inch cake pans thoroughly. Line the bottoms of the pans with parchment paper circles to ensure the cakes release easily later. This is a crucial step for keeping your 18Th Birthday Cake layers intact.
In a large bowl, whisk together the flour, cocoa powder, baking soda, baking powder, and salt. Make sure there are no large lumps of cocoa powder remaining. Set this dry mixture aside for now.
Step 3: Mix the Batter
In a separate large bowl, whisk the vegetable oil and sugar together until they are well combined. Add the eggs one at a time, whisking well after each addition. Stir in the vanilla extract. Next, whisk in the milk until the mixture is smooth.
Slowly whisk the dry ingredients into the wet mixture. Mix only until you see no more dry streaks of flour. Do not overmix. Finally, carefully pour in the hot coffee. Whisk gently until the batter is uniform. It will be thin, which is normal.
Step 4: Bake the Cake Layers
Divide the batter evenly among your three prepared pans. Each pan should hold roughly 420 grams of batter if you are using a scale. Place the pans on the middle rack of your oven.
Bake for 18 to 20 minutes. Test for doneness by inserting a toothpick into the center of a cake. It should come out with just a few moist crumbs attached. Let the pans cool on a wire rack for 15 minutes. Afterward, gently remove the cakes from the pans and let them cool completely on the rack.
Step 5: Whip the Frosting
While the cakes cool, make your buttercream. In the bowl of a stand mixer, cream the room temperature butter until it is smooth and creamy. Gradually mix in the powdered sugar and cocoa powder on low speed to avoid a mess.
Once the sugar is incorporated, add the heavy cream and vanilla extract. Increase the mixer speed to medium and beat the frosting for 4 to 5 minutes. The mixture should become light, fluffy, and triple in volume.
Step 6: Assemble the Cake
Place your first cake layer on a serving plate or board. Spread a thin layer of chocolate frosting over the top. Pipe a ring of frosting around the outer edge to act as a dam. Fill the center with half of your cooled raspberry filling. Be careful not to overfill past the border.
Place the second cake layer on top and repeat the process with frosting, a dam, and the remaining filling. Place the final cake layer on top, but flip it upside down so the flat bottom becomes the top of your cake. This ensures a level surface for your 18Th Birthday Cake.
Chill the assembled cake in the fridge for 20 to 30 minutes to set the filling. Once chilled, cover the top and sides with the remaining frosting. Use an offset spatula to create swirl textures. Top with fresh raspberries. Chill for one hour before serving.


How To Store Leftovers
If you have leftovers of this 18Th Birthday Cake, you will want to keep them fresh. Because of the fruit filling and dairy in the buttercream, it is best to store this cake in the refrigerator. Place slices in an airtight container to keep them from drying out. The cake will stay good for up to 4 days.
When you are ready to eat a slice, let it sit on the counter for about 20 minutes. Chocolate cake tastes best at room temperature, as the butter in the frosting softens and the sponge relaxes. If you want to freeze the cake, wrap individual slices tightly in plastic wrap and then foil. They can be frozen for up to 3 months. Thaw them in the fridge overnight before enjoying.
Tips
Making the best 18Th Birthday Cake comes down to a few small details. First, ensure your cold ingredients like eggs and milk are at room temperature before you start. This helps the batter emulsify properly, leading to a fluffier cake texture. If you use cold eggs, the batter might curdle or bake unevenly.
When measuring flour, avoid scooping the measuring cup directly into the bag. This packs the flour down and leads to a dense cake. Instead, spoon the flour into the cup and level it off with a knife. For the most accurate results, use a kitchen scale if you have one.
Don’t skip the straining step for the raspberry filling. Removing the seeds creates a smooth, luscious texture that feels much more luxurious. It elevates the dessert from a simple sponge to one of the most professional looking Birthday Cake Ideas you can make at home.
Finally, using hot coffee really does make a difference. The heat activates the cocoa powder, releasing more flavor. If you are worried about caffeine, decaf coffee works just as well. This simple trick is what separates average cakes from truly delicious ones.
Conclusion
Finding the right recipe among all the 18Th Cake Ideas out there can be tough, but this one is a winner. It combines the comfort of chocolate with the fresh zip of raspberry in a way that feels celebratory and special. Whether you are baking for a family member or a friend, this cake communicates care and effort.
The process is straightforward enough for anyone to follow, yet the result is stunning. Among all the Pretty Birthday Cakes you could choose, this one stands out for its flavor and elegance. So grab your ingredients, preheat that oven, and get ready to bake an 18Th Birthday Cake that will be remembered long after the party is over.
FAQ
Can I Make This Gluten Free?
Yes, you can. Swap the all purpose flour for a high quality gluten free 1 to 1 baking flour blend. Make sure the blend contains xanthan gum. The texture might vary slightly, but it will still be a delicious 18Th Birthday Cake.
Can I Use Store Bought Jam?
You can use high quality store bought raspberry preserves if you are short on time. However, the homemade filling is less sweet and has a fresher flavor. If using store bought, try to find one with fewer seeds or strain it yourself.
Can I Make The Cake Layers Ahead of Time?
Absolutely. You can bake the cake layers a day in advance. Once they are completely cool, wrap them tightly in plastic wrap and store them at room temperature. You can also freeze the wrapped layers for up to a week before assembling.
Do I Have To Use Coffee?
No, you do not have to use coffee. You can substitute it with hot water. However, the coffee enhances the chocolate flavor significantly without adding a coffee taste. It is highly recommended for the richest flavor profile.
Chocolate Raspberry 18th Birthday Cake
This chocolate raspberry cake is elegant, sophisticated, and packed with flavor. It balances the deep richness of dark cocoa with the bright and zesty tang of homemade raspberry jam. It is the kind of dessert that looks like it came from a high end bakery, yet you can make it right in your own kitchen.
Requirements


Ingredients
Instructions
- Start by placing your raspberries, sugar, and lemon juice in a saucepan. Cook this mixture over medium heat for about 10 to 12 minutes. You want to see it boiling and the fruit breaking down. Use a spoon or spatula to mash the berries frequently as they cook.
- While the fruit cooks, whisk together the corn starch and water in a small bowl to create a slurry. Pour this into the boiling jam and stir immediately. Continue cooking for another 1 to 2 minutes until the mixture has thickened significantly. Once thick, push the filling through a fine mesh strainer to remove the seeds. Set this smooth puree aside to cool completely before you use it.
- Preheat your oven to 325F (165C). Grease the sides of three 8 inch cake pans thoroughly. Line the bottoms of the pans with parchment paper circles to ensure the cakes release easily later. In a large bowl, whisk together the flour, cocoa powder, baking soda, baking powder, and salt. Make sure there are no large lumps of cocoa powder remaining. Set this dry mixture aside for now.
- In a separate large bowl, whisk the vegetable oil and sugar together until they are well combined. Add the eggs one at a time, whisking well after each addition. Stir in the vanilla extract. Next, whisk in the milk until the mixture is smooth. Slowly whisk the dry ingredients into the wet mixture. Mix only until you see no more dry streaks of flour. Do not overmix. Finally, carefully pour in the hot coffee. Whisk gently until the batter is uniform. It will be thin, which is normal.
- Divide the batter evenly among your three prepared pans. Each pan should hold roughly 420 grams of batter if you are using a scale. Place the pans on the middle rack of your oven. Bake for 18 to 20 minutes. Test for doneness by inserting a toothpick into the center of a cake. It should come out with just a few moist crumbs attached. Let the pans cool on a wire rack for 15 minutes. Afterward, gently remove the cakes from the pans and let them cool completely on the rack.
- While the cakes cool, make your buttercream. In the bowl of a stand mixer, cream the room temperature unsalted butter until it is smooth and creamy. Gradually mix in the powdered sugar and cocoa powder on low speed to avoid a mess. Once the sugar is incorporated, add the heavy cream and vanilla extract. Increase the mixer speed to medium and beat the frosting for 4 to 5 minutes. The mixture should become light, fluffy, and triple in volume.
- Place your first cake layer on a serving plate or board. Spread a thin layer of chocolate frosting over the top. Pipe a ring of frosting around the outer edge to act as a dam. Fill the center with half of your cooled raspberry filling. Be careful not to overfill past the border. Place the second cake layer on top and repeat the process with frosting, a dam, and the remaining filling. Place the final cake layer on top, but flip it upside down so the flat bottom becomes the top of your cake. This ensures a level surface for your cake. Chill the assembled cake in the fridge for 20 to 30 minutes to set the filling. Once chilled, cover the top and sides with the remaining frosting. Use an offset spatula to create swirl textures. Top with fresh raspberries. Chill for one hour before serving.
Notes
If you have leftovers of this Chocolate Raspberry 18th Birthday Cake, you will want to keep them fresh. Because of the fruit filling and dairy in the buttercream, it is best to store this cake in the refrigerator. Place slices in an airtight container to keep them from drying out. The cake will stay good for up to 4 days.
When you are ready to eat a slice, let it sit on the counter for about 20 minutes. Chocolate cake tastes best at room temperature, as the butter in the frosting softens and the sponge relaxes. If you want to freeze the cake, wrap individual slices tightly in plastic wrap and then foil. They can be frozen for up to 3 months. Thaw them in the fridge overnight before enjoying.
Making the best Chocolate Raspberry 18th Birthday Cake comes down to a few small details. First, ensure your cold ingredients like eggs and milk are at room temperature before you start. This helps the batter emulsify properly, leading to a fluffier cake texture. If you use cold eggs, the batter might curdle or bake unevenly.
When measuring flour, avoid scooping the measuring cup directly into the bag. This packs the flour down and leads to a dense cake. Instead, spoon the flour into the cup and level it off with a knife. For the most accurate results, use a kitchen scale if you have one.
Don’t skip the straining step for the raspberry filling. Removing the seeds creates a smooth, luscious texture that feels much more luxurious. It elevates the dessert from a simple sponge to one of the most professional looking Birthday Cake Ideas you can make at home.
Finally, using hot coffee really does make a difference. The heat activates the cocoa powder, releasing more flavor. If you are worried about caffeine, decaf coffee works just as well. This simple trick is what separates average cakes from truly delicious ones.
Nutrition
Calories
Sugar
Fat
Carbs