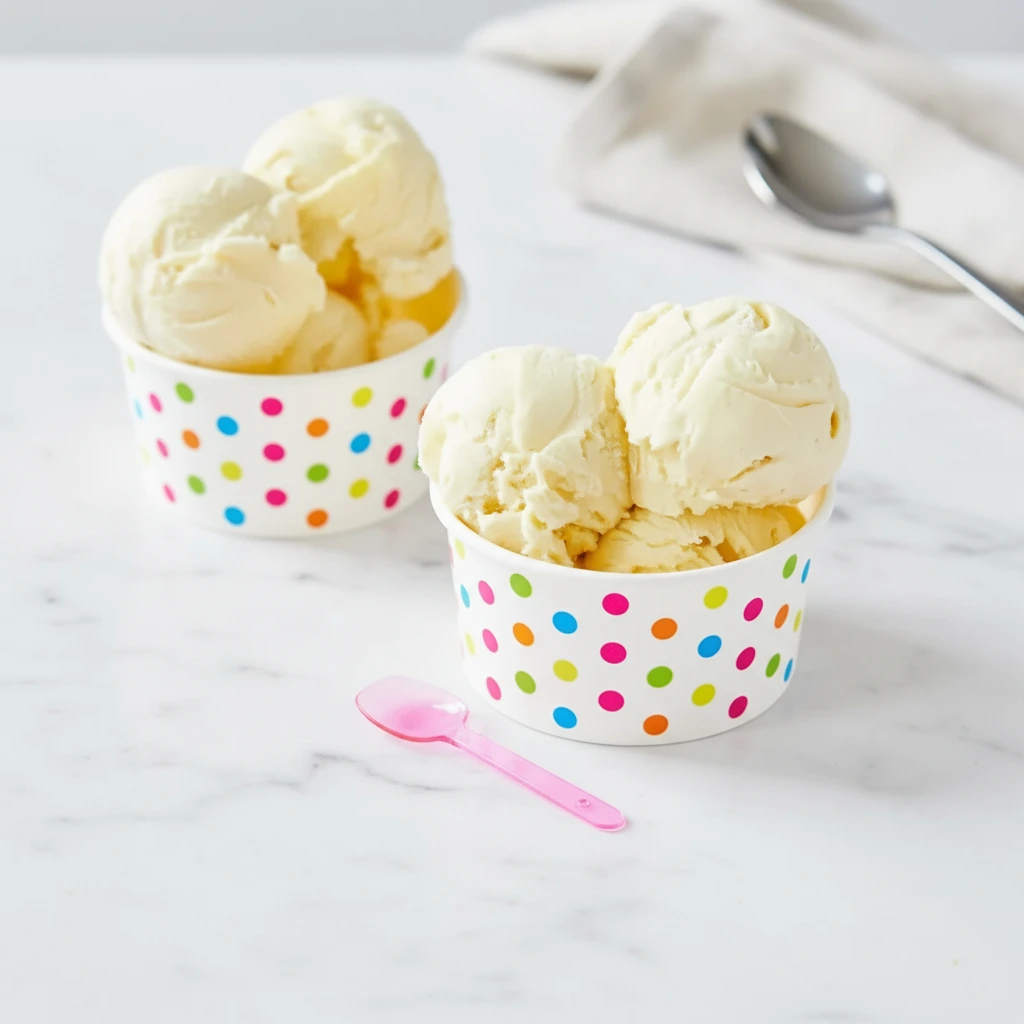
Have you ever craved ice cream but wanted something a little bit healthier? Something without the dairy that still tastes amazing? You are in the right place. We are about to make the most wonderful banana cream style ice cream that is completely dairy free. This is the Dairy Free Ninja Creami Recipe you have been searching for.
It’s creamy, it’s flavorful, and it’s so simple to prepare. Using the Ninja Creami machine turns a few basic ingredients into a frozen dessert that rivals any store bought pint. It is one of my favorite Protein Ice Cream Ninja Creami Recipes. Let’s get started!
Jump To:
Why You’ll Love This Recipe
So what makes this Dairy Free Ninja Creami Recipe so special? Honestly, there are so many reasons to love it. First off, the texture is out of this world. It’s so smooth and creamy, you’ll find it hard to believe there’s no dairy involved. The secret is the combination of banana and cashews, which creates a rich base.
Another great thing is how easy it is. You just blend the ingredients, freeze the mixture, and let the Ninja Creami do its magic. It is a fantastic recipe for beginners who are just getting familiar with their machine. You do not need any special cooking skills to make this happen.
It’s also incredibly versatile. You can adjust the sweetness to your liking or even add different mix ins to create your own unique flavor combinations. This recipe is a wonderful starting point for all sorts of frozen creations. It fits right in with other Ninja Creami Ice Cream Recipes High Protein Low Cal.
Plus, it is packed with protein! Thanks to the protein powder and soy milk, each serving gives you a nice little boost. This makes it a great post workout treat or a filling snack that will keep you satisfied. It is one of the best Ninja Creami Recipes Protein forward options out there.
And of course, it is a fantastic non dairy option. For anyone who is lactose intolerant or follows a vegan lifestyle, this recipe is a true delight. You can enjoy a delicious frozen dessert without any worries. This is one of those Healthy Ninja Creami Ice Cream Recipes Non Dairy that you will make again and again.
Finally, this Dairy Free Ninja Creami Recipe is budget friendly. You are using simple ingredients that are easy to find and much more affordable than buying specialty dairy free ice creams from the store. Making it at home saves money and lets you control exactly what goes into your food.
Ingredients
Let’s talk about what you will need. The beauty of this Dairy Free Ninja Creami Recipe is its simplicity. Each ingredient plays an important role in creating that perfect texture and flavor. It is a star among Protein Ice Cream Ninja Creami Recipes for a reason.
The base is dairy free milk. I really like using soy milk because it naturally has a higher protein content, which contributes to a creamier final product. However, you can use almond milk, oat milk, or cashew milk if you prefer. Just be aware the texture might be slightly different.
Banana is our natural sweetener and texture enhancer. A medium to large ripe banana works best as it will be sweeter and blend more easily. Cashews are the other key to creaminess. They add a wonderful richness and healthy fats. You can use raw or roasted, whatever you have on hand.
For that protein boost, we are adding a scoop of vanilla protein powder. This also adds a nice vanilla flavor. I have some notes on how to omit this if you prefer. A little bit of honey or maple syrup adds just enough extra sweetness. You can adjust this to your personal taste. A tiny pinch of salt balances all the flavors perfectly.
- 2 cups dairy free milk, I like soy milk for higher protein content
- 1 banana, medium to large
- ¼ cup cashews, raw or roasted work
- 1 scoop vanilla protein powder, see notes for options to omit
- honey or pure maple syrup, to taste (I use ½ tablespoon)
- pinch of salt, optional
- vanilla wafers, for mixing in (optional)
Step By Step Instructions
Ready to make this amazing Dairy Free Ninja Creami Recipe? The process is very straightforward. Just follow these simple steps for a perfect pint of homemade ice cream. It is so rewarding to make your own Healthy Ninja Creami Ice Cream Recipes Non Dairy at home.
Step 1: Blend The Base
First things first, gather all your ingredients. Grab your high speed blender. A good blender is helpful here to make sure the cashews get completely smooth. You do not want any gritty texture in your ice cream base. This is the foundation of our creamy Dairy Free Ninja Creami Recipe.
Combine the dairy free milk, banana, cashews, protein powder, honey or maple syrup, and the optional pinch of salt in the blender. Put the lid on tight and blend everything until it is completely smooth and creamy. This might take a minute or two depending on your blender.
Once it looks smooth, stop the blender and give it a quick taste. This is your chance to adjust the sweetness. If you have a sweet tooth, you might want to add a little more honey or maple syrup. Blend again for a few seconds to incorporate it.
Step 2: Freeze The Mixture
Now that your base is perfectly blended, it is time to get it ready for freezing. Pour the mixture into your Ninja Creami containers. This recipe should give you enough to fill two containers. Make sure you do not fill past the max fill line.
Seal the containers with their lids and place them in the freezer. It is very important that they are on a flat surface so they freeze evenly. Let them freeze for at least 6 to 8 hours. For best results, I recommend freezing them overnight. A solid freeze is critical for the best Dairy Free Ninja Creami Recipe texture.
Step 3: Let It Thaw Slightly
When you are ready to enjoy your ice cream, take a container out of the freezer. Do not try to spin it right away. Let it sit on the counter at room temperature for about 15 to 20 minutes. This little step makes a big difference.
Allowing the base to thaw slightly helps the Ninja Creami process it more easily. It prevents the machine from working too hard and results in a creamier texture from the first spin. If you forget this step, do not worry. You may just need an extra respin.
Step 4: Spin In The Ninja Creami
Place the container into the outer bowl, attach the lid, and lock it into your Ninja Creami machine. Select the ‘light ice cream’ setting and let it work its magic. This is the exciting part where your frozen block transforms into something amazing.
After the first spin, check the texture. Sometimes it might look a bit powdery or crumbly. This is completely normal for many Protein Ice Cream Ninja Creami Recipes. If it does, just add a small splash of dairy free milk, about a tablespoon, and use the ‘respin’ function. This usually does the trick.
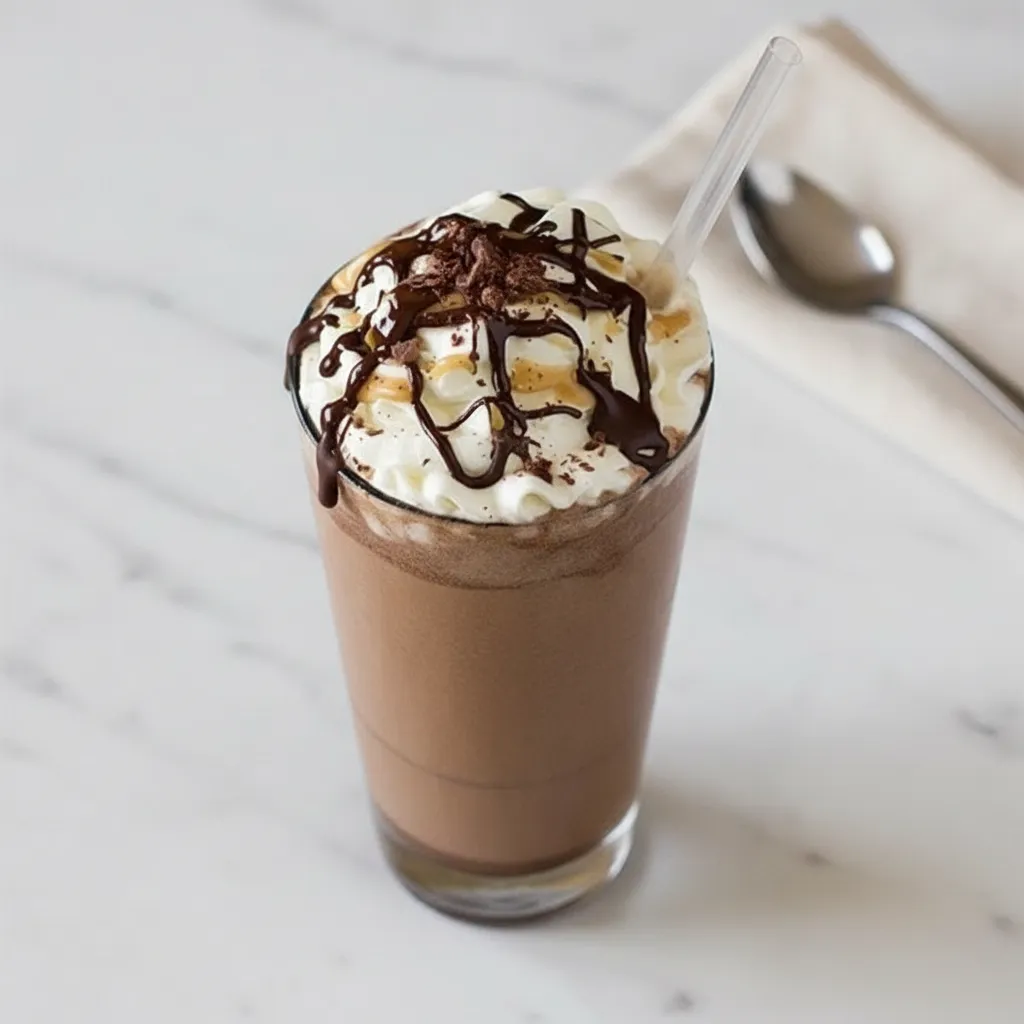
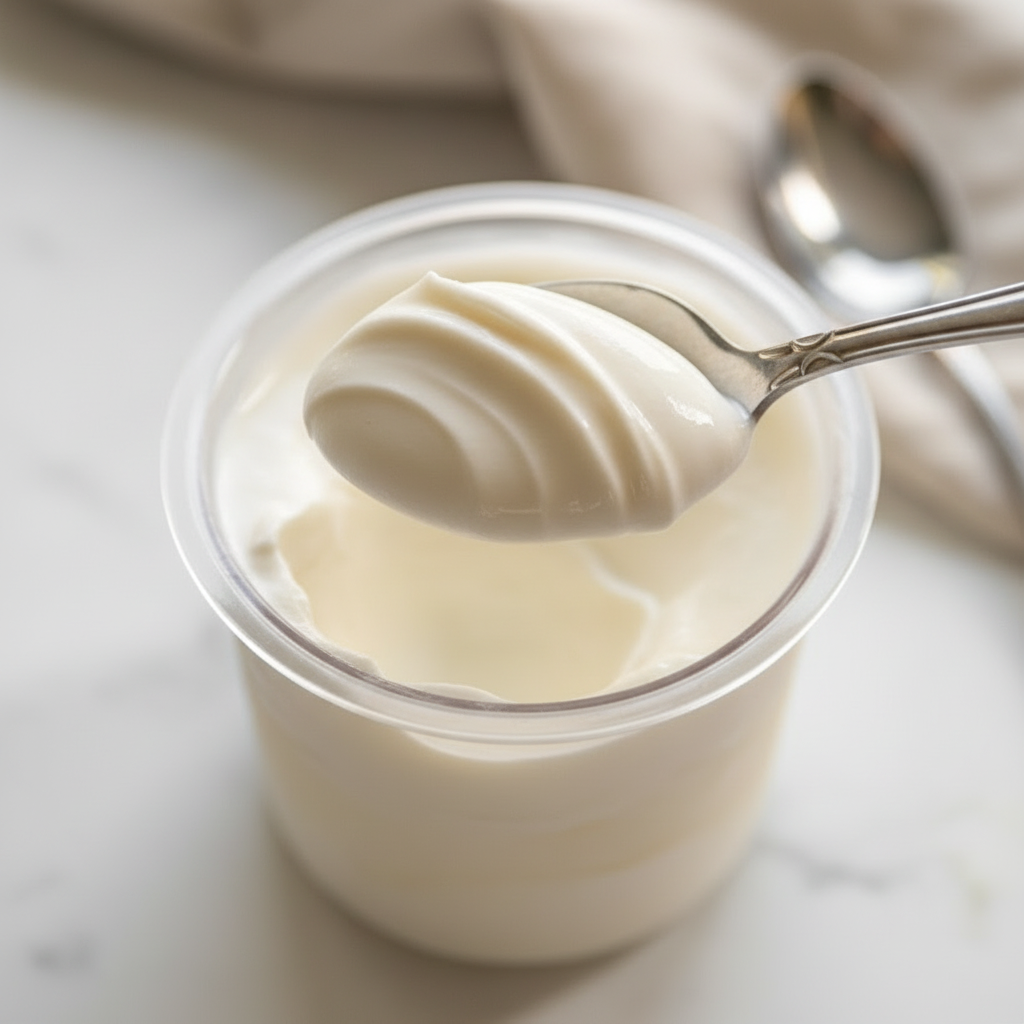
The goal is a smooth, scoopable texture, just like traditional ice cream. It should look like the creamy goodness you see in the photos. This is the heart of making a great Dairy Free Ninja Creami Recipe.
Step 5: Add Mix Ins And Serve
Now for the fun part. If you want to add mix ins, this is the time to do it. For this recipe, we are using vanilla wafers. Break them into small pieces and add them to the container. You do not need to stir them in by hand.
Place the container back in the machine and use the ‘mix in’ setting. The machine will gently fold the wafer pieces throughout your ice cream. Once it is done, your delicious homemade treat is ready to serve immediately. Enjoy your hard work!


How To Store Leftovers
If you somehow have leftovers from this tasty Dairy Free Ninja Creami Recipe, storing them is easy. Simply smooth the top of the remaining ice cream in the container and put the lid back on. Place it back in the freezer on a level surface.
When you want to eat it again, the texture will likely be very hard, similar to how the base was before the first spin. You will need to process it again in the Ninja Creami. Take it out and let it sit on the counter for a few minutes just like you did before.
Then, simply use the ‘respin’ function to bring it back to that creamy, scoopable consistency. It should be just as good as it was the first time. This is a huge advantage of the Ninja Creami. It makes enjoying leftover homemade ice cream so much better.
Tips
Want to make this Dairy Free Ninja Creami Recipe even better? Here are a few tips and tricks I have learned along the way. These will help you get the best results every time and allow you to customize your creation.
If you want to skip the protein powder, that is totally fine. To maintain the creamy texture, I suggest adding another ¼ cup of cashews to the blender. You will also want to add a little bit of non alcoholic vanilla extract to get that nice vanilla flavor.
Feel free to experiment with different mix ins. Chocolate chips, chopped nuts, or a swirl of peanut butter would all be delicious. The ‘mix in’ function is one of the best features of the Ninja Creami, so have fun with it.
For the sweetest flavor, use very ripe bananas. The ones with brown spots are perfect for this. They are naturally sweeter, so you might not need to add as much honey or maple syrup. It is a great way to use up bananas that are past their prime.
Patience is key. Make sure you freeze the base for the full recommended time. A solidly frozen base is essential for the machine to work properly and produce a smooth texture. Rushing this step often leads to a less than ideal result.
Finally, do not be afraid to respin. It is rare for a high protein, low fat base to be perfect on the first spin. The respin button is your best friend. Another spin with a splash of liquid almost always creates that perfect creamy texture you want from Ninja Creami Ice Cream Recipes High Protein Low Cal.
Conclusion
And there you have it. A simple, delicious, and healthy Dairy Free Ninja Creami Recipe that you can make right at home. It is a wonderful way to satisfy your sweet cravings without any of the dairy. Plus, it is packed with protein to keep you feeling full and energized.
I hope you love this recipe as much as I do. It is a go to in my house for a quick and easy dessert. Give it a try and let me know what you think. Enjoy your homemade, guilt free ice cream. It is a fantastic example of great Ninja Creami Recipes Protein forward treats.
FAQ
Can I Make This Without A Banana?
Yes, you can. If you are not a fan of bananas, you can substitute it with about ½ cup of full fat coconut cream from a can. This will also provide a creamy texture. You may need to add a bit more sweetener to compensate for the loss of the banana’s sweetness.
What Is The Best Dairy Free Milk To Use?
For the creamiest result in this Dairy Free Ninja Creami Recipe, I recommend using a milk with higher fat and protein content. Soy milk is my top choice for its protein. Full fat oat milk or cashew milk are also excellent options that will give you a very smooth texture.
Why Is My Ice Cream Powdery After Spinning?
A powdery or crumbly texture is very common, especially with low fat or high protein bases. It just means the mixture is very cold and dry. The fix is simple: add a tablespoon of your dairy free milk and use the ‘respin’ function. This adds a little moisture and allows the base to become creamy.
Can I Make This Recipe Without A High Speed Blender?
You can try, but the texture might not be as smooth. The main challenge is getting the cashews completely blended. If you do not have a high speed blender, I recommend soaking your cashews in hot water for at least an hour before blending. This will soften them up and help them blend more easily.
Dairy Free Ninja Creami Recipe
A simple and delicious dairy-free ice cream made with banana and cashews in the Ninja Creami. This high-protein recipe is creamy, flavorful, and easy to prepare for a wholesome frozen dessert.
Ingredients
Instructions
- Combine the dairy-free milk, banana, cashews, protein powder, honey or maple syrup, and salt in a high-speed blender. Blend until completely smooth and creamy.
- Pour the mixture into two Ninja Creami pint containers, making sure not to fill past the max fill line.
- Seal the containers and place them on a flat surface in the freezer. Freeze for at least 8 hours, or preferably overnight.
- When ready to process, remove a pint from the freezer and let it sit on the counter at room temperature for 15-20 minutes.
- Place the pint into the outer bowl, attach the lid, and lock it into the Ninja Creami machine. Select the ‘Light Ice Cream’ function.
- If the texture is powdery after the first spin, add 1 tablespoon of dairy-free milk and use the ‘Re-spin’ function until creamy.
- If desired, add crushed vanilla wafers or other mix-ins and process using the ‘Mix-In’ function.
- Serve immediately and enjoy your homemade dairy-free ice cream.
Notes
To omit protein powder, add another ¼ cup of cashews and a splash of vanilla extract to the base for a similar creamy texture.
Feel free to experiment with other mix-ins like chocolate chips, chopped nuts, or a swirl of peanut butter.
For the best flavor and natural sweetness, use very ripe bananas with brown spots.
Nutrition
Calories
Sugar
Fat
Carbs