The holiday season is here, and my kitchen is already buzzing with activity. There’s something so special about creating treats to share with family and friends. But let’s be honest, sometimes the thought of complicated baking can be a little overwhelming.
That’s where these amazing no bake peanut butter Christmas tree bars come in. They are one of my all time favorite Easy Christmas Sweets Recipes because they deliver all the festive cheer without any of the oven related stress. They are simple, fun, and oh so delicious.
Jump To:
Why You’ll Love This Recipe
First off, this is a no bake recipe. You heard that right. Your oven gets to take a holiday break too. This makes it a fantastic activity for when you have a full house and the oven is already working overtime on dinner.
It’s also an incredibly fun project to do with kids. They can help mix the ingredients, press the bars into the pan, and of course, decorate the little trees with sprinkles. Creating these Christmas Goodies Recipes together makes for wonderful memories.
These bars are the perfect combination of textures. You get a chewy base from the oats, a satisfying crunch from the crispy rice cereal and pretzels, and a smooth, rich topping of chocolate and peanut butter. It’s a flavor explosion in every single bite.
Plus, they make for a beautiful and thoughtful homemade gift. Just pack them in a festive box, tie a ribbon around it, and you have a wonderful present for neighbors, teachers, or coworkers. It’s a simple way to spread some holiday joy.
Ingredients
Here is everything you will need to get started on these delightful Christmas Sweet Snacks. The list is simple, and you probably have most of these ingredients in your pantry already.
For The Peanut Butter Bars
- 1/2 cup (100g) light brown sugar, packed
- 1/2 cup (170g) Karo Light Corn Syrup
- 3/4 cup (190g) creamy peanut butter
- 1/2 cup (60g) crushed pretzels
- 1 cup (100g) quick oats
- 2 cups (55g) crispy rice cereal
For The Chocolate Topping And Decoration
- 3/4 cup (130g) semisweet chocolate chips
- 1/2 cup (125g) creamy peanut butter
- 1 cup (120g) powdered sugar
- 1 1/2 tbsp milk
- 1 to 2 drops green gel food coloring
- Sprinkles of your choice
Step By Step Instructions
Ready to make some holiday magic? Let’s walk through this simple process together. This is the fun part of Easy Holiday Baking where everything comes together so quickly.
Step 1: Combine Your Dry Ingredients
First things first, grab a large mixing bowl. You’ll want plenty of room to stir everything without making a mess. In the bowl, combine your crushed pretzels, quick oats, and crispy rice cereal. Give them a gentle toss to mix them all up.
Step 2: Make The Sweet Binder
Now for the gooey part. In a medium saucepan, stir together the light corn syrup and the packed light brown sugar. Place the pan over medium heat. Keep stirring as the mixture heats up. You’ll see it start to bubble around the edges. Let it bubble for about 30 seconds, then immediately remove it from the heat.
Once it’s off the heat, add in your creamy peanut butter. Stir it until the peanut butter is completely melted and the mixture is smooth and glossy. The aroma is just wonderful.
Step 3: Mix And Press
Carefully pour the hot peanut butter mixture over your dry ingredients in the large bowl. Use a sturdy spatula to stir everything together until the cereal and pretzels are evenly coated. Work quickly here, as the mixture will start to set.
Next, prepare an 8×8 square baking dish. Grease it and line it with parchment paper, leaving some paper hanging over the sides. This overhang will act as handles later, making it super easy to lift the bars out. Transfer the mixture to the pan and press it down firmly and evenly into all the corners.
Step 4: Create The Chocolate Topping
Time for more chocolatey goodness. In a heat safe bowl, combine the semisweet chocolate chips and the other half cup of creamy peanut butter. Microwave this for 30 seconds, then take it out and stir. Pop it back in for another 15 to 30 seconds until everything is melted and beautifully smooth.
Pour this luscious chocolate peanut butter topping over the peanut butter bar layer. Spread it out evenly with your spatula. To get a really smooth top, give the pan a gentle shake and a few taps on the counter.
Step 5: Chill And Set
Now for a little patience. Place the pan in the refrigerator for about 30 minutes to an hour. This will help the bars set up properly. If you are in a hurry, you can place them in the freezer for 20 to 30 minutes. Just know they will be a bit harder to slice.
Step 6: Cut Into Triangles
Once the bars are fully set, it’s time to create our trees. Use the parchment paper handles to lift the entire block out of the pan. You might need to run a knife along the two uncovered sides to loosen it first. Place it on a cutting board.
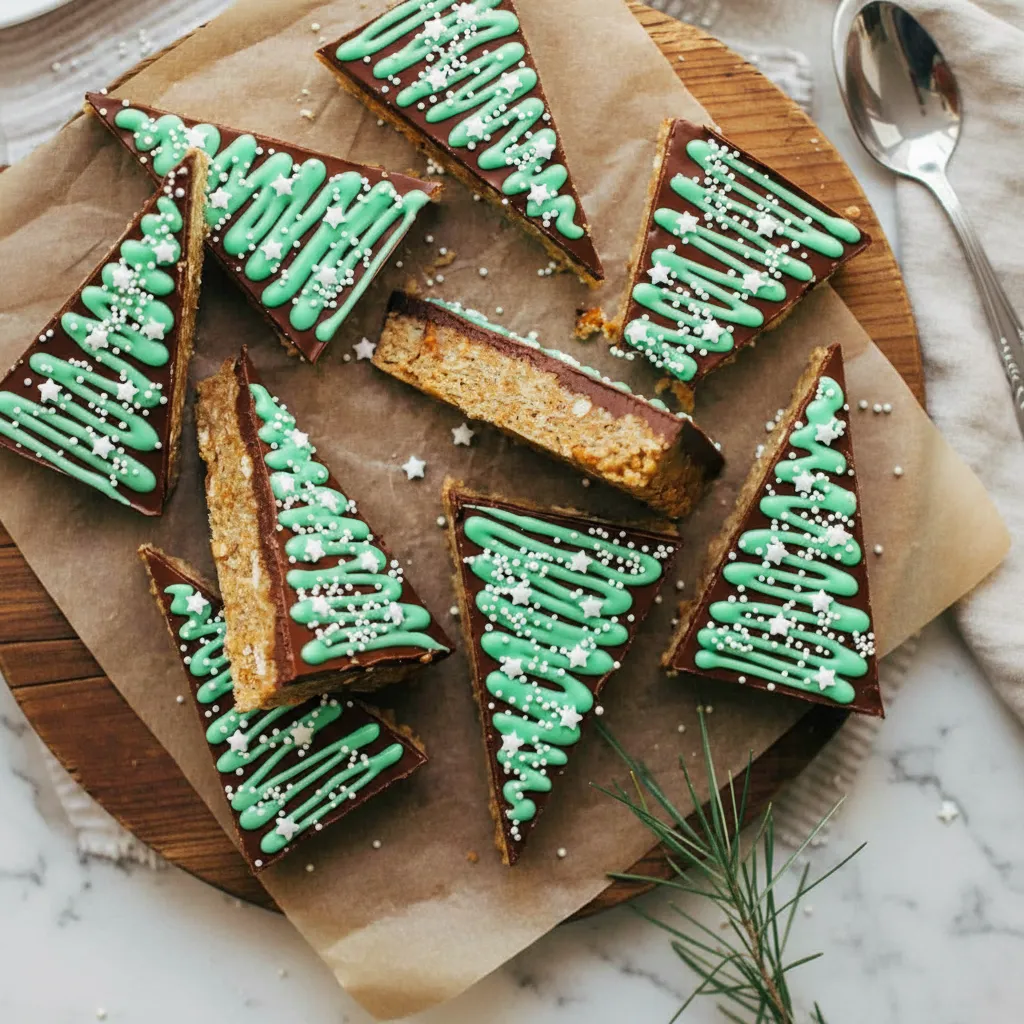
Make one clean cut directly down the middle, creating two long rectangles. Then, slice each rectangle into five triangles. This is how you get that classic Christmas tree shape for these Fun Christmas Desserts.
Step 7: Decorate Your Trees
Let’s get festive. To make the green icing, mix together the powdered sugar and milk in a small bowl. You are looking for a consistency similar to school glue. If it’s too thick, add more milk, just a teaspoon at a time.
Once you have the right texture, add one or two drops of green gel food coloring and stir until it’s a lovely tree green. Transfer the icing to a piping bag with a small round tip, or just use a small ziplock bag and snip off a tiny corner. Pipe zig zag lines across the triangles to look like garland. Immediately add your favorite sprinkles before the icing sets. And there you have it, one of the most charming Easy Christmas Sweets Recipes!


How To Store Leftovers
If you somehow have leftovers, storing them is a breeze. Place the bars in a single layer in an airtight container. If you need to stack them, place a piece of parchment paper between the layers to prevent them from sticking together.
They will keep well in the refrigerator for up to a week. You can also freeze them for longer storage. Just wrap them individually in plastic wrap and then place them in a freezer safe bag. They will last for up to 3 months in the freezer. Just let them thaw for a few minutes before enjoying.
Tips
For extra clean cuts, use a large, sharp knife. It can also help to run the knife under hot water and wipe it dry between slices. This will help it glide through the chocolate topping without cracking it.
Don’t be afraid to get creative with your decorations. You could use mini M&Ms as ornaments, or even a yellow star sprinkle on top of each tree. This is a great part of Easy Holiday Baking.
To make this recipe gluten free, simply use gluten free pretzels and certified gluten free quick oats. The rest of the ingredients are typically gluten free, but always double check your labels to be sure.
If you aren’t a fan of pretzels, you can substitute them with more crispy rice cereal or even some chopped nuts like peanuts or pecans for a different kind of crunch.
Conclusion
And that’s all there is to it. These no bake Christmas tree bars are proof that you don’t need to spend hours in the kitchen to create something special for the holidays. They are a wonderful addition to any festive gathering and a joy to make and eat.
I truly hope you give these Easy Christmas Sweets Recipes a try this season. They are sure to bring a smile to everyone’s face and become a new holiday tradition in your home. Happy holidays and happy treat making!
FAQ
Can I Make These Gluten Free?
Absolutely. It is very easy to adapt these Christmas Goodies Recipes to be gluten free. Simply swap the regular crushed pretzels for a gluten free version and ensure your quick oats are certified gluten free to avoid cross contamination.
Do I Have To Use Corn Syrup?
Corn syrup provides a unique chewy texture that is hard to replicate exactly. However, you can try substituting it with honey or pure maple syrup. Please note that using these alternatives will change the final flavor and texture of the bars slightly.
What Other Nut Butters Can I Use?
This recipe is very flexible. You can use almond butter or cashew butter as a direct substitute for peanut butter. For a nut free option, sunflower seed butter would work well and still provide a delicious flavor for your Christmas Sweet Snacks.
Can I Make These Ahead Of Time?
Yes, these are wonderful for making ahead. You can prepare them up to three days in advance and store them in an airtight container in the refrigerator. This makes them a great option for stress free holiday party planning.
No Bake Peanut Butter Christmas Tree Bars
These amazing no bake peanut butter Christmas tree bars deliver all the festive cheer without any oven stress. Simple, fun, and oh so delicious, they are a fantastic activity for kids and make for beautiful homemade gifts. Enjoy a chewy base, crunchy cereal and pretzels, and a smooth chocolate peanut butter topping in every bite.
Requirements


Ingredients
Instructions
- First things first, grab a large mixing bowl. You’ll want plenty of room to stir everything without making a mess. In the bowl, combine your crushed pretzels, quick oats, and crispy rice cereal. Give them a gentle toss to mix them all up.
- Now for the gooey part. In a medium saucepan, stir together the light corn syrup and the packed light brown sugar. Place the pan over medium heat. Keep stirring as the mixture heats up. You’ll see it start to bubble around the edges. Let it bubble for about 30 seconds, then immediately remove it from the heat.
- Once it’s off the heat, add in your creamy peanut butter. Stir it until the peanut butter is completely melted and the mixture is smooth and glossy. The aroma is just wonderful.
- Carefully pour the hot peanut butter mixture over your dry ingredients in the large bowl. Use a sturdy spatula to stir everything together until the cereal and pretzels are evenly coated. Work quickly here, as the mixture will start to set.
- Next, prepare an 8×8 square baking dish. Grease it and line it with parchment paper, leaving some paper hanging over the sides. This overhang will act as handles later, making it super easy to lift the bars out. Transfer the mixture to the pan and press it down firmly and evenly into all the corners.
- Time for more chocolatey goodness. In a heat safe bowl, combine the semisweet chocolate chips and the other half cup of creamy peanut butter. Microwave this for 30 seconds, then take it out and stir. Pop it back in for another 15 to 30 seconds until everything is melted and beautifully smooth.
- Pour this luscious chocolate peanut butter topping over the peanut butter bar layer. Spread it out evenly with your spatula. To get a really smooth top, give the pan a gentle shake and a few taps on the counter.
- Now for a little patience. Place the pan in the refrigerator for about 30 minutes to an hour. This will help the bars set up properly. If you are in a hurry, you can place them in the freezer for 20 to 30 minutes. Just know they will be a bit harder to slice.
- Once the bars are fully set, it’s time to create our trees. Use the parchment paper handles to lift the entire block out of the pan. You might need to run a large, sharp knife along the two uncovered sides to loosen it first. Place it on a cutting board. Make one clean cut directly down the middle, creating two long rectangles. Then, slice each rectangle into five triangles. This is how you get that classic Christmas tree shape for these Fun Christmas Desserts.
- Let’s get festive. To make the green icing, mix together the powdered sugar and milk in a small bowl. You are looking for a consistency similar to school glue. If it’s too thick, add more milk, just a teaspoon at a time.
- Once you have the right texture, add one or two drops of green gel food coloring and stir until it’s a lovely tree green. Transfer the icing to a piping bag with a small round tip, or just use a small ziplock bag and snip off a tiny corner. Pipe zig zag lines across the triangles to look like garland. Immediately add your favorite sprinkles before the icing sets. And there you have it, one of the most charming Easy Christmas Sweets Recipes!
Notes
For extra clean cuts, use a large, sharp knife. It can also help to run the knife under hot water and wipe it dry between slices. This will help it glide through the chocolate topping without cracking it.
Don’t be afraid to get creative with your decorations. You could use mini M&Ms as ornaments, or even a yellow star sprinkle on top of each tree.
To make this recipe gluten free, simply use gluten free pretzels and certified gluten free quick oats. The rest of the ingredients are typically gluten free, but always double check your labels to be sure.
If you aren’t a fan of pretzels, you can substitute them with more crispy rice cereal or even some chopped nuts like peanuts or pecans for a different kind of crunch.
Nutrition
Calories
Sugar
Fat
Carbs