Have you ever wanted to make a dessert that looks like it came straight from a bakery window? You know, the kind that gets all the oohs and aahs at a party. Well, you are in the right place. We are taking the classic, beloved Strawberry Shortcake and giving it a fun, modern twist.
Instead of a single large cake, we are creating individual trifles layered in beautiful dessert cups. It is a simple change that makes a huge impact. This recipe is all about creating something special without all the stress. Let us get started!
Jump To:
Why You’ll Love This Recipe
Honestly, this Strawberry Shortcake trifle is a joy to make and eat. First, it is so easy to assemble. You are basically just layering components, so there is no tricky frosting work involved. Anyone can do this, even if you are new to baking.
The individual servings are another big plus. They are great for parties, picnics, or any get together. Everyone gets their own little cup of happiness, and serving is a breeze. No cutting messy slices of cake.
Plus, the taste is just incredible. You get soft, tender cake, juicy strawberries bursting with flavor, and a rich, creamy filling in every single spoonful. It is a wonderful combination of textures and flavors that is always a crowd pleaser.
The visual appeal is undeniable. These little cups look so elegant and professional. Your friends and family will think you spent hours on them. It is a great way to make a big impression with very little effort. The layers create a beautiful Strawberry Background for the garnish.
Ingredients
Here is what you will need to gather for this lovely Strawberry Shortcake recipe. Having everything ready to go makes the process so much smoother.
For the Cake
- 2 cups (284g) all purpose flour, plus more for dusting pan
- 3 Tbsp (26g) cornstarch
- 1/2 tsp salt
- 1/2 tsp baking soda
- 1/2 tsp baking powder
- 12 Tbsp (170g) unsalted butter, softened
- 1 1/2 cups (315g) granulated sugar
- 1 tsp lemon zest
- 4 large eggs
- 1 1/2 tsp vanilla extract
- 1 cup (283g) sour cream
For the Strawberry Layer
- 2 lbs fresh strawberries, diced, plus 12 more small whole for garnish
- 3 1/2 Tbsp (45g) granulated sugar
For the Cream Layer
- 2 cups (475ml) heavy cream
- 6 oz (170g) cream cheese, softened
- 1/2 tsp vanilla extract
- 3/4 cup (90g) powdered sugar
Step By Step Instructions
Let us break down how to make this beautiful Strawberry Shortcake dessert. Just follow along, and you will have amazing results.
Step 1: Prepare The Cake Batter
First things first, preheat your oven to 350 degrees F. Get your 18 by 13 inch rimmed baking sheet ready by greasing it with butter and dusting it with flour. This prevents the cake from sticking.
In a mixing bowl, whisk together the flour, cornstarch, salt, baking soda, and baking powder. This is your dry mixture. Set it aside for now.
Now, in a stand mixer with the paddle attachment, beat the softened butter, sugar, and lemon zest together. You want it to become pale in color and fluffy in texture. This step adds air to the batter, which makes the cake light.
Next, add the eggs one at a time, mixing well after each addition. Then, mix in the vanilla extract. It is starting to smell good already, right?
Time to combine the wet and dry ingredients. Add about a third of the flour mixture and mix just until it is combined. Then, add half of the sour cream and mix again. Repeat this process, ending with the last third of the flour mixture. Remember to scrape down the bowl to make sure everything is evenly mixed. Do not overmix!
Step 2: Bake The Cake
Pour the batter into your prepared baking sheet. Use a spatula to spread it into an even layer. This ensures the cake bakes evenly.
Bake for about 20 to 24 minutes. You will know it is done when a toothpick inserted into the center comes out clean. The cake should be a lovely golden brown color.
Once it is out of the oven, let it cool completely on a wire rack. This is a very important step. If the cake is warm when you assemble, the cream will melt. Once it is cool, use a round cutter to cut out 24 circles that fit your dessert cups.
Step 3: Make The Strawberry Layer
This part is super simple. Just toss your diced fresh strawberries with the granulated sugar in a bowl. Let them sit for about 10 minutes. This process, called macerating, draws out the natural juices from the berries, creating a wonderful syrup. This will be the star of your Strawberry Shortcake.
Step 4: Whip The Cream Filling
In a large mixing bowl, use an electric hand mixer to whip the heavy cream until soft peaks form. Soft peaks are when the cream holds its shape but the tips flop over when you lift the beaters.
In a separate bowl, whip the softened cream cheese until it is smooth. Then, add the powdered sugar and vanilla and whip until it is light and fluffy. Getting the cream cheese smooth first prevents lumps in your final filling.
Now, gently fold the cream cheese mixture into the whipped cream. Continue to whip the combined mixture until stiff peaks form. Stiff peaks will stand straight up. This cream is so rich and delicious.
Step 5: Assemble Your Trifles
It is time for the fun part! Grab your 12 dessert cups. Place one cake round at the bottom of each cup. Add a spoonful of the juicy strawberries and their syrup over the cake.
For a clean, professional look, transfer the cream mixture to a piping bag fitted with a large round tip. Pipe a layer of the cream over the strawberries. Seeing these layers build is so satisfying and makes for great Strawberry Shortcake Pictures.
Repeat the process one more time. Add another cake round, another spoonful of strawberries, and a final swirl of cream on top. Your lovely Strawberry Shortcake trifles are almost complete.
To finish, garnish each trifle with a small, whole fresh strawberry. This little touch makes them look extra special. Serve them within an hour for the best texture and flavor.


How To Store Leftovers
If you have any leftover Strawberry Shortcake trifles, you can store them in the refrigerator. Cover each cup with plastic wrap to keep them fresh. They are best enjoyed within a day or two.
Keep in mind that the cake will absorb moisture from the strawberries and cream over time. It will still be delicious, but the texture will soften a bit. For the best experience, assembling them fresh is always the way to go.
If you know you will not eat them all at once, you can store the components separately. Keep the cake rounds in an airtight container at room temperature, and the cream and strawberries in the fridge. Then, you can assemble a fresh trifle whenever you want one!
Tips
Want to make your Strawberry Shortcake even better? Here are a few simple tips. Do not have a round cutter for the cake? No problem! You can use the rim of a drinking glass that fits your dessert cups.
Feel free to get creative with the fruit. While strawberries are classic, this recipe would also be wonderful with raspberries, blueberries, or a mix of berries. Peaches would be a great choice in the summer too.
For the cream layer, make sure your heavy cream and cream cheese are cold. Cold ingredients whip up much better and create a more stable filling. The rich cream and fruity topping create a stunning Strawberry Background of flavor.
If you are short on time, you can use a store bought pound cake or angel food cake instead of baking one from scratch. It is a great shortcut that still delivers a delicious dessert.
Conclusion
And there you have it! A simple yet elegant recipe for individual Strawberry Shortcake trifles. This dessert proves that you do not need to be a professional baker to create something truly special and delicious for your loved ones.
From the tender cake to the fresh berries and luscious cream, every bite is a little celebration. I hope you enjoy making and sharing this wonderful treat. It is sure to become a new favorite for any occasion. Go ahead and take lots of Strawberry Shortcake Pictures to remember your success!
FAQ
Can I Make The Cake Ahead Of Time?
Yes, absolutely! You can bake the cake a day in advance. Once it is completely cool, store it tightly covered at room temperature. This is a great way to split up the work and make assembly even quicker on the day you plan to serve it.
Do I Need A Piping Bag?
A piping bag gives the cream layer a very clean and neat look, but it is not necessary. If you do not have one, you can simply spoon the cream filling over the strawberry layer. It will still taste just as amazing.
Why Can’t I Use Frozen Strawberries?
Frozen strawberries release a lot of water when they thaw, which can make the dessert soggy. Their texture also becomes quite soft. For the best flavor and texture in this Strawberry Shortcake, fresh strawberries are highly recommended.
What Can I Do With The Leftover Cake Scraps?
Do not throw away those cake scraps! They are delicious. You can freeze them to enjoy later. They are great for snacking, crumbling over ice cream, or making a small, deconstructed trifle for yourself. It is a tasty bonus treat.
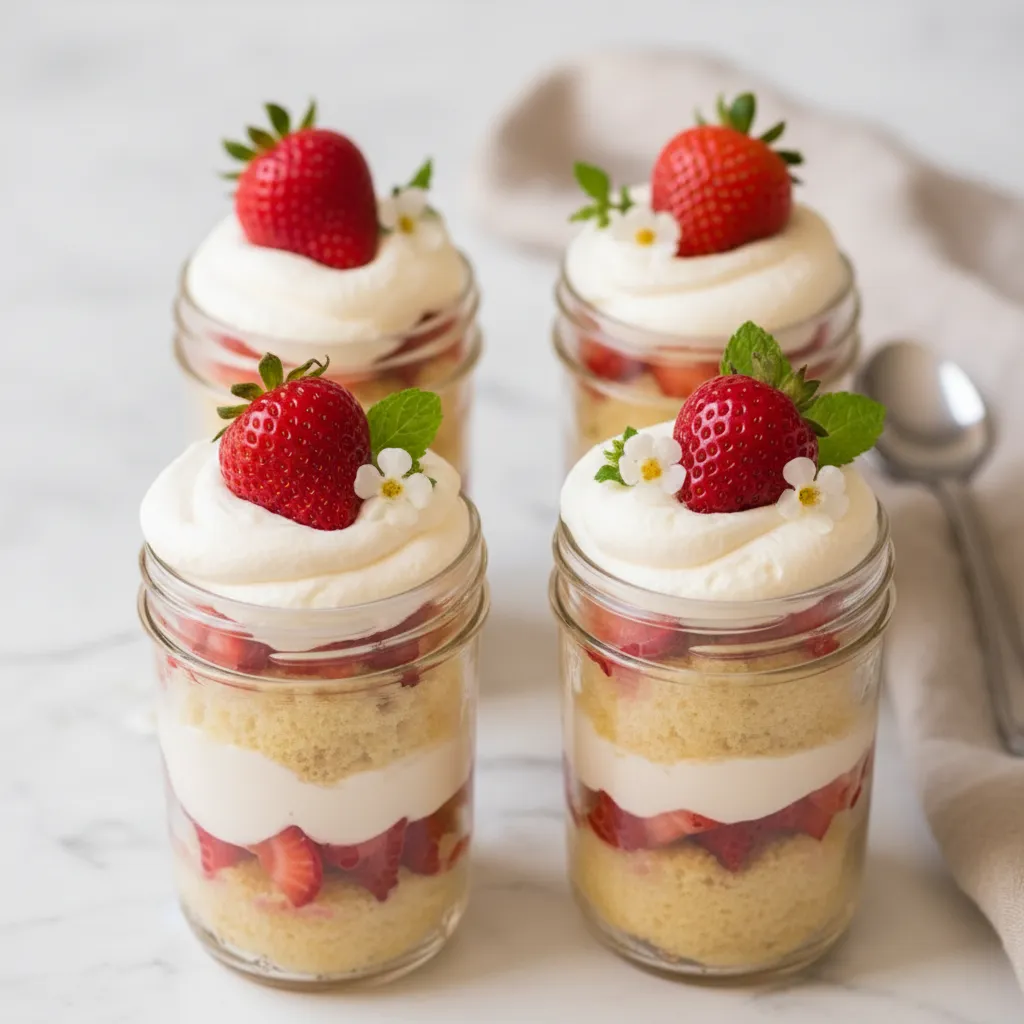
Strawberry Shortcake Trifles
Take classic Strawberry Shortcake to the next level with these easy-to-assemble individual trifles. Layers of tender cake, juicy fresh strawberries, and rich, creamy filling create a beautiful and delicious dessert perfect for any occasion.
Requirements


Ingredients
Instructions
- First things first, preheat your oven to 350 degrees F. Get your 18 by 13 inch rimmed baking sheet ready by greasing it with butter and dusting it with flour. This prevents the cake from sticking.
- In a mixing bowl, whisk together the flour, cornstarch, salt, baking soda, and baking powder. This is your dry mixture. Set it aside for now.
- Now, in a stand mixer with the paddle attachment, beat the softened butter, sugar, and lemon zest together. You want it to become pale in color and fluffy in texture. This step adds air to the batter, which makes the cake light.
- Next, add the eggs one at a time, mixing well after each addition. Then, mix in the vanilla extract. It is starting to smell good already, right?
- Time to combine the wet and dry ingredients. Add about a third of the flour mixture and mix just until it is combined. Then, add half of the sour cream and mix again. Repeat this process, ending with the last third of the flour mixture. Remember to scrape down the bowl to make sure everything is evenly mixed. Do not overmix!
- Pour the batter into your prepared baking sheet. Use a spatula to spread it into an even layer. This ensures the cake bakes evenly.
- Bake for about 20 to 24 minutes. You will know it is done when a toothpick inserted into the center comes out clean. The cake should be a lovely golden brown color.
- Once it is out of the oven, let it cool completely on a wire rack. This is a very important step. If the cake is warm when you assemble, the cream will melt. Once it is cool, use a round cutter to cut out 24 circles that fit your dessert cups.
- This part is super simple. Just toss your diced fresh strawberries with the granulated sugar in a bowl. Let them sit for about 10 minutes. This process, called macerating, draws out the natural juices from the berries, creating a wonderful syrup. This will be the star of your Strawberry Shortcake.
- In a large mixing bowl, use an electric hand mixer to whip the heavy cream until soft peaks form. Soft peaks are when the cream holds its shape but the tips flop over when you lift the beaters.
- In a separate bowl, whip the softened cream cheese until it is smooth. Then, add the powdered sugar and vanilla and whip until it is light and fluffy. Getting the cream cheese smooth first prevents lumps in your final filling.
- Now, gently fold the cream cheese mixture into the whipped cream. Continue to whip the combined mixture until stiff peaks form. Stiff peaks will stand straight up. This cream is so rich and delicious.
- It is time for the fun part! Grab your 12 dessert cups. Place one cake round at the bottom of each cup. Add a spoonful of the juicy strawberries and their syrup over the cake.
- For a clean, professional look, transfer the cream mixture to a piping bag fitted with a large round tip. Pipe a layer of the cream over the strawberries. Seeing these layers build is so satisfying and makes for great Strawberry Shortcake Pictures.
- Repeat the process one more time. Add another cake round, another spoonful of strawberries, and a final swirl of cream on top. Your lovely Strawberry Shortcake trifles are almost complete.
- To finish, garnish each trifle with a small, whole fresh strawberry. This little touch makes them look extra special. Serve them within an hour for the best texture and flavor.
Notes
Want to make your Strawberry Shortcake even better? Here are a few simple tips. Do not have a round cutter for the cake? No problem! You can use the rim of a drinking glass that fits your dessert cups.
Feel free to get creative with the fruit. While strawberries are classic, this recipe would also be wonderful with raspberries, blueberries, or a mix of berries. Peaches would be a great choice in the summer too.
For the cream layer, make sure your heavy cream and cream cheese are cold. Cold ingredients whip up much better and create a more stable filling. The rich cream and fruity topping create a stunning Strawberry Background of flavor.
If you are short on time, you can use a store bought pound cake or angel food cake instead of baking one from scratch. It is a great shortcut that still delivers a delicious dessert.
Nutrition
Calories
Sugar
Fat
Carbs