Have you ever wanted to capture the feeling of a cozy holiday celebration in a single scoop of ice cream? It sounds like a tall order, I know. But what if I told you it was not only possible, but surprisingly simple to do right in your own kitchen? That’s the beauty of using a ninja creami.
We are about to walk through one of my favorite Ninja Creami Ice Cream Recipes. It’s a game changer for anyone who loves rich, creamy desserts. Get ready to turn some basic ingredients into a truly special treat that will have everyone asking for more. It is one of those fantastic ice cream maker recipes you will come back to again and again.
Jump To:
Why You’ll Love This Recipe
First off, this recipe is incredibly easy. You do not need to be a professional dessert chef to get this right. It is all about combining a few quality ingredients and letting the machine do the heavy lifting. The result is pure creamy goodness every single time.
The flavor is just out of this world. We are using a thick vanilla custard base and adding some festive holiday chocolates. Think about those lovely little nut truffles or rich cocoa pralines you see during the holidays. They add a wonderful texture and deep chocolate flavor.
This is one of those Christmas Ninja Creami Recipes that feels both nostalgic and new. It has that classic comforting taste but with a fun, modern twist thanks to the amazing texture the ninja creami creates. It is so much smoother than traditional homemade ice cream.
Another great thing is how forgiving this recipe is. You can play around with the types of chocolates you use. This flexibility makes it a wonderful base for your own creative ideas. It’s a fantastic starting point for all your future Ninja Creami Ice Cream Recipes.
Plus, making it at home is so much more affordable than buying fancy pints from the store. You get to control the ingredients, making it a treat you can feel good about serving to your family and friends. It truly is one of the best ice cream maker recipes for any occasion.
Ingredients
What I love about these Ninja Creami Ice Cream Recipes is the short ingredient list. You only need a few things to create something spectacular. We have options for both the regular and deluxe models.
For The Regular Ninja Creami
- 1 ½ cups thick vanilla custard
- 2–3 tablespoons sweetened cream syrup (see note in tips section)
- About 4 holiday chocolates (like Ferrero style nut truffles or cocoa pralines)
For The Ninja Creami Deluxe
- 2 ⅓ cups thick vanilla custard
- ⅓ cup sweetened cream syrup
- 6 holiday chocolates, roughly chopped
Step By Step Instructions
Alright, let’s get into the fun part. Follow these simple steps for one of the most delicious Ninja Creami Ice Cream Recipes you will ever make. It is a straightforward process that delivers amazing results.
Step 1: Prepare Your Base
First things first, make sure you have a clear, level spot in your freezer. This is more important than you might think for getting an even freeze. Grab your ninja creami pint container.
Pour the thick vanilla custard directly into the pint. Then, add your sweetened cream syrup. Give it a gentle stir just to combine the two. You do not want to whip a bunch of air into it.
Be very careful not to fill the pint above the MAX FILL line. The mixture will expand a bit as it freezes, and you need to leave room for that. Overfilling can make a mess and affect the machine’s performance.
Step 2: Freeze
This step requires patience, but it is so worth it. Put the lid on your pint and place it in the freezer. Let it freeze for a full 24 hours. Yes, a whole day. This ensures it is frozen completely solid, which is essential for the ninja creami to work its magic.
Sometimes, when the base freezes, a little dome can form on the surface. If you see this, just take the back of a spoon and gently press it down to create a flat surface. This helps the blade process the base evenly.
Step 3: Prepare The Add Ins
While your base is having its long winter nap in the freezer, you can get your mix ins ready. Take your festive holiday chocolates and give them a rough chop. You want medium sized chunks, not tiny dust.
The texture of the chunks is what makes the final product so interesting. Set the chopped chocolates aside in a small bowl. This is a key step in many great ice cream maker recipes.
Step 4: Process The Ice Cream
The moment of truth. Take the frozen pint out of the freezer. Lock it into your Ninja Creami machine. It should click securely into place. Select the Ice Cream program and let it run.
After the first spin, take a look at the texture. If it looks dry or powdery, do not worry. This is a common occurrence. Simply drizzle in one tablespoon of milk or cream, put it back in the machine, and use the Re Spin button once. This usually fixes it right up.
Step 5: Add The Mix Ins
Now for the best part. Use a spoon to create a well in the center of the ice cream, about one inch wide, that goes all the way to the bottom of the pint. This is where your chopped chocolates will go.
Pour your reserved chocolate chunks into the well. Place the pint back into the machine and run the Mix Ins cycle. This cycle is designed to gently fold the additions into the ice cream without pulverizing them.
Step 6: Serve And Enjoy
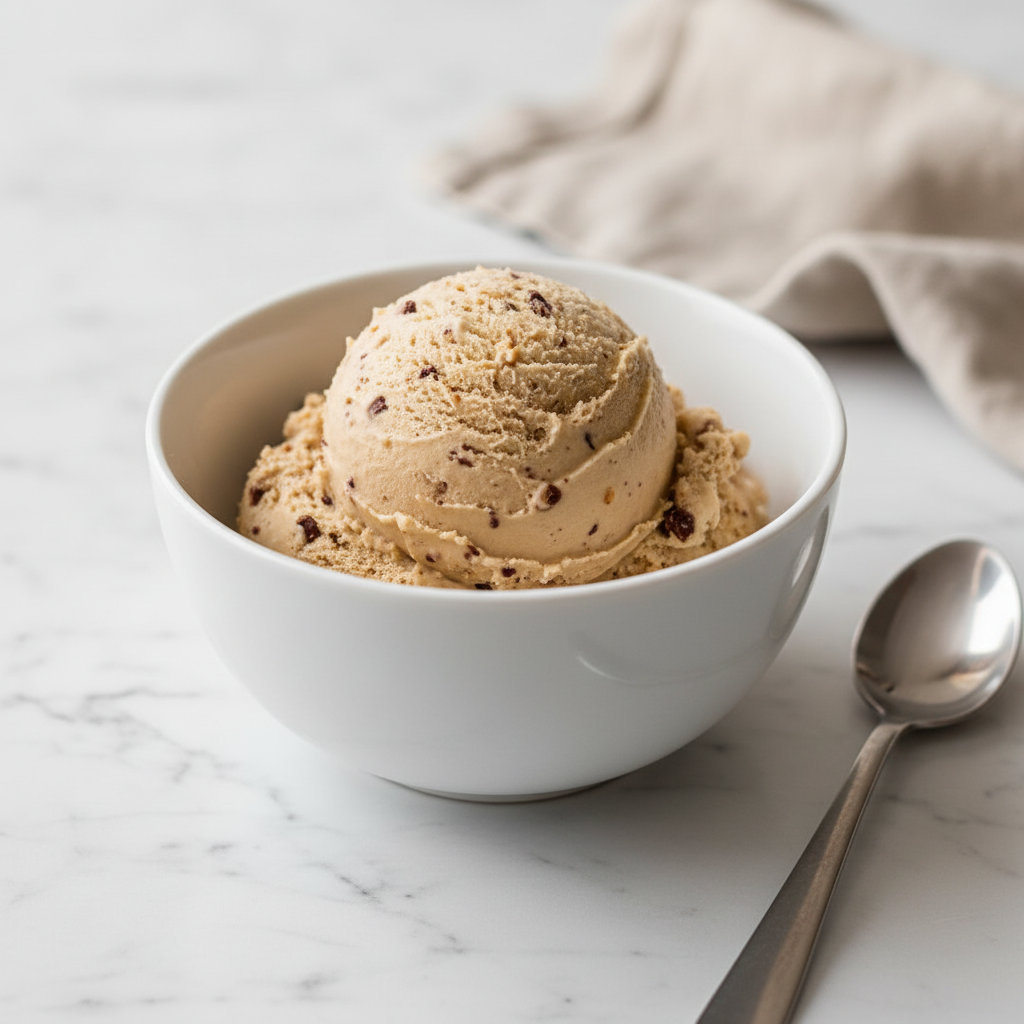
Your masterpiece is ready. You can scoop it into bowls or glasses and serve it right away. The texture will be incredibly smooth and creamy, almost like a soft serve. This is perfect for those who love that fresh churned consistency.
If you prefer a firmer, more traditional scoopable ice cream, just put the lid back on the pint and pop it back in the freezer for about 30 minutes. This will firm it up nicely. This is a great tip for many Ninja Creami Ice Cream Recipes.


How To Store Leftovers
If you somehow have leftovers, which I doubt, storing them is easy. Just make sure the surface of the ice cream is relatively flat in the pint. Pop the lid back on and store it in the freezer.
It will keep well for up to one week. When you are ready for another scoop, I recommend taking it out of the freezer for about 10 minutes to soften up a bit before serving. This makes scooping much easier.
Tips
Let’s talk about a few little things that can make your Ninja Creami Ice Cream Recipes even better. These small details can make a big difference in the final product. Especially for Christmas Ninja Creami Recipes where you want everything to be just right.
First, the sweetened cream syrup. To get a flavor that is similar to a rich Irish cream, you can make your own. Just mix two tablespoons of condensed milk with half a teaspoon of vanilla extract. For a deeper flavor, add half a teaspoon of instant coffee. It gives a lovely caramel coffee note.
Next, a quick note on the custard. It is tempting to use an extra thick, rich custard, but you should avoid it. If your custard is too thick, it can struggle to process smoothly. Just thin it out with a small splash of milk for the perfect texture.
When choosing your chocolates, feel free to get creative. Any kind of truffle, praline, or even chopped candy bars would work well. Just make sure they are alcohol free if you are serving to a general audience. The mix in possibilities are endless with ice cream maker recipes.
Pre chilling your serving bowls is a nice touch. Just stick them in the freezer for about 15 minutes before you serve the ice cream. It helps keep the ice cream from melting too quickly, especially on a warm day.
Conclusion
And there you have it. A simple yet incredibly decadent recipe that shows just how amazing a ninja creami can be. This is more than just a dessert; it’s an experience. It’s about creating something special for the people you care about.
I hope you enjoy making these Ninja Creami Ice Cream Recipes as much as I do. It’s a fun way to get creative in the kitchen and the perfect treat for any holiday gathering. Happy ice cream making.
FAQ
Can I Use A Different Kind Of Chocolate?
Absolutely. That is the beauty of this recipe. You can use your favorite chocolate truffles, chopped candy bars, or even chocolate chips. Just make sure the pieces are not too big or too small for the best texture.
My Ice Cream Is Powdery, What Did I Do Wrong?
You did nothing wrong. A powdery or crumbly texture is very common after the first spin, especially if your freezer is very cold. Just add one tablespoon of milk or cream and use the Re Spin function. It should become perfectly creamy.
Can I Make This Dairy Free?
Yes, you can adapt this for a dairy free diet. Use a thick, full fat coconut based vanilla custard as your base. You will also want to choose dairy free chocolates for your mix ins. The results will be just as delicious and creamy.
Do I Really Need To Freeze It For 24 Hours?
Yes, this is a very important step. The base needs to be frozen completely solid for the ninja creami to work correctly. A shorter freezing time might result in a soupy texture instead of creamy ice cream. Plan ahead for the best results.
Holiday Chocolate Ninja Creami Ice Cream
Create a rich and festive holiday treat with this simple Ninja Creami ice cream recipe. A creamy vanilla custard base is blended with your favorite holiday chocolates for a smooth, flavorful dessert that’s easy to make at home.
Ingredients
Instructions
- In the Ninja Creami pint container, combine the thick vanilla custard and sweetened cream syrup. Stir gently, making sure not to fill above the MAX FILL line.
- Secure the lid and place the pint on a level surface in your freezer. Freeze for a full 24 hours until completely solid.
- While the base is freezing, roughly chop the holiday chocolates into medium-sized chunks and set them aside.
- Once frozen, place the pint into the Ninja Creami machine and select the ‘Ice Cream’ program.
- After the first spin, check the texture. If it appears dry or powdery, add 1 tablespoon of milk or cream and use the ‘Re-Spin’ function.
- Create a 1-inch wide well in the center of the ice cream that goes to the bottom. Add the chopped chocolates into the well.
- Place the pint back into the machine and run the ‘Mix-Ins’ cycle to incorporate the chocolates.
- Serve immediately for a soft-serve texture, or return to the freezer for 30 minutes for a firmer, scoopable ice cream.
Notes
For a homemade sweetened cream syrup, mix 2 tbsp condensed milk with 1/2 tsp vanilla extract. Add 1/2 tsp instant coffee for a deeper flavor.
If your custard is very thick, thin it with a splash of milk before freezing for a smoother result.
Feel free to use any kind of truffle, praline, or chopped candy bar as a mix-in.
For a nice touch, pre-chill your serving bowls in the freezer for 15 minutes before serving.
Nutrition
Calories
Sugar
Fat
Carbs