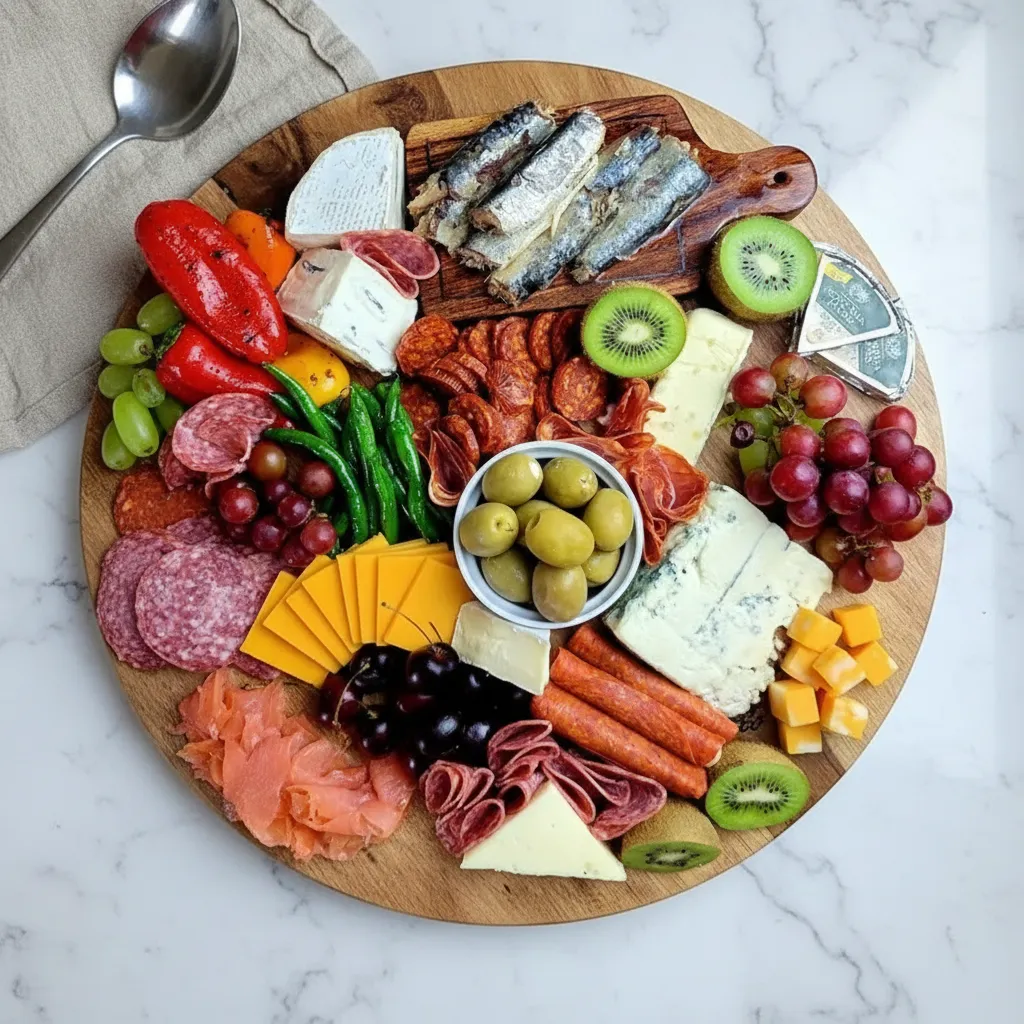
Have you ever wanted to create one of those beautiful food boards you see everywhere? It might seem complicated, but I’m here to tell you it’s one of the easiest ways to serve up a stunning spread. This Simple Charcuterie Snack Board Recipe is all about gathering delicious ingredients and arranging them with a little bit of flair. No real cooking is needed, just some creativity!
This isn’t just a recipe; it’s a guide to making a gorgeous centerpiece for any get together. Perfect for Food Boards For Parties or just a special night in, this board is packed with a variety of cheeses, meats, and other tasty bites. It’s a fun, interactive way to eat and share. Let’s get started on your very own charcuterie creation!
Jump To:
Why You’ll Love This Recipe
Honestly, what’s not to love about a board piled high with delicious treats? This Simple Charcuterie Snack Board Recipe is a real crowd pleaser. It’s incredibly flexible, so you can easily swap ingredients based on what you have or what you love. You don’t need any special cooking skills, which makes it great for beginners.
It’s also just so visually appealing. The mix of colors and textures from the cheeses, cured meats, fruits, and olives makes it look like a work of art. It feels special without requiring a ton of effort. This is the kind of dish that gets people talking and gathering, making it a wonderful addition to any social event.
Ingredients
Here’s what you’ll need to assemble this beautiful and simple charcuterie board. Remember, these are suggestions, feel free to get creative!
- 7 ounces Brie cheese (with plant or microbial rennet)
- 5 ounces goat cheese
- 5 ounces blue cheese (with plant or microbial rennet)
- 2 ounces Havarti cheese (with plant or microbial rennet)
- ½ cup Colby Jack cheese, cubed (with plant or microbial rennet)
- 6 white Cheddar sticks (with plant or microbial rennet) wrapped in thinly sliced spicy cured beef or turkey sausage
- 1 (3.75 ounce) can sardines, drained
- 2 ounces smoked salmon
- 1 (4 ounce) package thinly sliced cured beef or turkey sausage
- ½ cup cured beef or turkey sausage bites
- ¼ cup pitted green olives
- ¼ cup black olives
- 1 cup green grapes
- ½ cup roasted bell peppers, drained
- 2 kiwi, halved
Step By Step Instructions
Step 1: Prep Your Ingredients
First things first, let’s get everything ready to go. Wash and dry your grapes thoroughly. If you bought whole kiwis, go ahead and slice them in half. Drain your olives and roasted bell peppers well so they don’t make the board soggy. Cube up your Colby Jack cheese if it didn’t come that way. The goal is to have everything ready to place on the board when you start arranging.
Step 2: Start With The Cheeses
Now for the fun part! Grab a large wooden board, either round or square will work great. Think of the cheeses as your anchors. Place the Brie, goat cheese, and blue cheese on the board first. Space them out, maybe one in the center, one in a corner, and another one on the opposite side. This helps create visual interest and gives you pockets to fill in later.
Step 3: Add The Meats And Fish
Next, let’s add the savory meats and fish. You can roll up the slices of smoked salmon and cured beef or turkey sausage to make them look a little fancier. Place these rolls and the sausage bites in the spaces between the cheeses. You can also artfully arrange the cheddar sticks wrapped in sausage. Dot the drained sardines in a small cluster where they fit best.
Step 4: Fill In With Everything Else
This is where the board really comes to life. Start filling in all the empty spaces with the remaining ingredients. Place handfuls of grapes in a couple of different spots to add a pop of color. Arrange the olives, roasted peppers, and cubed Colby Jack in small piles. Finally, nestle the kiwi halves wherever you see a gap. The idea is to make the board look full and abundant. Don’t be afraid to let things overlap a bit for a rustic, generous look.
How To Store Leftovers
If you happen to have any leftovers, storing them is pretty straightforward. The best way is to disassemble the board and store each type of ingredient separately. Put the cheeses in airtight containers or wrap them well in wax paper. The meats should also go into their own sealed containers or bags. Fruits and veggies can be stored together in the fridge. This keeps everything fresh and prevents the flavors from mingling too much.
Crackers or bread, if you served them, should be stored at room temperature in an airtight container to keep them from getting stale. When you’re ready for another snack, you can just pull out your containers and make a mini board!
Tips
To make your Charcuterie Board Simple yet stunning, think about textures and colors. You want a good mix of soft cheeses like Brie and hard cheeses like cheddar. The same goes for the meats. A variety of textures makes each bite more interesting.
Don’t overcrowd your board right away. It’s better to start with the larger items like the cheese wedges and then fill in the gaps. This helps you create a balanced and beautiful arrangement. You can also use small bowls for things like olives or roasted peppers to contain any juices and add some height to your board.
Lastly, let your cheese sit out for about 20 to 30 minutes before serving. This allows it to come to room temperature, which really brings out its full flavor. A slightly softened cheese is also much easier for your guests to slice and enjoy.
Conclusion
And there you have it! A guide to creating a beautiful and delicious Simple Charcuterie Snack Board Recipe. It’s all about having fun and playing with different flavors, textures, and colors. This kind of food board is perfect for any occasion, from a casual get together with friends to a more formal celebration. It’s an easy way to offer a little something for everyone. So go ahead, give it a try and impress your guests with your amazing food styling skills!
FAQ
Can I Prepare This Board Ahead Of Time?
You sure can! You can prep most of it ahead of time. Slice your cheeses and meats and store them in separate airtight containers in the refrigerator. You can wash your fruit as well. I would recommend assembling the board right before you plan to serve it to keep everything looking its best. This way, nothing gets soggy or discolored.
What Kind Of Board Should I Use?
A wooden board is classic for a charcuterie board, but you don’t have to use one. A large platter, a slate tile, or even a clean baking sheet will work just fine. The most important thing is that it’s large enough to hold all your goodies without being too crowded. Use what you have!
What If I Don’t Like Some Of The Ingredients?
That’s the best part about making your own Snack Board, it is completely customizable! Feel free to swap out any ingredient you don’t like. Don’t enjoy blue cheese? Add another type of cheese you love. Not a fan of sardines? Leave them out or add some different cured meat. It’s your board, so make it with all of your favorite things.
Simple Charcuterie Snack Board
A simple guide to creating a stunning and delicious charcuterie snack board. This no-cook recipe is great for parties and gatherings, featuring a beautiful arrangement of cheeses, cured meats, fruits, and olives.
Ingredients
Instructions
- Prep your ingredients. Wash and dry grapes, slice kiwis, drain olives and roasted peppers, and cube the Colby Jack cheese. Have everything ready to place on the board.
- Start with the cheeses. On a large wooden board, place the Brie, goat cheese, and blue cheese, spacing them out to act as anchors for the other ingredients.
- Add the meats and fish. Roll up slices of smoked salmon and cured sausage. Arrange these, along with sausage bites, cheddar sticks, and sardines, in the spaces between the cheeses.
- Fill in with everything else. Fill all empty spaces with grapes, olives, roasted peppers, and cubed Colby Jack. Nestle the kiwi halves in any remaining gaps to create a full, abundant look.
Notes
Make it your own: This recipe is completely customizable! Feel free to swap any ingredient for something you prefer.
Bring cheese to room temp: Let your cheese sit out for 20-30 minutes before serving. This brings out its full flavor and makes it easier to slice.
Use small bowls: Use small bowls for juicy items like olives or peppers to prevent the board from getting soggy and to add visual height.
Nutrition
Calories
Sugar
Fat
Carbs


