There’s something truly magical about homemade sourdough bread. That crackly crust, the soft, airy interior, and that unmistakable tangy flavor – it’s pure comfort. For many, the thought of starting a sourdough starter feels like a big, daunting task, reserved for seasoned bakers with fancy equipment.
But what if I told you that you could easily make your own sourdough starter right at home, with minimal effort? You absolutely can! This guide is all about making the process of starting your own sourdough starter simple and fun. Let’s dive in and unlock the secrets to delicious, easy everyday sourdough.
Jump To:
Why You’ll Love This Recipe
- It’s surprisingly simple, perfect for beginners who want to learn how to start making sourdough.
- You get that wonderful sourdough flavor without all the complicated steps.
- It uses common pantry ingredients, making it budget friendly.
- The no-knead method means less work for you and more time to relax.
- It yields a beautiful, crusty loaf that will impress everyone.
Ingredients
Starter Build (Night Before)
- 25 grams mature starter (about 2 tablespoons)
- 75 grams unbleached bread flour or all-purpose flour (½ cup + 1 teaspoon)
- 75 grams water 90℉ (⅓ cup)
For The Dough
- 100 grams ripe starter (heaping ⅓ cup)
- 300 grams filtered water 90℉ (1¼ cups + 1 tablespoon)
- 500 grams white bread flour or unbleached all-purpose flour (3½ cups + ½ teaspoon)
- 10 grams sea salt (2⅛ teaspoons)
Step-By-Step Instructions
Step 1: Prepare Your Starter
The evening before you plan to mix your dough, it’s time to feed your starter. Grab a clean mason jar.
Combine 25g of your mature starter with 75g flour and 75g warm water (around 90 degrees Fahrenheit) in the jar. Give it a good mix until there’s no dry flour left.
Cover it loosely with plastic wrap and let it sit at room temperature for 8 to 12 hours. By morning, it should be noticeably bubbly and about double its original size. That’s your ripe starter, ready for action!
Step 2: Mix The Dough
Now for the main event! In a large mixing bowl, combine 100g of your ripe starter with 300g of warm water (again, around 90°F).
Stir it with a spoon until the starter is nicely dissolved. Add the 500g of bread flour and 10g of sea salt.
Mix everything together until a shaggy dough forms. Then, get your hands in there and bring it together into a sticky ball. Don’t worry if it looks a bit rough or sticky; that’s exactly what we’re going for with this easy sourdough starter recipe.
Step 3: The First Rise
Cover the bowl with plastic wrap. Place the bowl in your oven with just the light on. This creates a cozy, warm environment for the dough to rise.
Let it rise for about 5 to 6 hours. You’re looking for it to become puffy and roughly double in size.
A good test? Gently poke the dough with your finger. If the indentation slowly fills back in, it’s ready. If it springs back immediately, give it more time.
Oven Light Tip: Oven lights can vary! Your oven should feel just barely warm, around 80-85°F. If it feels too warm, crack the oven door slightly or turn the light off after the first hour to prevent overdoing it.
Step 4: Shape The Dough
Lightly dust your clean countertop with a bit of flour. Gently turn the dough out onto the floured surface, making sure the smooth side is down.
Starting with the top edge, gently pull the dough away from you and fold it towards the center. Do the same with the bottom edge, then the left and right sides. Pinch the seams together.
Flip the dough over so the seam side is down. Now, cup your hands around the dough and gently rotate it on the counter. This helps create tension and form a nice, smooth ball. It should feel taut but still soft.
Step 5: The Second Rise
Generously dust a bread basket or banneton with flour. This is crucial to prevent sticking!
Carefully place your shaped dough, seam side up, into the prepared basket. Dust the top lightly with flour, then cover it with plastic wrap.
Return the basket to the oven with the light on for another 2 to 3 hours. You want it to double in size again and feel light and airy.
A gentle press should leave an indentation that slowly springs back. This second rise is key for that lovely texture in your how to start making sourdough bread.
Step 6: Preheat And Score
Once the dough has finished its second rise, it’s time to get your oven ready. Remove the dough from the oven.
Preheat your oven to 450°F (232°C). Importantly, you do NOT preheat the Dutch oven itself for this recipe.
Lay a sheet of parchment paper on your counter. Gently turn the dough out onto the parchment, seam side down.
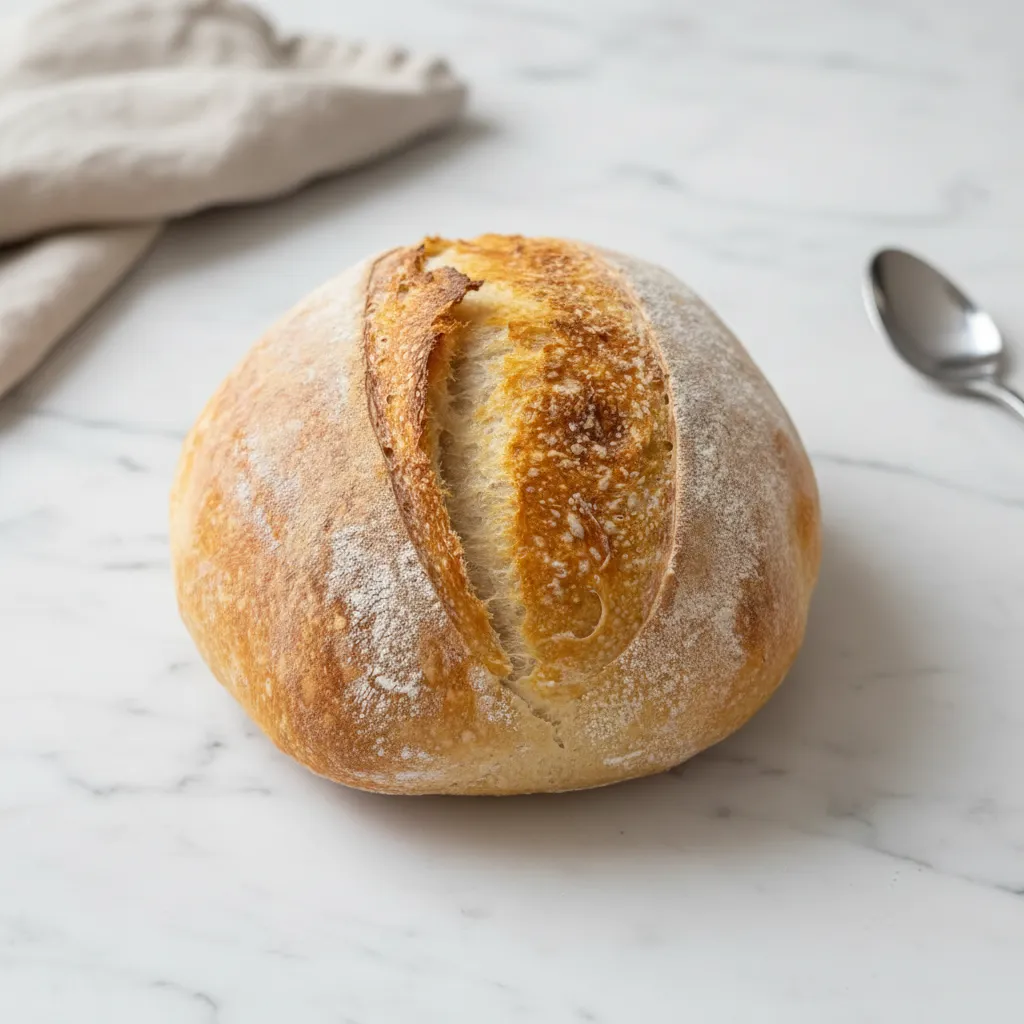
Using a sharp knife or a bread lame, score the top of the dough about half an inch deep. Make one decisive, lengthwise cut. You should see the pale dough underneath – this helps the bread expand beautifully as it bakes.
Step 7: Bake Your Sourdough
Carefully lift the dough using the parchment paper corners and lower it into your Dutch oven. Place the lid back on.
Reduce the oven temperature to 425°F (218°C). Bake with the lid on for 40 minutes.
After 40 minutes, remove the lid. Continue baking for another 5 to 10 minutes, or until the crust is a deep golden brown. It should sound hollow when you tap the bottom.
Step 8: Cool Completely
Using the parchment paper again, carefully lift the bread out of the Dutch oven. Place it on a wire cooling rack.
This is super important: let the bread cool completely for at least 2 hours before slicing. This allows the interior to set properly.
The internal temperature should reach 190-205°F. Patience here ensures a perfect crumb and a crisp crust. Your easy sourdough starter recipe creation is ready to enjoy!


How To Store Leftovers
Once your beautiful loaf has cooled completely, store it at room temperature. The best way is to wrap it in a clean kitchen towel or place it cut side down on a cutting board and cover it loosely with plastic wrap or a bread bag.
Avoid storing it in an airtight container or the refrigerator, as this can make the crust soft and the bread stale faster. Properly stored, it should stay fresh for 3-4 days.
Tips
- Flour Choice: While bread flour gives a great structure, unbleached all-purpose flour works wonderfully too. Experiment to see what you like best for your sourdough how to get started journey.
- Water Temperature: Using a kitchen thermometer for your water ensures it’s just right. Too hot and you’ll kill the yeast; too cold and it won’t activate properly.
- Oven Temperature Consistency: Ovens can be quirky. If you find your bread browning too quickly, you can tent it loosely with foil during the last 10-15 minutes of baking.
- Dutch Oven Size: A 5-7 quart Dutch oven is ideal. If yours is smaller, you might need to adjust baking time slightly.
- Patience is Key: Sourdough isn’t a rushed process. Trust the timings, but also trust your senses. If the dough looks ready before the time is up, or needs a bit longer, go with it!
Conclusion
See? Making a fantastic sourdough starter easy recipe is totally achievable! You’ve got the steps, you know the ingredients, and you’re ready to bake.
This no-fuss method proves that you don’t need to be a professional baker to enjoy the incredible taste and satisfaction of homemade sourdough bread. So go ahead, give it a try, and welcome the delightful aroma of freshly baked sourdough into your home. Happy baking!
FAQ
How Did Sourdough Bread Start?
Sourdough bread has ancient origins, dating back thousands of years. It’s believed to have started accidentally when early humans discovered that wild yeasts and bacteria present in flour and the air could leaven dough, creating a naturally fermented bread.
What Do You Need To Start Sourdough?
To start sourdough, you primarily need flour, water, and time. You’ll also need a container for your starter, a bowl for mixing dough, and baking equipment like a Dutch oven. This recipe simplifies the process, requiring only common kitchen items.
How To Start Sourdough Bread?
Starting sourdough bread involves creating and maintaining a sourdough starter, which is a culture of wild yeast and bacteria. Once active, you use a portion of this starter to leaven your bread dough, as outlined in this easy sourdough starter recipe.
Can I Make Sourdough Bread Daily?
While you can feed and maintain a starter daily, baking sourdough bread daily might be a bit much unless you have a very efficient system or a large family! This recipe provides a straightforward way to get a great loaf without the daily grind.
Is This A Good Recipe For Someone Learning How To Start Making Sourdough?
Absolutely! This recipe is designed with beginners in mind. It’s a no-knead approach that simplifies the process, making it much more approachable for anyone wanting to learn how to start making sourdough bread.
Easy No-Knead Sourdough Bread
This simple, no-knead sourdough recipe is perfect for beginners. Create a tasty, crusty loaf at home with minimal effort and basic pantry ingredients.
Requirements


Ingredients
Instructions
- The evening before, mix 25g mature starter, 75g flour, and 75g warm water in a jar. Cover loosely and let sit 8-12 hours until bubbly and doubled.
- In a large mixing bowl, combine 100g ripe starter with 300g warm water (90°F) and stir until dissolved.
- Add 500g bread flour and 10g sea salt. Mix into a shaggy dough, then use hands to form a sticky ball.
- Cover and place in the oven with the light on. Let rise for 5-6 hours until puffy and doubled in size.
- Turn dough onto a floured surface. Fold edges to the center, flip seam-side down, and rotate to shape into a smooth ball.
- Dust a banneton or bowl generously with flour. Place dough seam-side up, dust top with flour, and cover.
- Return to the oven (light on) for a second rise of 2-3 hours until light and airy.
- Preheat oven to 450°F (232°C). Turn dough onto a sheet of parchment paper.
- Score the top lengthwise with a sharp knife or lame. Lift dough into a Dutch oven (do not preheat the pot).
- Bake covered at 425°F (218°C) for 40 minutes. Remove lid and bake 5-10 minutes more until crust is deep golden brown.
- Cool completely on a wire rack for at least 2 hours before slicing.
Notes
Flour Choice: Bread flour provides the best structure, but unbleached all-purpose flour works well too for a tasty loaf.
Water Temp: Use a kitchen thermometer to ensure water is around 90°F. Too hot kills yeast; too cold slows it down.
Oven Light: If your oven light makes the space too warm (over 85°F), crack the door slightly to prevent over-proofing.
Patience: Let the bread cool fully. Cutting it while hot releases steam and can make the inside gummy.
Nutrition
Calories
Sugar
Fat
Carbs